3.1. Microstructure
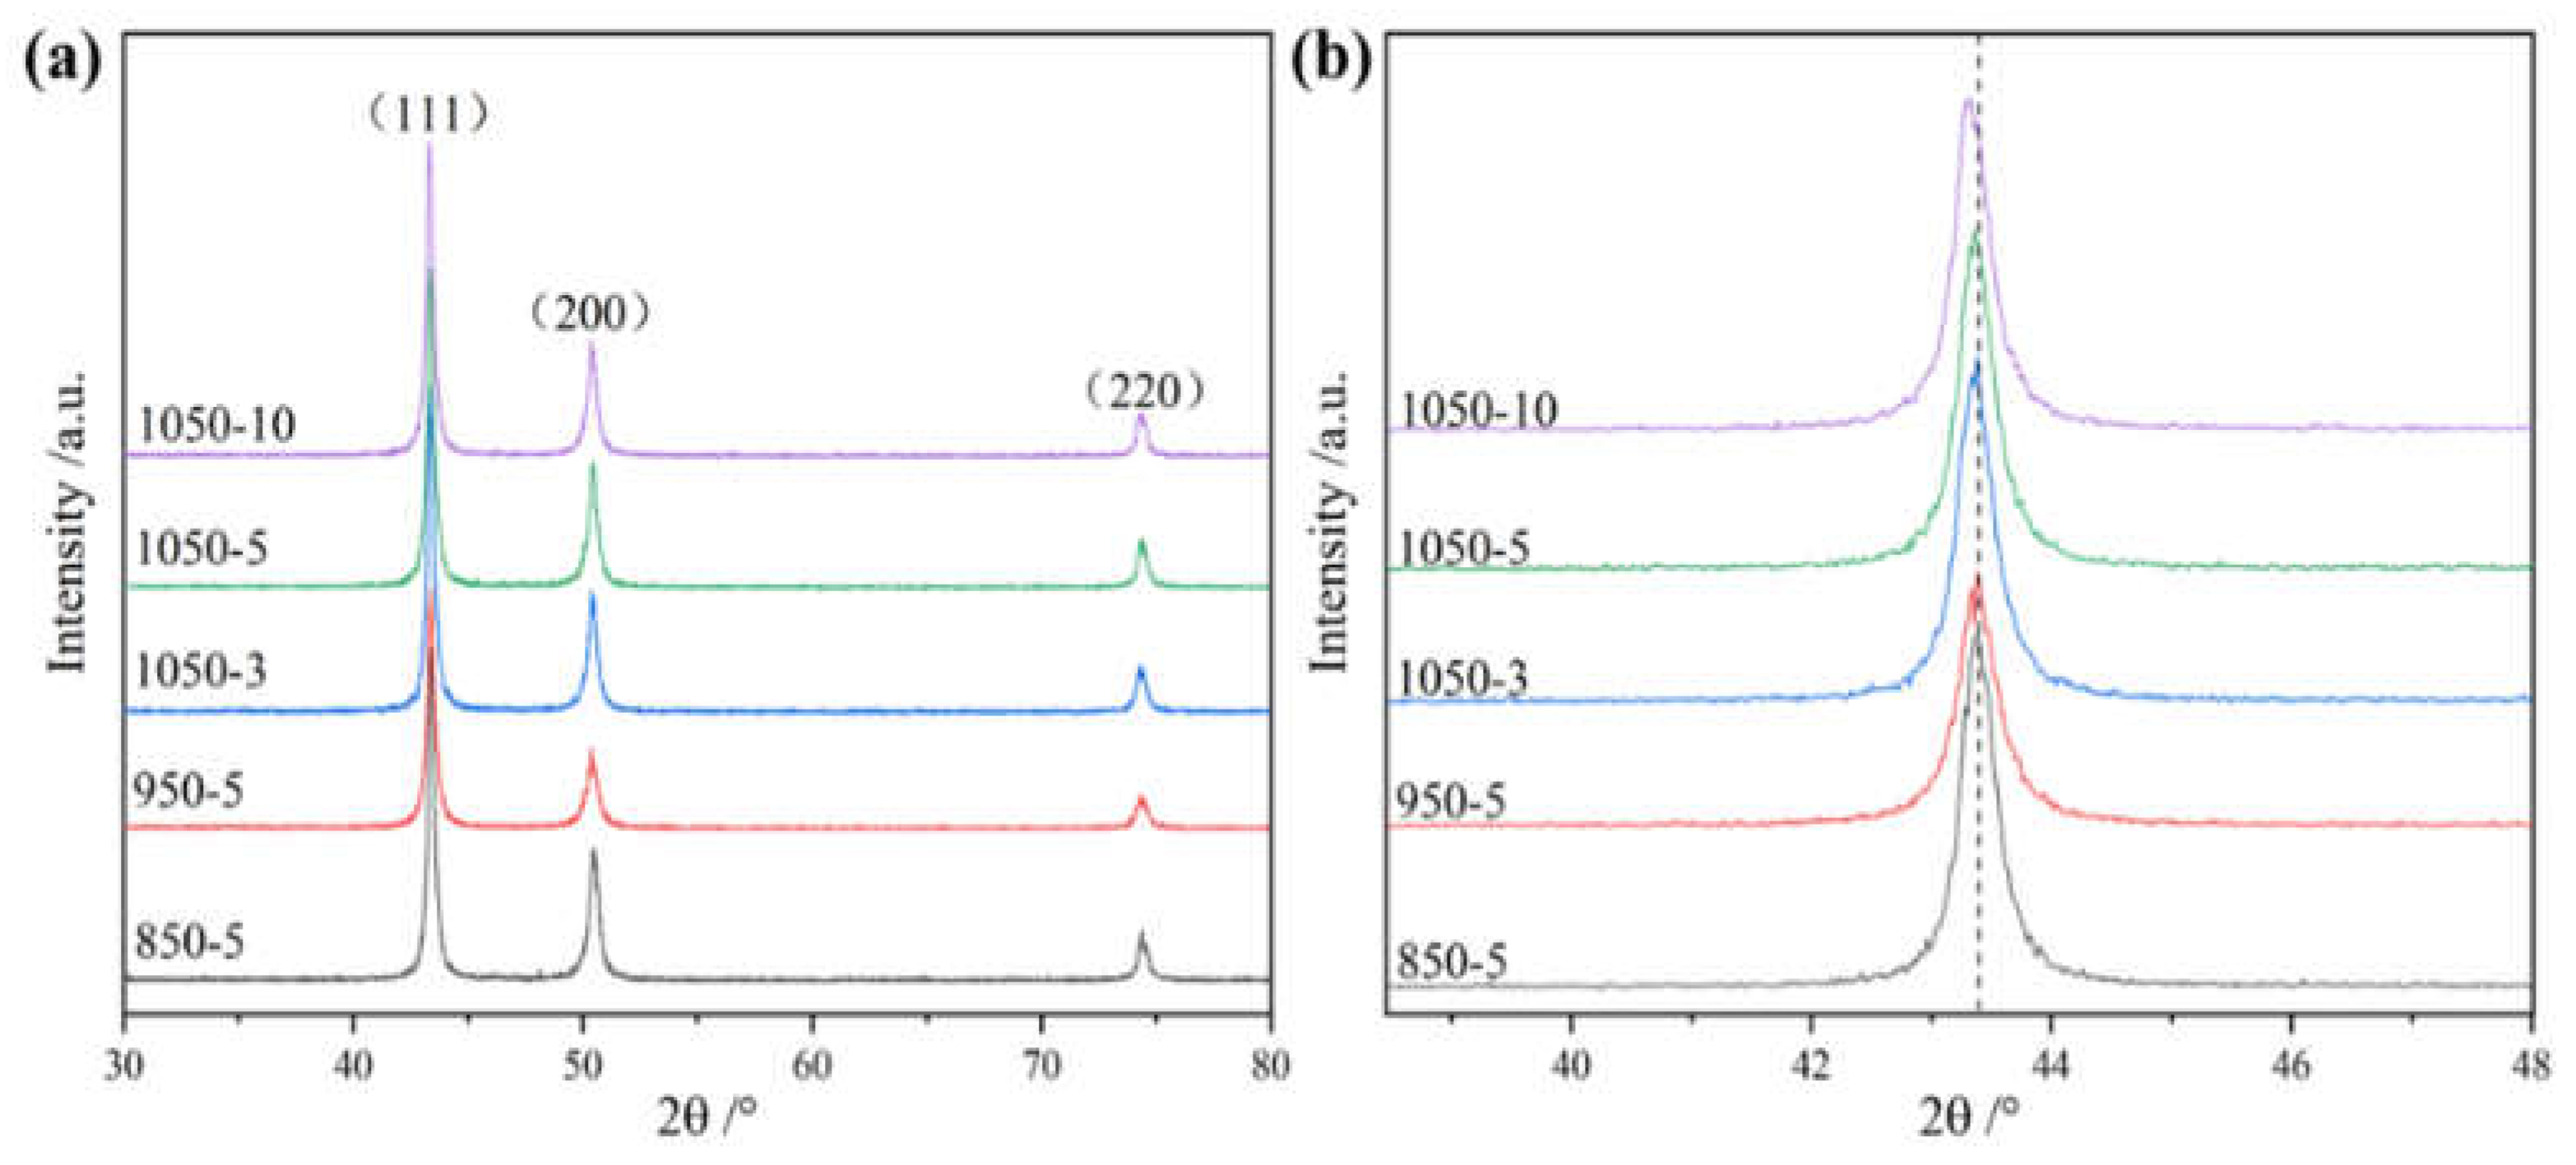
The XRD diffraction patterns of 850 (sintered at 850°C), 950 (sintered at 950°C), 1050-3 (sintered and held at 1050°C for 3 min), 1050-5 (sintered and held at 1050°C for 5 min), and 1050-10 (sintered and held at 1050°C for 10 min) are shown in
Figure 2. It can be seen from the figure that the increase of sintering temperature and holding time did not cause the phase change of CoCrFeNiMn high-entropy alloy, which is still a single-phase FCC structure, and did not form any precipitation phase. The lattice constant and half peak width of the strongest peak (111) of the FCC phase were calculated using Bragg's formula, and the results are shown in
Table 1, from which it is easy to see that the FCC diffraction peaks of the high entropy alloy are shifted to the left because of the increase of the lattice constant of the BCC phase. Since the displacement of the diffraction peak is very small, the change in the lattice constant is not obvious. By observing the half-peak width we can see that the half-peak width gradually increases as the sintering temperature increases. This is mainly due to the increase in temperature, the full diffusion of elements, and the increase in internal defects after the alloy is densified. With the increase of holding time, the half peak width gradually increases, mainly because of grain growth, and alloy internal stress reduction caused by.
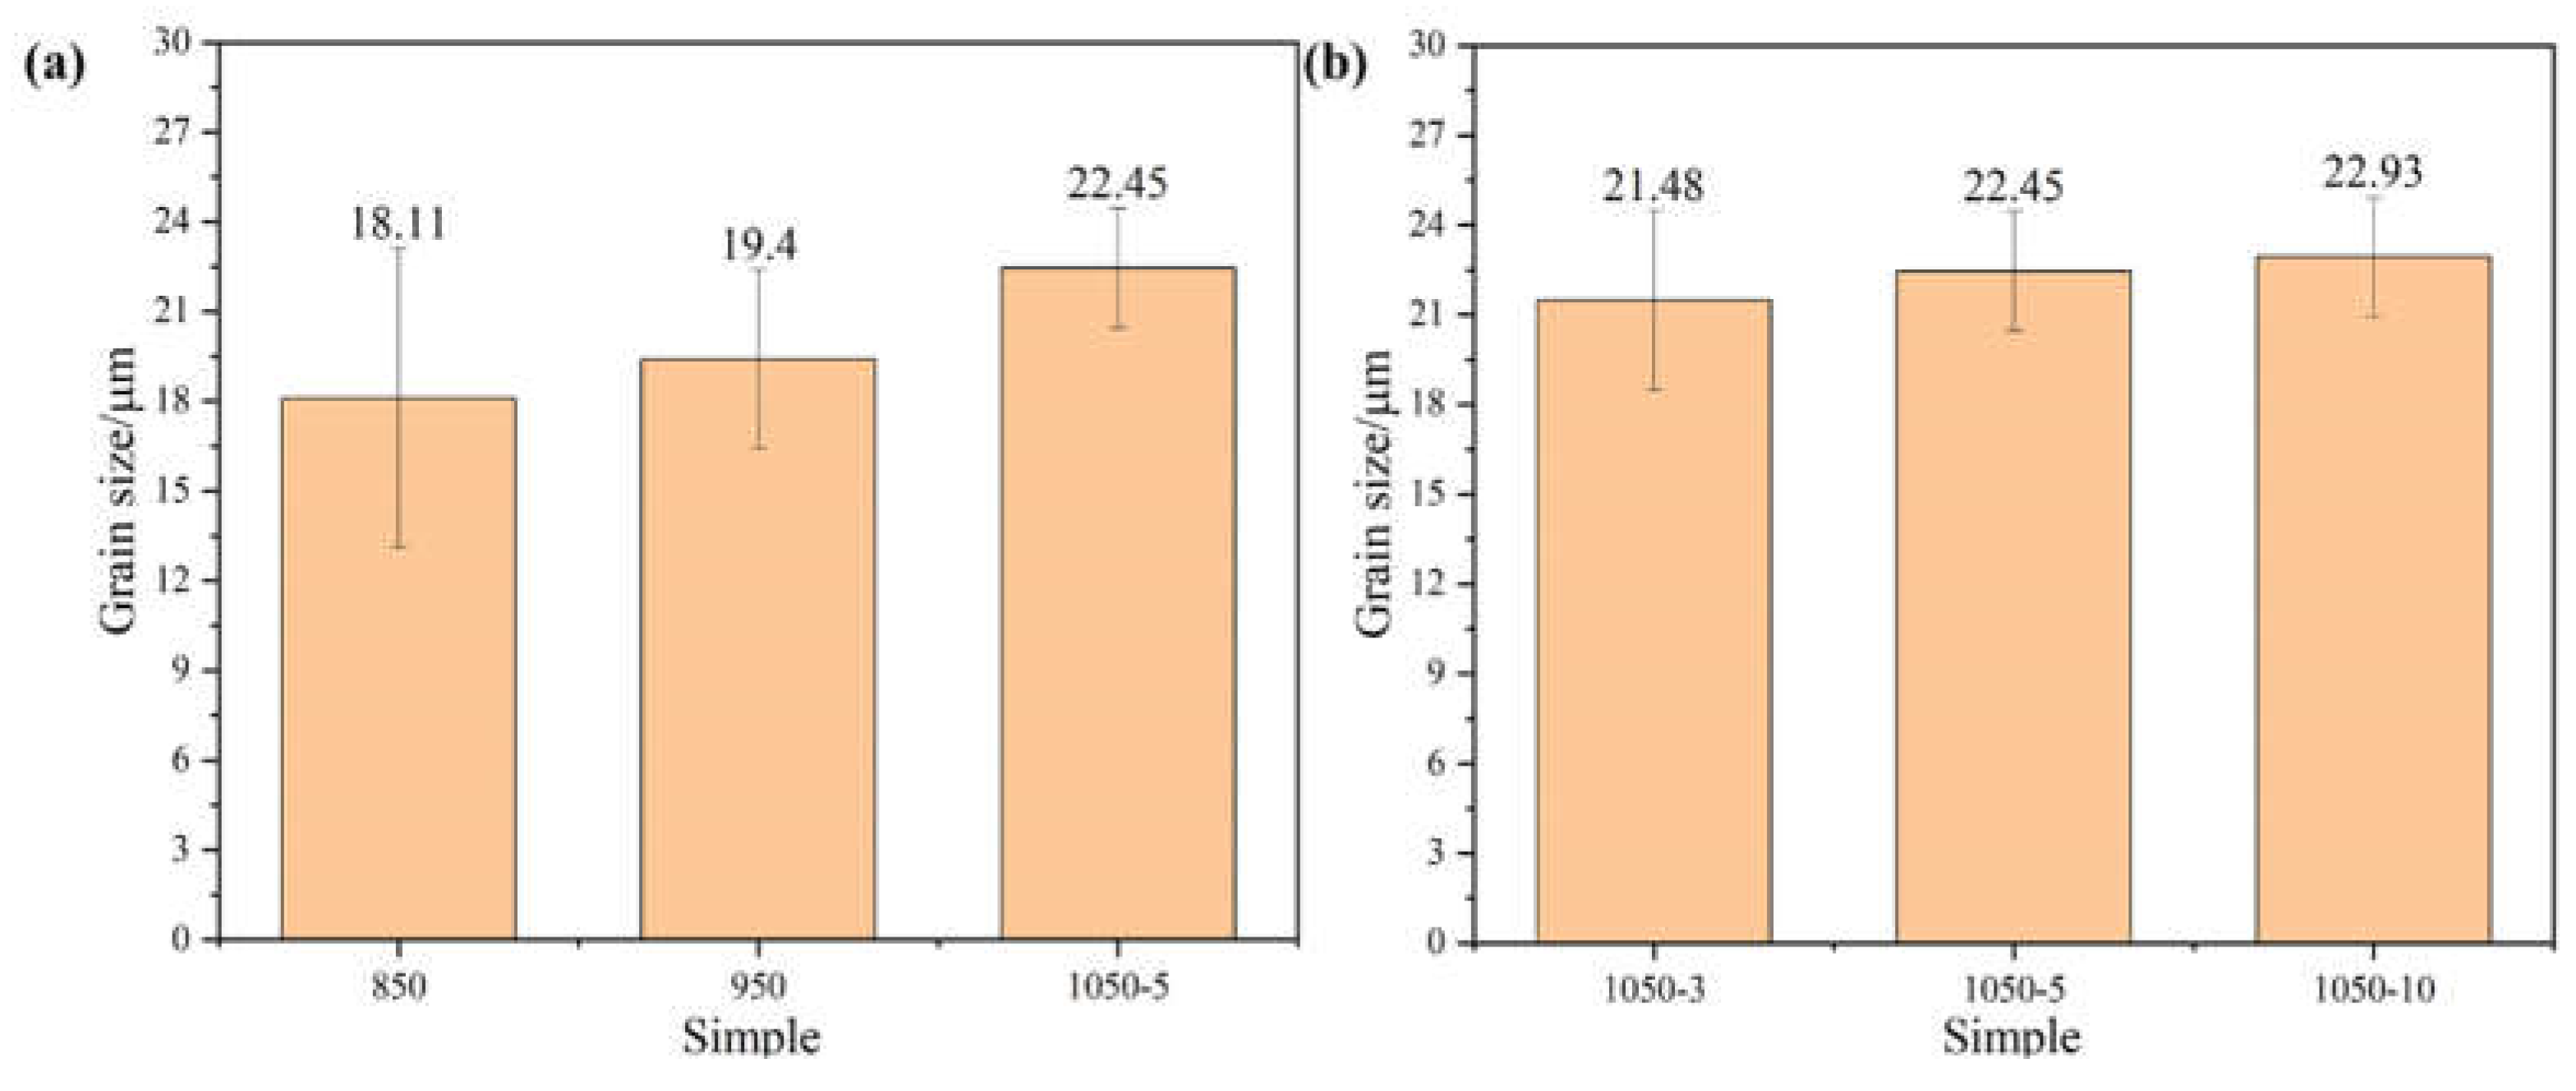
The experimental grain size was measured using Image-pro-plus software.
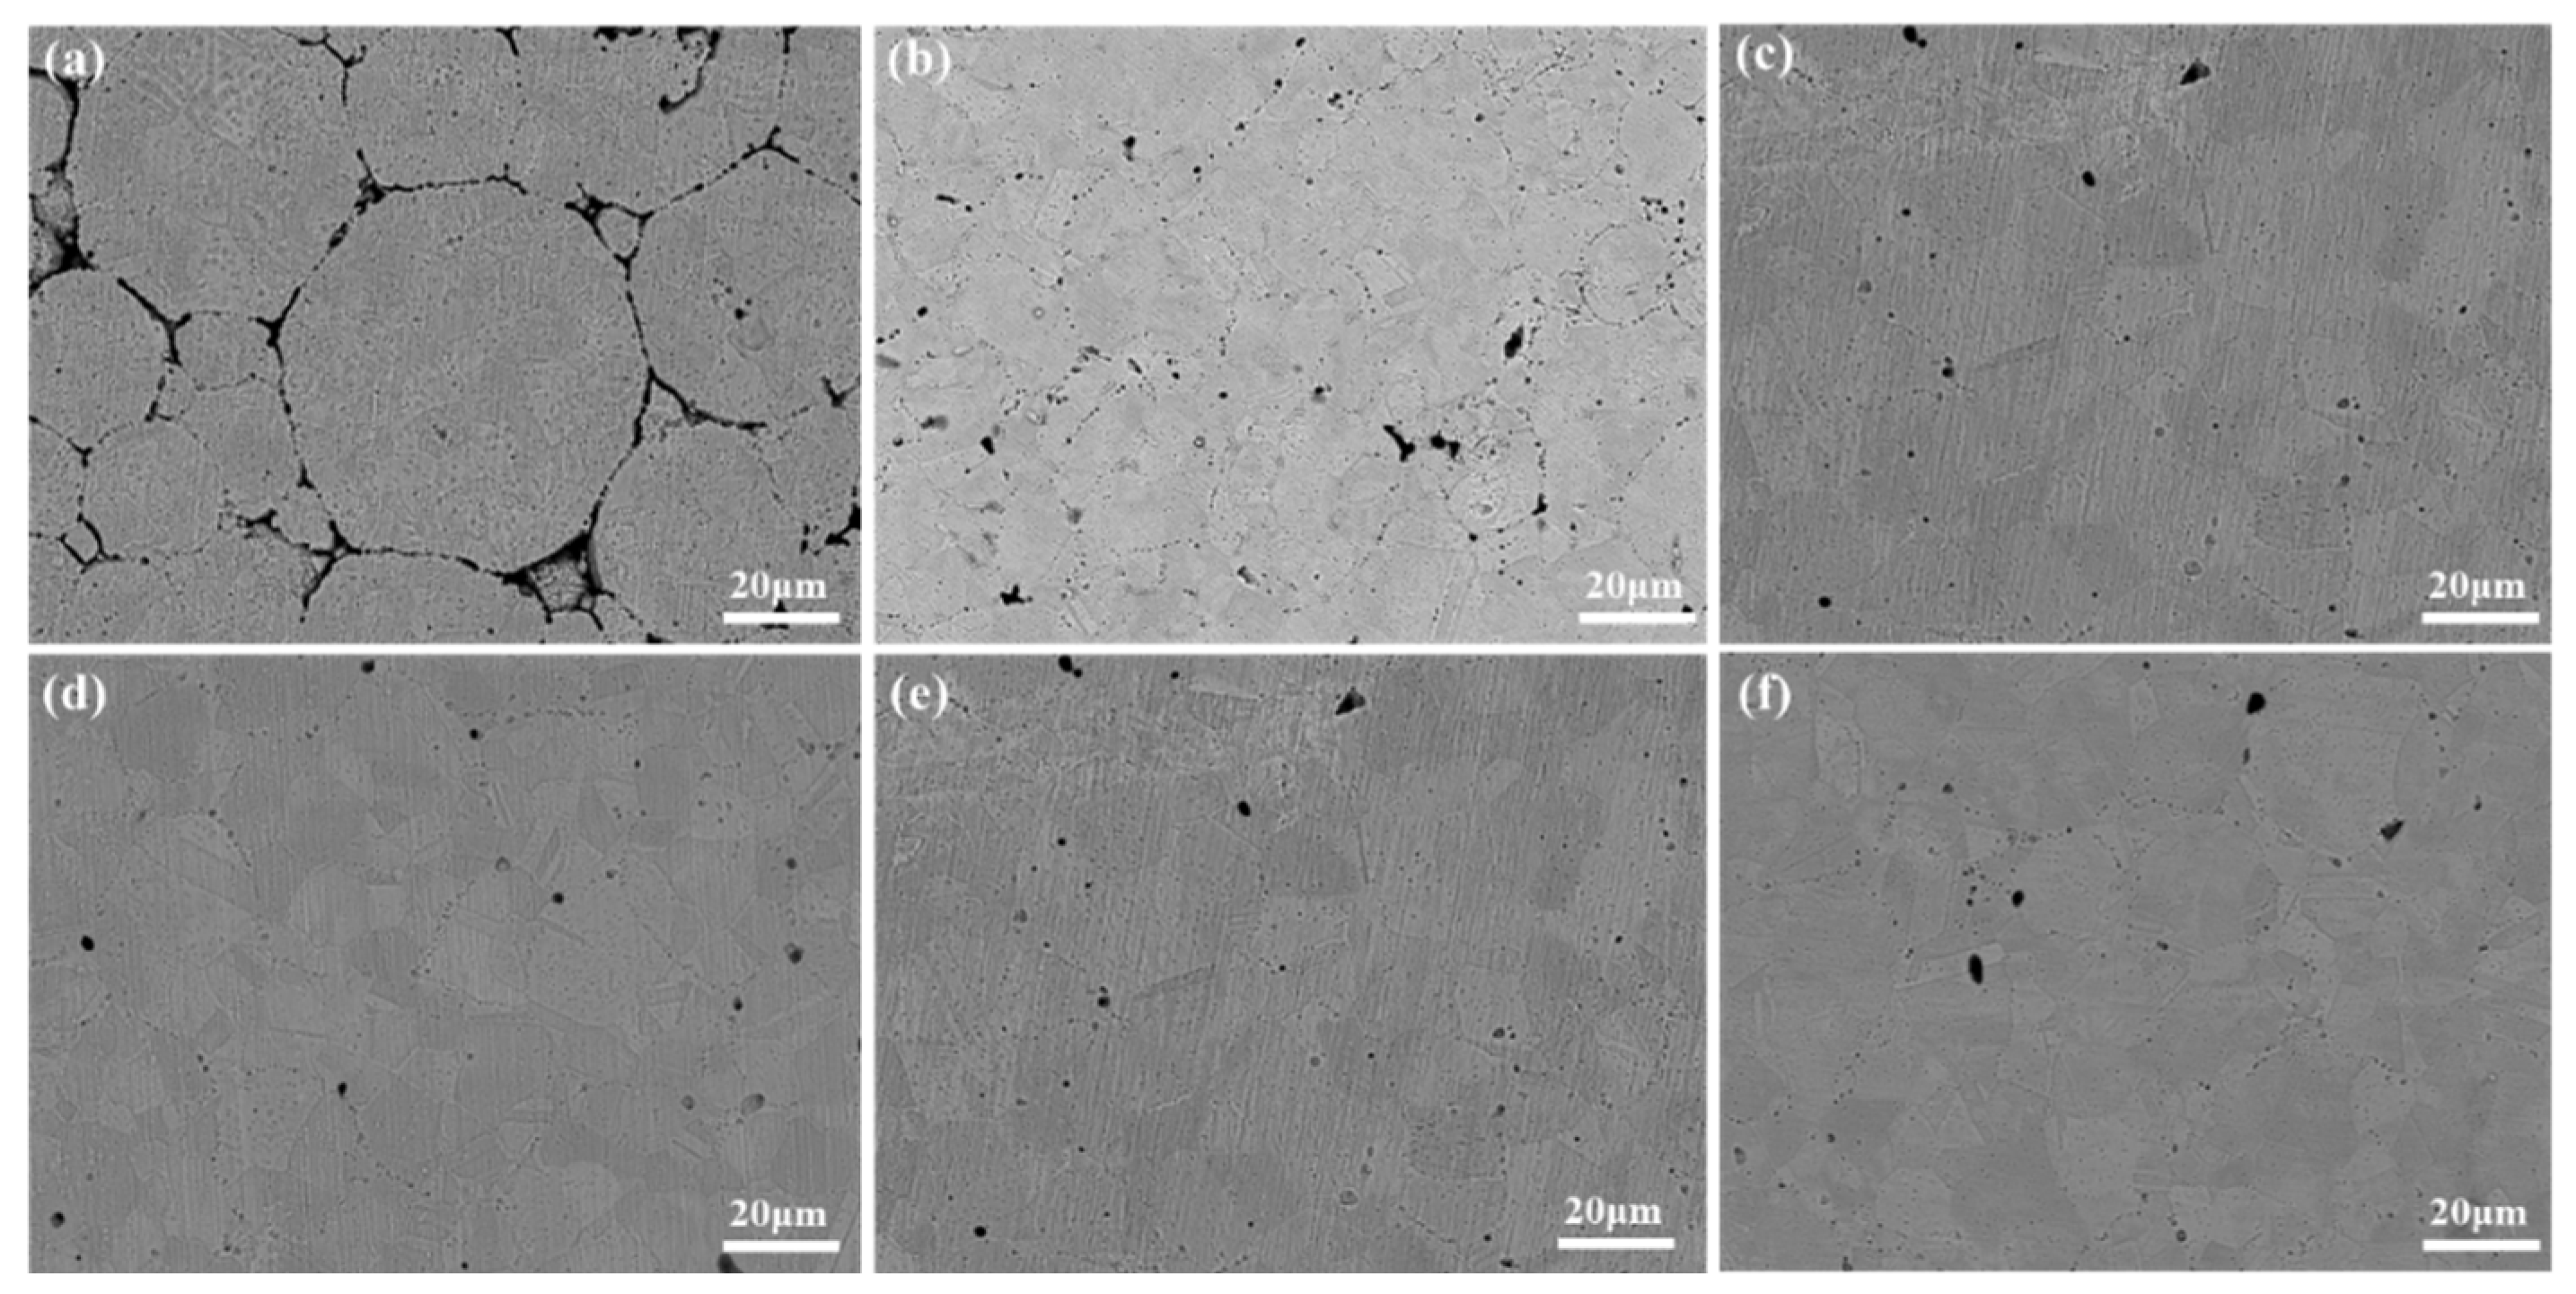
Figure 3 shows the alloy grain size sintered at different temperature sintering temperatures. From the figure, it can be seen that when the sintering temperature is 850°C, the alloy grain size reaches a minimum of about 18.11 μm, which is because the internal particles of the alloy heat themselves uniformly under the action of Joule heat during plasma sintering, and the atoms on the surface of the particles are in the activation state, so the process of sintered body densification avoids the uneven densification of the alloy caused by the heat transfer from the outside to the inside, which leads to the refinement of the grains. With the gradual increase in temperature and holding time, the grain size of the alloy increases gradually, which is attributed to the increased diffusion driving force at higher temperatures leading to grain growth, but the degree of grain growth is not high. The SEM micrographs of the alloy are shown in
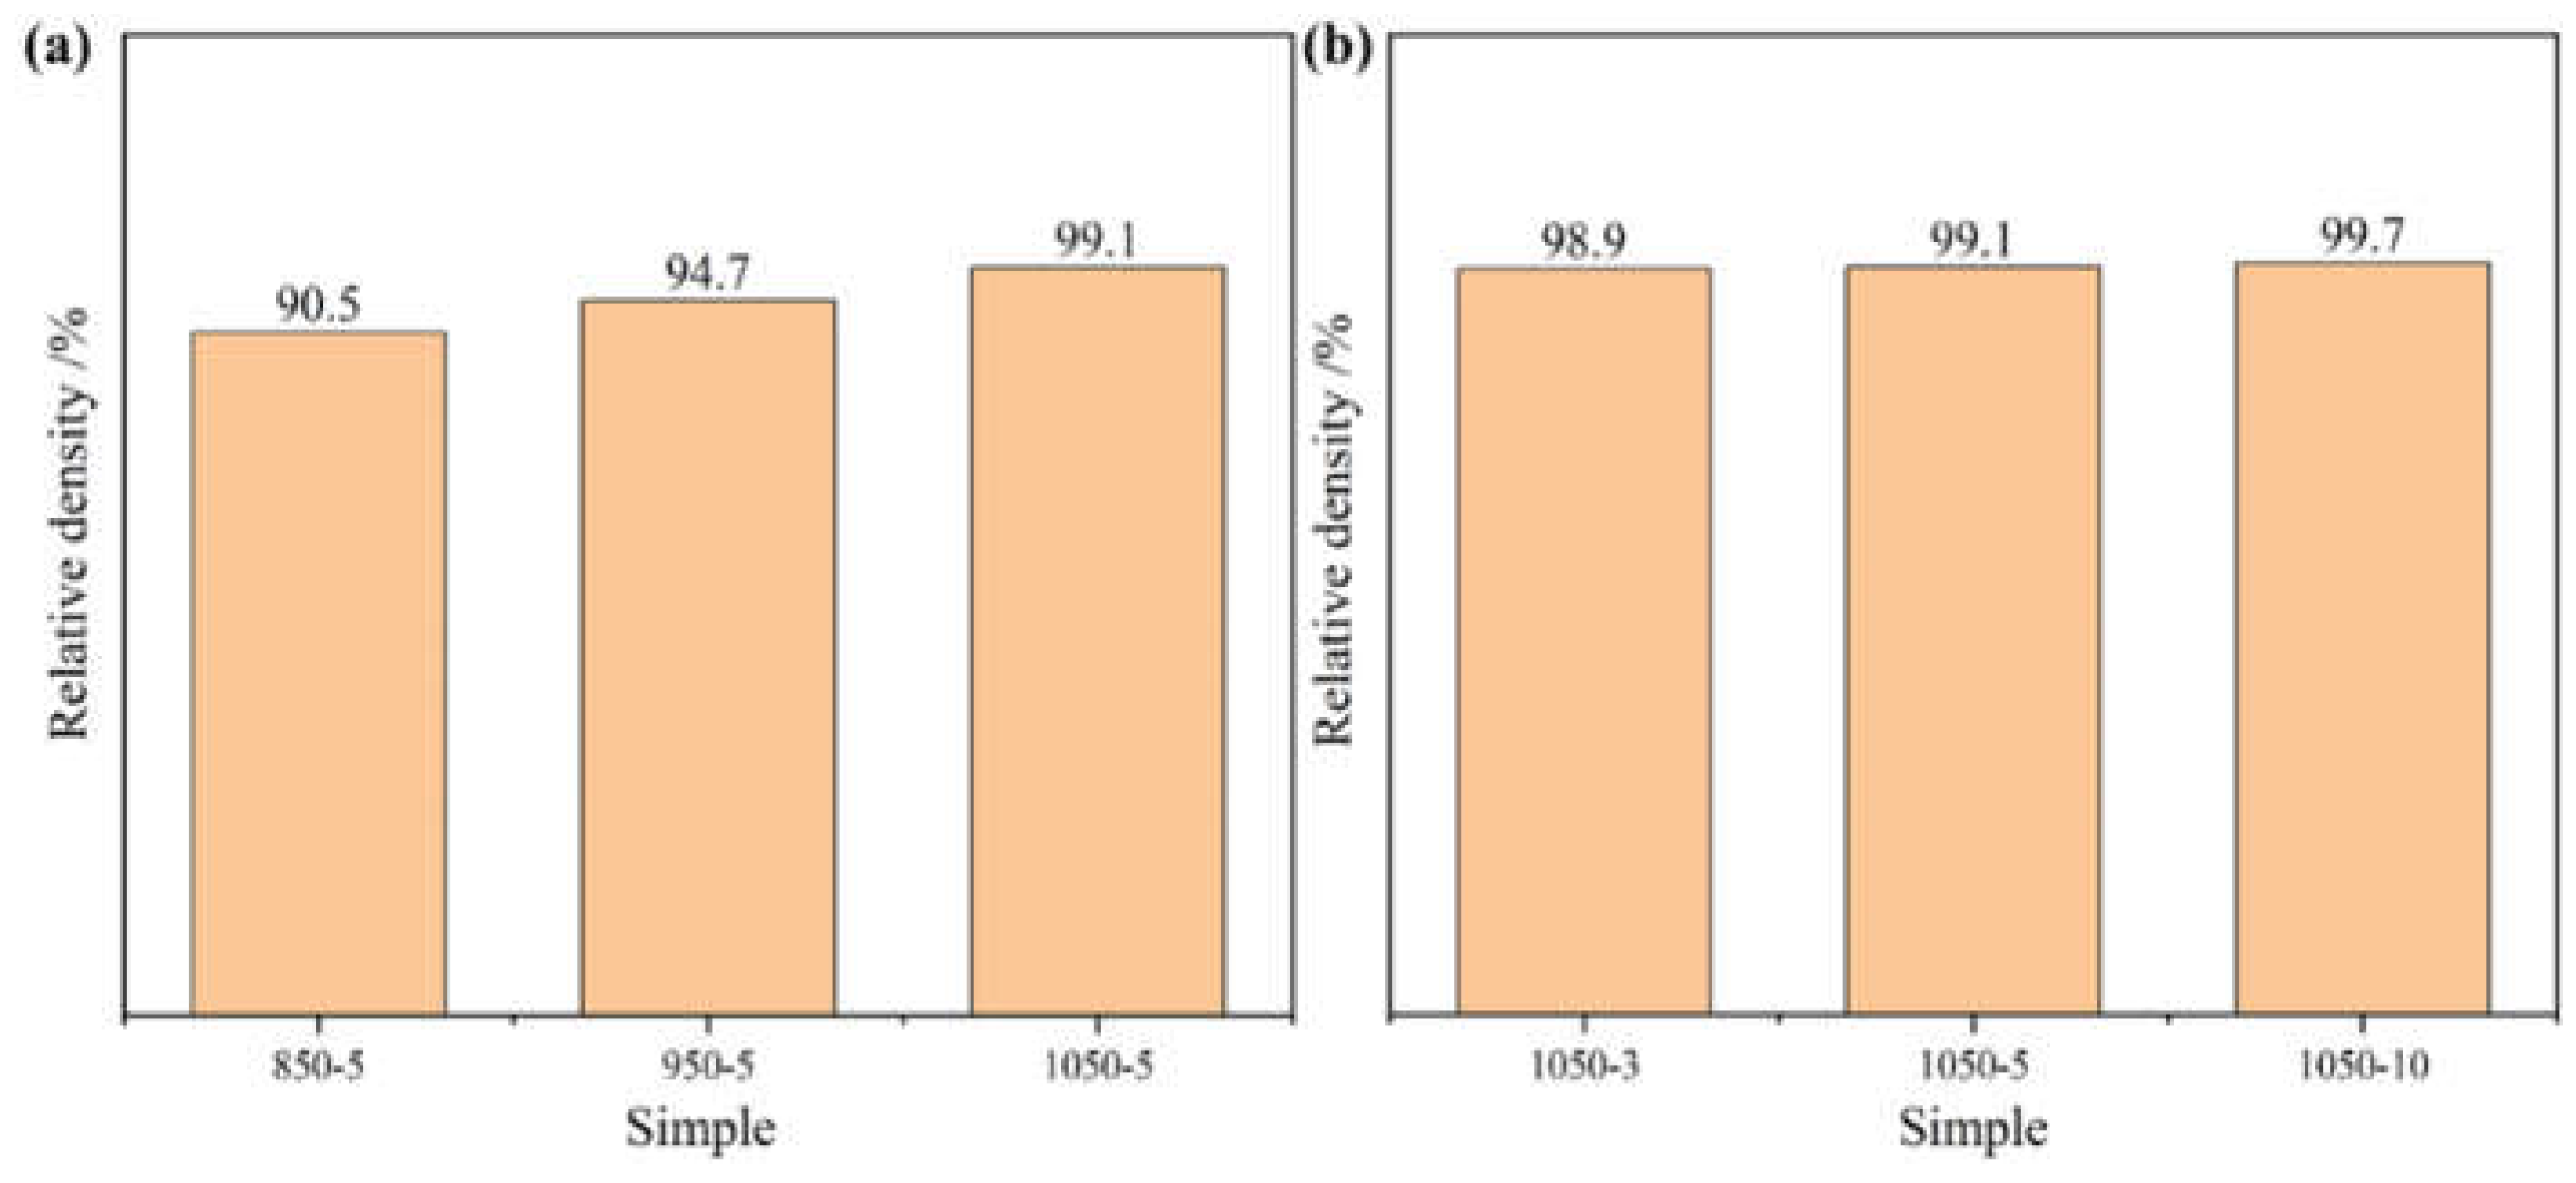
Figure 4, the whole specimen shows an equiaxial grain structure and a large number of twins exist in it. When the sintering temperature was 850°C, the pores of the alloy were obvious, and the low sintering temperature resulted in the alloy having inconspicuous grain boundaries and low actual density. With the increase of sintering temperature and holding time, the pores in the alloy are gradually reduced and the density of the alloy is gradually increased, the actual density of the alloy is shown in
Figure 5, and the relative density value of the alloy is the largest when the sintering temperature is 1050 ℃ and the holding time is 10 minutes.
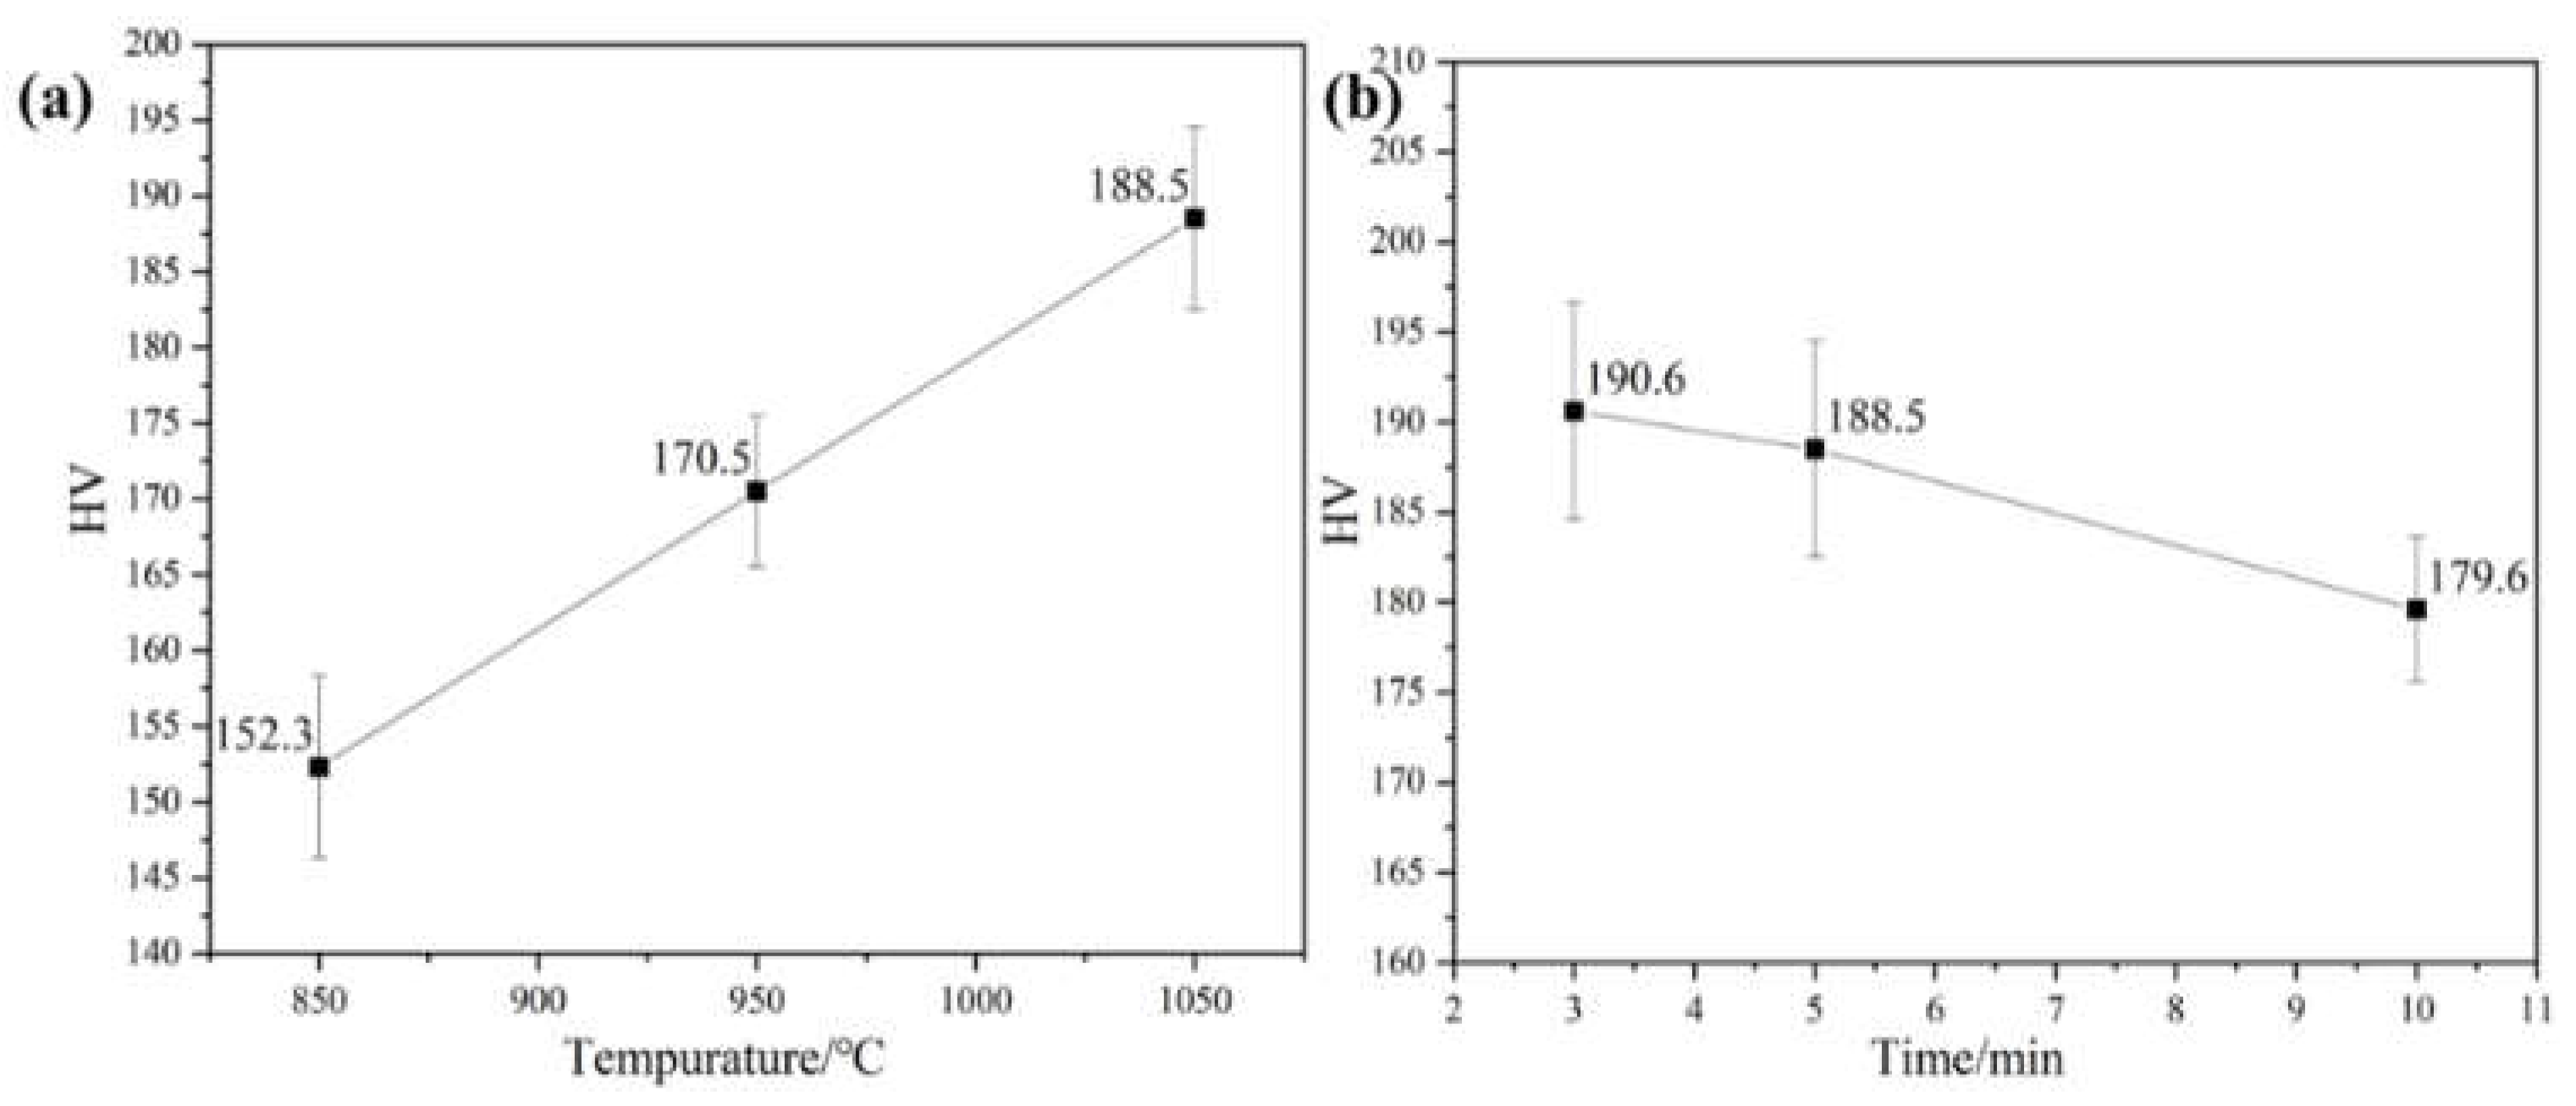
Figure 6 shows the measured values of microhardness of the samples after different sintering temperatures and holding times. The results show that the hardness of the alloy gradually increases with the increase of sintering temperature and decreases with the extension of holding time, and the hardness value is the highest at 191 HV when the sintering temperature is 1050°C and the holding time is 3 min. This is since the diffusion and fusion of alloying elements are more fully integrated with the increase of the sintering temperature, the internal pores of the alloy are reduced, and the densification is improved. With the extension of the holding time, the alloy grain size gradually increases and the resistance to deformation decreases, leading to a decrease in hardness.
3.2. Mechanical Properties
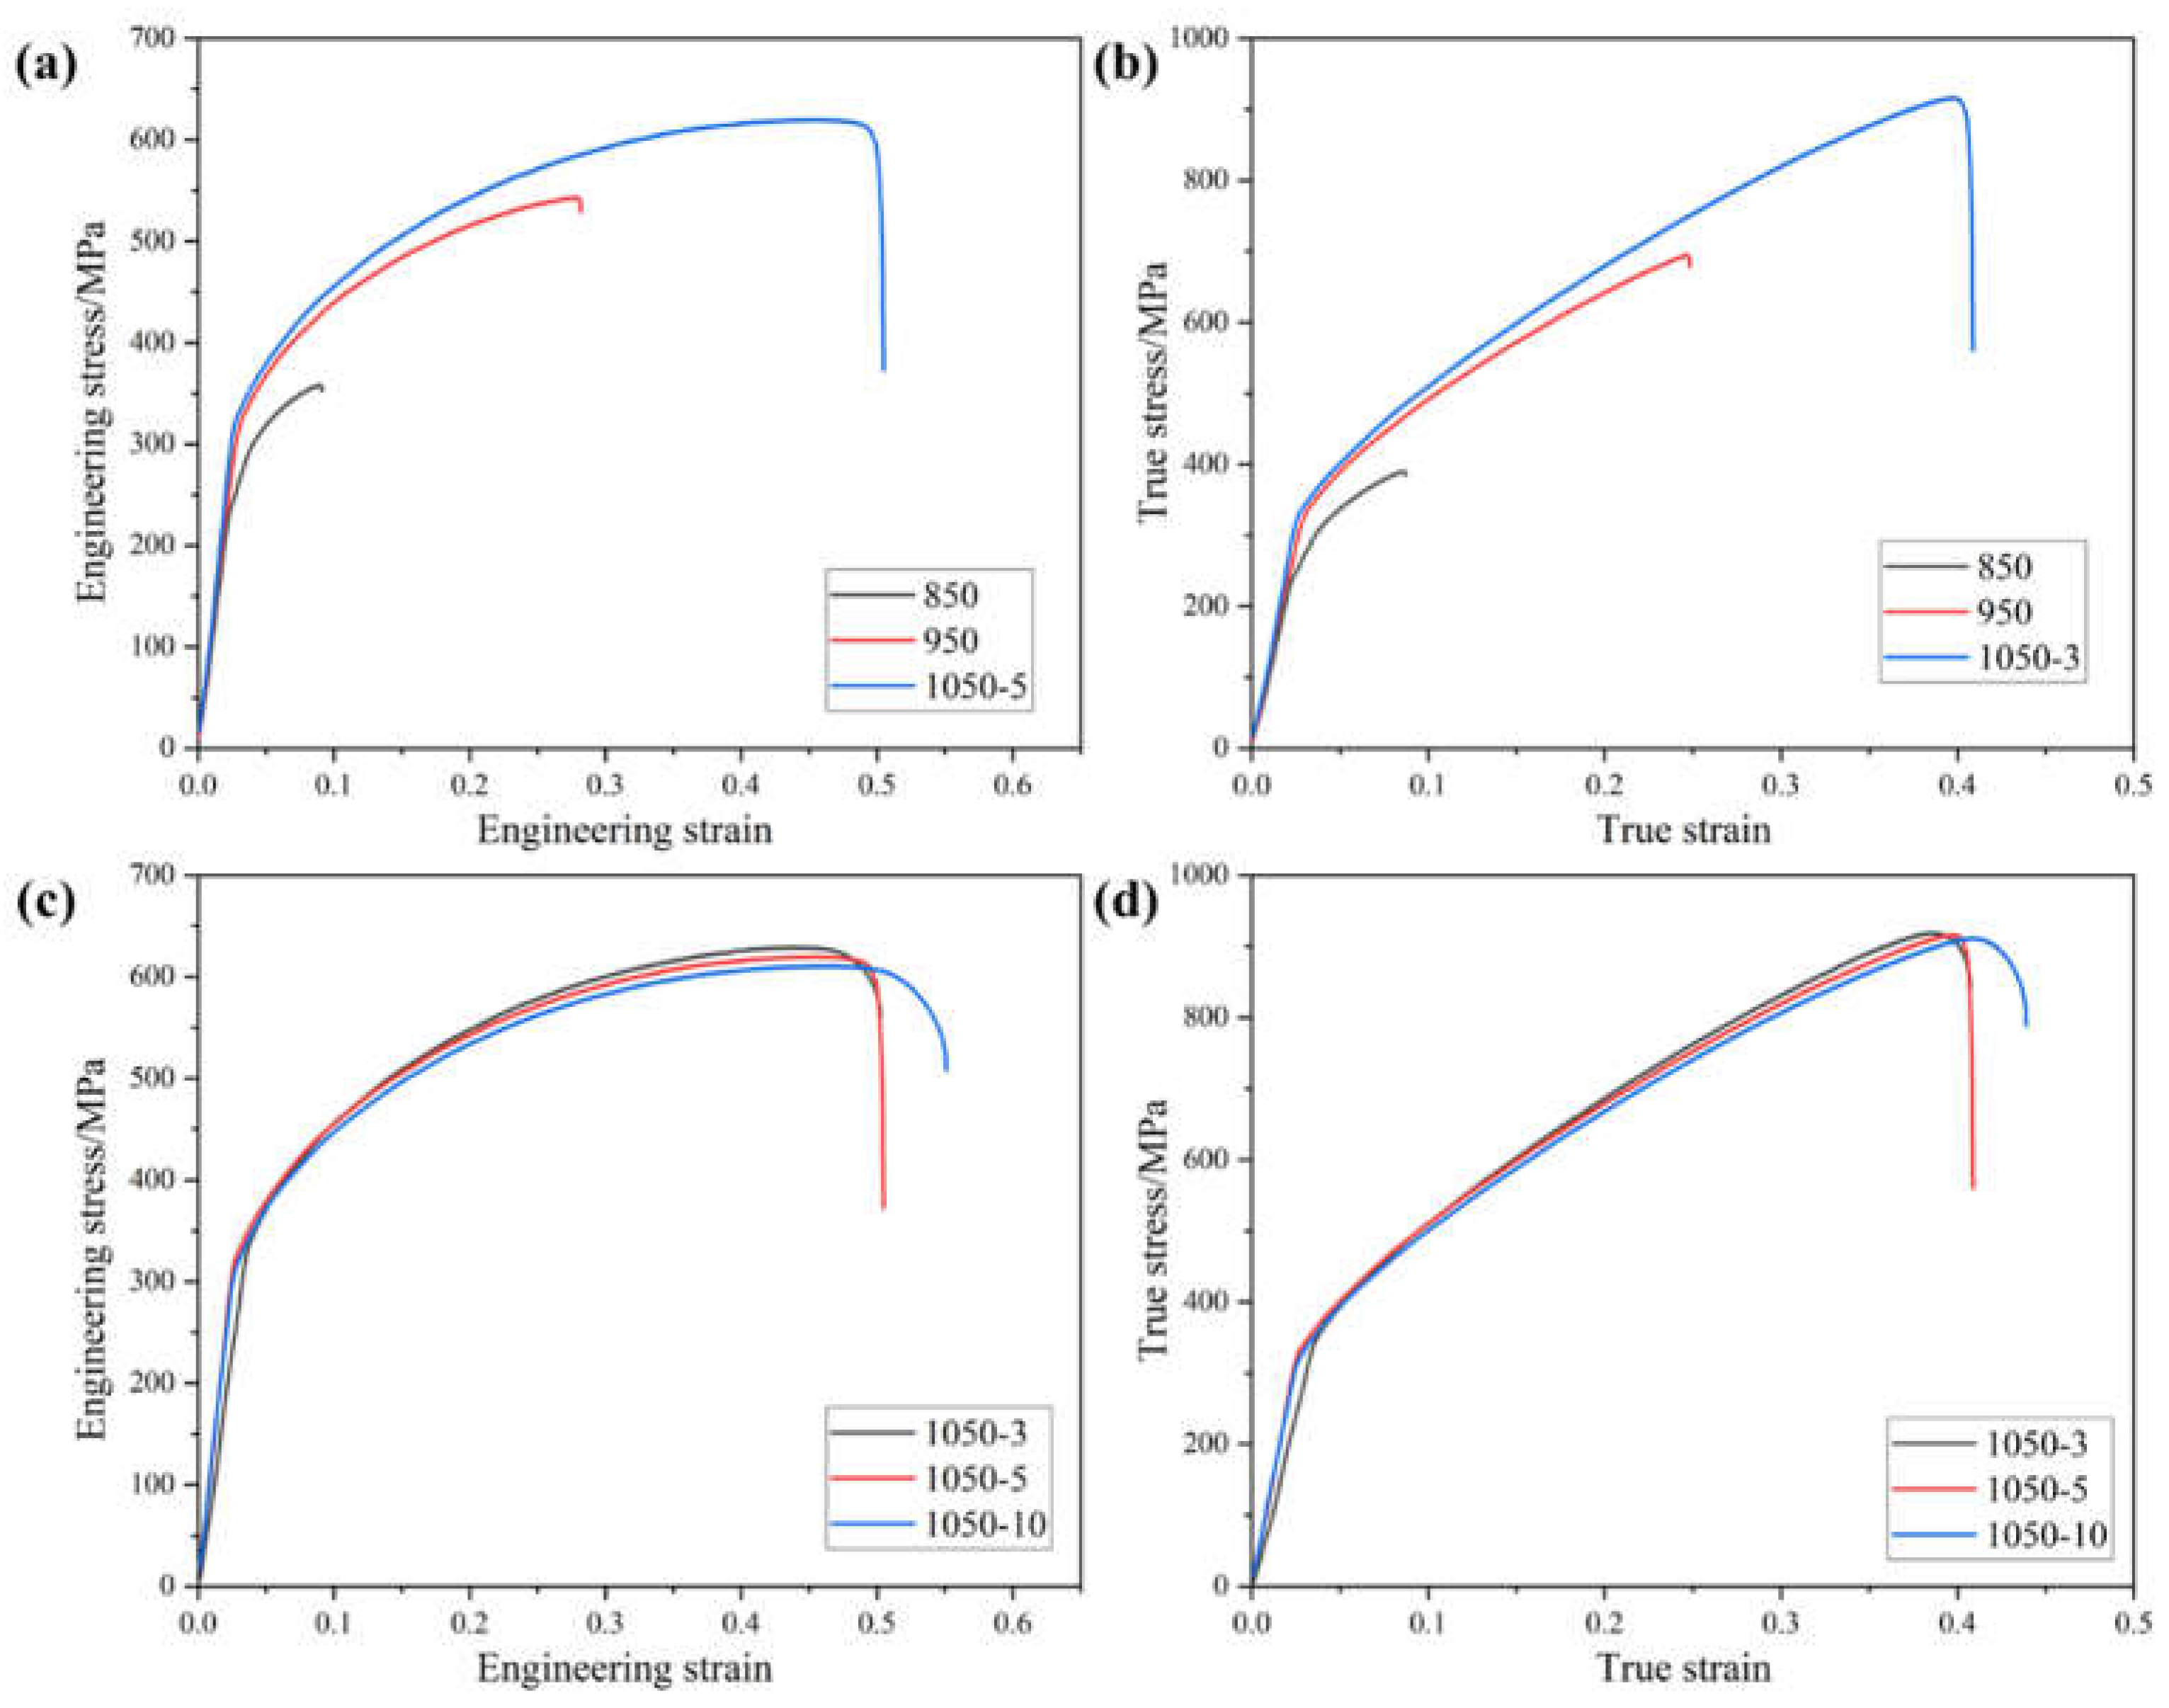
Figure 7 shows the room temperature tensile engineering stress-strain curve and true stress-strain curve of High-entropy alloy sintered at different sintering temperatures and holding times, from which it is learned that the strength and ductility of the alloy gradually increases with the increase of temperature, and the strength of the alloy gradually decreases and the ductility gradually increases with the increase of holding time. When the temperature is 850 ℃, the tensile strength and plasticity of the alloy is only 358.3 MPa and 9.1%, this is due to the existence of a large number of pores in the alloy sintered at 850 ℃, the densification is very poor, and the sintering temperature is too low resulting in the elements can not be sufficiently diffused, the particles can not be completely combined, resulting in poor tensile properties [
13]. The strength of the alloy reaches its maximum value of 629.0 MPa when the holding time is 3 minutes at a temperature of 1050°C. The ductility of the alloy reaches its maximum value of 55.6% when the holding time is 10 minutes at a temperature of 1050°C. The ductility of the alloy reaches its maximum value of 55.6% when the holding time is 10 minutes at a temperature of 1050°C. This is because as the holding time increases, the grain boundary energy decreases and the grain growth leads to an increase in ductility and a decrease in strength. The tensile strength and elongation do not change much due to low grain growth.
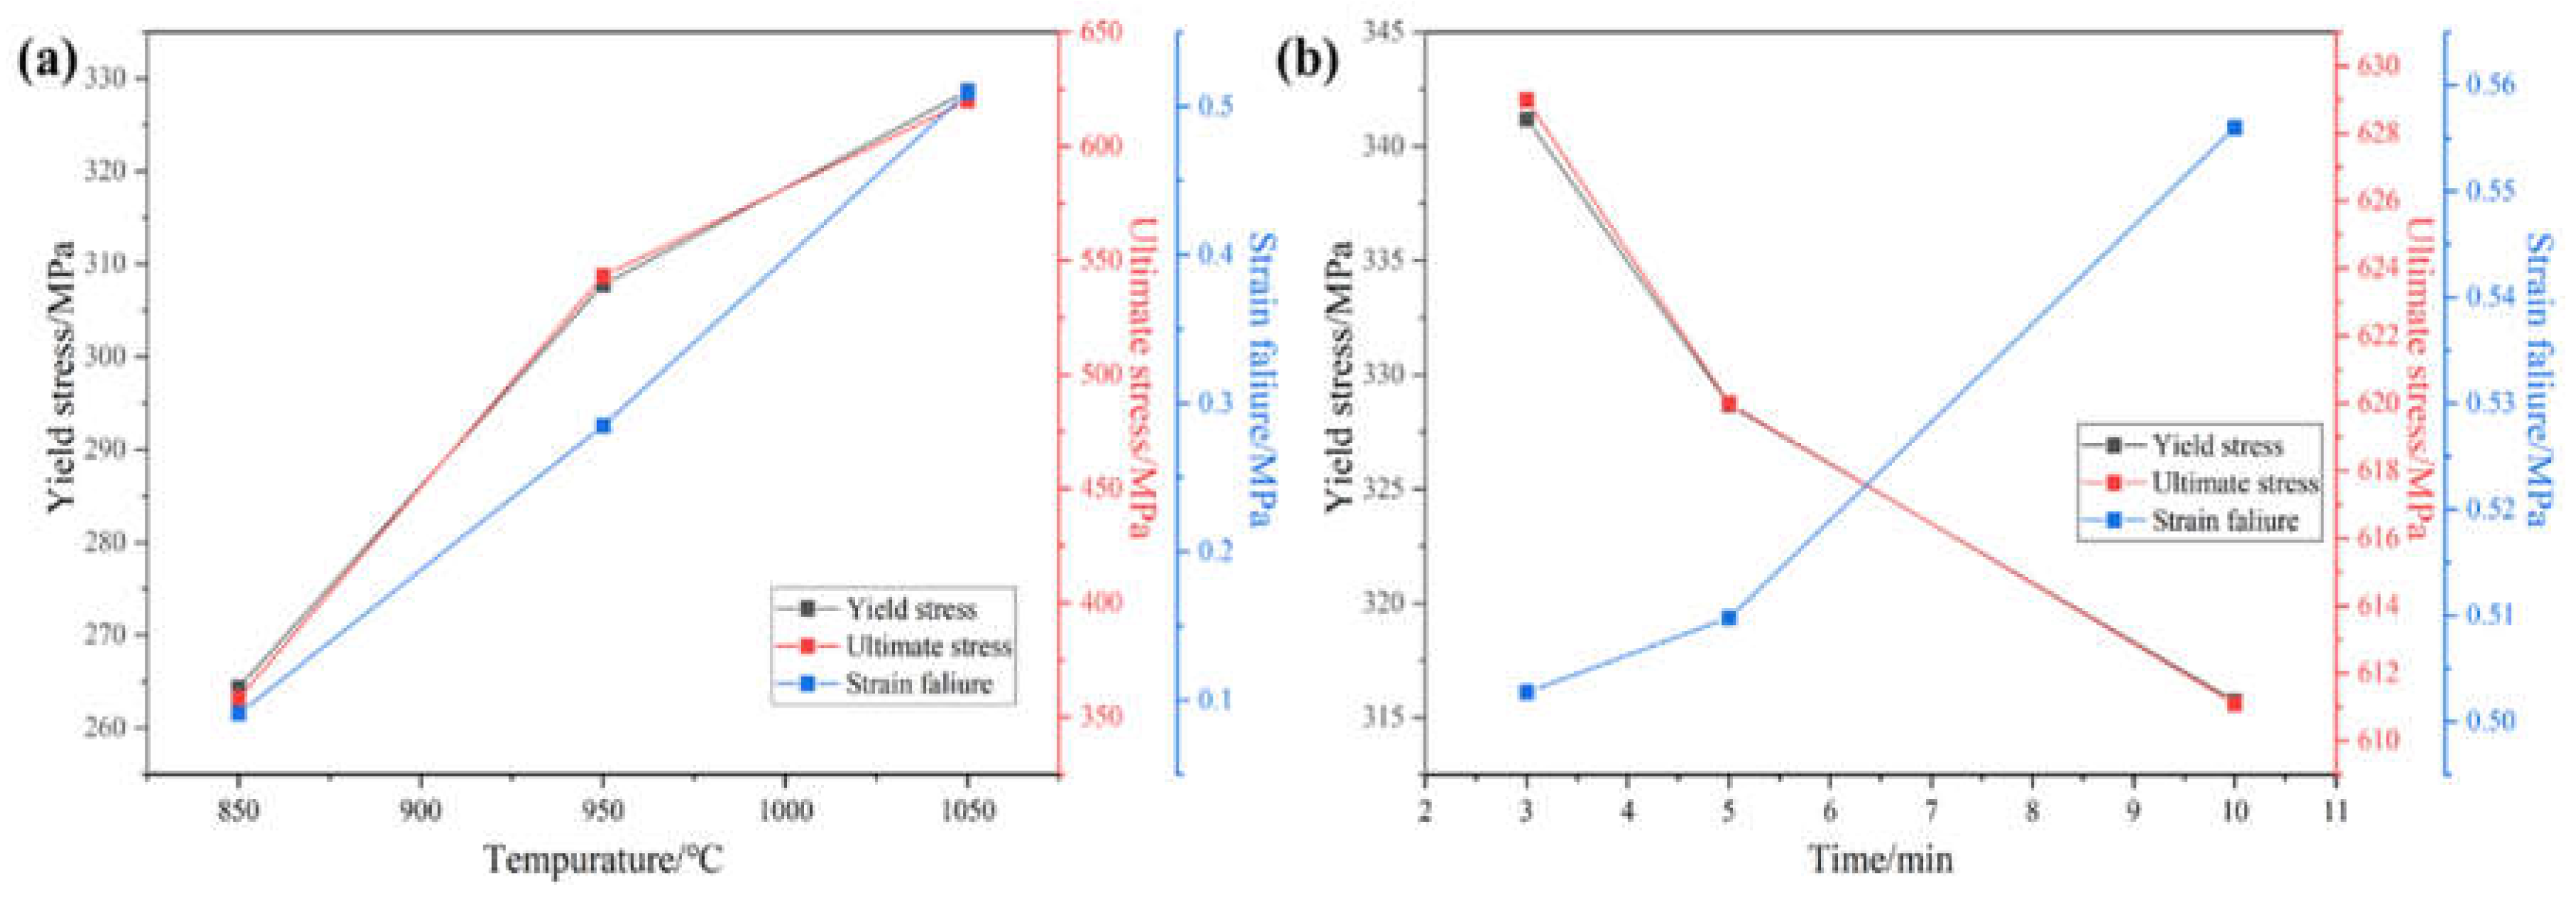
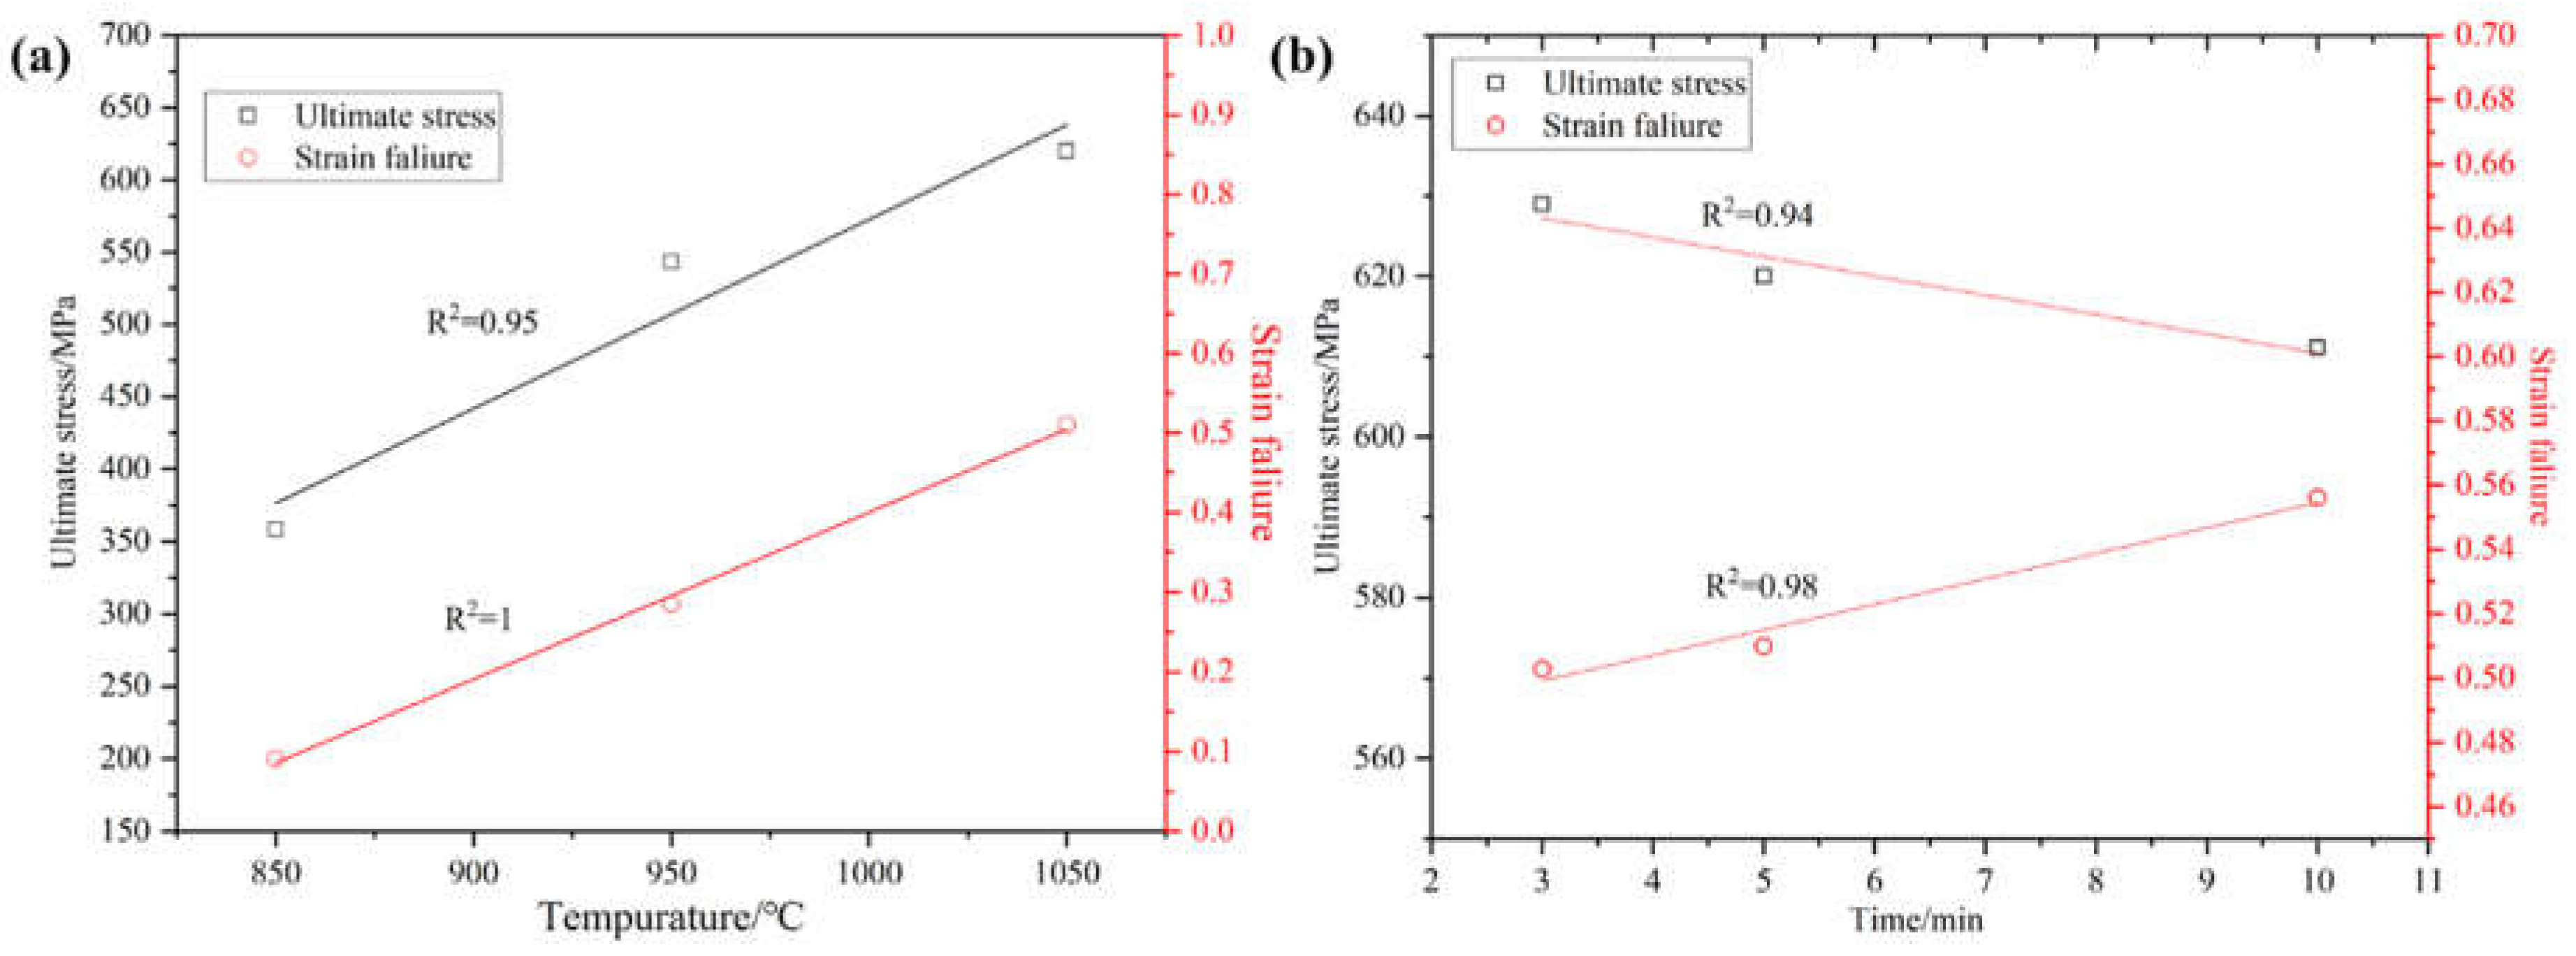
Figure 8 shows the yield strength, tensile strength and elongation graphs, which can be more intuitively seen as trend of the yield strength, tensile strength and elongation of the alloy with the increase in temperature and holding time. Through the different sintering temperatures and different holding times sintered alloy strength and elongation of linear fitting to get the fitted line segment shown in
Figure 9, can be seen in a certain sintering temperature and holding time within the temperature and holding time with the increase in temperature and the extension of the holding time, tensile strength and elongation has a certain regularity. When the sintering temperature is increased from 850°C to 1050°C, the tensile strength and elongation of the alloy show a linearly increasing trend. When the holding time was increased from 3 minutes to 10 minutes, the alloy tensile strength showed a linear decreasing trend and the elongation showed a linear increasing relationship.
The difference in tensile fracture angle of the prepared samples at different sintering temperatures is shown in
Figure 10(a). As the sintering temperature increases from 850°C to 1050°C, the fracture break angle of the tensile samples decreases gradually. When the sintering temperature is 850°C, the tensile sample has the largest fracture angle of 81°. When the sintering temperature was 950°C and 1050°C, the fracture angles of the tensile samples were 73° and 53°, respectively. The fitting analysis was carried out by using origin software, and the results showed that the fracture angle of the sample decreased gradually with the increase of sintering temperature, which was fitted by using the formula y=86.33-5.33*exp((x-850)/109.14)), and the fitting R
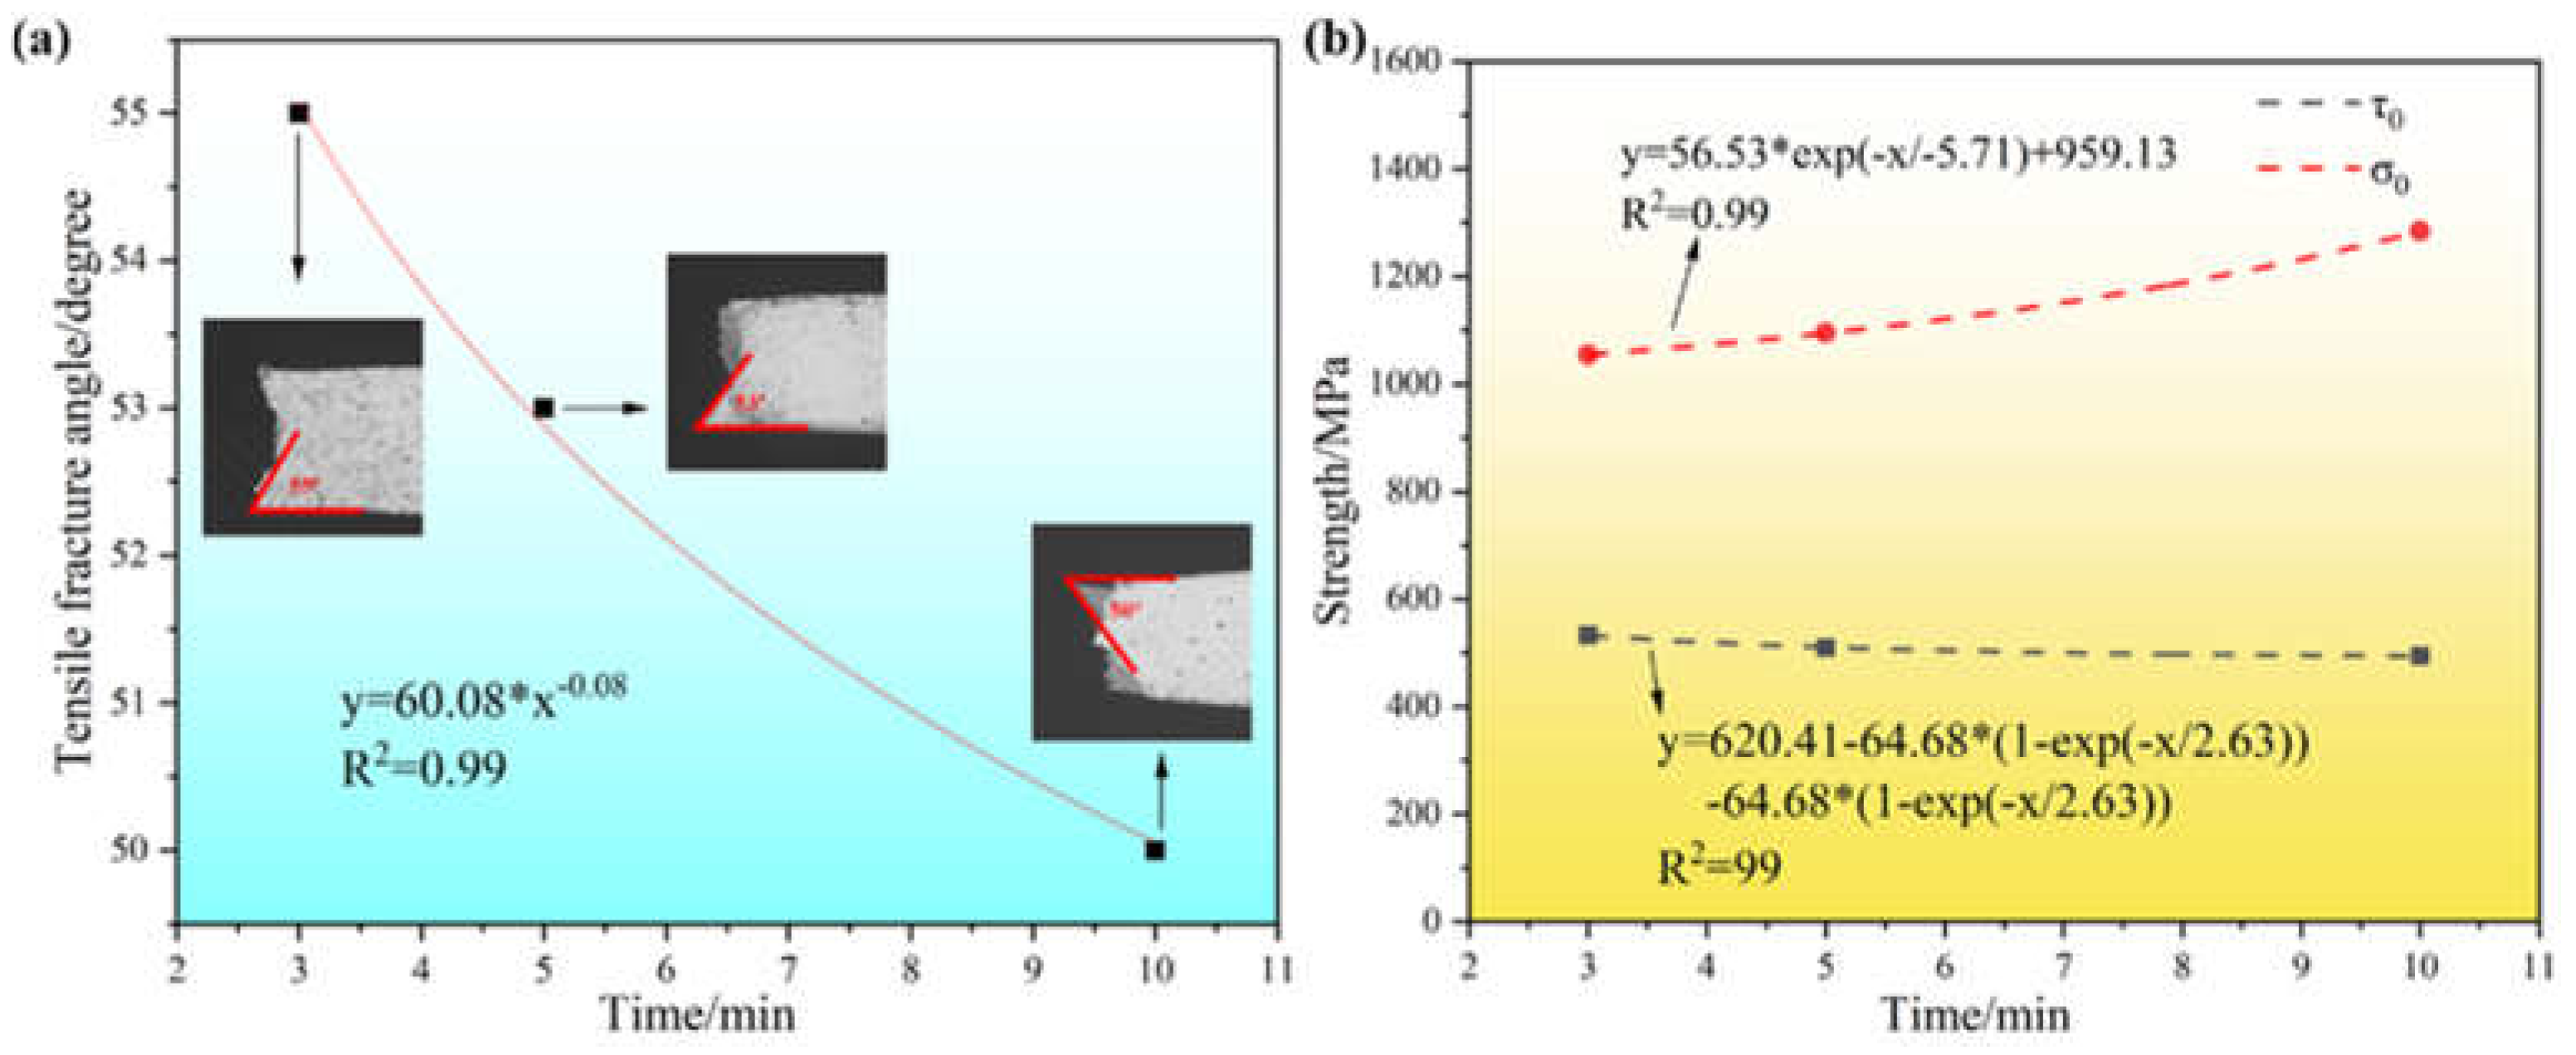
2=1, which indicated that the fitting effect was good. The difference in tensile fracture angle of the samples prepared at 1050°C after different holding times is shown in
Figure 11(a). As the holding time increases from 3 min to 10 min, the fracture break angle of the tensile samples decreases gradually. When the holding time is 3 min, the tensile samples have the largest fracture angle of 55°. When the holding time was 5 min and 10 min, the fracture angle of the tensile samples was 53° and 50°, respectively. Continuing to fit the value of the tensile fracture angle analysis, the results show that with the increase of the insulation time, the sample fracture angle gradually decreases, using the formula y = 60.08 * x - 0.08 to fit it, the fitting R
2 = 0.99, indicating that the fitting effect is good.
Zhang and Eckert [
14] proposed an elliptic criterion to analyze the fracture behavior of bulk metallic glasses (BMGs), introducing parameters related to this material to explain the deformation and damage behavior of different undercuts [
15],expressed as follows:
where σ and τ are the normal and shear stresses applied on the same plane, σ
0 and τ
0 are the critical normal and shear fracture strengths, respectively, and α = σ
0/τ
0 is the fracture mode factor. When the tensile stress τ
T is applied to the sample, the normal stress σ and shear stress τ on any shear surface can be expressed as:
Combining the above formulas, the fracture mode factor α can be expressed as a function of the tensile fracture angle θ
T, σ
0 and τ
0 can be expressed as a function of the tensile fracture strength σ
F and α:
Without considering the effect of necking behavior, the tensile shear fracture angle is mainly determined by the parameter α. The graphs of σ
0 and τ
0 functions are calculated by the equations of (4)-(6) [
16].
The plots of σ
0 and τ
0 functions for the samples prepared at 850°C, 950°C and 1050°C sintering temperatures, respectively, are shown in
Figure 10(b). From the Figure, it can be seen that with the increase of sintering temperature, the critical normal fracture strength σ
0 shows a gradually increasing trend, and the selection of the formula y = 4.55*x
4.76 to fit it found that the fitting R
2 = 0.99, the fitting effect is good. The shear fracture strength τ
0 firstly rises and then gradually tends to level off, and y=-2.15+1.07*(1-exp(-x/62.15))+1.07*(1-exp(-x/62.15))+1.07*(1-exp(-x/62.15)) is chosen to fit it, and the fitting R
2=1, which is a good fitting effect. From the critical normal fracture strength σ
0 and shear fracture strength τ
0 fitting images, it can be seen that with the increase of sintering temperature, the critical normal fracture strength σ
0 shows an obvious rising trend, and when the sintering temperature reaches a certain temperature, the shear fracture strength τ
0 no longer rises, resulting in a gradual decrease in the tensile fracture angle. The plots of σ
0 and τ
0 functions for the samples prepared at 3 min, 5 min and 10 min holding time, respectively, are shown in
Figure 11(b). From the Figure, it can be seen that with the increase of holding time, the critical normal fracture strength σ
0 shows a gradual increase in the trend, the selection of the formula y = 56.53 * exp (-x/-5.71) + 959.13 to fit it found that the fitting R
2 = 0.99, the fitting effect is good. The shear fracture strength τ
0 shows a gradual decrease, and y=620.41-64.68*(1-exp(-x/2.63))-64.68*(1-exp(-x/2.63)) is chosen to fit it, and the fitting R
2=0.99, the fitting effect is good. From the critical normal fracture strength σ
0 and shear fracture strength τ
0 fitting images, it can be seen that with the increase of holding time, the critical normal fracture strength σ
0 shows a significant rising trend, while the shear fracture strength τ
0 shows a gradual decline in the trend of the rise of the critical normal fracture strength σ
0 and the decline of the shear fracture strength τ
0 leads to a gradual decrease in the tensile fracture angle. With the increase of sintering temperature and holding time, the High-entropy alloy sample gradually tends to be dense, the reduction of alloy pores, the full diffusion of elements and the full combination of particles are the main reasons for the rise of σ
0, and the final sample fracture mode gradually evolves from forward fracture to shear fracture.
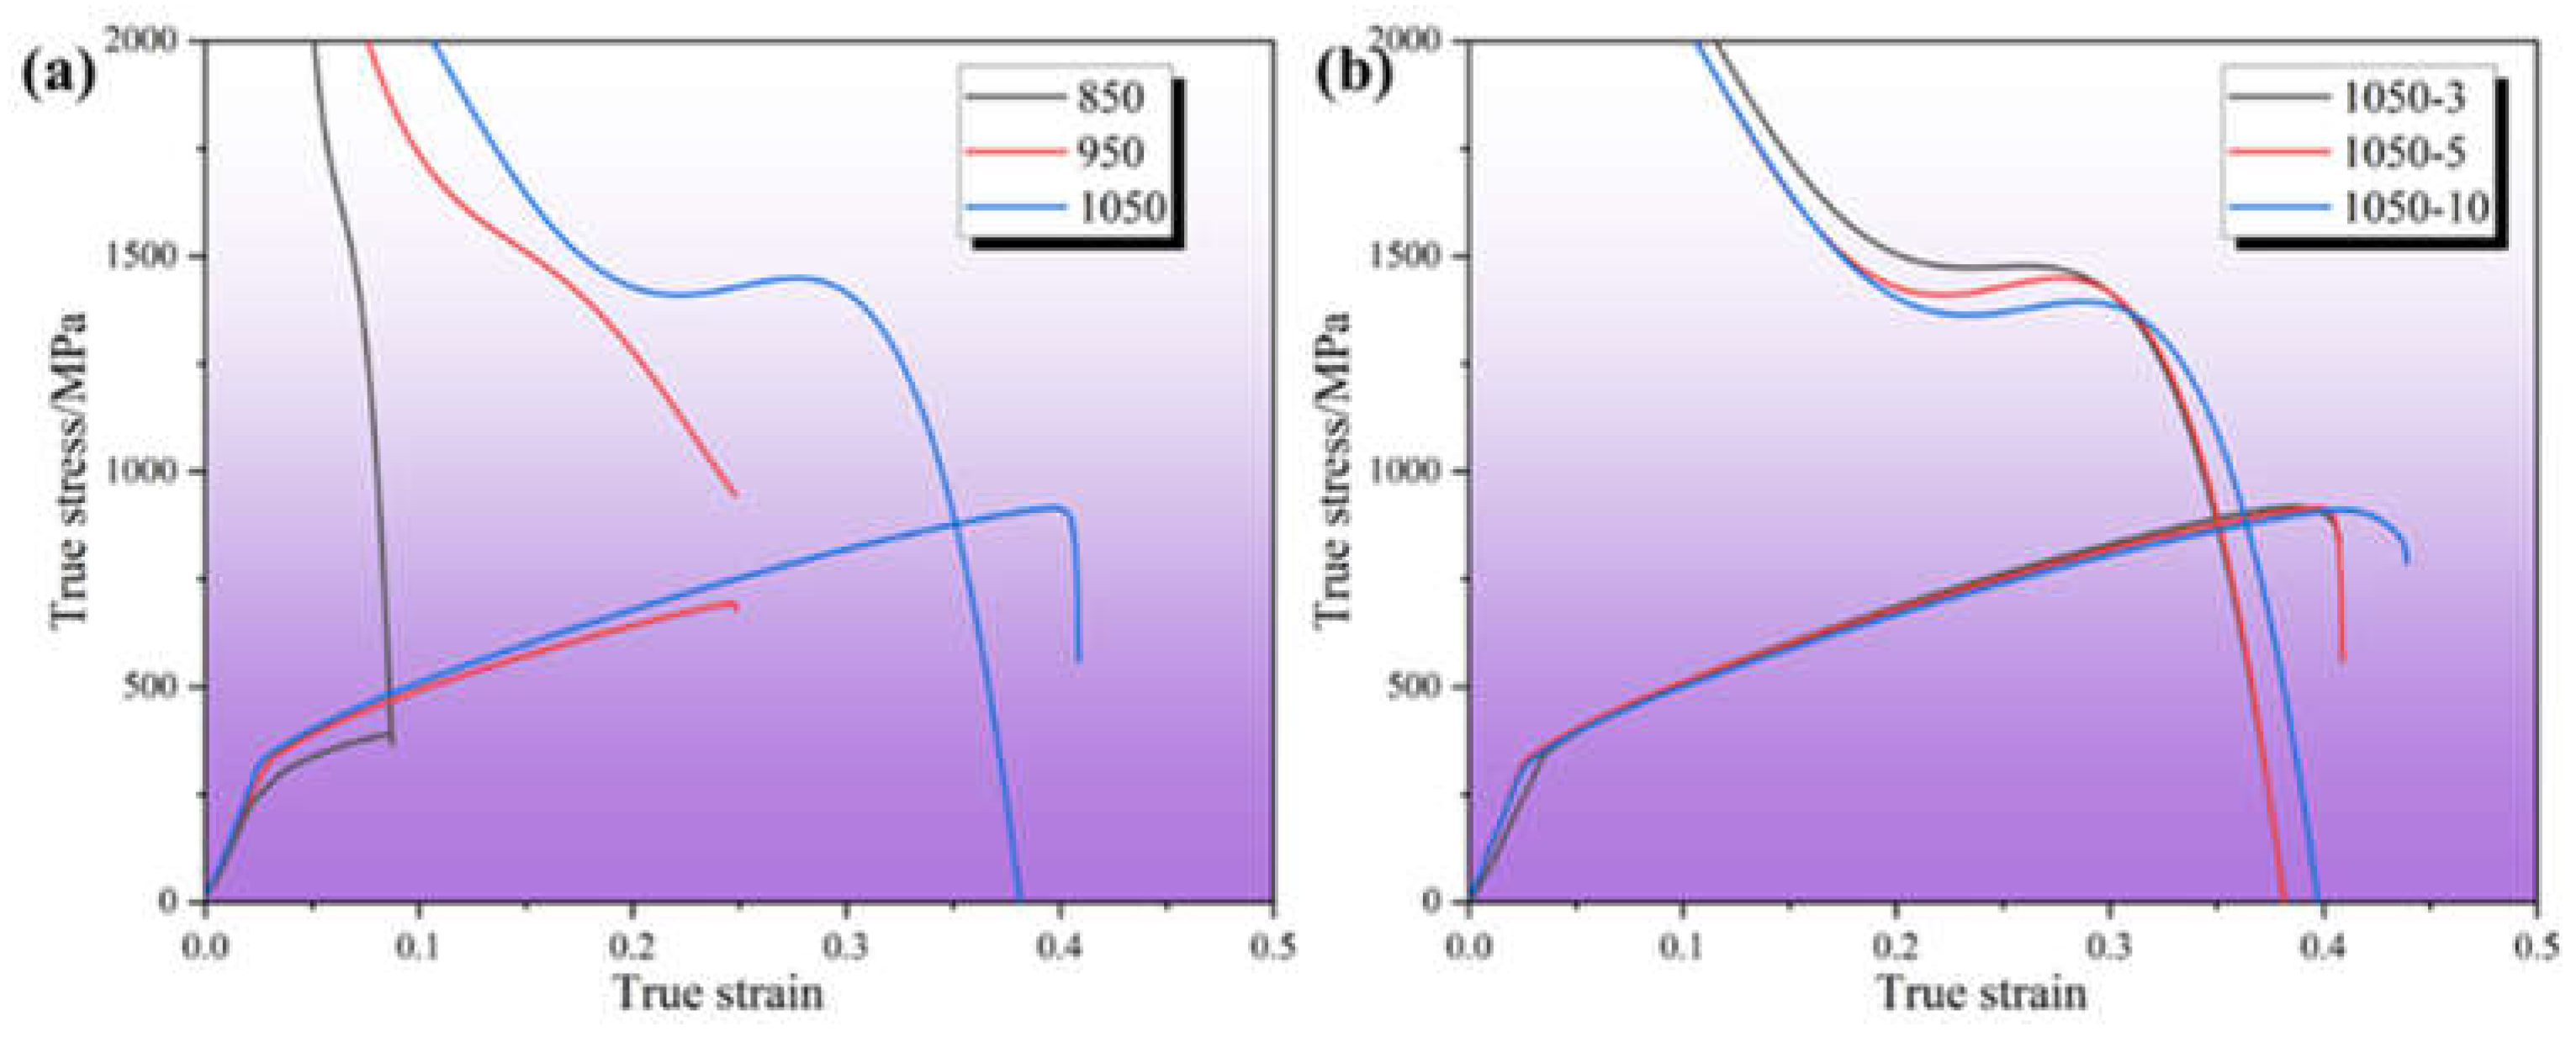
Figure 12 shows the true stress-strain versus strain-hardening curves of High-entropy alloy samples prepared at different sintering temperatures and holding times. From
Figure 12(a), it can be seen that in the sintered samples prepared at 850 ℃ in the low strain region strain hardening rate is very fast, with the continuation of stretching, the strain rate gradually slowed down and then continued to decline rapidly until the tensile samples fracture. The samples prepared by sintering at 950°C also show three stages, firstly a rapid decline, followed by a leveling off and finally a continued rapid decline. There is a slight increase in the work-hardening region compared to the sintered samples prepared at 850 °C. The samples prepared by sintering at 1050°C show three stages of rapid decline, followed by a slow increase and finally a continued rapid decline. Compared to the samples prepared by sintering at 850°C and 950°C, the work-hardening region increases significantly, which is mainly due to the reduction of internal pores, more homogeneous bonding between elements, and the generation of twins in the High-entropy alloys as the temperature increases. From
Figure 12(b), it can be seen that the samples prepared under the holding time of 3min, 5min and 10min respectively show three stages of rapid decrease, then slow increase and finally rapid decrease. The intersection of the stress-strain curves and strain-hardening curves of the three samples occurred at higher strains. The intersection of the true stress-strain curves of the samples prepared at a holding time of 3 min is slightly lower than that of the samples prepared at a holding time of 5 min, and both intersections are lower than that of the samples prepared at a holding time of 5 min. Due to the delay of necking, the ductility of the samples prepared with a holding time of 10 min is the highest and the ductility of the samples prepared with a holding time of 3 min is the worst.
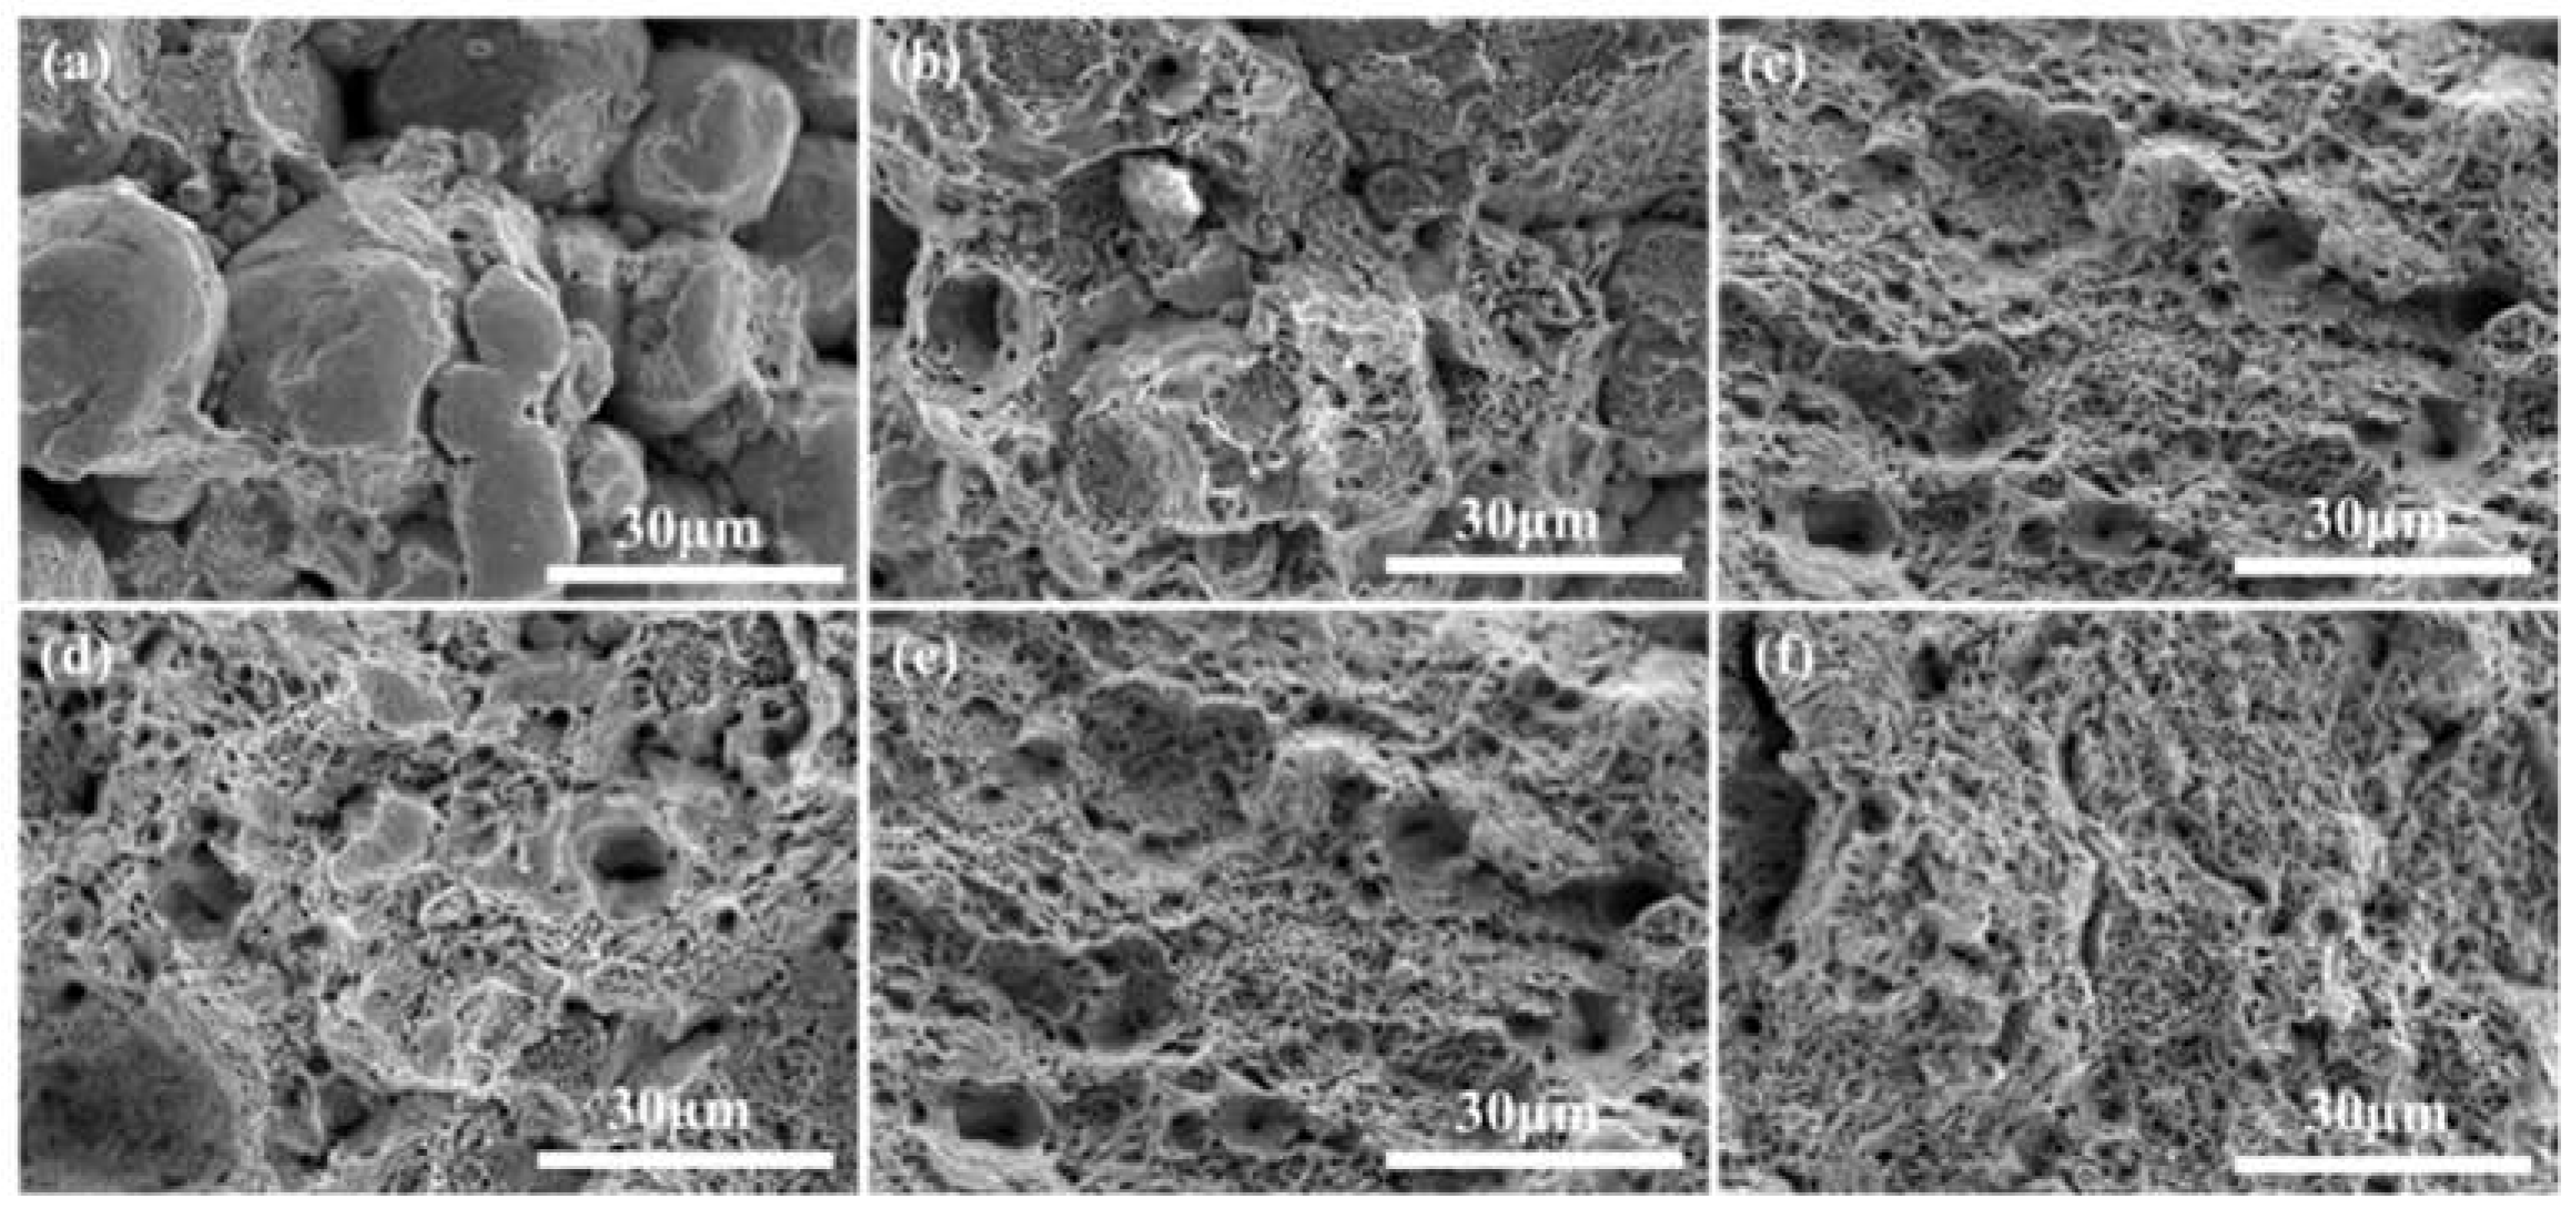
Figure 13 shows the fractured picture of the sintered alloy under different sintering temperatures and holding times, from Figure (a) it can be seen that when the sintering temperature is 850 ℃, the elemental particles are obviously not completely fused, the elemental diffusion is not uniform, resulting in poor performance of tensile strength and elongation, with the sintering temperature increased to 950 ℃ elemental fusion is more fully, there are a small number of tough nests appear, but still presents a certain amount of particles and cracks, when the temperature is increased to 1050 ℃, the elemental fusion is more fully, the tough nests increased significantly, with the prolongation of the holding time, the performance of the tough nests is more pronounced.
3.3. Wear Properties
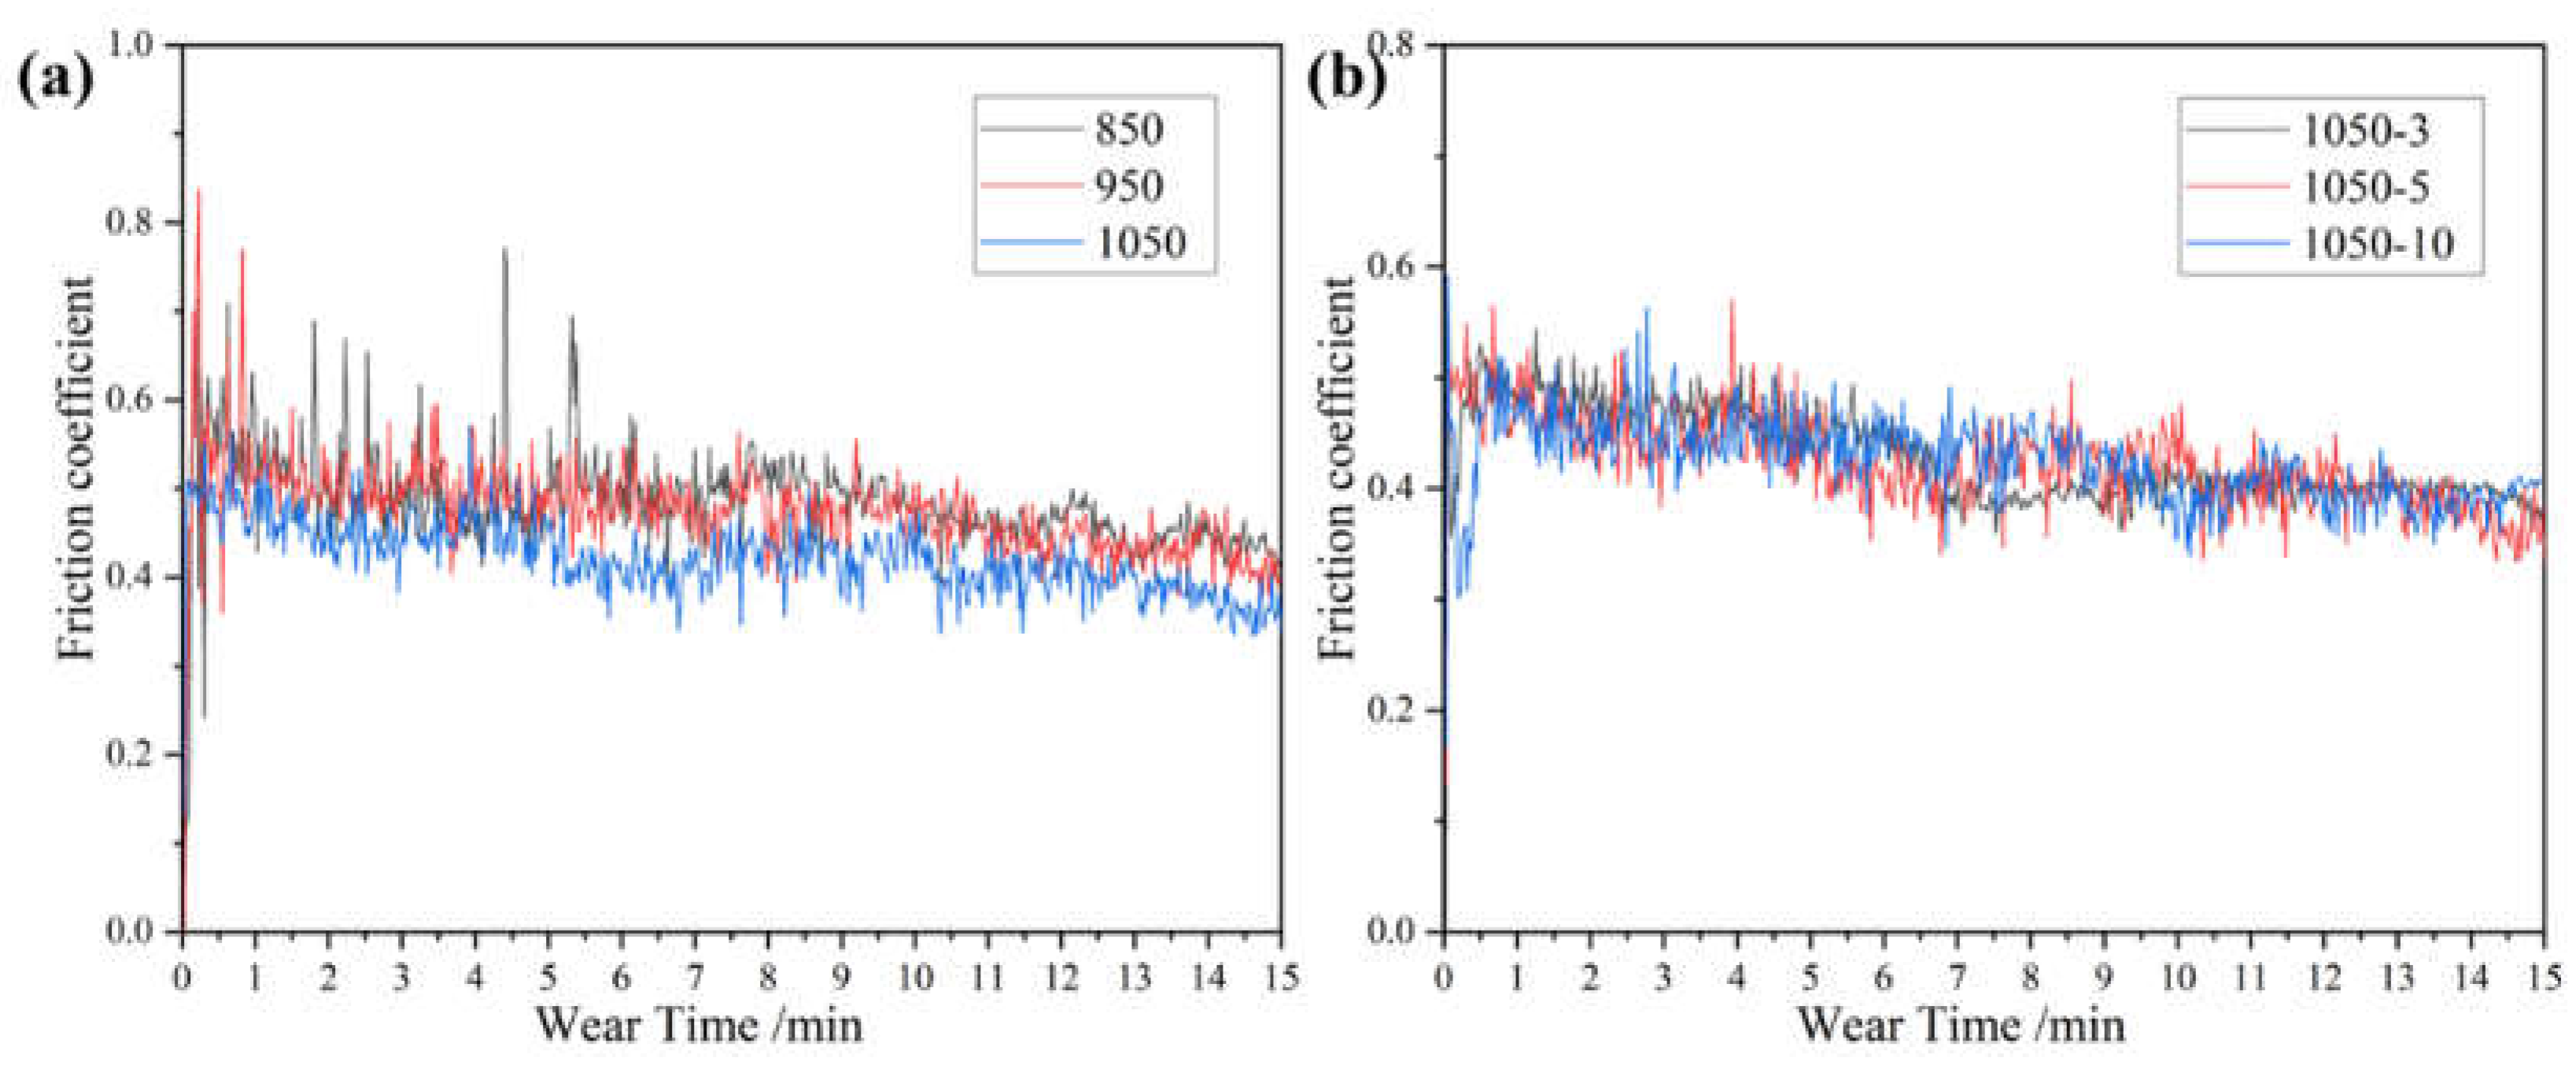
Figure 14 shows the friction coefficient-time curves of sintered alloys at different sintering temperatures and holding times. From the Figure, it can be seen that at the beginning of the test, the interface is very rough and the contact area with the grinding ball is very small. When the grinding ball is worn, a cold welding effect occurs, which requires a large shear force to cut it, causing the friction coefficient to increase rapidly [
17]. With the increase of wear time, the contact area increases and the interface becomes a smooth friction layer, so that the friction coefficient gradually stabilizes. The friction coefficients of the samples under different conditions in the Figure show large fluctuations, which are mainly due to the periodic accumulation and elimination of wear debris from the wear surface [
18,
19]. The friction coefficient increases with the accumulation of wear debris on the wear surface. The coefficient of friction decreases when the wear debris separates from the wear surface or fills in the cracks. Among them, porosity in alloys 850 and 950 caused localized fractures. Therefore, the localized fracture caused by porosity is the reason for the large fluctuation of friction coefficient [
17,
18,
19,
20].
Figure 15 shows the average friction coefficient and wear rate of the sintered alloy at different sintering temperatures and holding times. It can be seen from
Figure 15 (a) that the average friction coefficient and wear rate of the alloy show a downward trend with the increase of sintering temperature. It can be seen from
Figure 15 (b) that with the increase of holding time, the average friction coefficient and wear rate of the alloy increase slightly and remain basically unchanged.
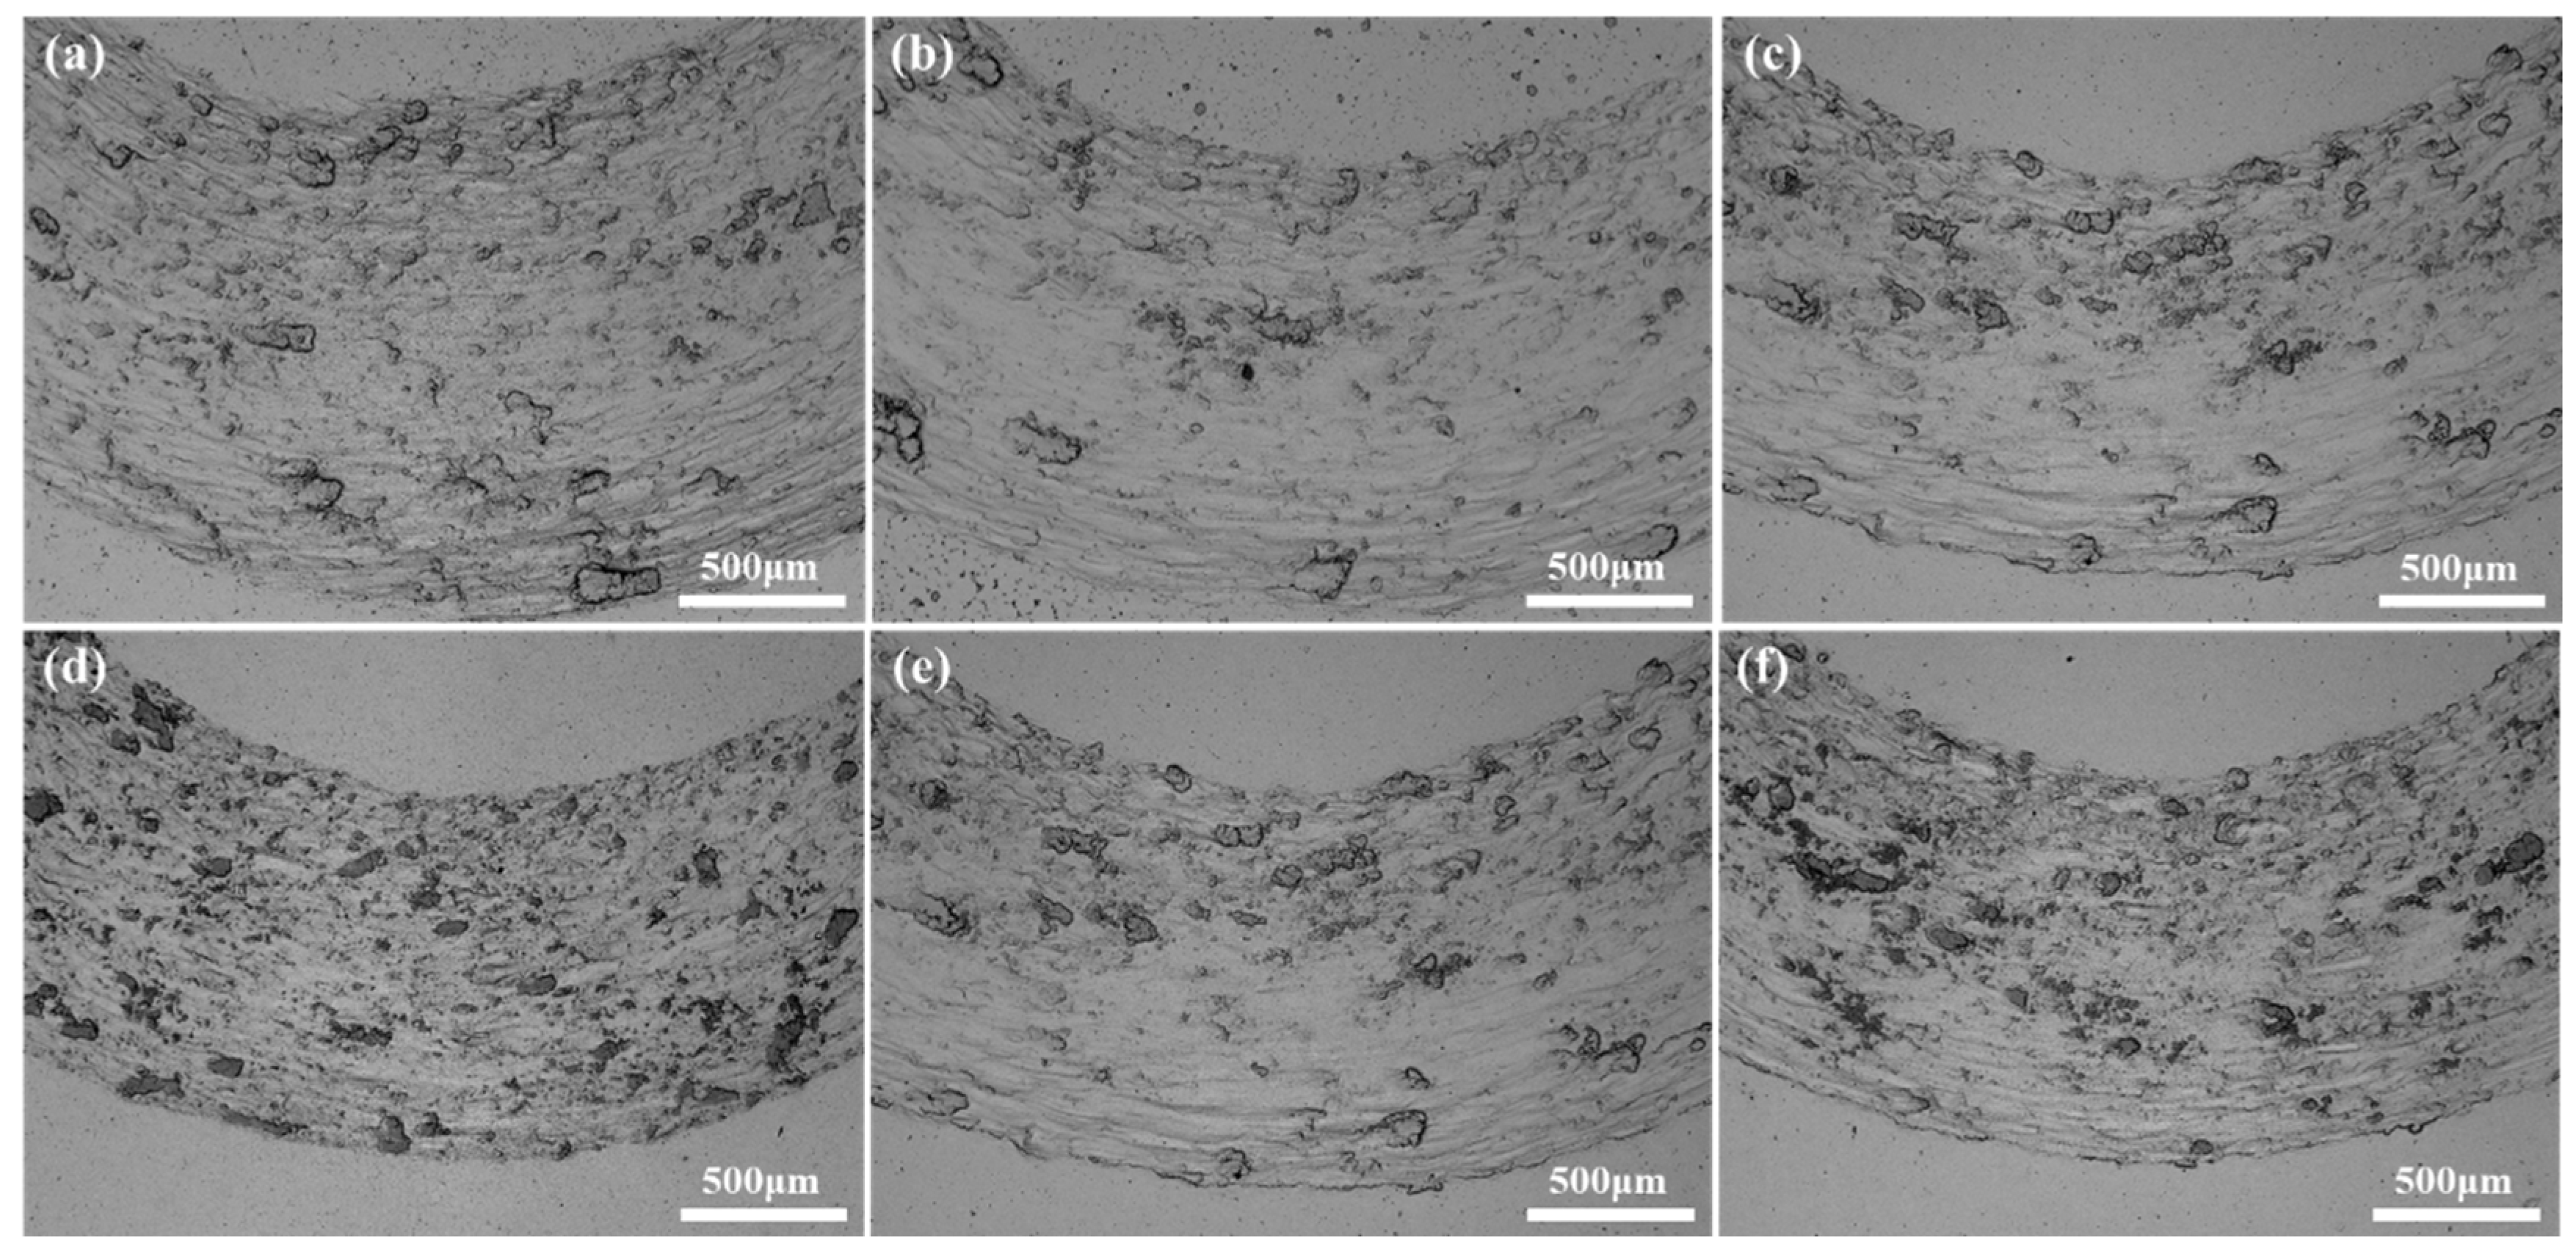
Figure 16 shows the wear surface of the alloy after room temperature frictional wear. It can be seen from the Figure that the samples sintered at different temperatures and holding times have similar wear morphology, including certain scratches and steps. Some plastic deformation exists in the direction parallel to the scratches, and when the plastic deformation of the alloy exceeds a certain level, the alloy cracks and breaks into wear chips. As wear proceeds, some of the chips undergo fragmentation, accumulation, and elimination. Finally they are compacted to form steps. Another portion of the debris peels off from the worn surface and becomes crumbs [
20]. Slight oxidation of the wear surface can be observed from the Figure, and obvious grooves can also be observed from the Figure, so the wear mechanism of this alloy is adhesive wear.
