

Submitted:
06 July 2023
Posted:
10 July 2023
Read the latest preprint version here
Abstract
In current electric vehicles, the traction battery is intended to store energy. When designing this battery different parameters must be taken into account in order to arrange the battery/module/cells in the mechanically and thermally safest configuration. Moreover, the battery layout must have a correct dynamic behavior in possible collisions. In the present study, different battery configurations plus added energy absorbers are analyzed. In order to do that, an internal combustion vehicle modeled with finite elements is applied as the reference model. The structural behavior of the different battery configurations in the event of a side collision is examined. Firstly, the safest arrangement is stablished, both with respect to cabin intrusion and thermal runaway propagation. Secondly, the safest arrangement that guarantees the safety of the occupants in the event of a side collision is analyzed but using the MADYMO. This software includes experimentally validated dummies which allow have an insight in the stresses experienced by occupants. On the one hand, the analysis states that the battery pack inclusion in the vehicle increases the stiffness of the car floor, resulting in fewer intrusions in the passenger compartment. Therefore, a greater safety for the occupants is reached. On the other hand, none of the configurations analyzed has shown enough safety against the phenomenon of Thermal Runaway.
Keywords:
Thermal Runaway
; side collision
; electric vehicle battery
1. Introduction
A vehicle must comply with a series of regulations and homologation norms. In addition to these regulations, there are several private programs that also assess vehicle safety. These are the NCAP programs (Euro NCAP, US NCAP, J NCAP,…) which are not mandatory. In most current electric vehicles (EVs), the battery pack is placed in the primary safe zone [1]. However, in this study, the battery pack has been placed in the secondary safe zone to make it interact with the crumple zone of the vehicle. In addition, the battery pack will need appropriate protection mechanisms in case of a side collision. EVs provide propulsion by transforming the energy stored in the traction battery into electrical energy. EVs are very efficient at converting electrical energy into mechanical energy. However, they face major challenges associated with range, weight, and safety. In particular, the safety of the battery in a side collision is a concern for EVs. Based on data from real world accidents and laboratory crash tests, two safe zones are defined:
Figure 1.
Safe zones in a vehicle based on intrusion data from vehicles experiencing real-world accidents and laboratory crash tests [1].
Figure 1.
Safe zones in a vehicle based on intrusion data from vehicles experiencing real-world accidents and laboratory crash tests [1].
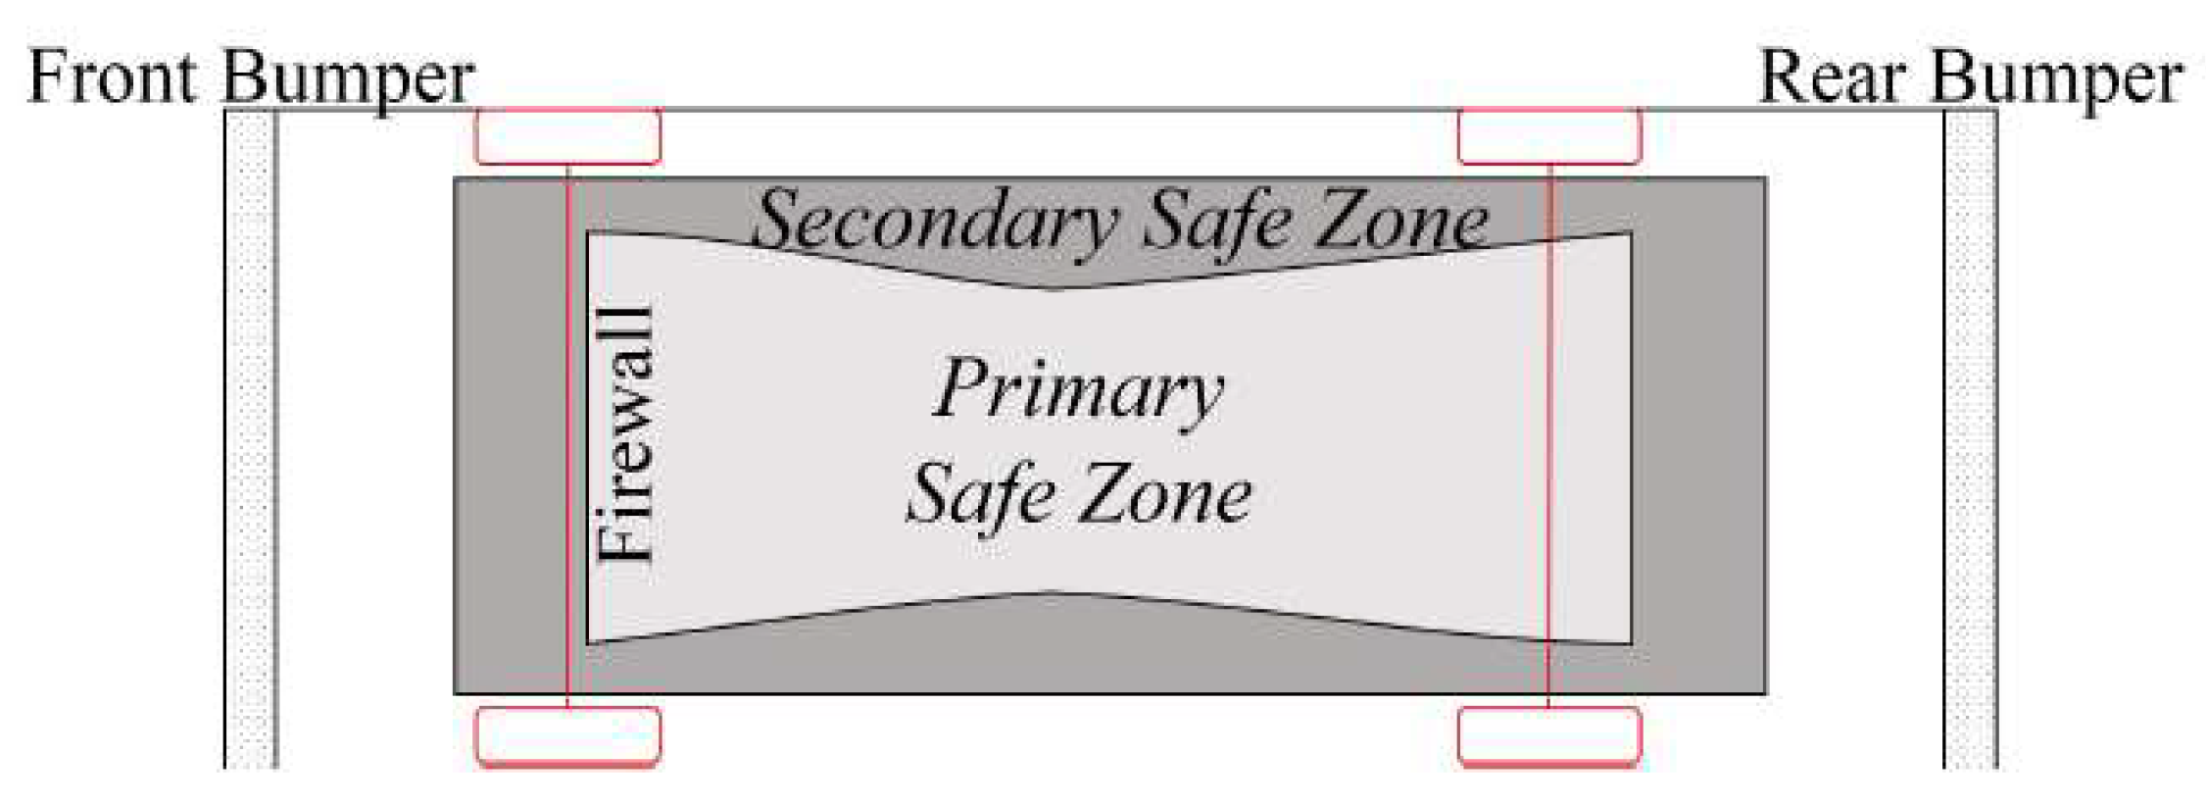
In the event of an impact, there are vehicle components that absorb large amounts of deformation energy that is transformed from the kinetic energy when a collision takes place. It should be underlined that in the case of a side collision in an Electric Vehicle (EV), the space available to absorb the energy is reduced to the area between the body and the battery pack.
The failure mechanisms of a lithium-ion battery can occur due to mechanical failure, electrical failure, and thermal failure, at the cell, module, or battery pack level. The problem is that this failure happens as a series of successive failures, and it provokes Thermal Runaway phenomenon. Mechanical failure may be due to collision, deformation or puncture which may cause an internal short circuit and high internal heat. With the temperature rise, many exothermic reactions occur. Finally, if the heat is not controlled, feedback occurs, and the dreaded Thermal Runaway occurs. In the case of battery deformation, the battery separator deforms, which may cause an internal short circuit, or the electrolyte liquid may leak and cause a fire. During a collision a battery puncture may occur, which is usually more serious than a deformation, resulting in many cases in Thermal Runaway too. Electric failure can be caused by an external short circuit, overload, or over-discharge, which are mainly due to poor control of the BMS (Battery Management System). An external short-circuit can occur when the electrodes are connected by a conductor during a collision or by water entering the battery. Overcharge and over-discharge do not always cause Thermal Runaway but commonly lead to degradation of the storage capacity of the cell and thus of the battery. In the case of over-discharge, the BMS fails to stop the charging process at the maximum voltage limit, and consequently heat and gas generation occur. On the other hand, in the case of over-discharge, the BMS fails to correctly limit cell usage at minimum voltage levels, resulting in a greater heat generation, gas generation and cell swelling. Finally, thermal failure can be due to overheating, which can be caused by incorrect contact connections, or excessive heat in the vicinity of the battery pack, such as from a fire caused by car accident. On the other hand, overheating can occur during fast charging with a “supercharger”. This failure can also be caused by an internal short circuit, which occurs because of cell separator failures, due to contamination, manufacturing defects, or dendrite formation (lithium build-up) at the anode. This failure may also be due to defects during cell manufacture that cause an internal short circuit.
Figure 2.
Thermal Runaway Mechanism of a lithium-ion battery for EVs [2].
Figure 2.
Thermal Runaway Mechanism of a lithium-ion battery for EVs [2].
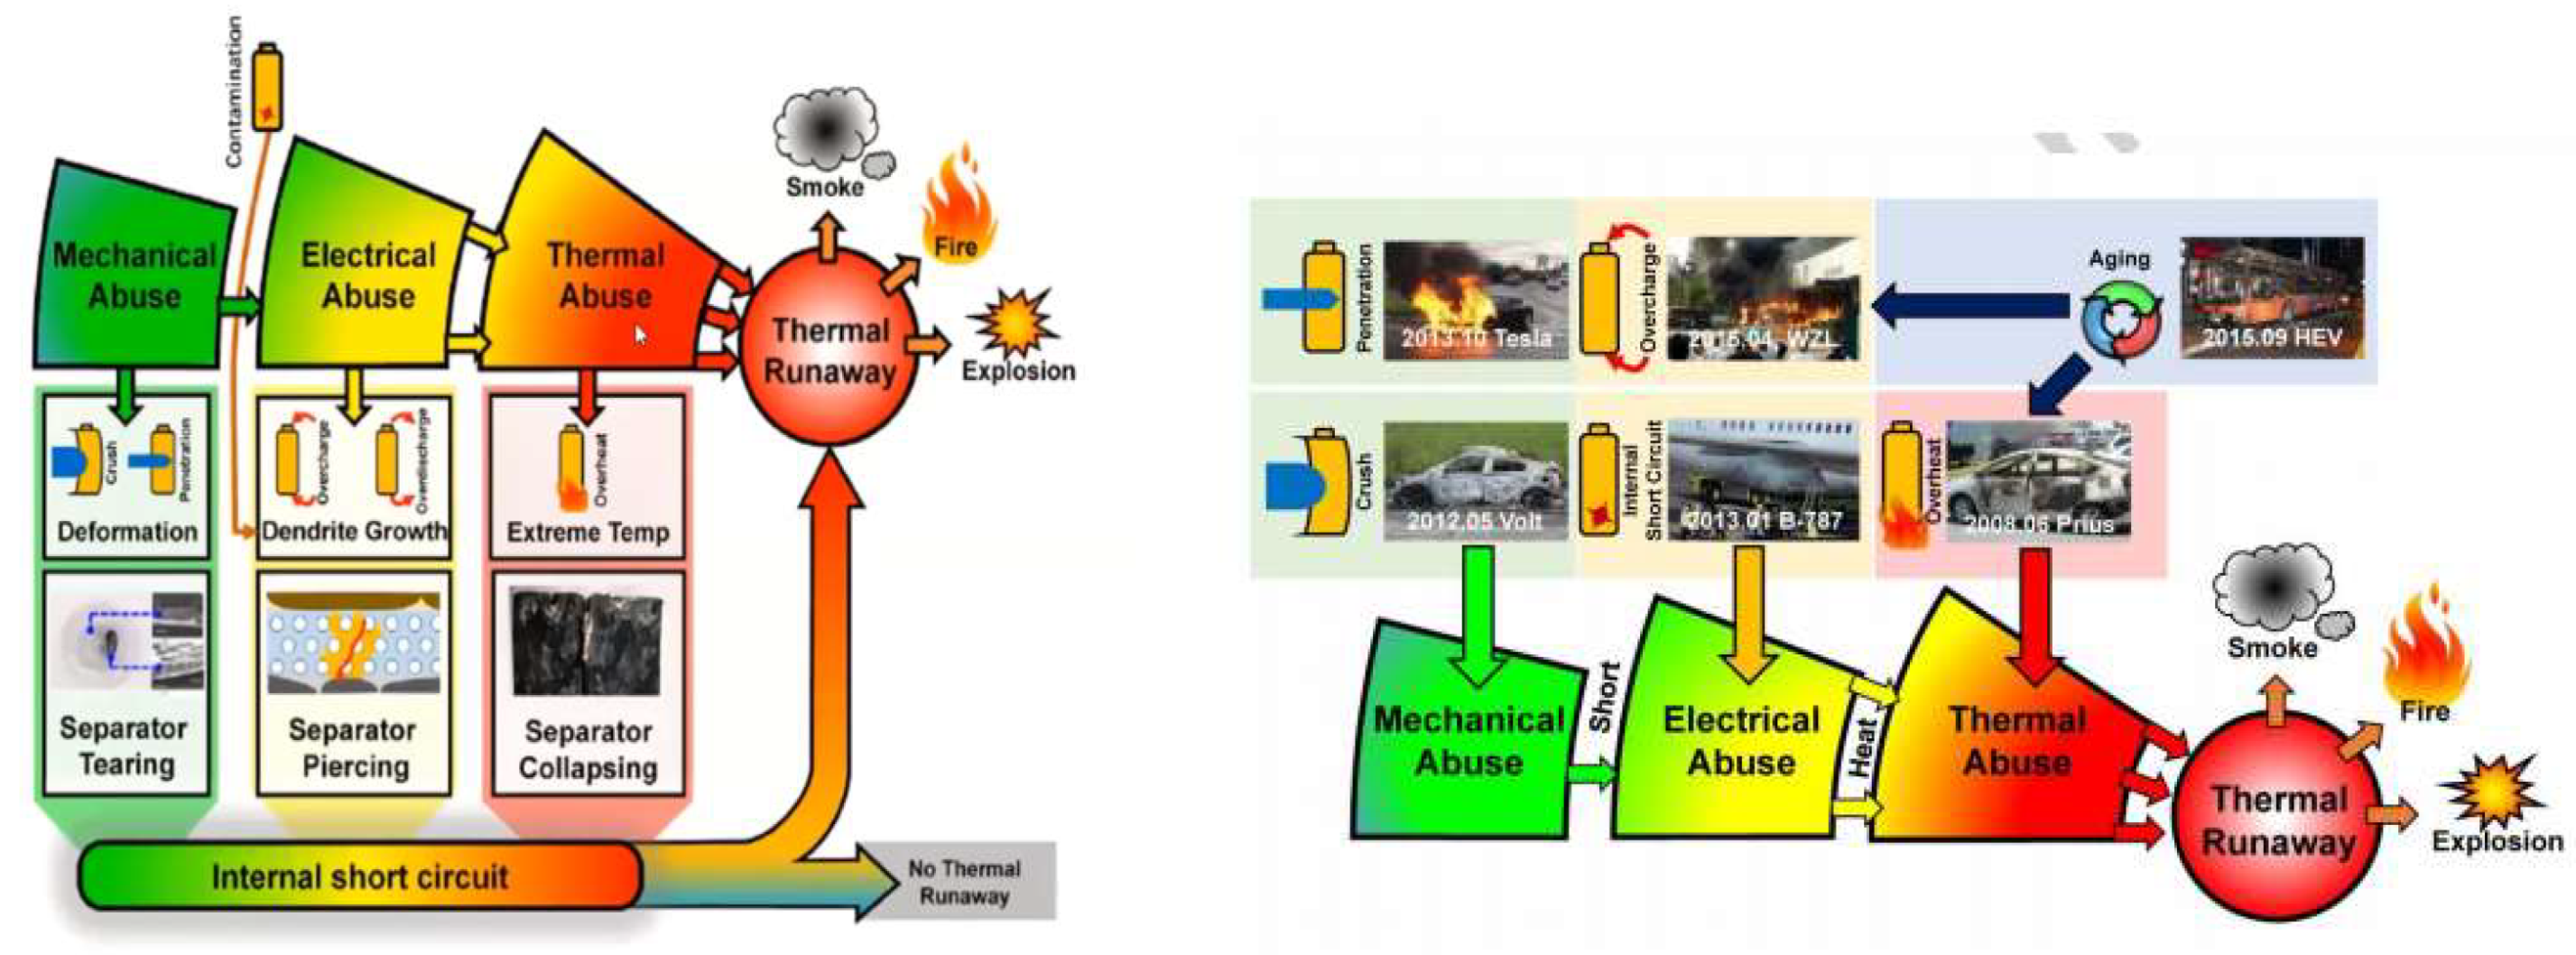
This inherent feature of high-voltage batteries requires the need to reinforce the traction battery casing and to include elements capable of absorbing the energy produced during the collision, to prevent the battery cells from being damaged.
According to published data [3], in the year 2022, 11,5% of interurban road casualties in Spain were died in a side or frontal-side collision. Compared to a frontal collision, there is much less space inside the vehicle to absorb energy. Therefore, serious head and chest injuries are common in side impacts, being more severe that in the frontal collision. The reason why is because the body of the driver is closer to the impacting car and/or the internal structures of the door are deformed, resulting in its intrusion, and directly striking the hemithorax close to the impact side. The side impact test with a movable deformable barrier simulates the collision of a vehicle striking the side of a second vehicle. For this purpose, a trolley with a deformable barrier with the physical characteristics of a real vehicle is launched against a vehicle, imitating its behavior and stiffness, at a given speed and angle. These tests are defined in official regulations. Depending on the type of test and the standard in which it is described, the characteristics of the collision vary (speed of the crash element, angle of impact). The US standard is FMVSS 214 (Federal Motor Vehicle Safety Standard), defining an impact speed of the crash barrier of 53,9 km/h, a barrier weight equals to 1.361 ± 4,5 kg and the angle of impact 27°[4].
Figure 3.
Diagram of the side collision test with movable barrier according to ECE Regulation R95 [5].
Figure 3.
Diagram of the side collision test with movable barrier according to ECE Regulation R95 [5].
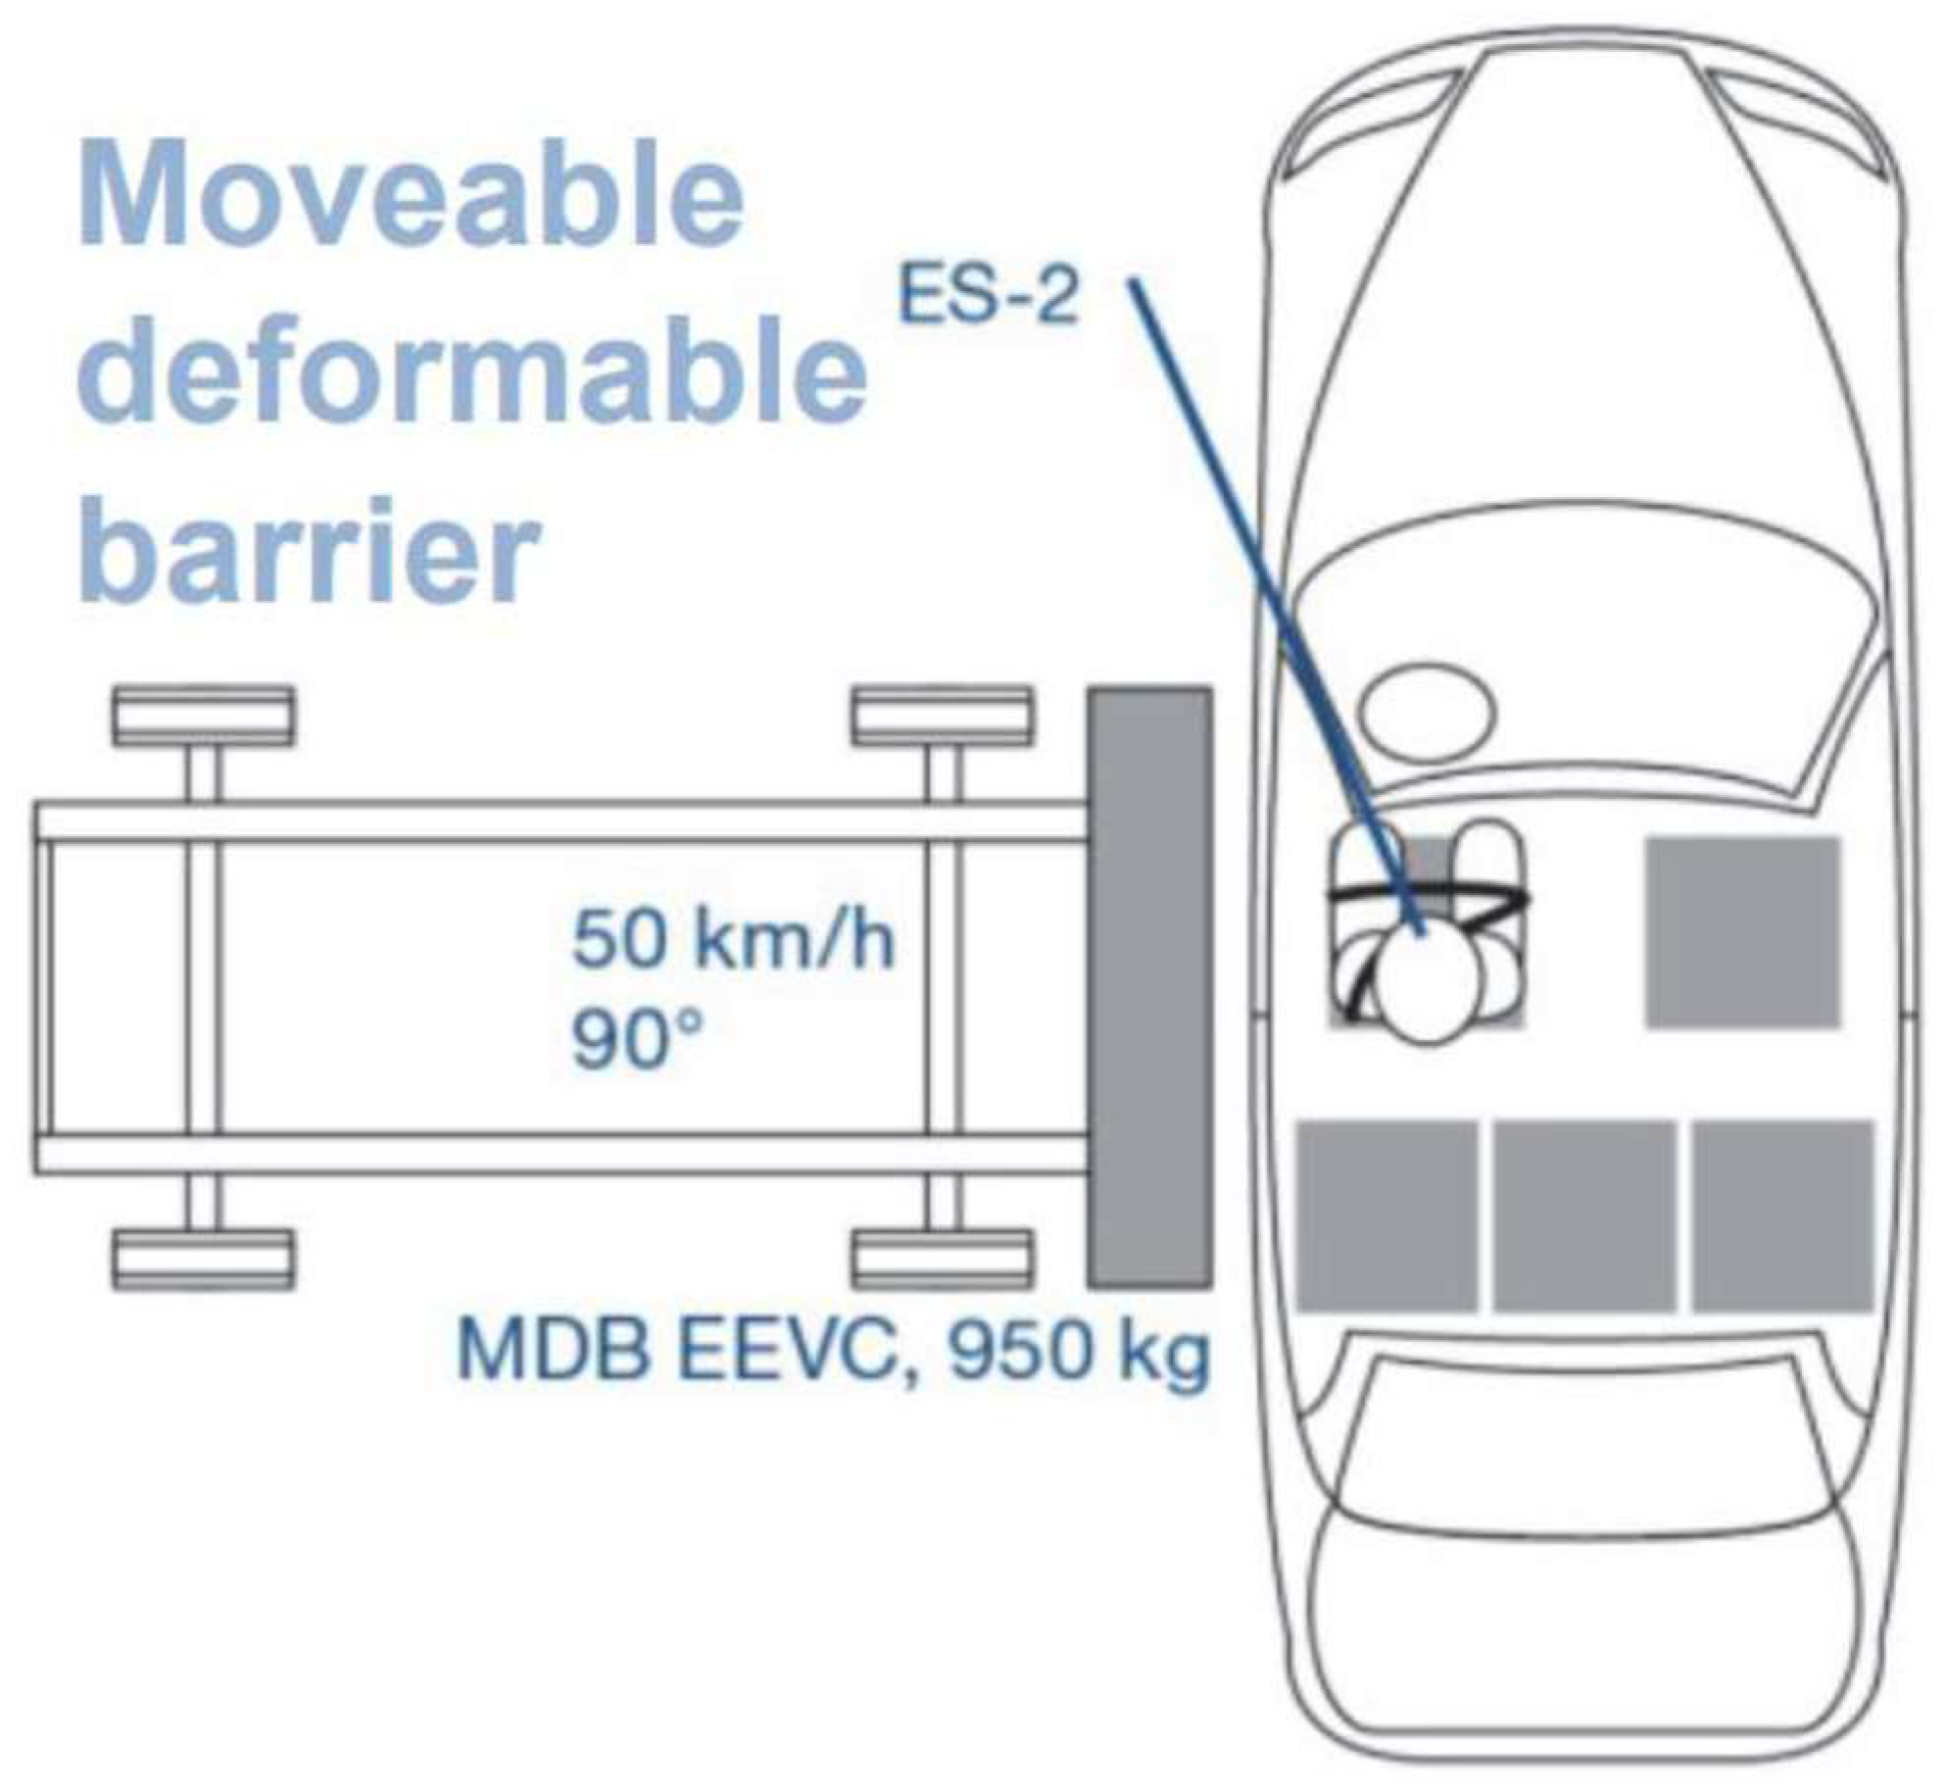
The standards applied in this paper are those set out in the United Nations Regulation No. 95, Uniform provisions concerning the approval of vehicles regarding the protection of the occupants in the event of a side collision [5], describing the side impact test procedure. Side impacts cause many fatalities and serious injuries, accounting for around a quarter of all crashes. Euro NCAP has been testing on the side of driver since its inception. However, almost half of the occupants injured in side impacts are on the side opposite the struck side. In a side impact, both occupants on the struck (near) side and occupants on the opposite (far) side of the vehicle are at risk of injury. Specifically, impacts on the opposite side account for 9.5% of all car accidents and 8.3% of all MAIS+3 injuries experienced by occupants [6]. Numerous studies indicate that the head and thorax are the most injured body regions. Given that the main cause of head injuries occurs on the vehicle struck side [7], establishing measures to reduce vehicle intrusion and head excursion plays a crucial role to reduce injuries. Currently, some automobile manufacturers are addressing these "opposite side" impacts and are introducing countermeasures to mitigate the injuries that could take place, such as a central airbag. This study analyzes injuries to the co-driver, receiving the impact on the right side depending on the direction of travel of the vehicle. There are different dummies able to analyze the protection of vehicles in a lateral collision. However, different studies conclude that the male WorldSID dummy is more biofidelic than the ES-2re dummy and its level of biofidelity is acceptable for these regulations. This study carries out a parametric evaluation of the effect of a side impact on the kinematics of a dummy, which is analyzed on a EuroSID 2, for each of the five Vehicle configurations studied. Test conditions considered are those established in the ECE R95 regulation, in which the ES-2 dummy (EuroSID 2) is used.
2. Materials and Methods
2.1. Research Methodology
This study evaluates the safety of different electric vehicle configurations, by means of correlating the simulation results with the thresholds set out in ECE Regulation R95. The reference car model is the combustion engine car Geo Metro 3-Door Gen II, modeled with finite elements, including a mobile barrier. Side impact to simulate has been defined according to Directive 97/26/EC.
Figure 4.
(a) Geo Metro 3-Door Gen II model; (b) Geo Metro 3 model modeled with finite elements. Model to use as a reference.
Figure 4.
(a) Geo Metro 3-Door Gen II model; (b) Geo Metro 3 model modeled with finite elements. Model to use as a reference.
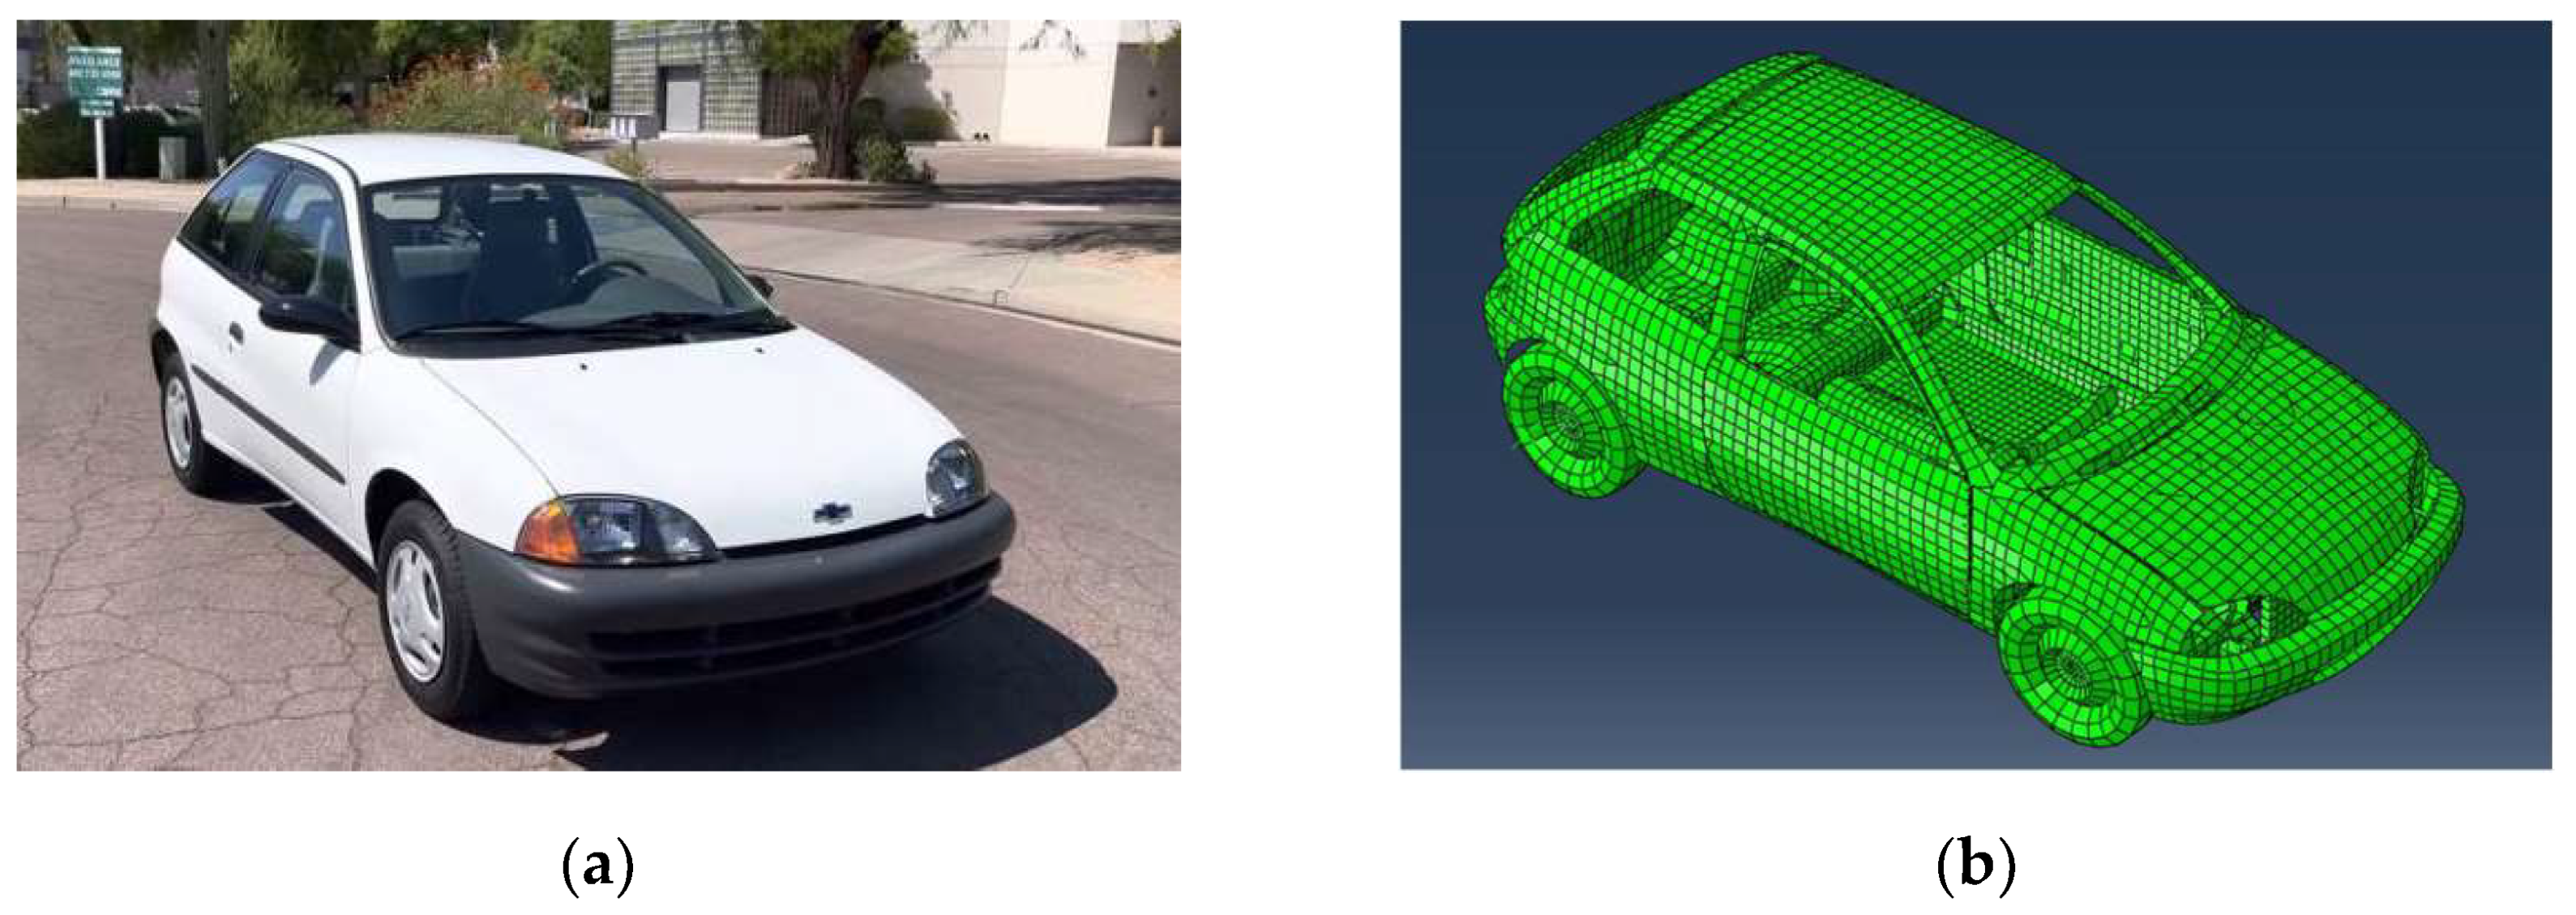
This model has been converted to an electric vehicle by introducing two different traction battery configurations and subsequently some absorbers have been applied to them. A real battery of a first-generation Nissan Leaf has been taken as a reference (48 modules 24 kWh), 48 modules with 4 cells each. Materials applied in this real battery were characterized by means of measurements made on some samples taken from it.
Figure 5.
(a) Vehicle floor and area under rear bench of the reference vehicle; (b) Adapted electric vehicle floor and area under rear bench, to be able to place the traction battery.
Figure 5.
(a) Vehicle floor and area under rear bench of the reference vehicle; (b) Adapted electric vehicle floor and area under rear bench, to be able to place the traction battery.
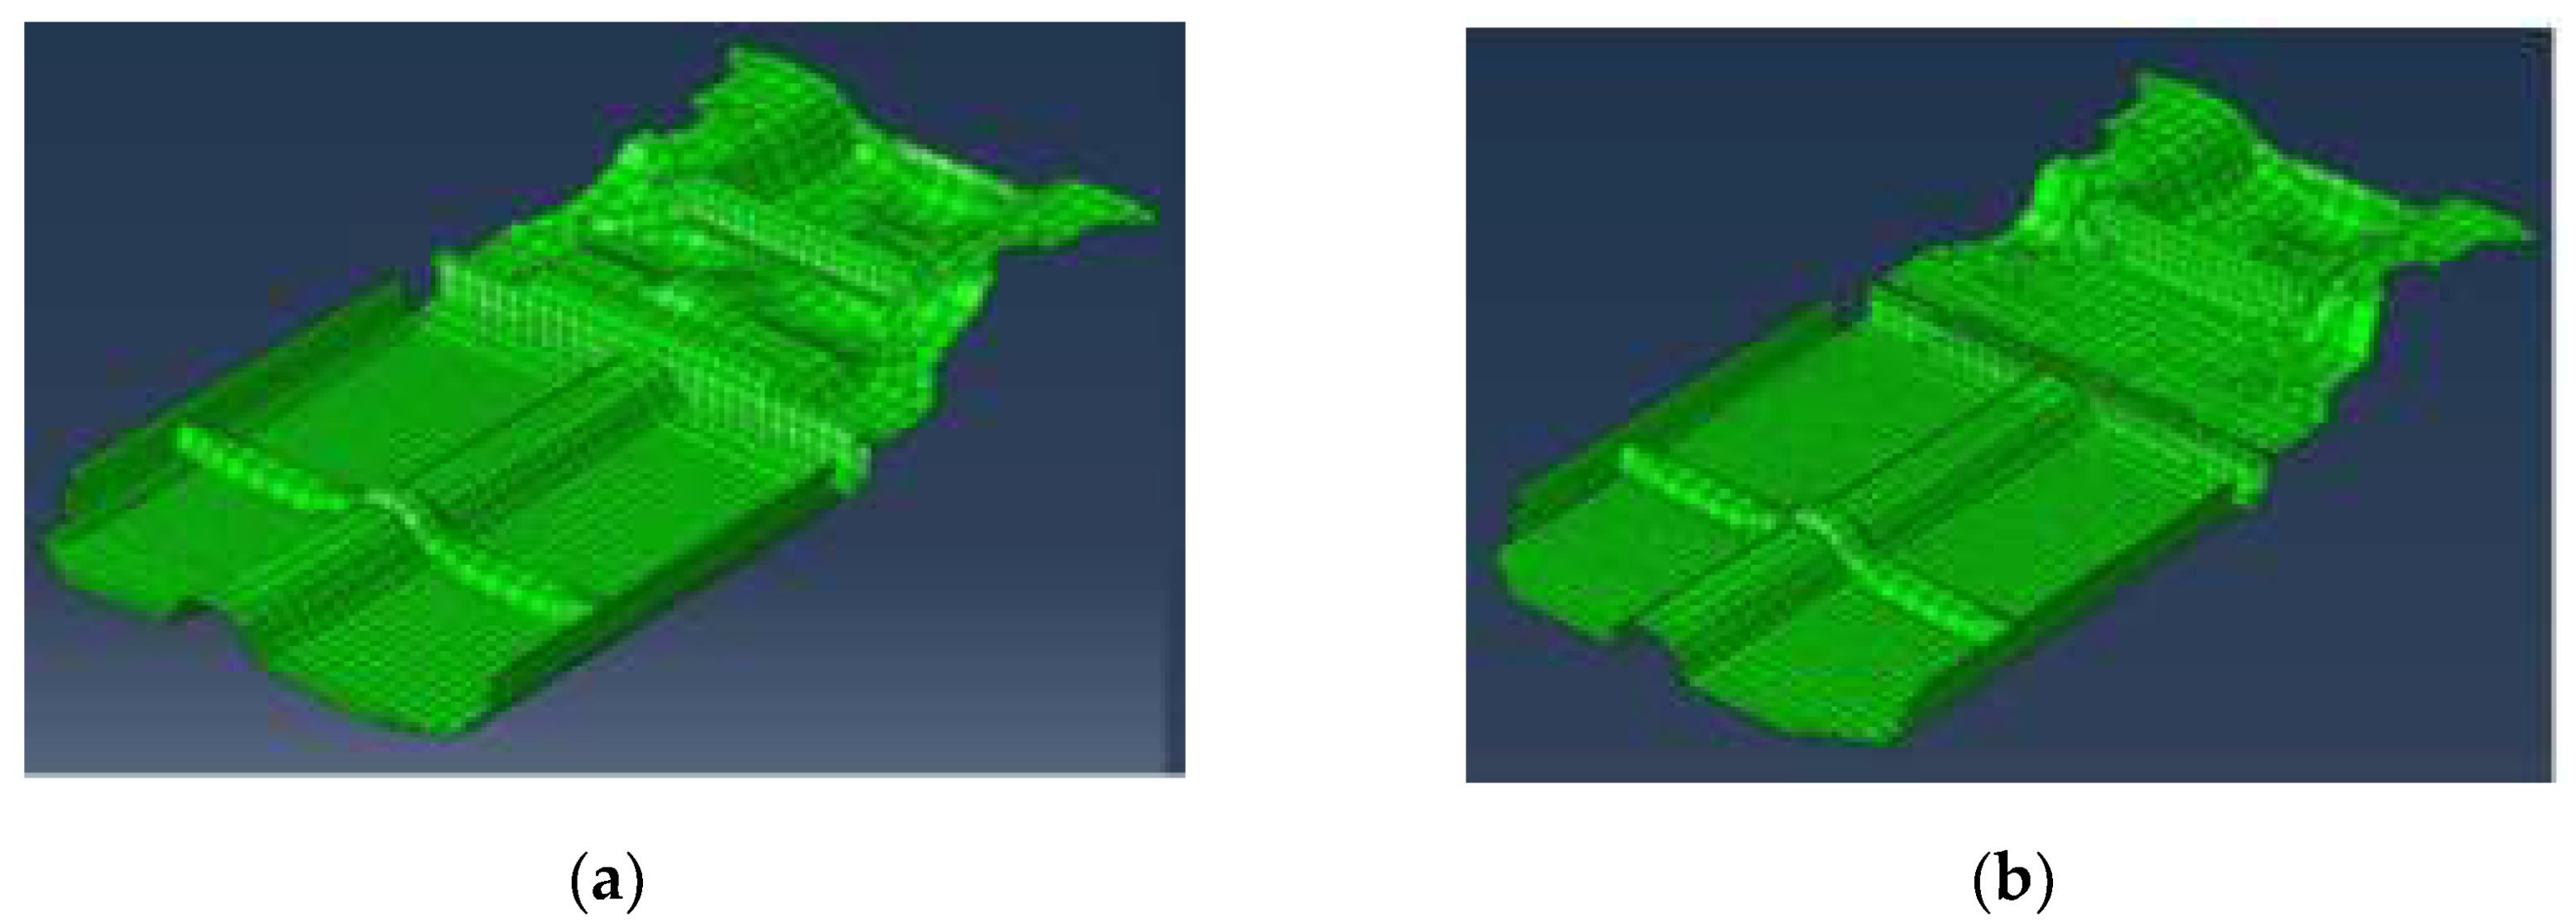
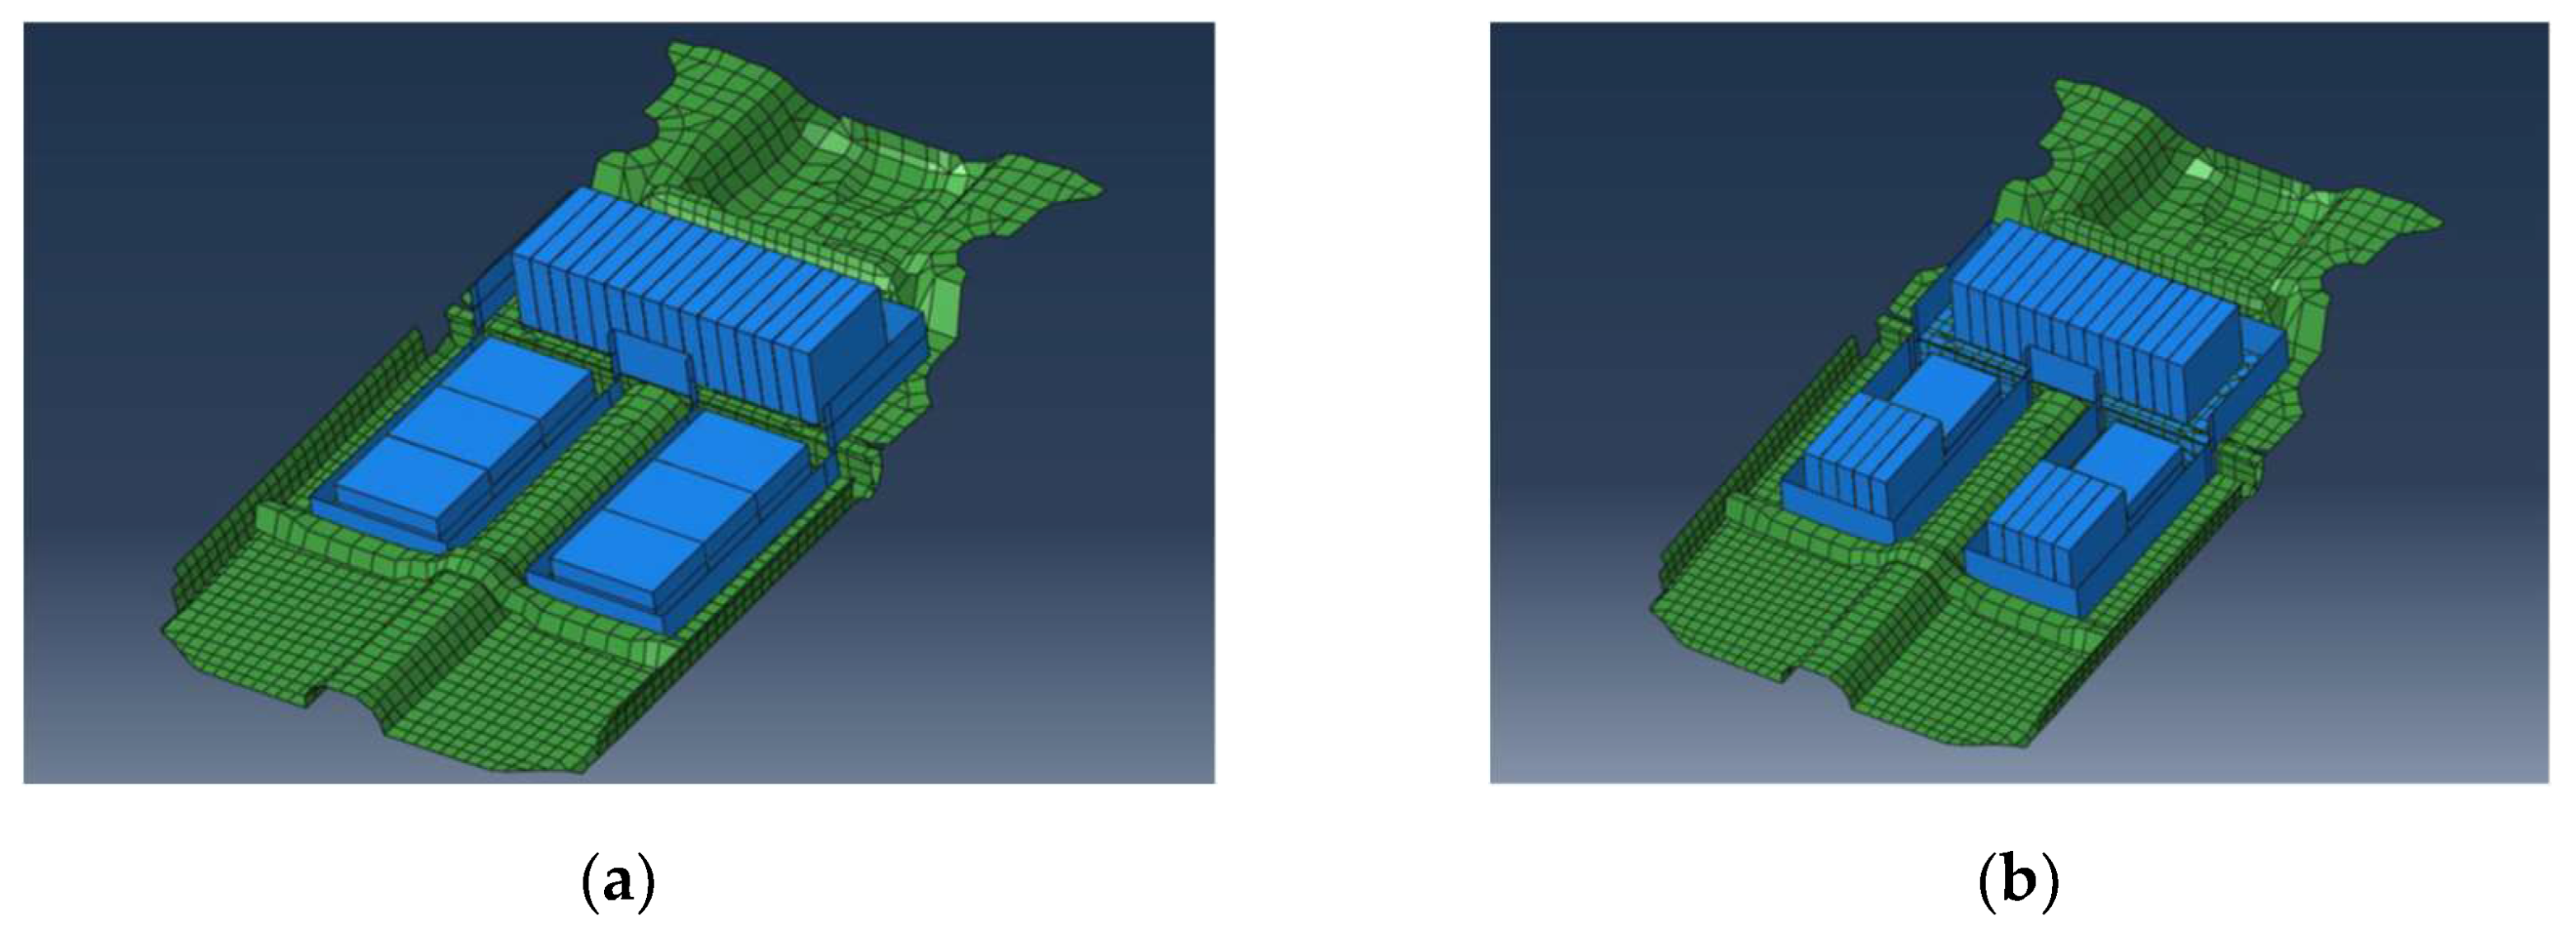
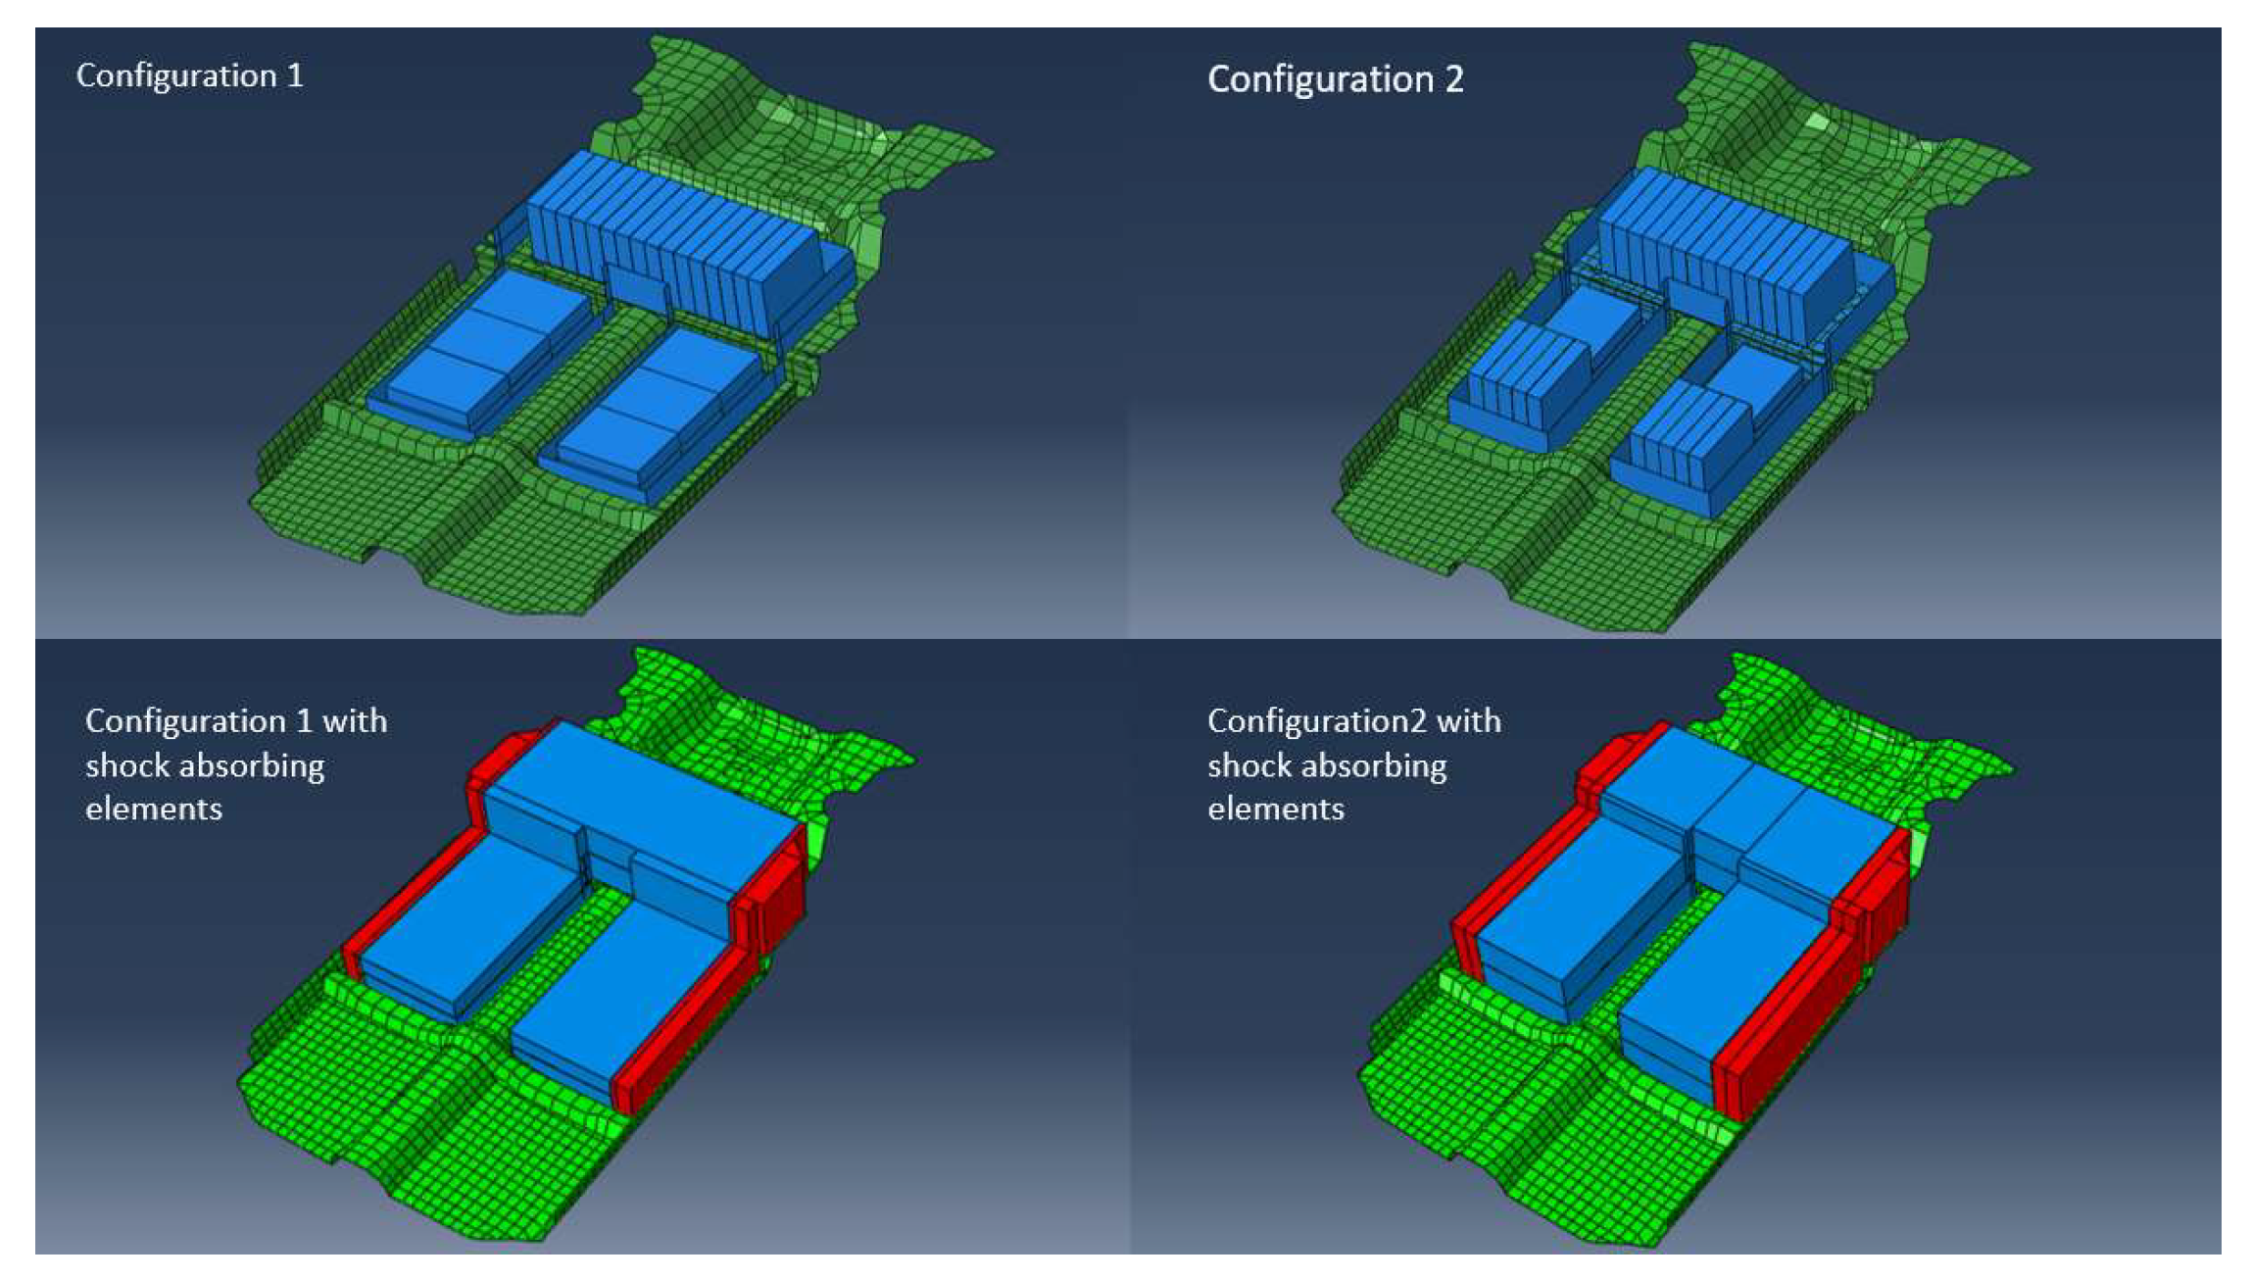
A battery of 28 modules with 4 pouch cells each will be placed. There are safer cells with higher energy density, such as prismatic and cylindrical cells [8]. However, pouch cells have been selected because they are commonly used in most electric vehicles. On the other hand, the least favorable scenario is studied. In total, four different configurations of Electric Vehicle have been analyzed; each of them is explained bellow.
2.1.1. Electric Vehicle Configuration 1
High voltage battery was designed based on obtaining a maximum use of available space on the floor and under the rear bench, and the minimal increase in floor height under occupant feet. The separation between the modules and the housing wall is 50 mm, recommended dimension to avoid damage to cells in case of impact [9]. The high-voltage battery housing has been modeled in two parts, namely, bottom housing and top housing, reproducing the real battery scheme. The modules have been characterized according to the technical data of the Nissan Leaf battery [10]. The dimensions are 303x223x55 mm in total. Inner volume of modules was modelled with these measures as a solid. Meanwhile, battery housing was represented as a 0,5 mm thickness and the same overall dimensions. Moreover, a space of 245x135x30 mm was reserved on one side of the modules, to represent the space occupied by the BMS (Battery Management System). However, BMS was not implemented in the finite element model. This gap is considered to not interfere with the results obtained from simulation because it is on the opposite side to where the side impact takes place.
2.1.2. Electric Vehicle Configuration 2
In this second configuration, the results of a study on the propagation of Thermal Runaway have been considered [11]. Authors of this study stated that the possibility of propagation of Thermal Runaway is higher in the case of vertical modules than in horizontal arrangement. In addition, the importance of spaces between packages and their cooling to ensure safe operation is highlighted, reducing the likelihood of a loss of heat transfer control in the battery assembly. In this configuration, protection against Thermal Runaway is improved since the modules on the floor of the vehicle have been reorganized, and the overall width of the assembly is reduced, leaving more space for possible lateral shock absorbers. In this configuration there are 90 mm of space at both battery set sides, which is a greater distance than the 50 mm in configuration 1.
The way to model the battery housing is the same as in configuration 1, adapting its dimensions to the new battery layout. On the other hand, modules, their respective housings and the BMS have the same dimensions as for configuration 1.
Figure 6.
(a) High voltage battery layout in VE configuration 1; (b) High voltage battery layout in VE configuration 2.
Figure 6.
(a) High voltage battery layout in VE configuration 1; (b) High voltage battery layout in VE configuration 2.
2.1.3. Electric Vehicle Configuration 3
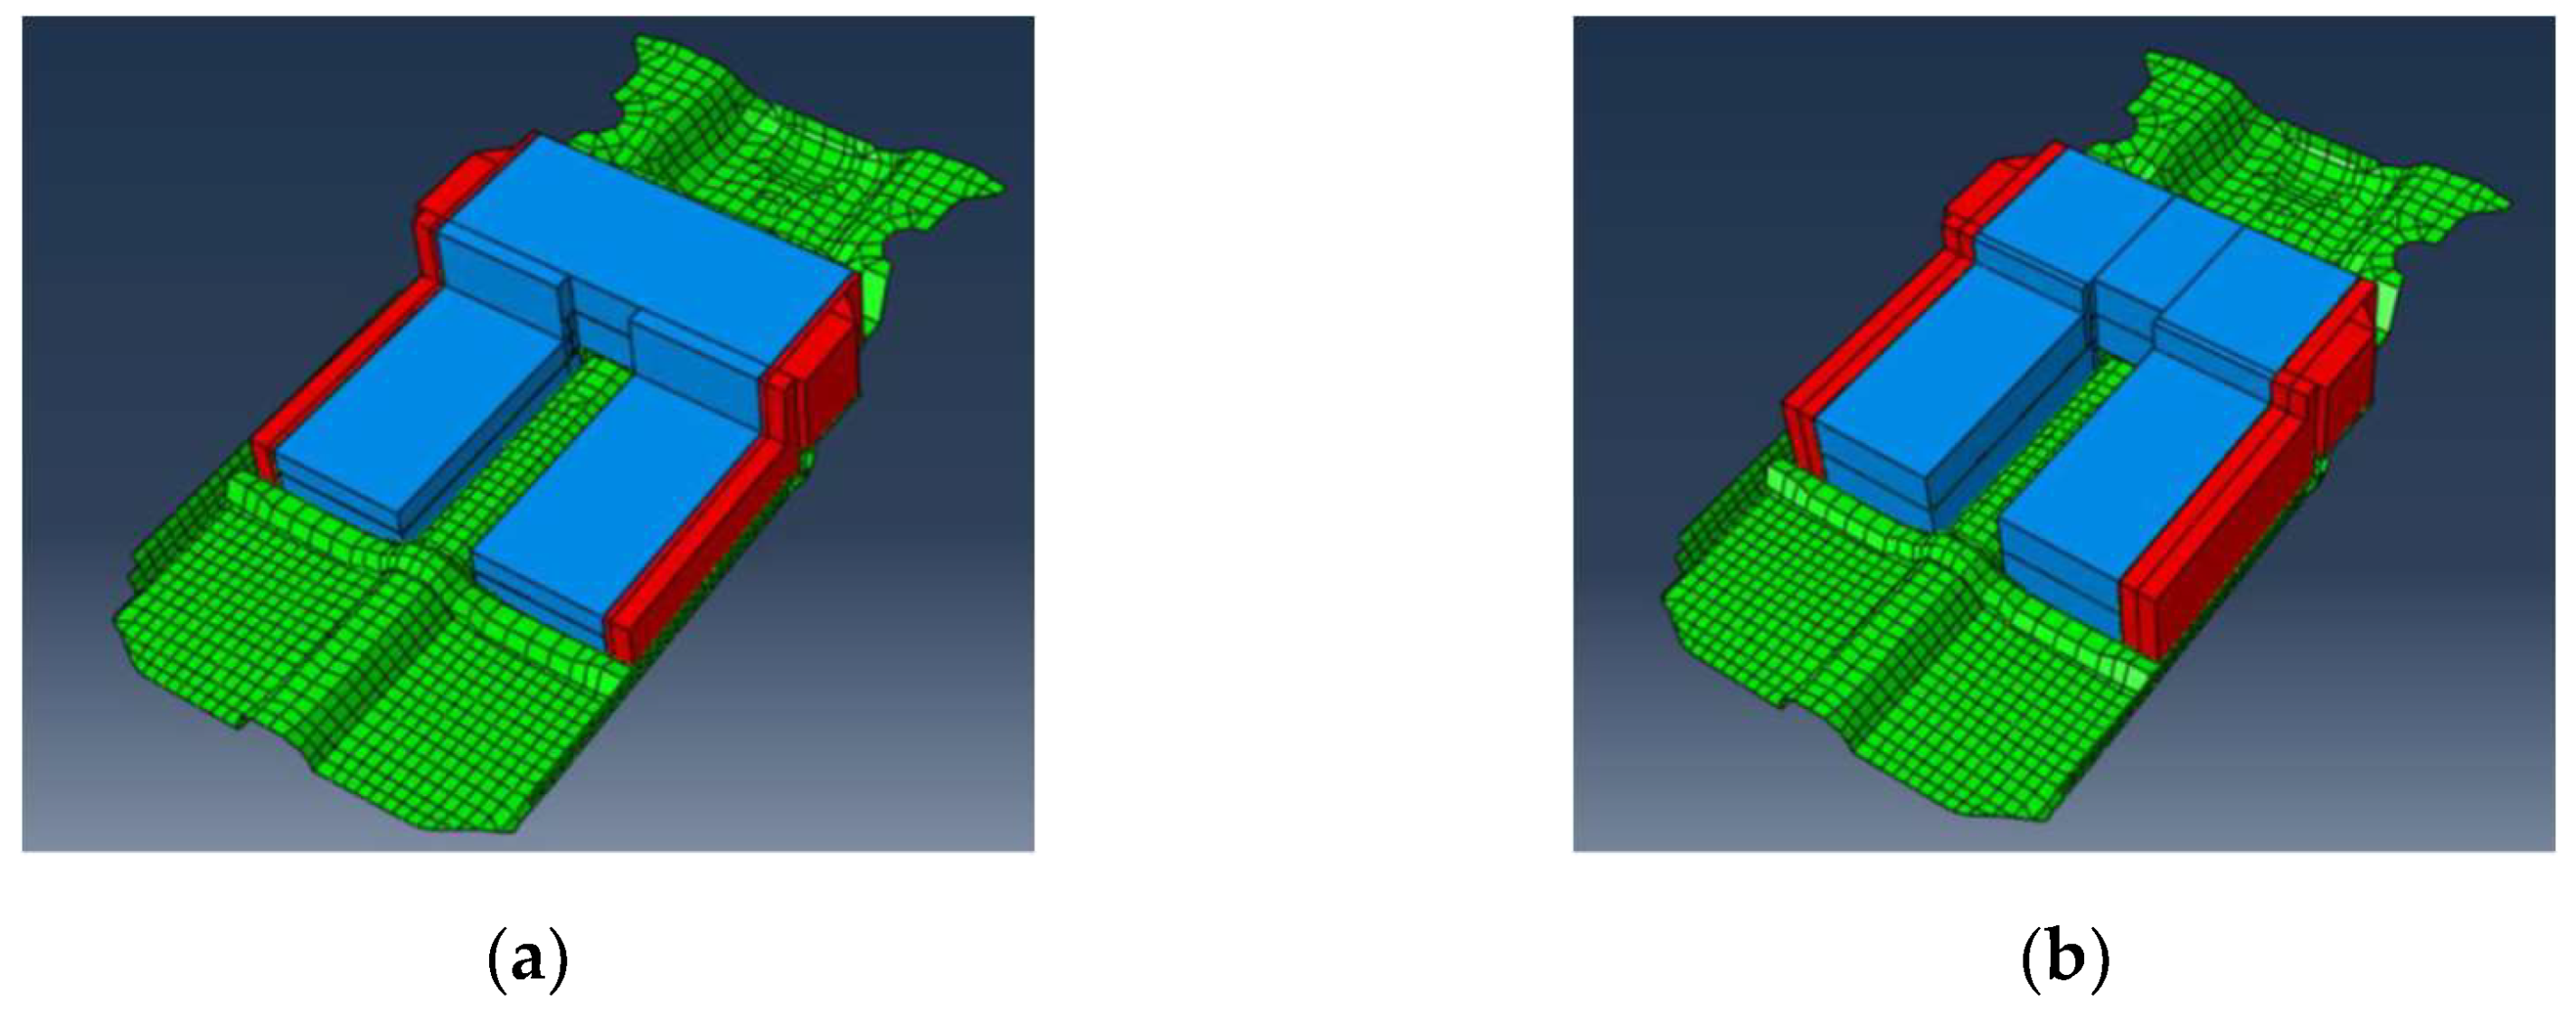
Both configurations 3 and 4 aim to improve the protection of the battery in case of a collision by implementing shock absorbing elements at both sides of the housing, adapting their dimensions to the battery housing shape and the available space.
Based on the results of the study [12], in which three alternatives for different shock absorbers are compared, the material chosen for these new components is aluminum foam (Table 1).
Configuration 3 corresponds to configuration 1 with the addition of absorbers. In configuration 1 there was less space available on the sides of the battery, as the distribution is lower on the vehicle floor and therefore wider. In this case the maximum absorber width is 10.9 cm.
Figure 7.
(a) Configuration 3: Configuration 1 with shock absorbers; (b) Configuration 4: Configuration 2 with shock absorbers.
Figure 7.
(a) Configuration 3: Configuration 1 with shock absorbers; (b) Configuration 4: Configuration 2 with shock absorbers.
2.1.4. Electric Vehicle Configuration 4
Configuration 4 corresponds to configuration 2 to which shock absorbers have been added. In configuration 2 the battery distribution is higher above the vehicle floor and allows for a narrower housing. Therefore, the shock absorbers have a maximum width of 14 cm (3.1 cm wider than in configuration 3).
Figure 8.
Comparison of the four Electric Vehicle configurations to be analyzed.
2.2. Characterisation of Materials Used in the Battery
For the finite element modelling of a traction battery to carry out simulations with various computer programs, it is necessary to characterize the materials used in the battery. To this end, Vickers micro-hardness tests have been carried out on a sample of both the upper and lower cover of the original battery casing and the module casings, to determine their mechanical properties for their introduction into the simulation program. On the other hand, to characterize the material inside the modules, the composition of the four cells of the bag that make up the modules.
The Vickers test is based on an optical measuring system. A diamond indenter shaped like a square pyramid is used to perform the microhardness test. This is used to penetrate the material to be studied, with a known load and for a period that is usually between 10 and 15 seconds. Subsequently, the length of the diagonal of the indentation left by the diamond indenter is measured with a microscope to calculate the area of the inclined surface of the indentation. With this data, it is possible to calculate the Vickers hardness as the quotient between the load applied during the test and the indentation area.
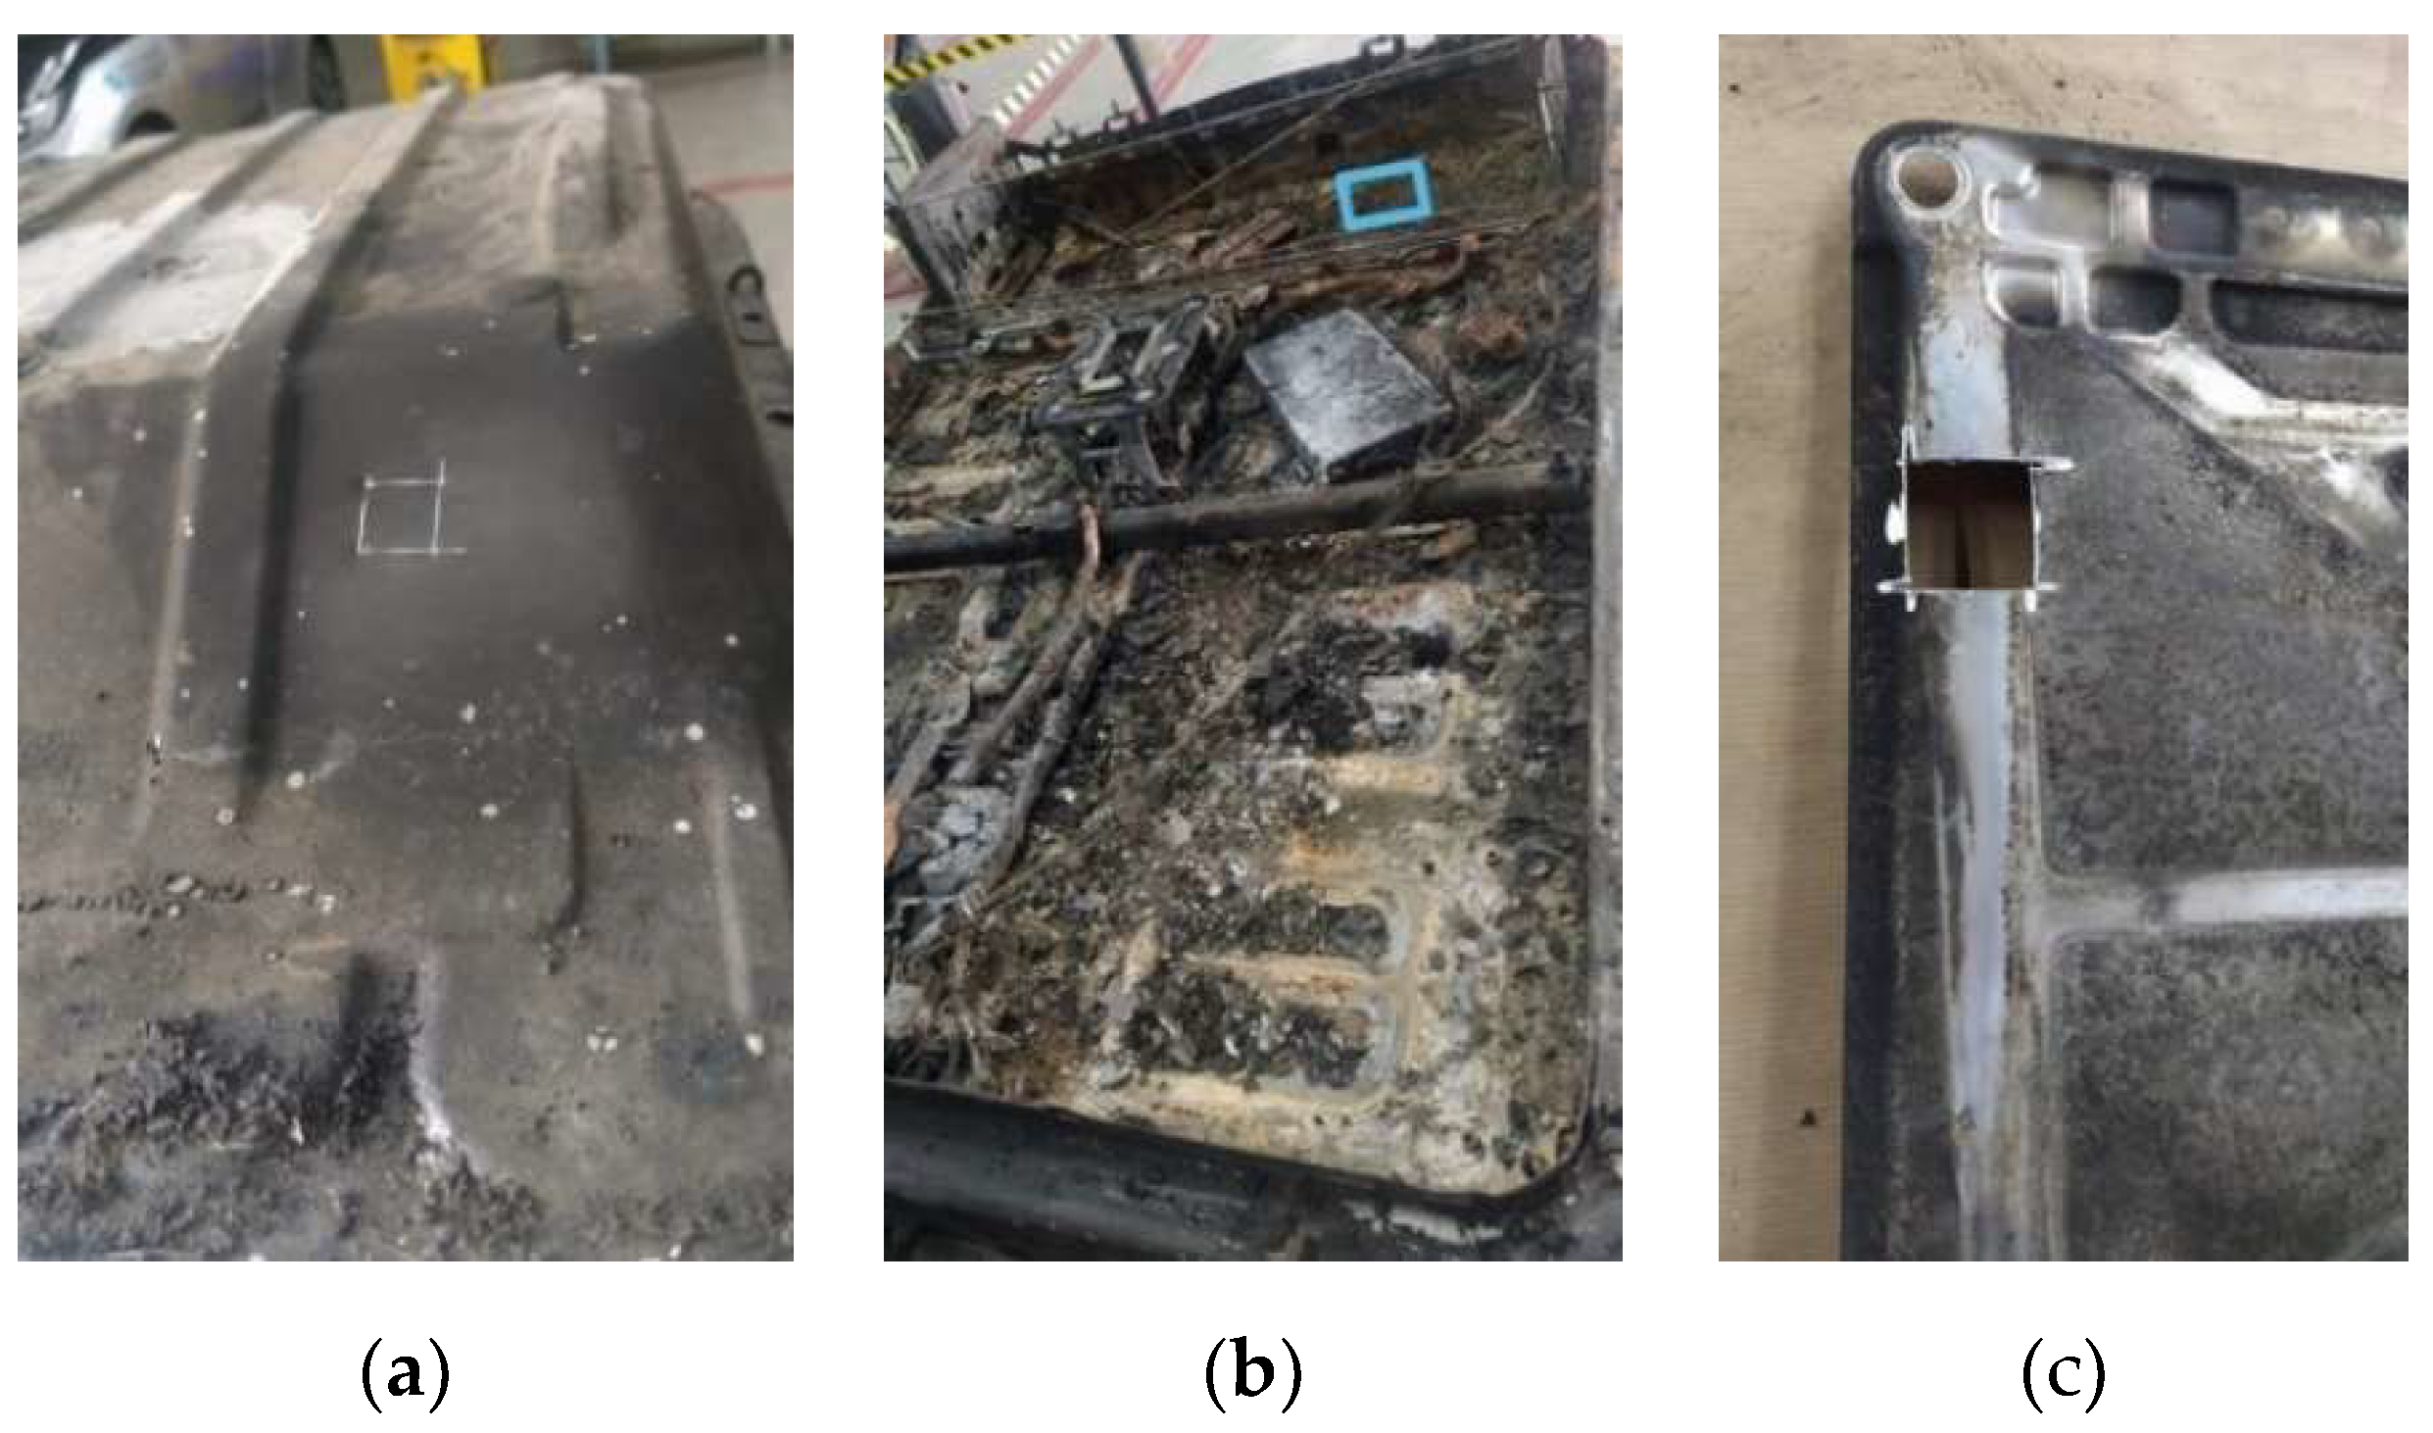
To carry out these tests, the Materials Department of the University of Zaragoza has been asked to collaborate. Firstly, specimens of the necessary dimensions to carry out the tests have been obtained.
Figure 9.
Explanation of the Vickers microhardness test.
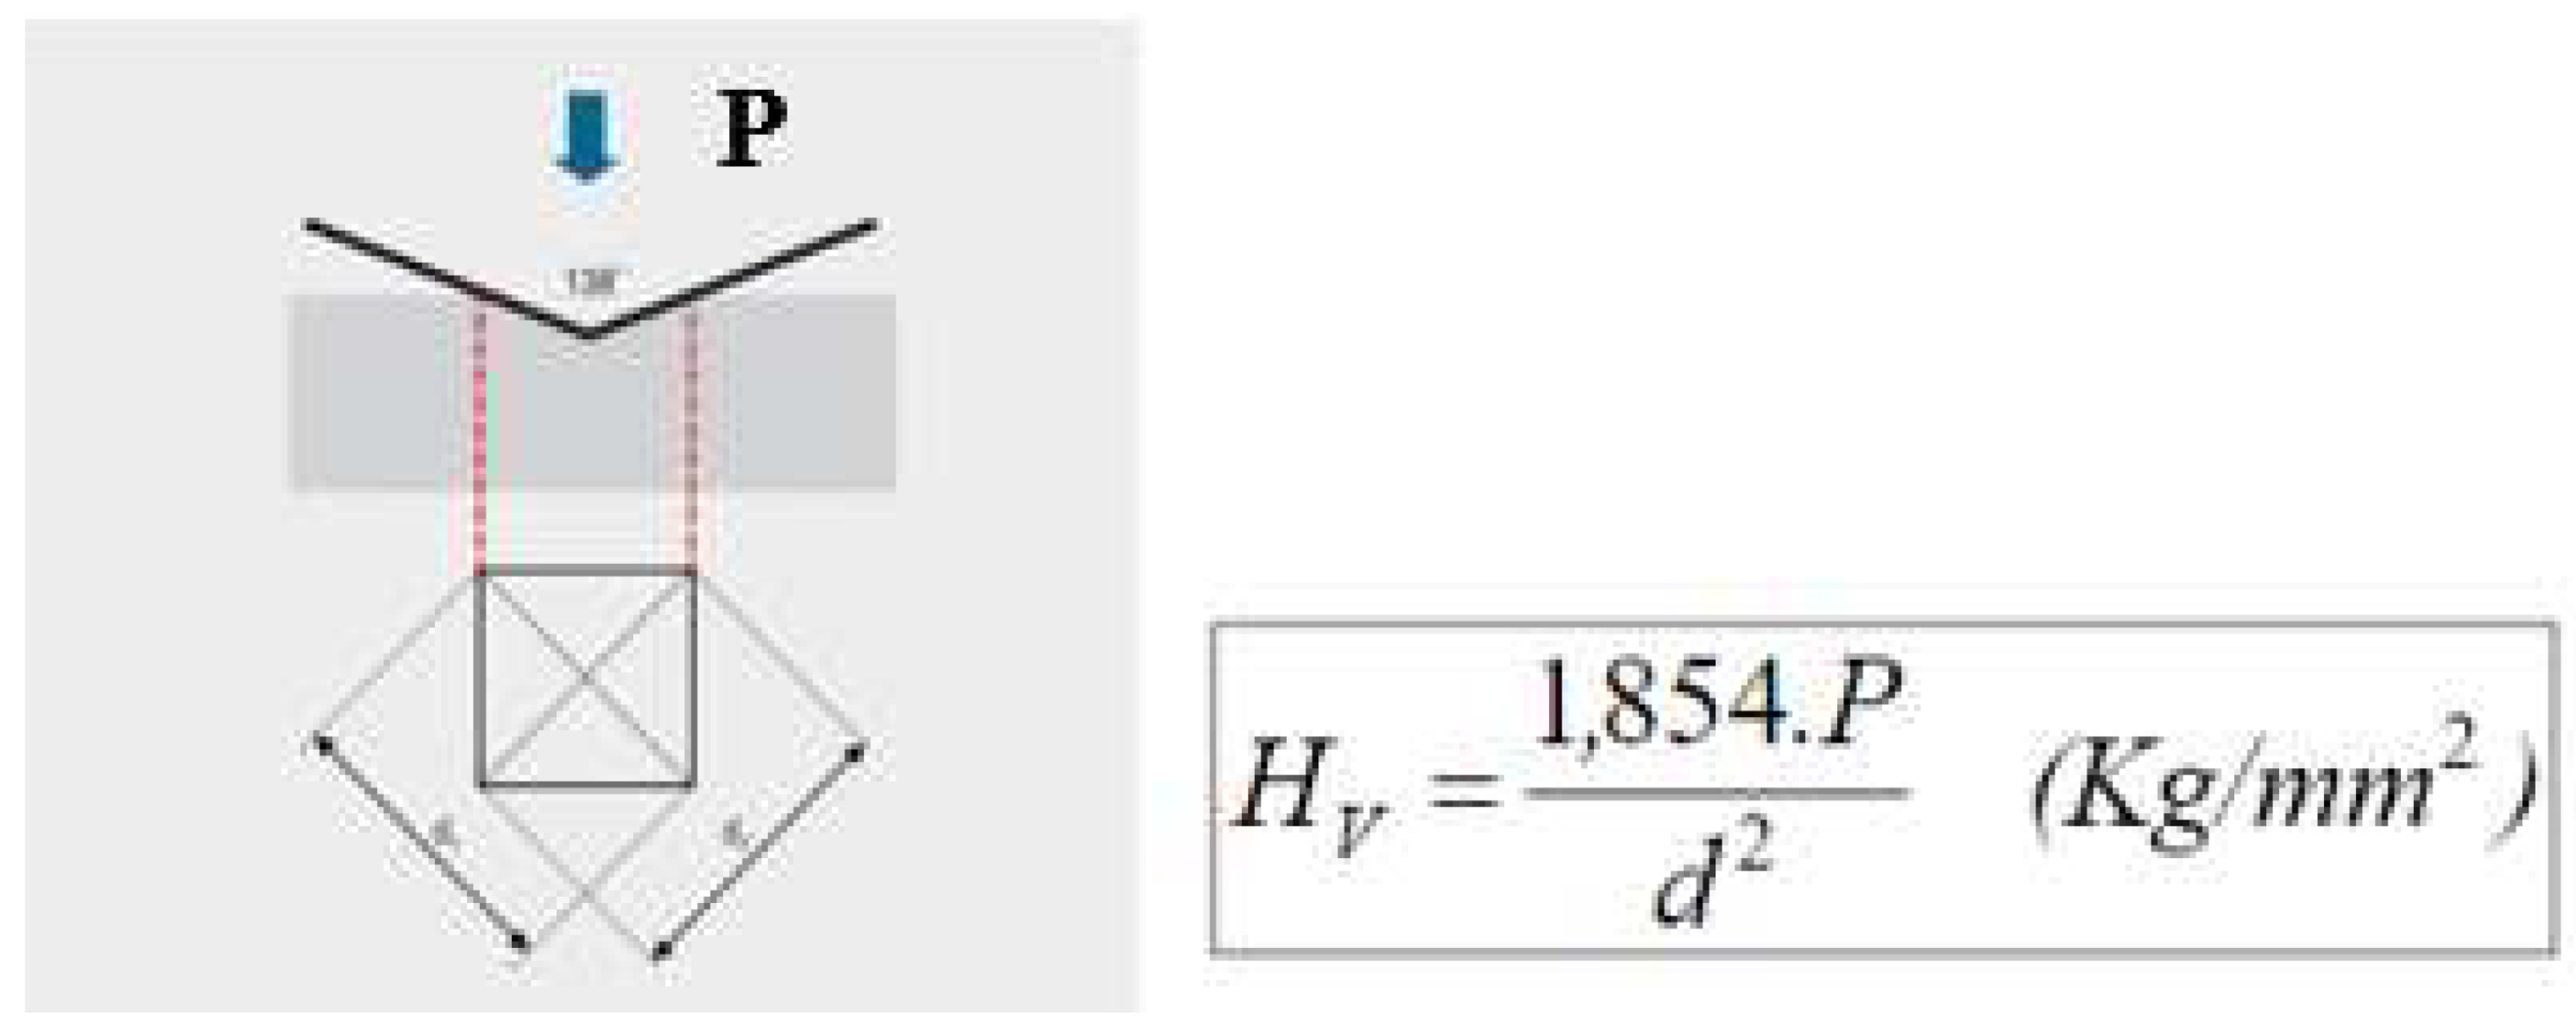
Figure 10.
(a) Test specimen obtained from the upper casing of the high-voltage battery; (b) Test specimen obtained from the lower casing of the high-voltage battery; (c) Test specimen obtained from the casing of a high-voltage battery module.
Figure 10.
(a) Test specimen obtained from the upper casing of the high-voltage battery; (b) Test specimen obtained from the lower casing of the high-voltage battery; (c) Test specimen obtained from the casing of a high-voltage battery module.
The tests carried out are shown below:
Figure 11.
Views of the Vickers test on the specimen of the upper casing of the high-voltage battery.
Figure 11.
Views of the Vickers test on the specimen of the upper casing of the high-voltage battery.
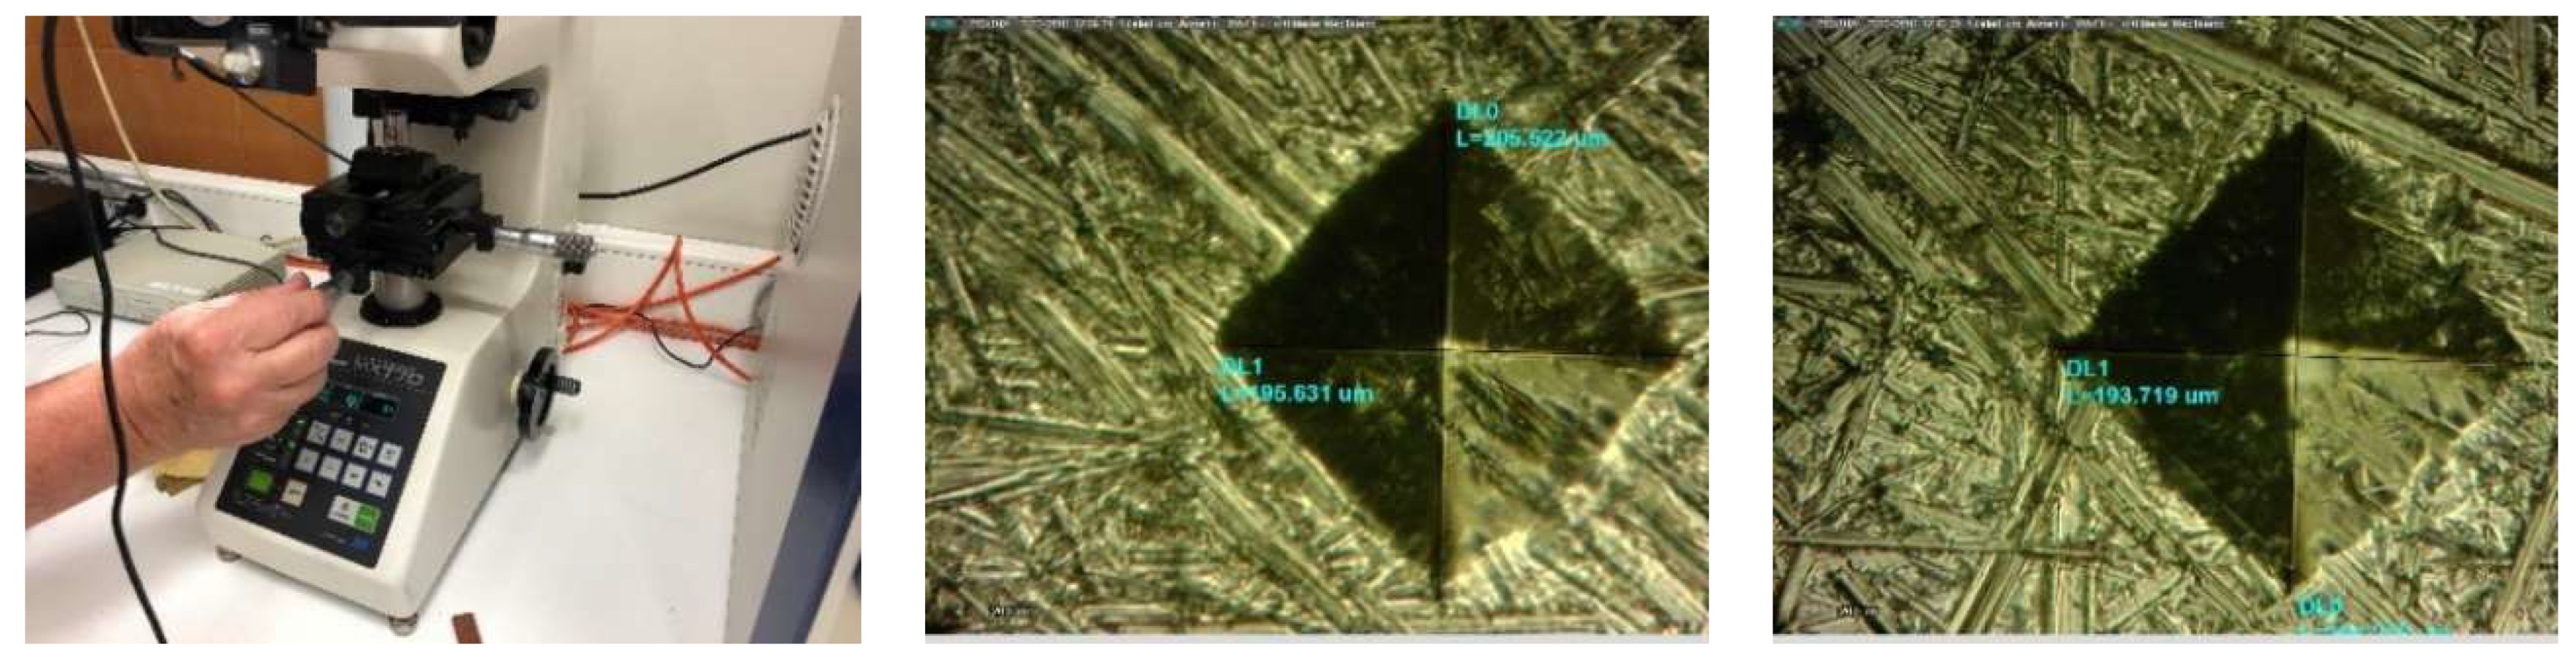
Figure 12.
Views of the Vickers test on the high-voltage battery module housing specimen.
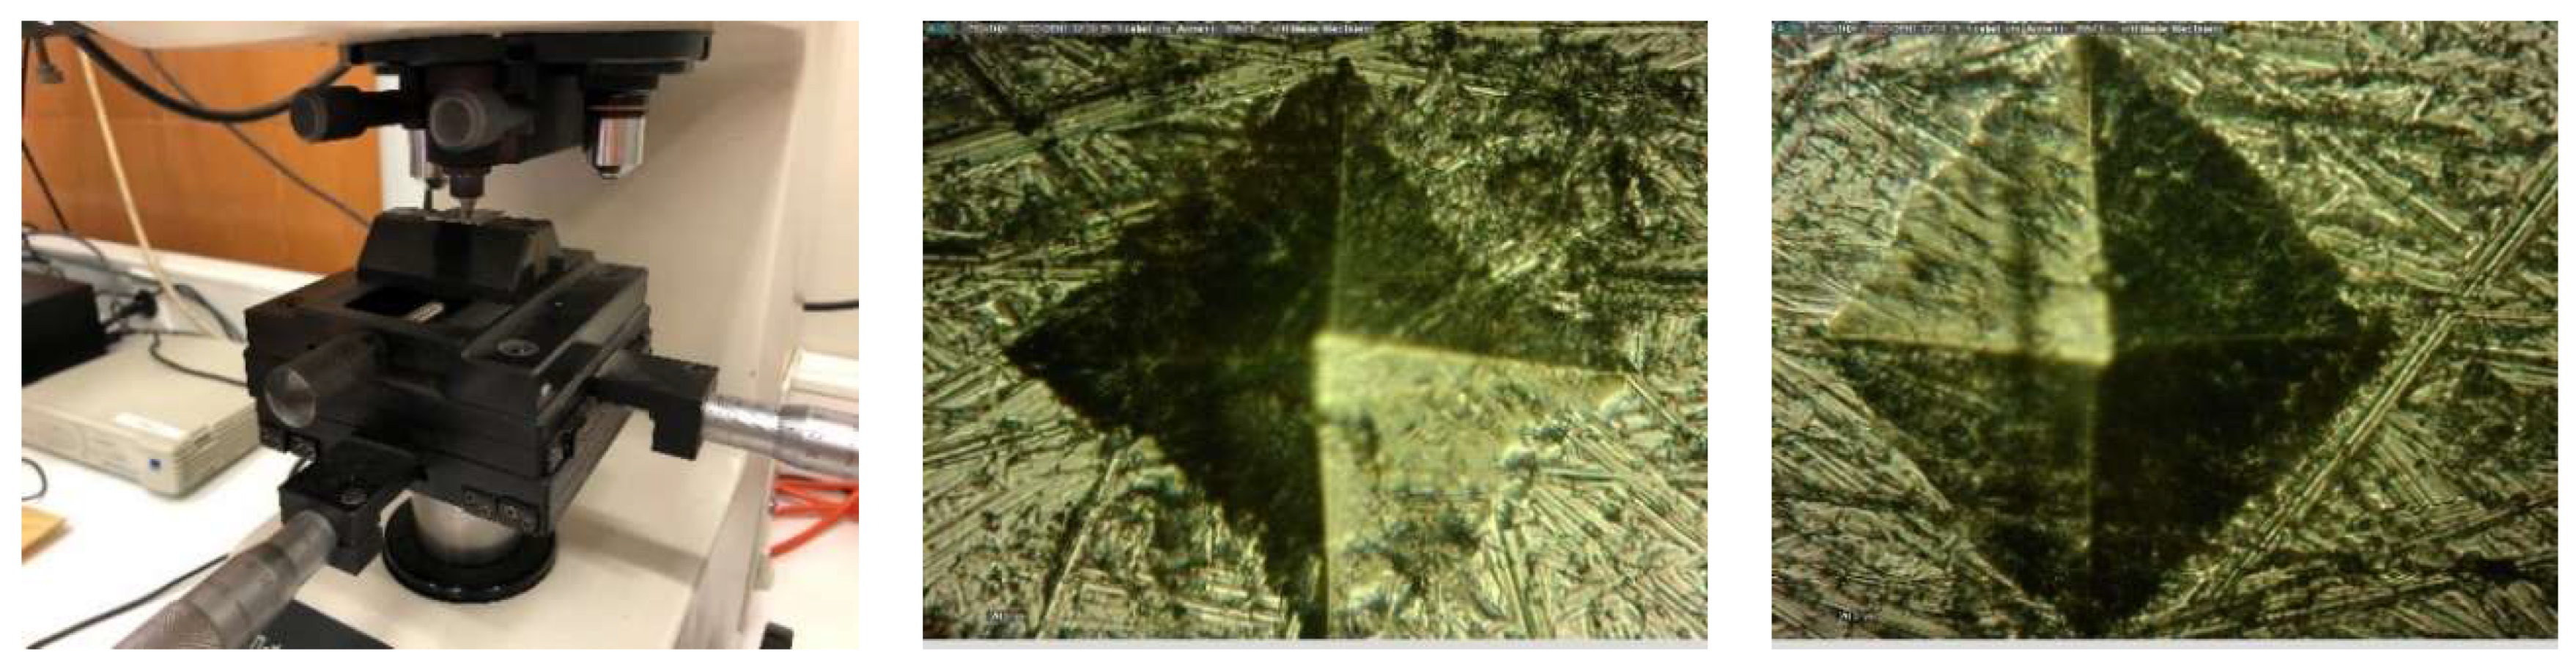
The results obtained in each of the tests (two per specimen) are shown in the table below:

Table 2.
Results of the Vickers microhardness tests carried out on the different specimens analyzed.
Table 2.
Results of the Vickers microhardness tests carried out on the different specimens analyzed.
| P (kg) | d1 (mm) | d2 (mm) | HV (kg/mm2) |
|
|---|---|---|---|---|
| Upper housing cover | 0,5 | 0,094941 | 0,1956 | 108,005069 |
| 0,5 | 0,0897204 | 0,1937 | 115,480832 | |
| 111,742951 | ||||
| Lower housing cover | 0,5 | 0,094941 | 0,2031 | 104,076514 |
| 0,5 | 0,0903672 | 0,1962 | 113,193268 | |
| 108,634891 | ||||
| Module housing | 0,5 | 0,1103256 | 0,2582 | 70,3455591 |
| 0,5 | 0,114807 | 0,2409 | 72,5473466 | |
| 71,4464529 |
Based on microhardness tests on both the upper and lower casing covers, a hardness of 110 kg/mm² was obtained. According to the interpretation in the conversion tables [13], a mechanical strength of 53 psi is deduced. Applying the conversion factor (6.9 N/mm² per psi unit), it is possible to obtain a mechanical strength of 365.7 N/mm². The yield strength can be also approximated as three times the Vickers hardness, i.e., 330 MPa. With these results, a comparison has been made between various materials that could have been used to manufacture the casing, among which the low-carbon steels DC01, DC02 and DC03 have been compared [14]. The hardened DC01 was chosen, with a yield strength of 200-380 N/mm² and a mechanical strength of 290-430 N/mm². The properties used to define the steel chosen are listed in Table 3 and Table 4.
The same procedure was applied for the individual module housings, giving a Vickers hardness of 71 kg/mm². This gave a yield strength of 213 MPa (three times the Vickers hardness) and a mechanical strength of 227.7 MPa. Several aluminum alloys and low carbon steels were compared and the aluminum alloy 6063-T6 was chosen, with a yield strength of 215 MPa and a mechanical strength of 240 MPa. The properties used to define the chosen Aluminum 6063-T6 are listed in Table 5 and Table 6.
The content of the modules has been defined by calculating equivalent properties from the components of the four pouch cells inside them. These modules have a graphite anode and a LiMn₂O₄ cathode with LiNiO₂ [10]. Both separator foils and cell envelopes have been neglected. LiMn₂O₄ and LiNiO₂ have been assumed to have the same characteristics, and the properties of the anode and cathode have been weighted with a coefficient of 0.5 each. Based on the data collected in the article Lithium Concentration Dependent Elastic Properties of Battery Electrode Materials from First Principles Calculations [16], the properties of the equivalent module material were obtained, and they are summarized in Table 7:
2.3. Occupant Injury Anlaysis
This vehicle model was imported into the MADYMO software (MAthematical DYnamic MOdel). MADYMO is a software that allows to analyze the injuries suffered by the occupants in a collision and to determine their origin. It is able to determine the behavior of occupant restraint systems (seat belts, airbags, head restraints).
In this study, MADYMO is used to analyze the movement and stresses experienced by a right front occupant in a vehicle that is involved in a collision on the right side, with reference to the running direction. For this purpose, the vehicle has been fitted with a seat on which the dummy is located. The dummy movement and the stresses it experiences because of the lateral collision is analyzed. The seat belt has also been modelled.
2.3.1. Dummy Model Used
This study carries out a parametric evaluation of the effect of a side impact on the kinematics of a dummy. For this purpose, a EuroSID 2 is used for each of the five vehicle configurations analysed. The test conditions are those established in the ECE R95 regulation, in which the ES-2 dummy (EuroSID 2) is applied. The models used by MADYMO are shown below (Figure 13). They have been calibrated and validated using numerous impact tests, on components and on complete dummies.
2.3.2. Vehicle Model
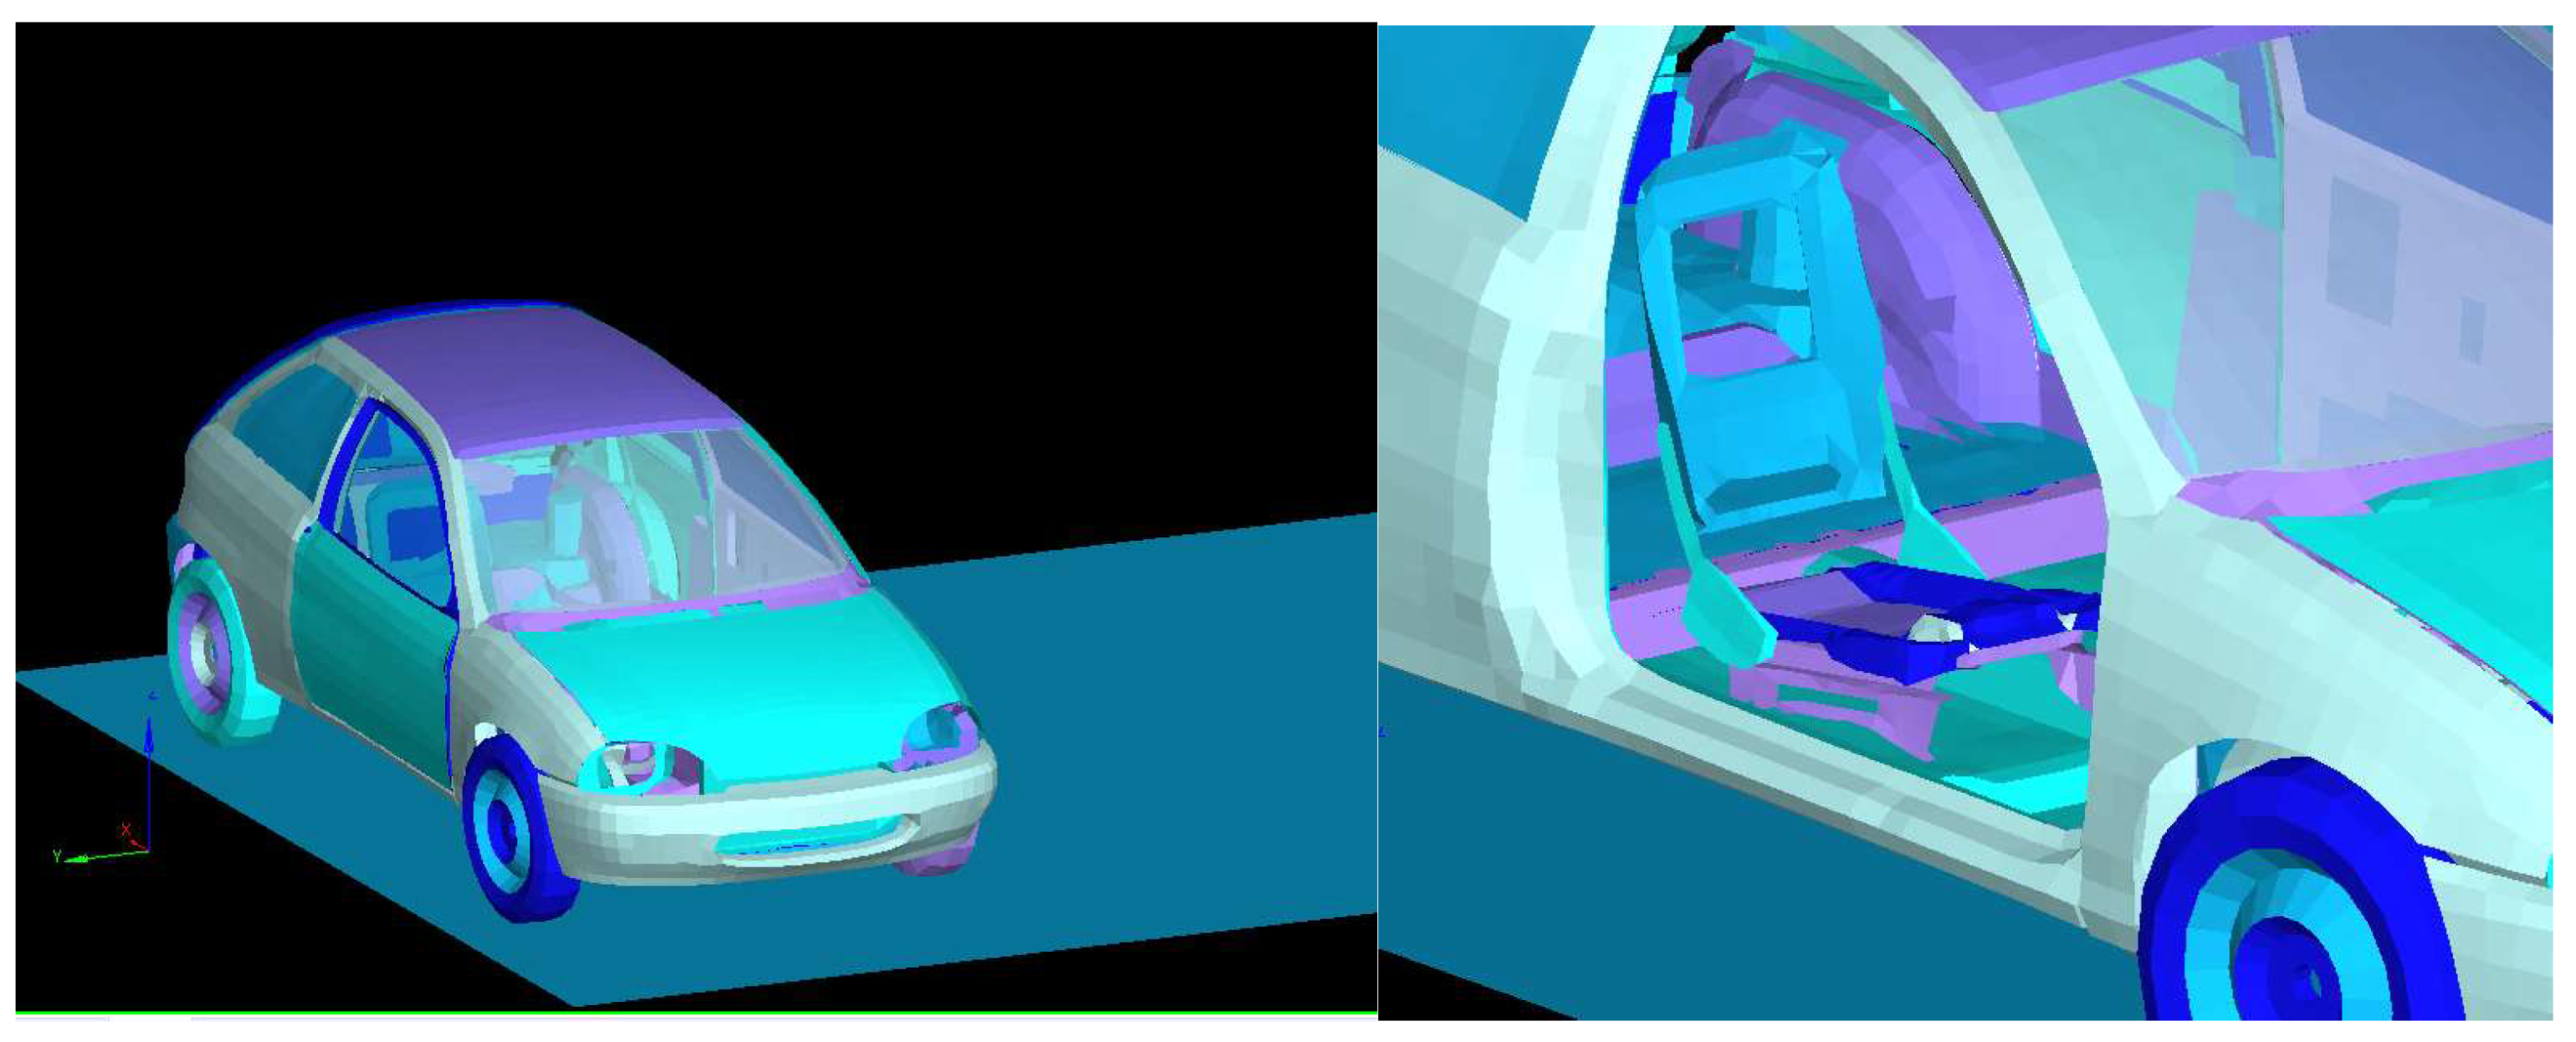
For the analysis, the car model was imported (for the five configurations to be analysed) and the seat was fitted. In addition, the stresses experienced by the right front occupant, with reference to the running direction, will be analysed.
Figure 14.
Image of the vehicle used, and detail of the fitted seat to seat the dummy.
2.3.3. Lateral Crash Test with Deformable Barrier
The side crash test with deformable barrier is analysed according to the UN ECE R95 standard. This test simulates a side crash between two cars at a given relative angle, as might occur at a road junction, for example. To perform this test, a vehicle to be tested, a movable deformable barrier and dummies are required. A deformable barrier with the characteristics of the barrier used in the ECE R95 regulation is added to the above model.
According to FMVSS 214 the dummy ES-2 re is used, in UN R95 the dummy ES-2 is used and in EuroNCAP the dummy WorldSID is used. For this reason the ECE R95 regulation is applied with the corresponding dummy ES-2.
Figure 15 shows the whole model to be simulated including the corresponding dummy and the seat belt.
3. Results and Discussion
The behavior of the different configurations studied was analyzed by F.E.M. to find out the optimum configuration in terms of occupant safety and intrusion into the passenger compartment and Thermal Runaway propagation.
Firstly, the instant of maximum deformation for each of the configurations is analyzed. The instant of maximum deformation is considerably reduced when the battery pack is installed, as the vehicle is transversely stiffened. After including the shock-absorbers, a decrease in the time before reaching the moment of maximum deformation has also been observed, as these new components also add stiffness to the car.
Table 8.
Comparison of the instant of maximum deformation of the car model.
| Without battery | Config. 1 | Conf.2 | Config. 1 with shock absorbing elements | Config. 2 with shock absorbing elements | |
|---|---|---|---|---|---|
| Time of maximum deformation(s) | 0,1 | 0,0615 | 0,0625 | 0,056 | 0,058 |
Upper view for each of the five configurations, at the moment of maximum deformation, are shown below (Figure 16).
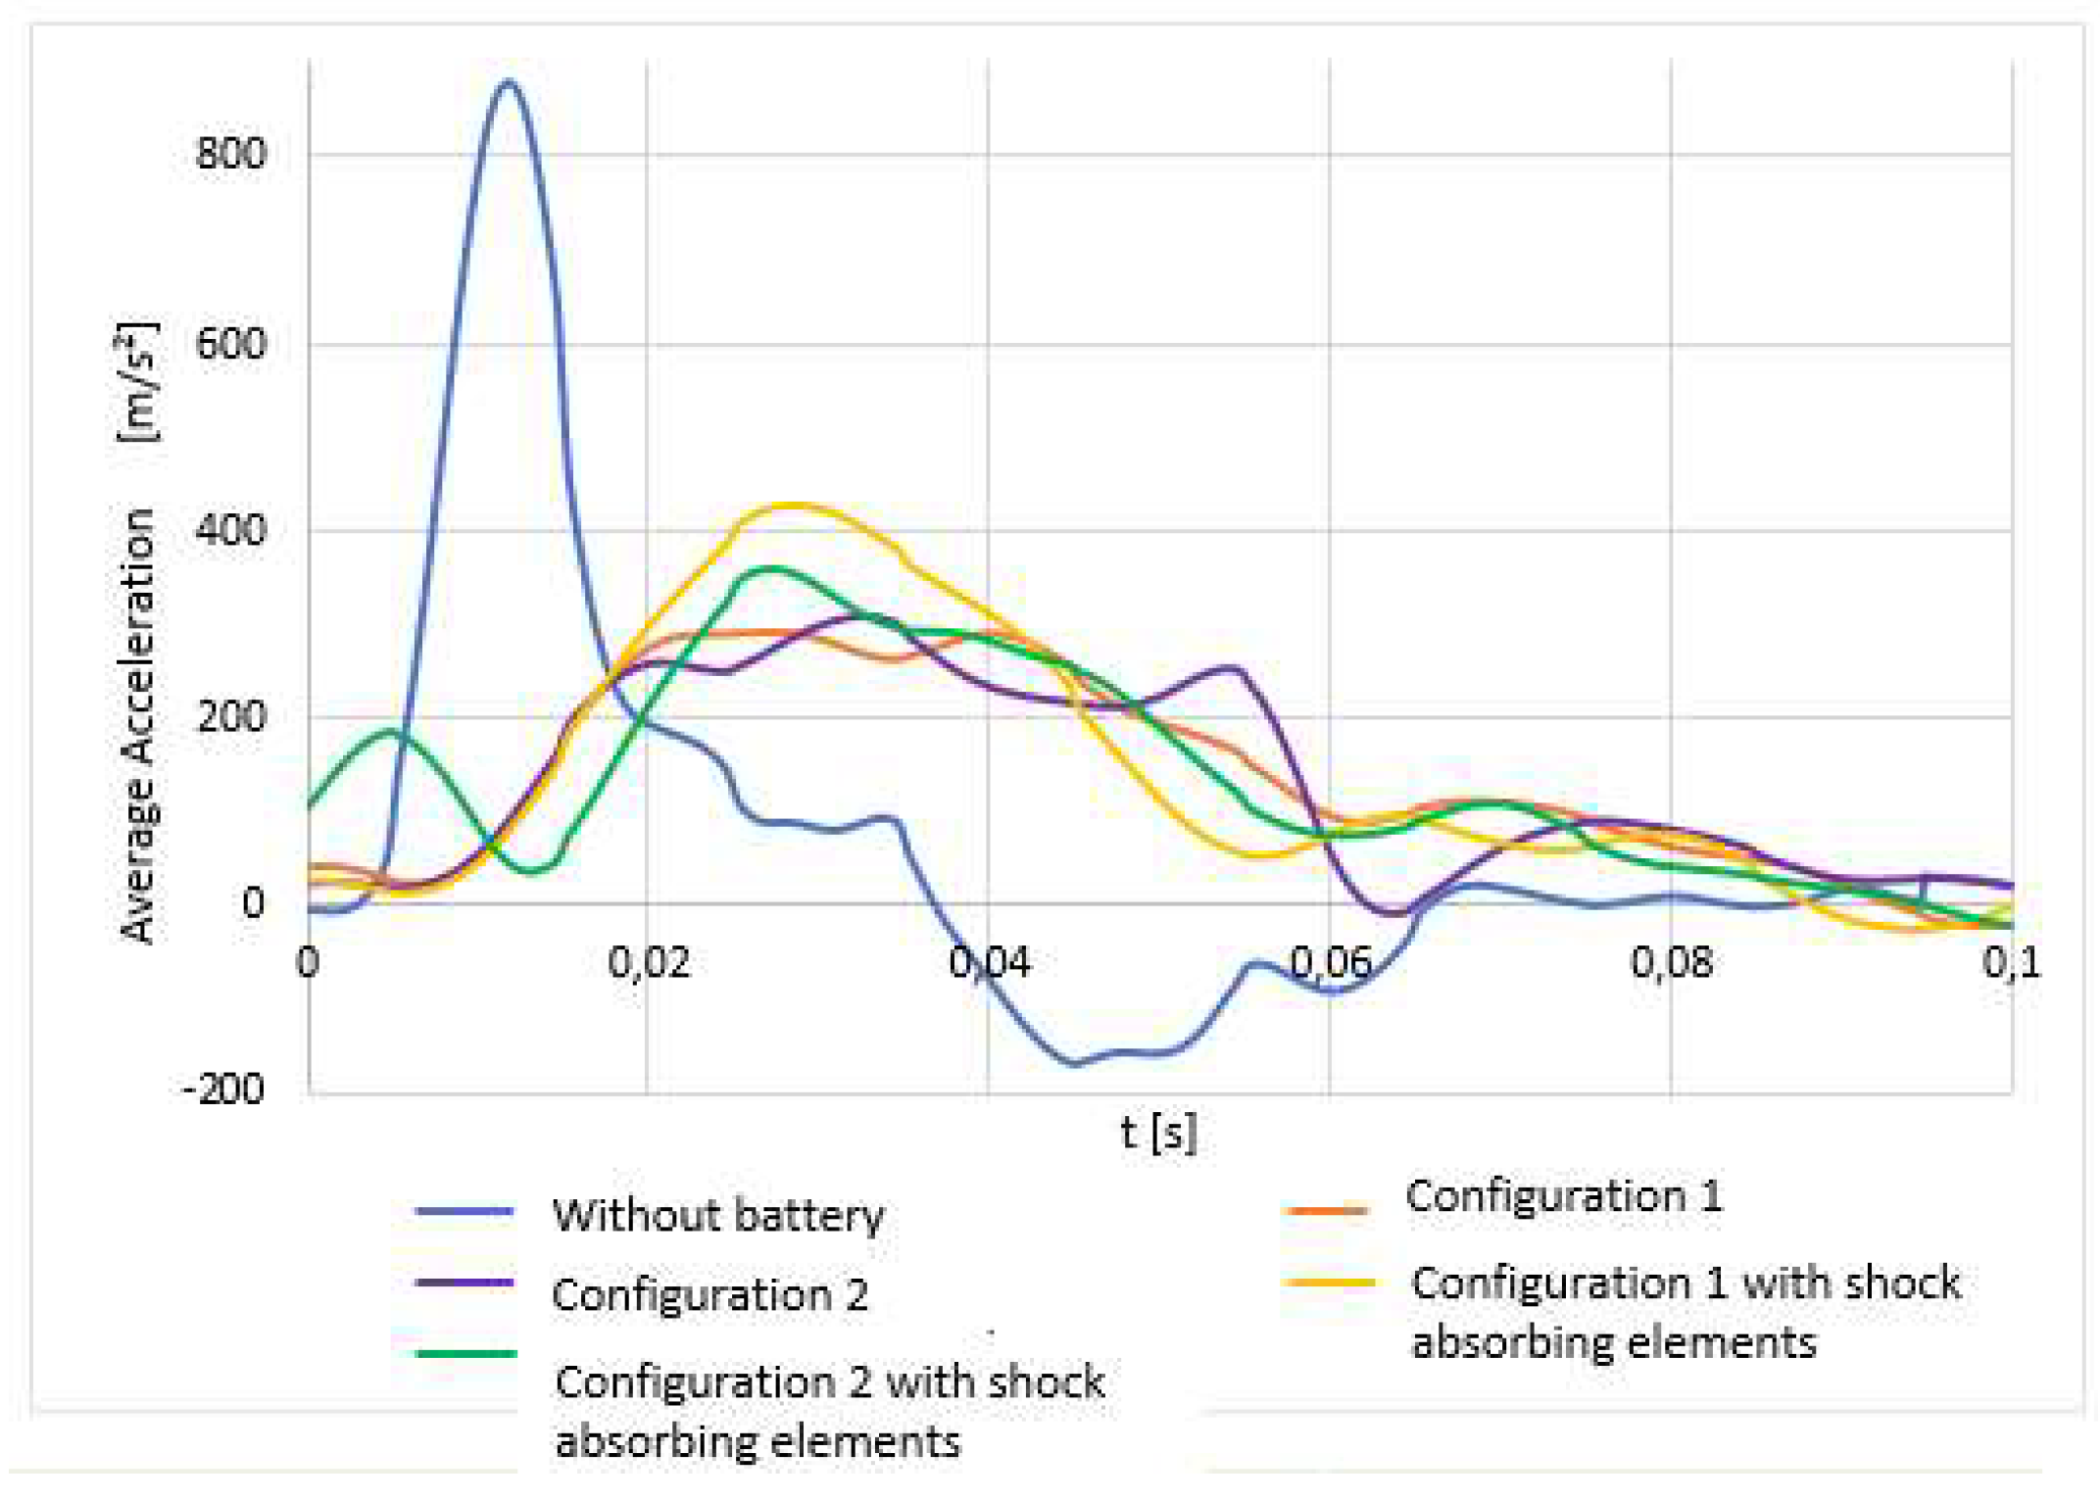
The following table shows the maximum velocity and acceleration for each of the five configurations analyzed. Because the mass of the vehicle increases with the inclusion of the battery pack, and applying the conservation of linear momentum, the maximum velocity and acceleration after impact for the configurations with battery pack are lower.
Table 9.
Comparison of maximum speed and acceleration.
| Without battery | Config. 1 | Conf.2 | Config. 1 with shock absorbing elements | Config. 2 with shock absorbing elements | |
|---|---|---|---|---|---|
| Maximum Velocity (m/s) | 10,09 | 7,52 | 7,35 | 7,77 | 7,73 |
| Maximum Acceleration (m/s2) | 876,49 | 291,12 | 310,65 | 427,49 | 360,06 |
Figure 17.
Average velocity (m/s) measured on the ground of the vehicle during the impact for each configuration.
Figure 17.
Average velocity (m/s) measured on the ground of the vehicle during the impact for each configuration.
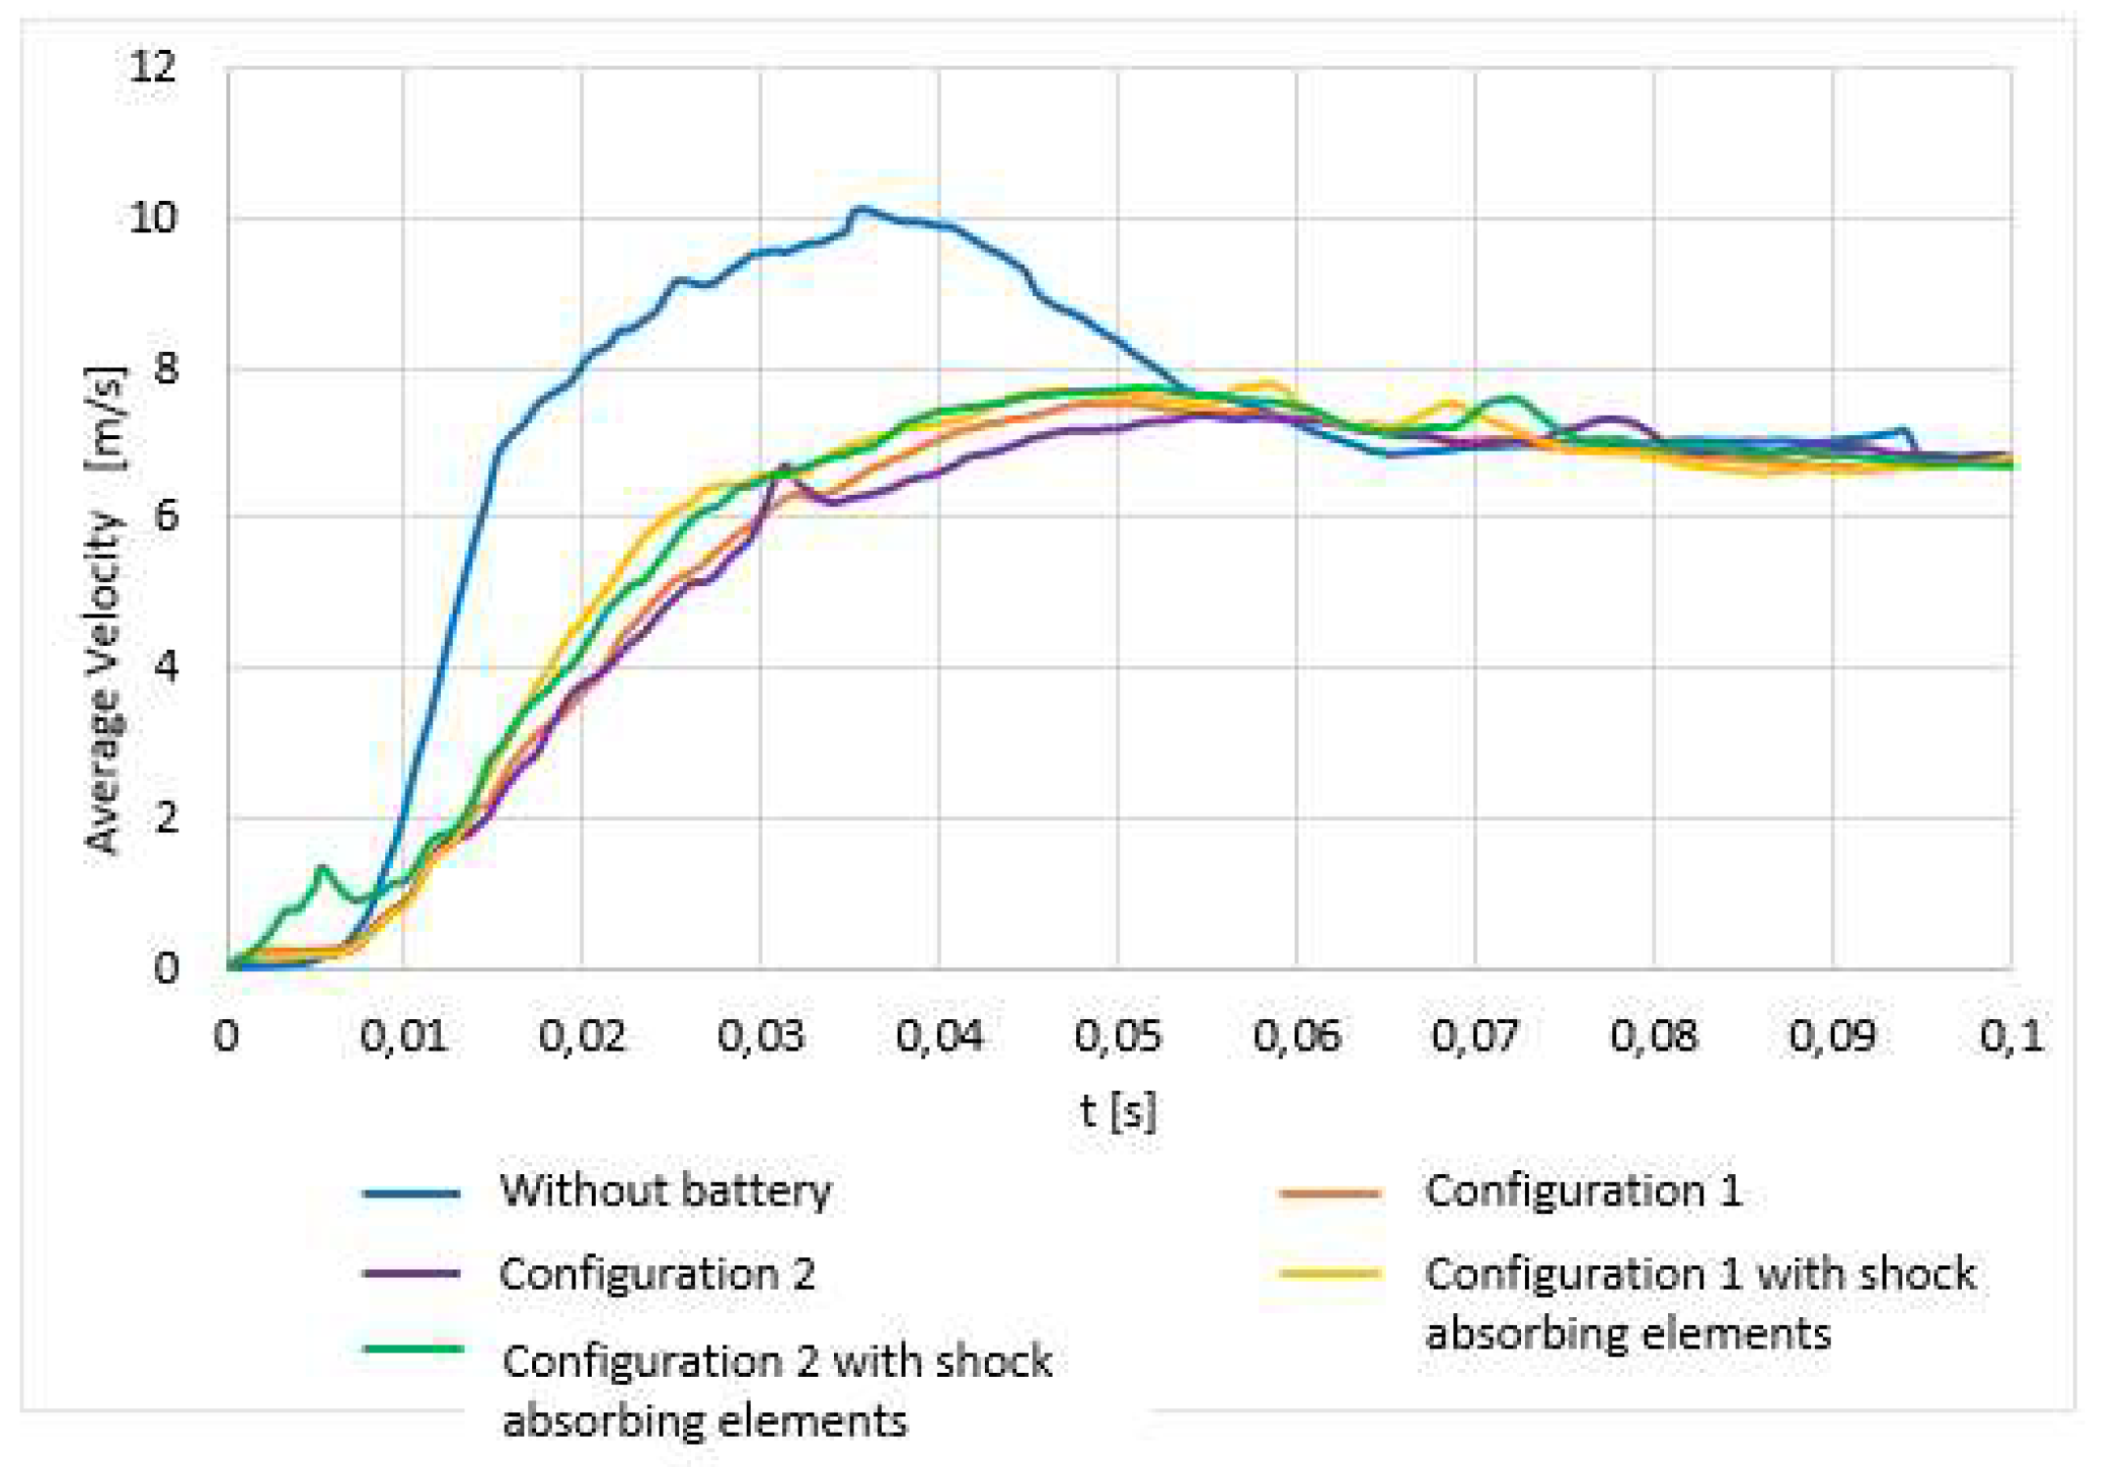
Figure 18.
Average acceleration (m/s2) measured at the floor of the vehicle during the impact for each configuration.
Figure 18.
Average acceleration (m/s2) measured at the floor of the vehicle during the impact for each configuration.
Once the moment of maximum deformation is known, the maximum von Mises stress in the vehicle components that absorb energy in the impact between the barrier and the battery modules is analyzed to find out whether these elements become over the yield strength and whether they withstand the impact without breaking, comparing the maximum stress achieved with the yield strength and the ultimate strength.
Table 10.
Comparison of protection elements.
| Without battery | Config.1 | Config.2 | Config.1 with shock absorbing elements | Config.2 with shock absorbing elements | ||
|---|---|---|---|---|---|---|
| side sill | Edeformmax (J) | 939,08 | 1472,23 | 1597,28 | 878,17 | 784,30 |
| σVMmax (MPa) | 982,11 | 10892 | 991,81 | 909,61 | 895,81 | |
| Housing | Edeformmax (J) | - | 2125,87 | 2515,62 | 1908,04 | 1782,96 |
| σVMmax (MPa) | st- | 365,72 | 360,51 | 339,61 | 351,31 | |
| Shock absorber | Edeformmax (J) | - | - | - | 684,09 | 729,94 |
| ⅀Edeformmax (J) | 939,08 | 3598,1 | 4112,9 | 3470,31 | 3297,20 | |
1The element stress is over the yield strength. 2The element breaks.
In none of the configurations appears a plastic deformation of the modules, and therefore no breakage is observed. However, Table 11 shows that in all the models with battery, the phenomenon of thermal runaway occurs in the same type of module: those that are placed with the largest area facing the impact. Interestingly, this distribution is precisely the one recommended [18] to reduce the transmission of this phenomenon between the different modules of the battery.
3.1. Thermal Runaway Phenomenon
Criteria have been sought to ensure that the battery is not damaged in a way that endangers the vehicle occupant’s safety in relation to the Thermal Runaway phenomenon. It has been considered that a module can sustain a compressive force of 445 kN before Thermal Runaway occurs [19].
To convert this data into a criterion, a battery module with a shell and solid interior was modelled, with the same characteristics as in the side impact model. This module was simulated in three different situations, each time receiving the corresponding force on one of the three different surfaces. This force was applied punctually at the nodes, so it was necessary to divide the force of 445 kN by the number of nodes defining the surface to be studied.
Subsequently, the shortening obtained has been noted down, this being the criterion to be considered when interpreting the results obtained. If the shortening obtained in any of the battery configurations exceeds this value, it shows that the configuration is not safe against the phenomenon of thermal runaway.
In the first configuration, the modules on the floor are placed horizontally on the floor, with the smallest surface (55 x 223 mm) facing the movable barrier. They are resting on the ground at their base, the largest surface area, and the impact hits the smallest surface area.
The maximum shortening that a module under compression can withstand on its smallest face (Δ 𝑙minimum) is 0.0699 mm. For larger deformations, it can be concluded that the phenomenon of Thermal Runaway occurs.
In the second configuration, the modules placed horizontally on the vehicle floor have the median surface perpendicular to the direction of movement of the moving barrier and rest on the larger surface.
The maximum shortening that a module whose median face is directed towards the impact (Δ 𝑙𝑚ean) can withstand is 0.037 mm before the thermal runaway phenomenon occurs.
Finally, it has been simulated for the situation of the modules of both configurations resting under the rear bench, placed on edge, and part of those placed on the floor of the second configuration, also on edge. These are in contact with the floor through the middle surface and in contact with other modules on their larger surface.
The maximum shortening of a module under compression on its largest surface (Δ 𝑙𝑚maximum) is 0.0094 mm, before the thermal runaway phenomenon occurs.
Taking into account the previous results, it can be concluded that the most critical module of configuration 1 with shock-absorbers implemented is very close (within 0.0004 mm) to fulfill the requirements of avoiding the thermal runaway phenomenon. This would make it the best option between the four arrangements including battery proposed in this study. However, it is possible to implement improvements that would move the fire hazard in the battery away, which will be indicated later.
3.2. Intrusion into the Passenger Compartment of the Vehicle
Intrusion into the passenger compartment has been measured with four different parameters, measured at the instant of maximum deformation in each of the cases analyzed, to determine the effect of the battery on the structural behavior of the vehicle during a side impact.
3.2.1. Intrusion at Side Sill
The first two parameters are the maximum distance and the average distance that different nodes penetrate at side sill height (Figure 19). These distances have been calculated as the difference between the vehicle width before and after impact at different nodes.
It is observed that both the battery and the absorbers stiffen the vehicle structure, as intrusions are reduced. By including the battery, the floor is stiffened, and the side sill intrusions are considerably reduced. The intrusions are smaller in the case of configuration 1 as the battery is wider than in the case of configuration 2, and therefore a greater zone of the vehicle floor is stiffened.
By implementing the shock absorbers, the average distance penetrated the passenger compartment at side sill has been further reduced. However, in the second configuration with absorbers, the maximum intrusion obtained between the nodes was almost the same as without absorbers, while the average distance has decreased considerably. This means that there is one of the nodes that has a very high deviation from the line of nodes, but generally the right side of the vehicle reduces the intrusion of its surface.
Table 12.
Comparison of protection elements.
| Without battery | Config.1 | Config.2 | Config.1 with shock absorbing elements | Config.2 with shock absorbing elements | |
|---|---|---|---|---|---|
| dTmax(mm) | 333,55 | 224,85 | 253,02 | 205,55 | 253,48 |
| dTmax(mm) | 252,60 | 128,862 | 160,31 | 93,87 | 100,67 |
3.2.2. Intrusion at B-Pillar
For this element, two different parameters have also been calculated that quantify the intrusion into the passenger compartment at the B-pillar of the vehicle at the instant of maximum deformation.
The first one, 𝑑𝐻, is defined as the distance that a B-pillar node penetrates inside the passenger compartment with respect to two nodes of the A and C pillars. The distances from this node to the imaginary line formed by two nodes on the A and C pillars of the vehicle at the same z-value, both before and after the impact (Figure 20), are calculated and summed to calculate the value of 𝑑𝐻.
The second of the parameters, 𝑑𝑉, is the distance penetrating the center of the B-pillar in relation to its anchorages. It has been calculated as the sum of the distances, before and after the impact (Figure 21), from a node in the middle of the pillar to the imaginary line between two nodes each located at an anchorage of the pillar.
When analyzing the intrusions on the B-pillar of the vehicle by including the battery assembly, a reduction of the distance dH has been achieved. After implementing the absorbers, this distance has been further reduced. The distance dV increases slightly when the battery pack is fitted, as the floor does not deform as much as the rest of the side and this intrusion is measured as a function of the distance from a node in the center of the pillar to the line formed by its anchorages. However, this distance decreases with the implementation of the absorbers.
Table 13.
Intrusion at B-pillar for the different configurations analyzed.
| Without battery | Config.1 | Config.2 | Config.1 with shock absorbing elements | Config.2 with shock absorbing elements | |
|---|---|---|---|---|---|
| dH(mm) | 351,48 | 222,91 | 238,96 | 160,19 | 120,95 |
| dV(mm) | 101,32 | 103,71 | 108,85 | 85,30 | 81,24 |
3.3. Results of the Different Electric Vehicle Configurations Analyzed
The movement of the dummy and the stresses to which it is subjected are analyzed for the different vehicle configurations studied. The injury thresholds indicated by the regulations and by the private programs that analyze vehicle safety will be taken as the reference values. Moreover, as it has been explained before, the test configuration used is ruled by ECE R95 regulation.
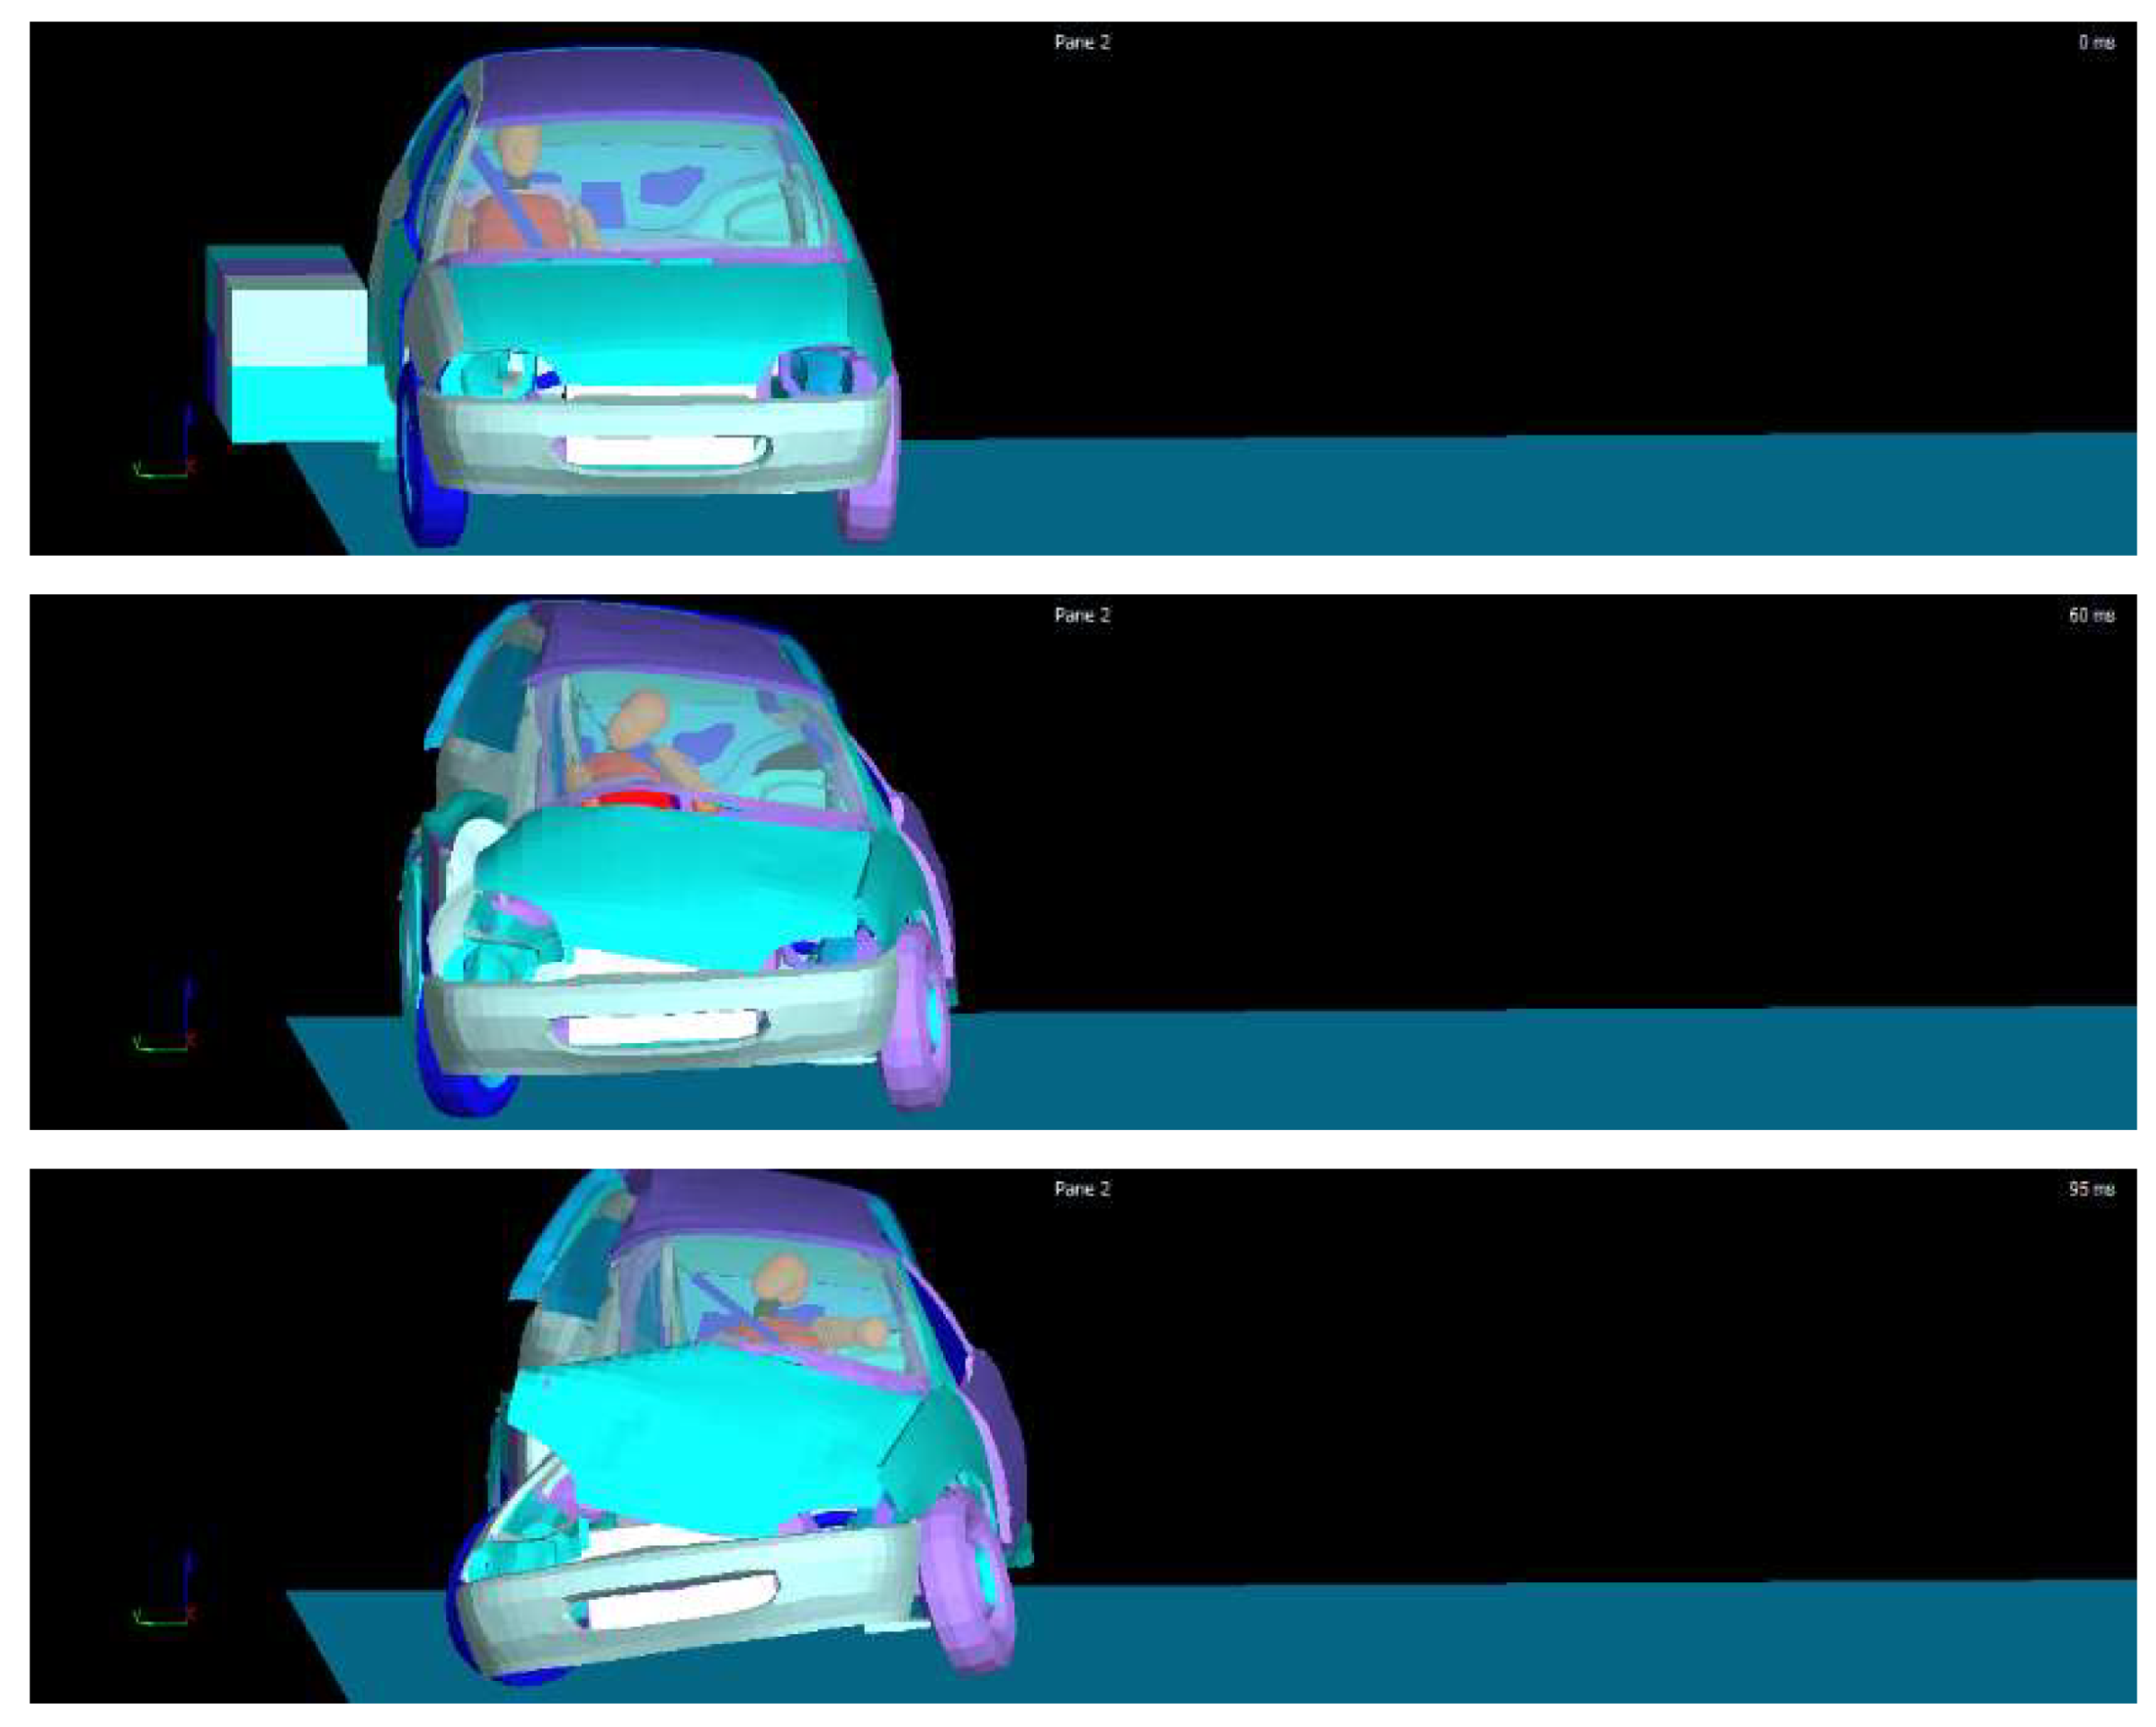
Below is a sequence of frames showing the movement experienced by the co-driver of a vehicle subjected to an acceleration like that experienced in a lateral collision according to the ECE R95 regulation. The co-driver is located on the right-hand side of the vehicle related to the running direction.
3.3.1. Co-Driver Kinematics on a Combustion Engine Vehicle
Figure 22.
Kinematics of the co-driver on a combustion vehicle subjected to a lateral collision according to ECE Regulation R95, using the ES-2 dummy.
Figure 22.
Kinematics of the co-driver on a combustion vehicle subjected to a lateral collision according to ECE Regulation R95, using the ES-2 dummy.
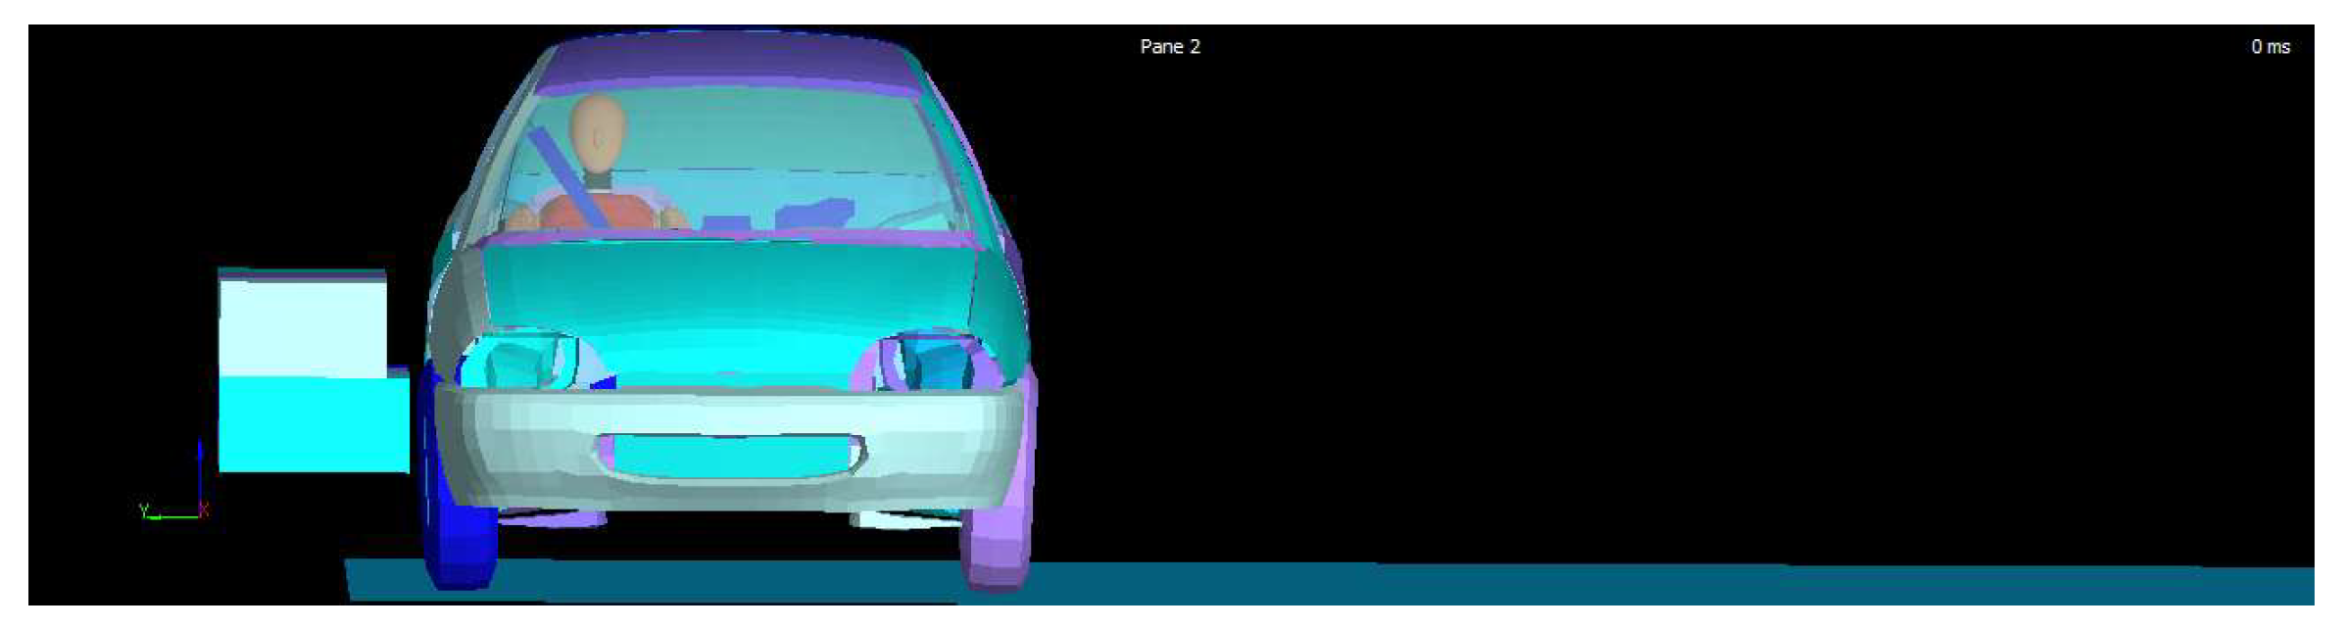
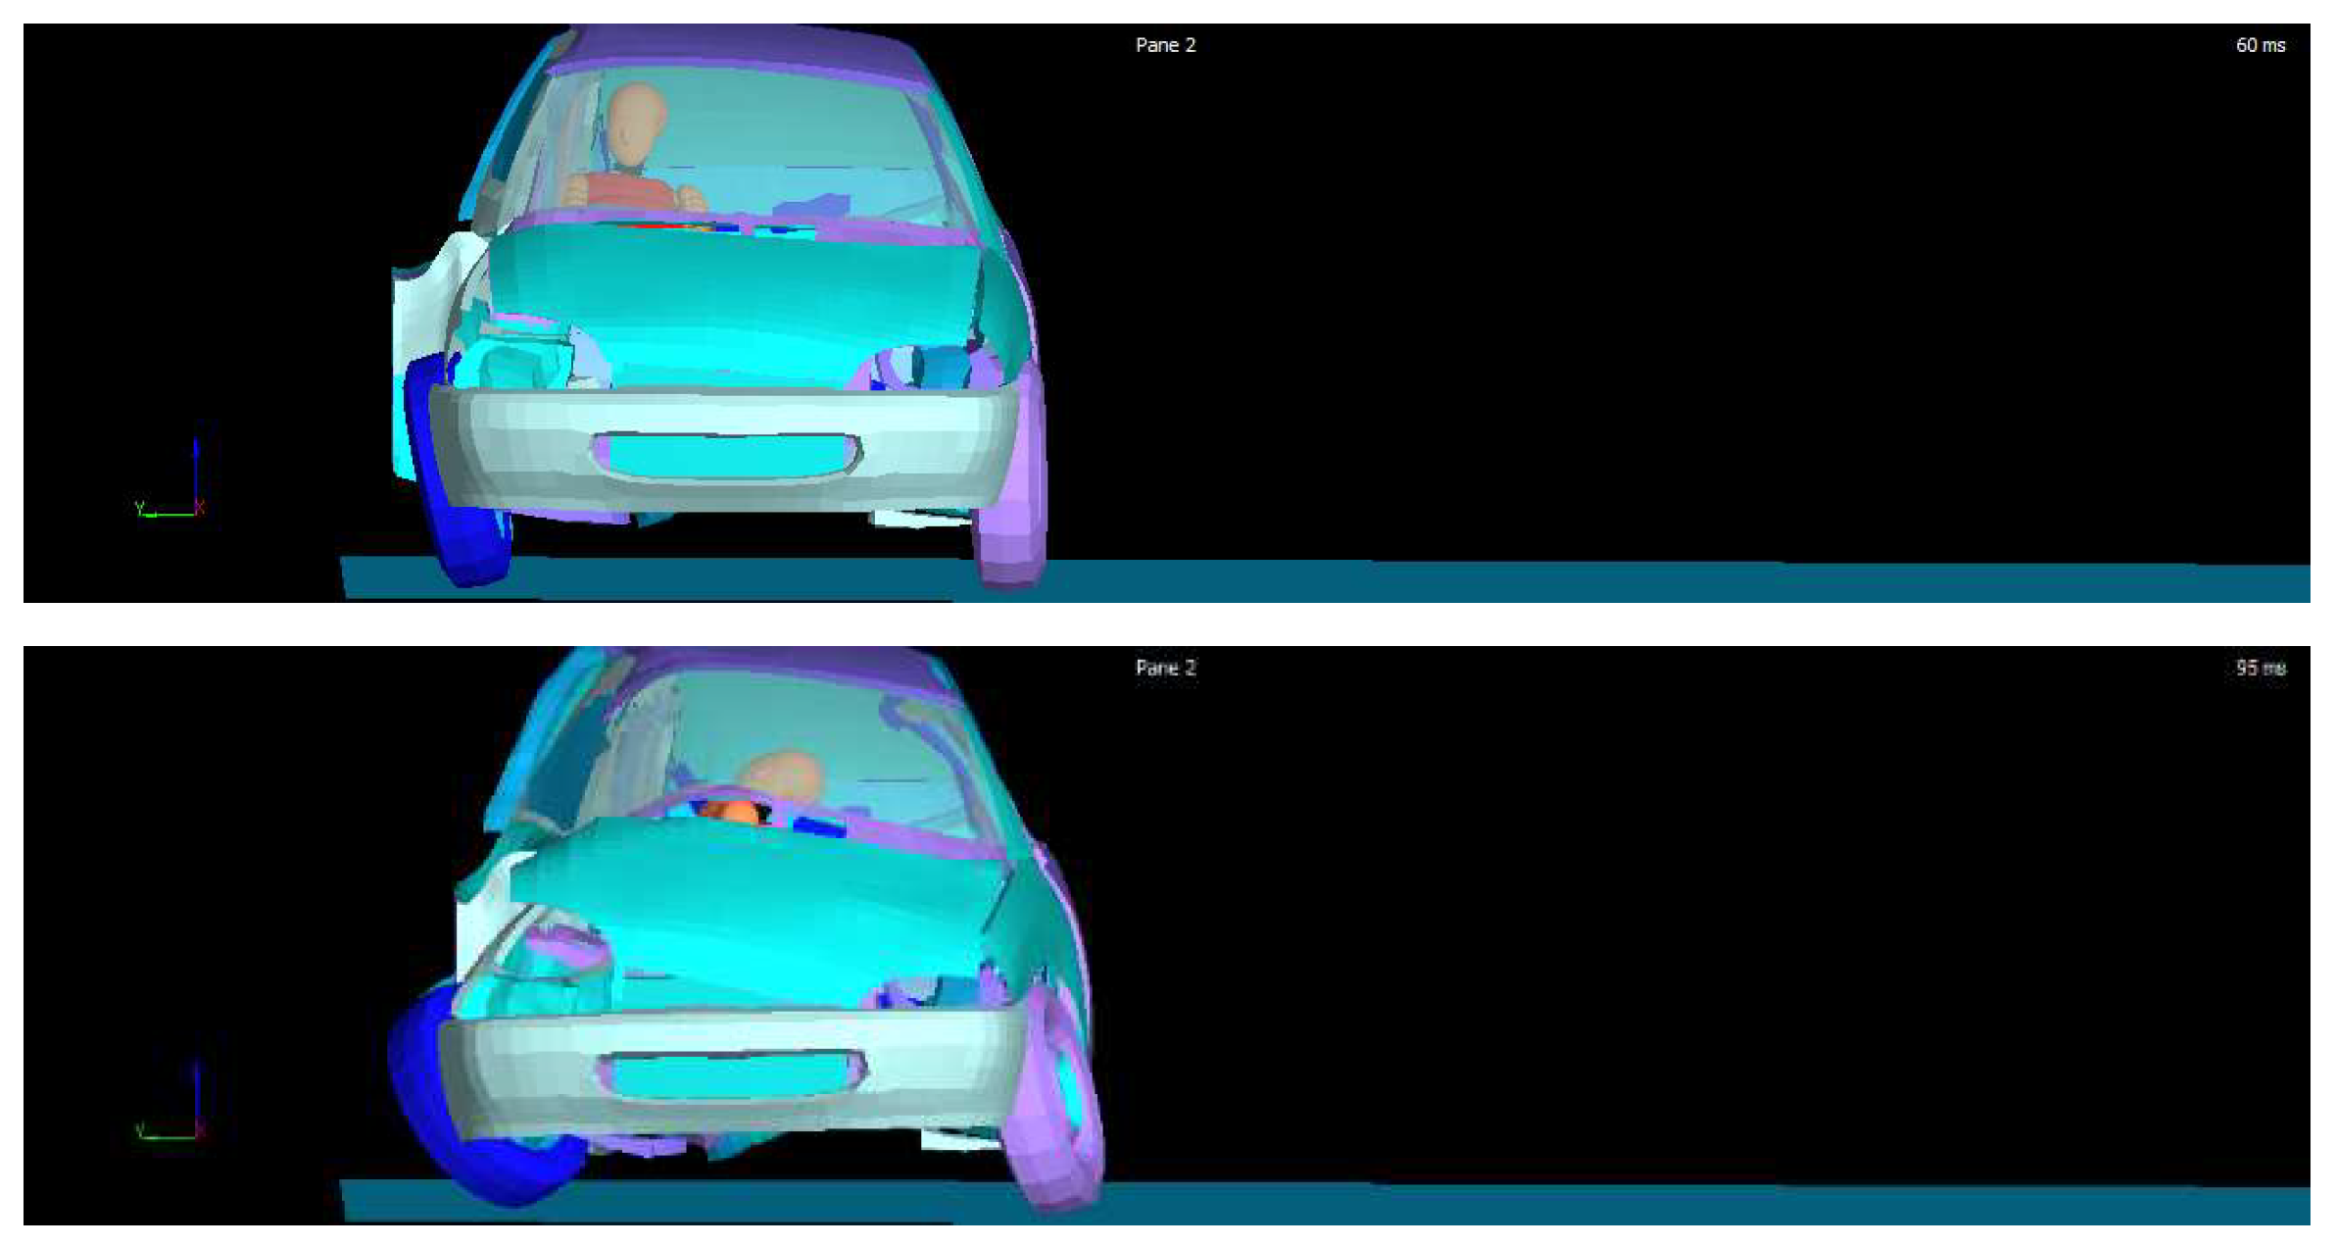
3.3.2. Co-Driver Kinematics on an Electric Vehicle: Configuration 1
Figure 23.
Kinematics of the co-driver on an electric vehicle configuration 1 subjected to a lateral collision according to ECE Regulation R95, using the ES-2 dummy.
Figure 23.
Kinematics of the co-driver on an electric vehicle configuration 1 subjected to a lateral collision according to ECE Regulation R95, using the ES-2 dummy.
3.3.3. Co-Driver Kinematics on an Electric Vehicle: Configuration 2
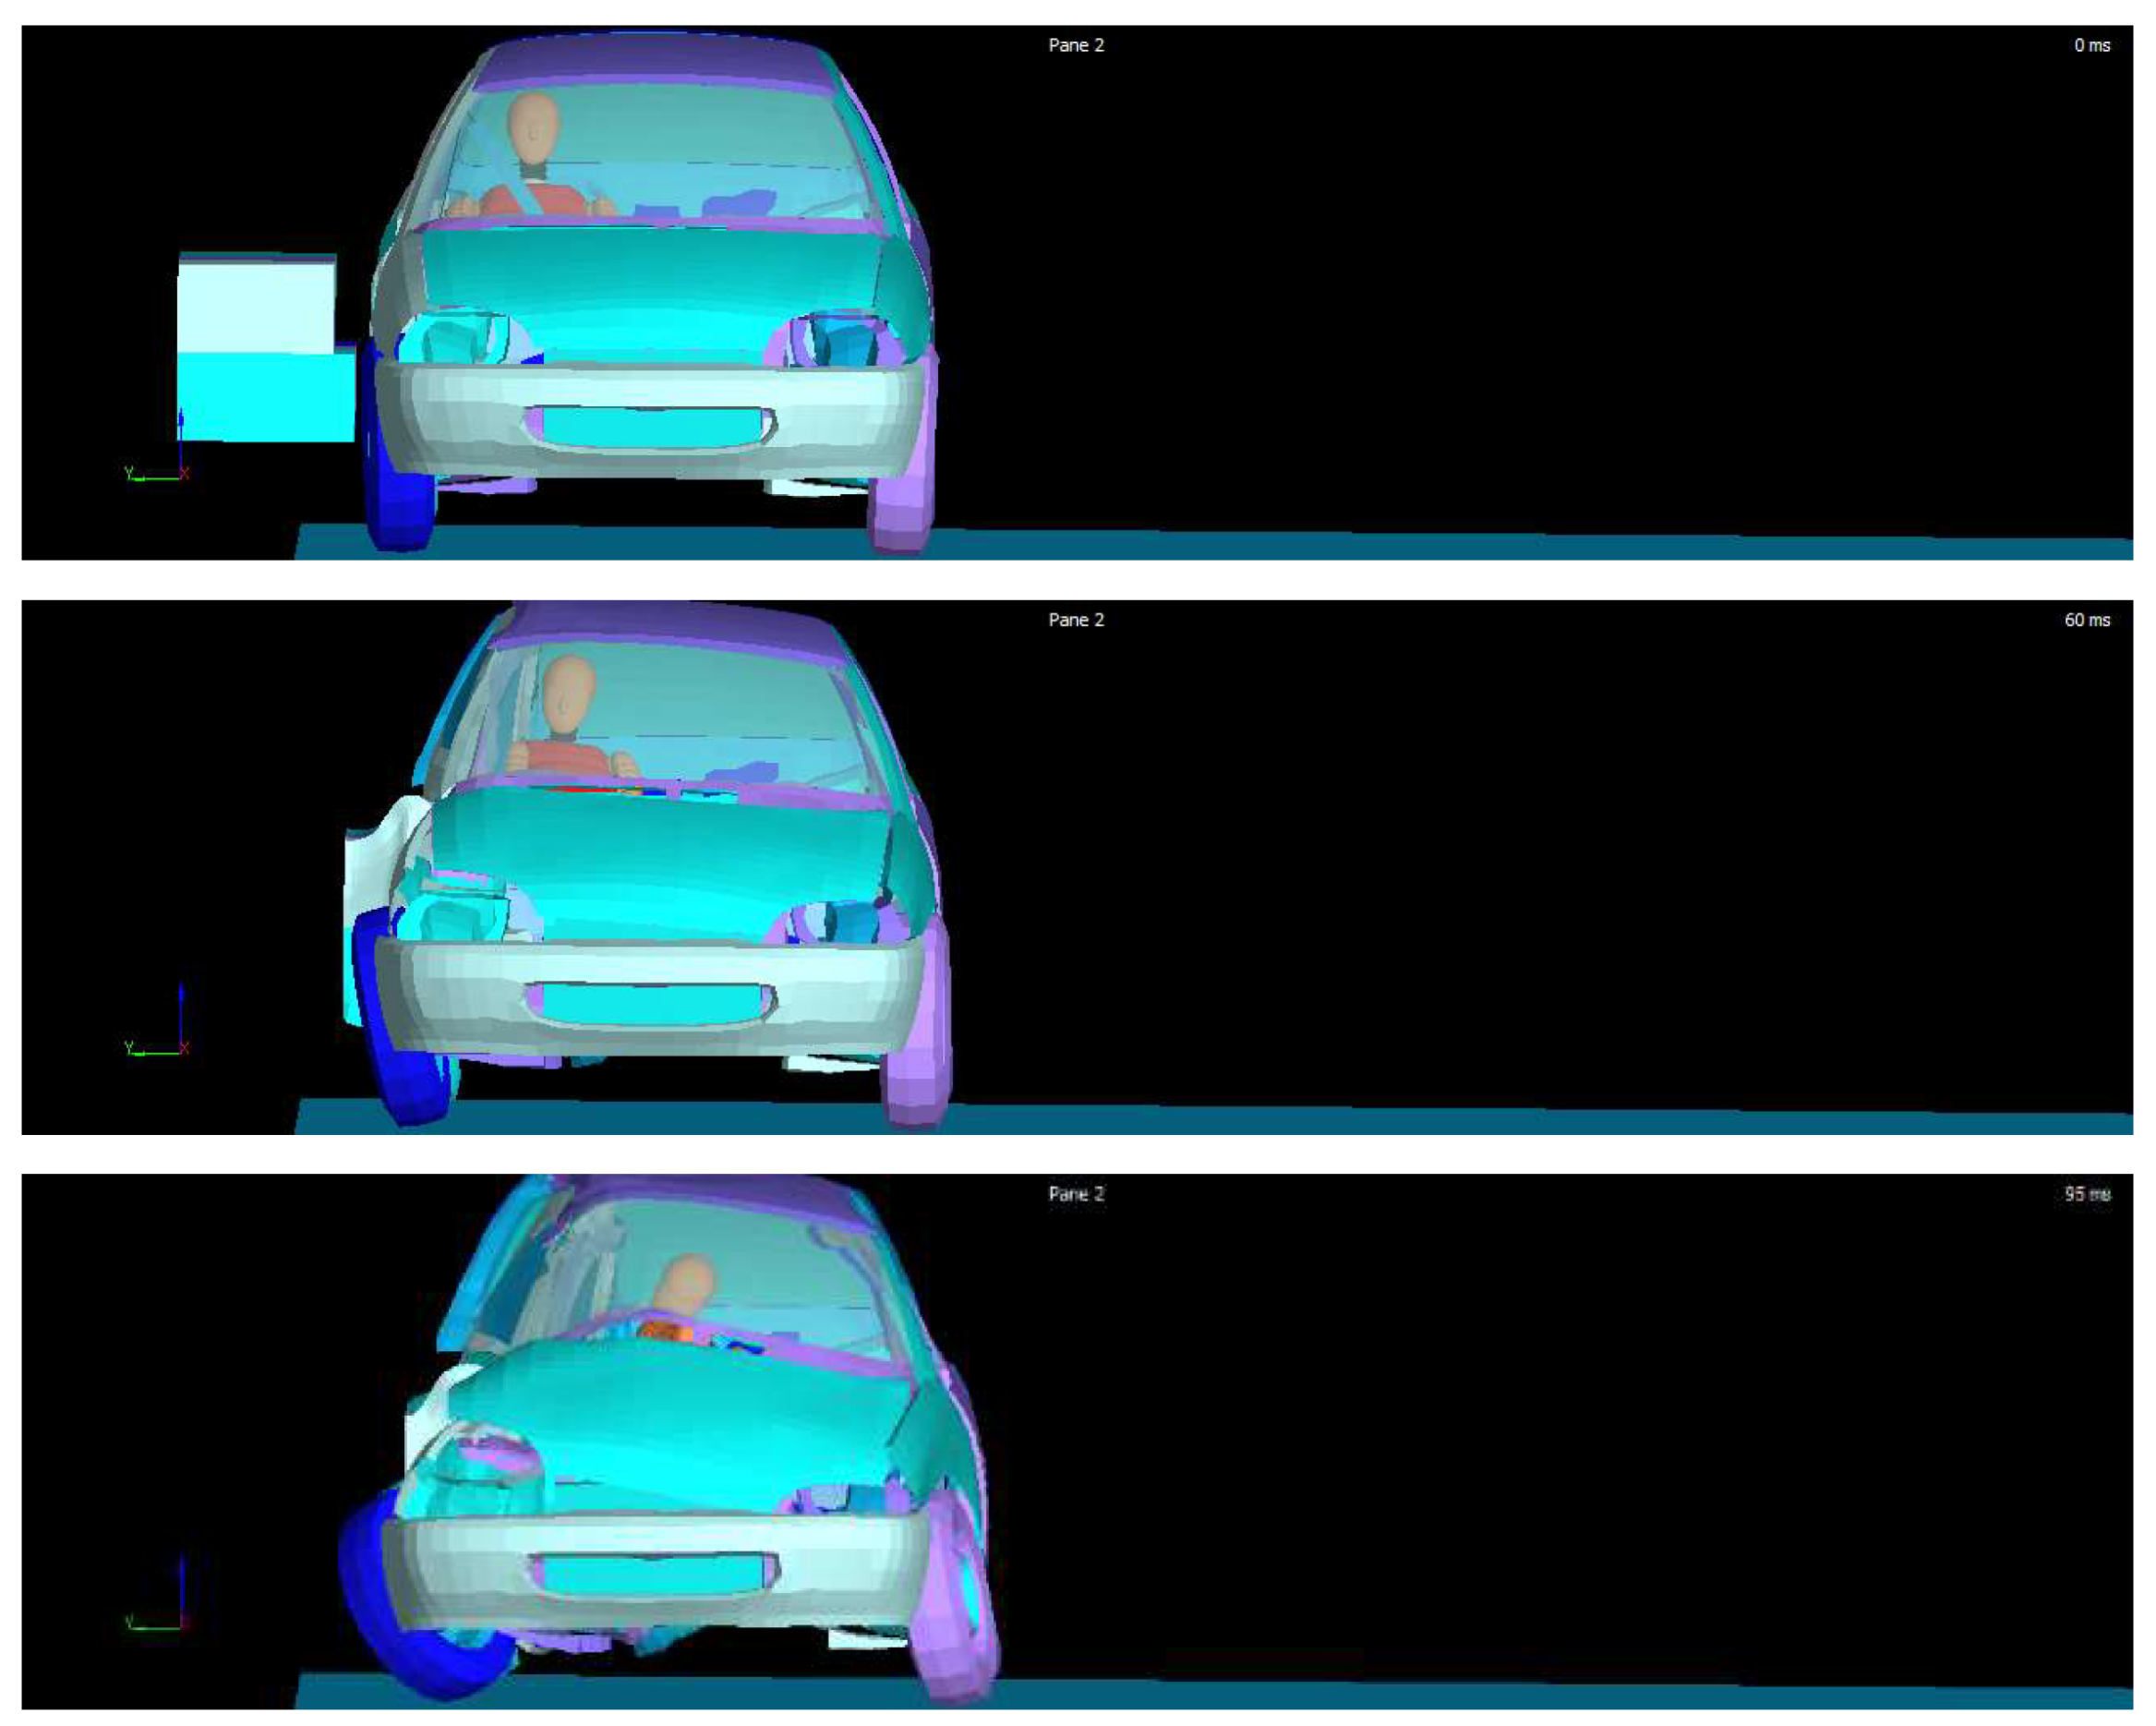
Figure 24.
Kinematics of the co-driver on an electric vehicle configuration 2 subjected to a lateral collision according to ECE Regulation R95, using the ES-2 dummy.
Figure 24.
Kinematics of the co-driver on an electric vehicle configuration 2 subjected to a lateral collision according to ECE Regulation R95, using the ES-2 dummy.
3.3.4. Co-Driver Kinematics on an Electric Vehicle: Configuration 1 with Energy Absorbers
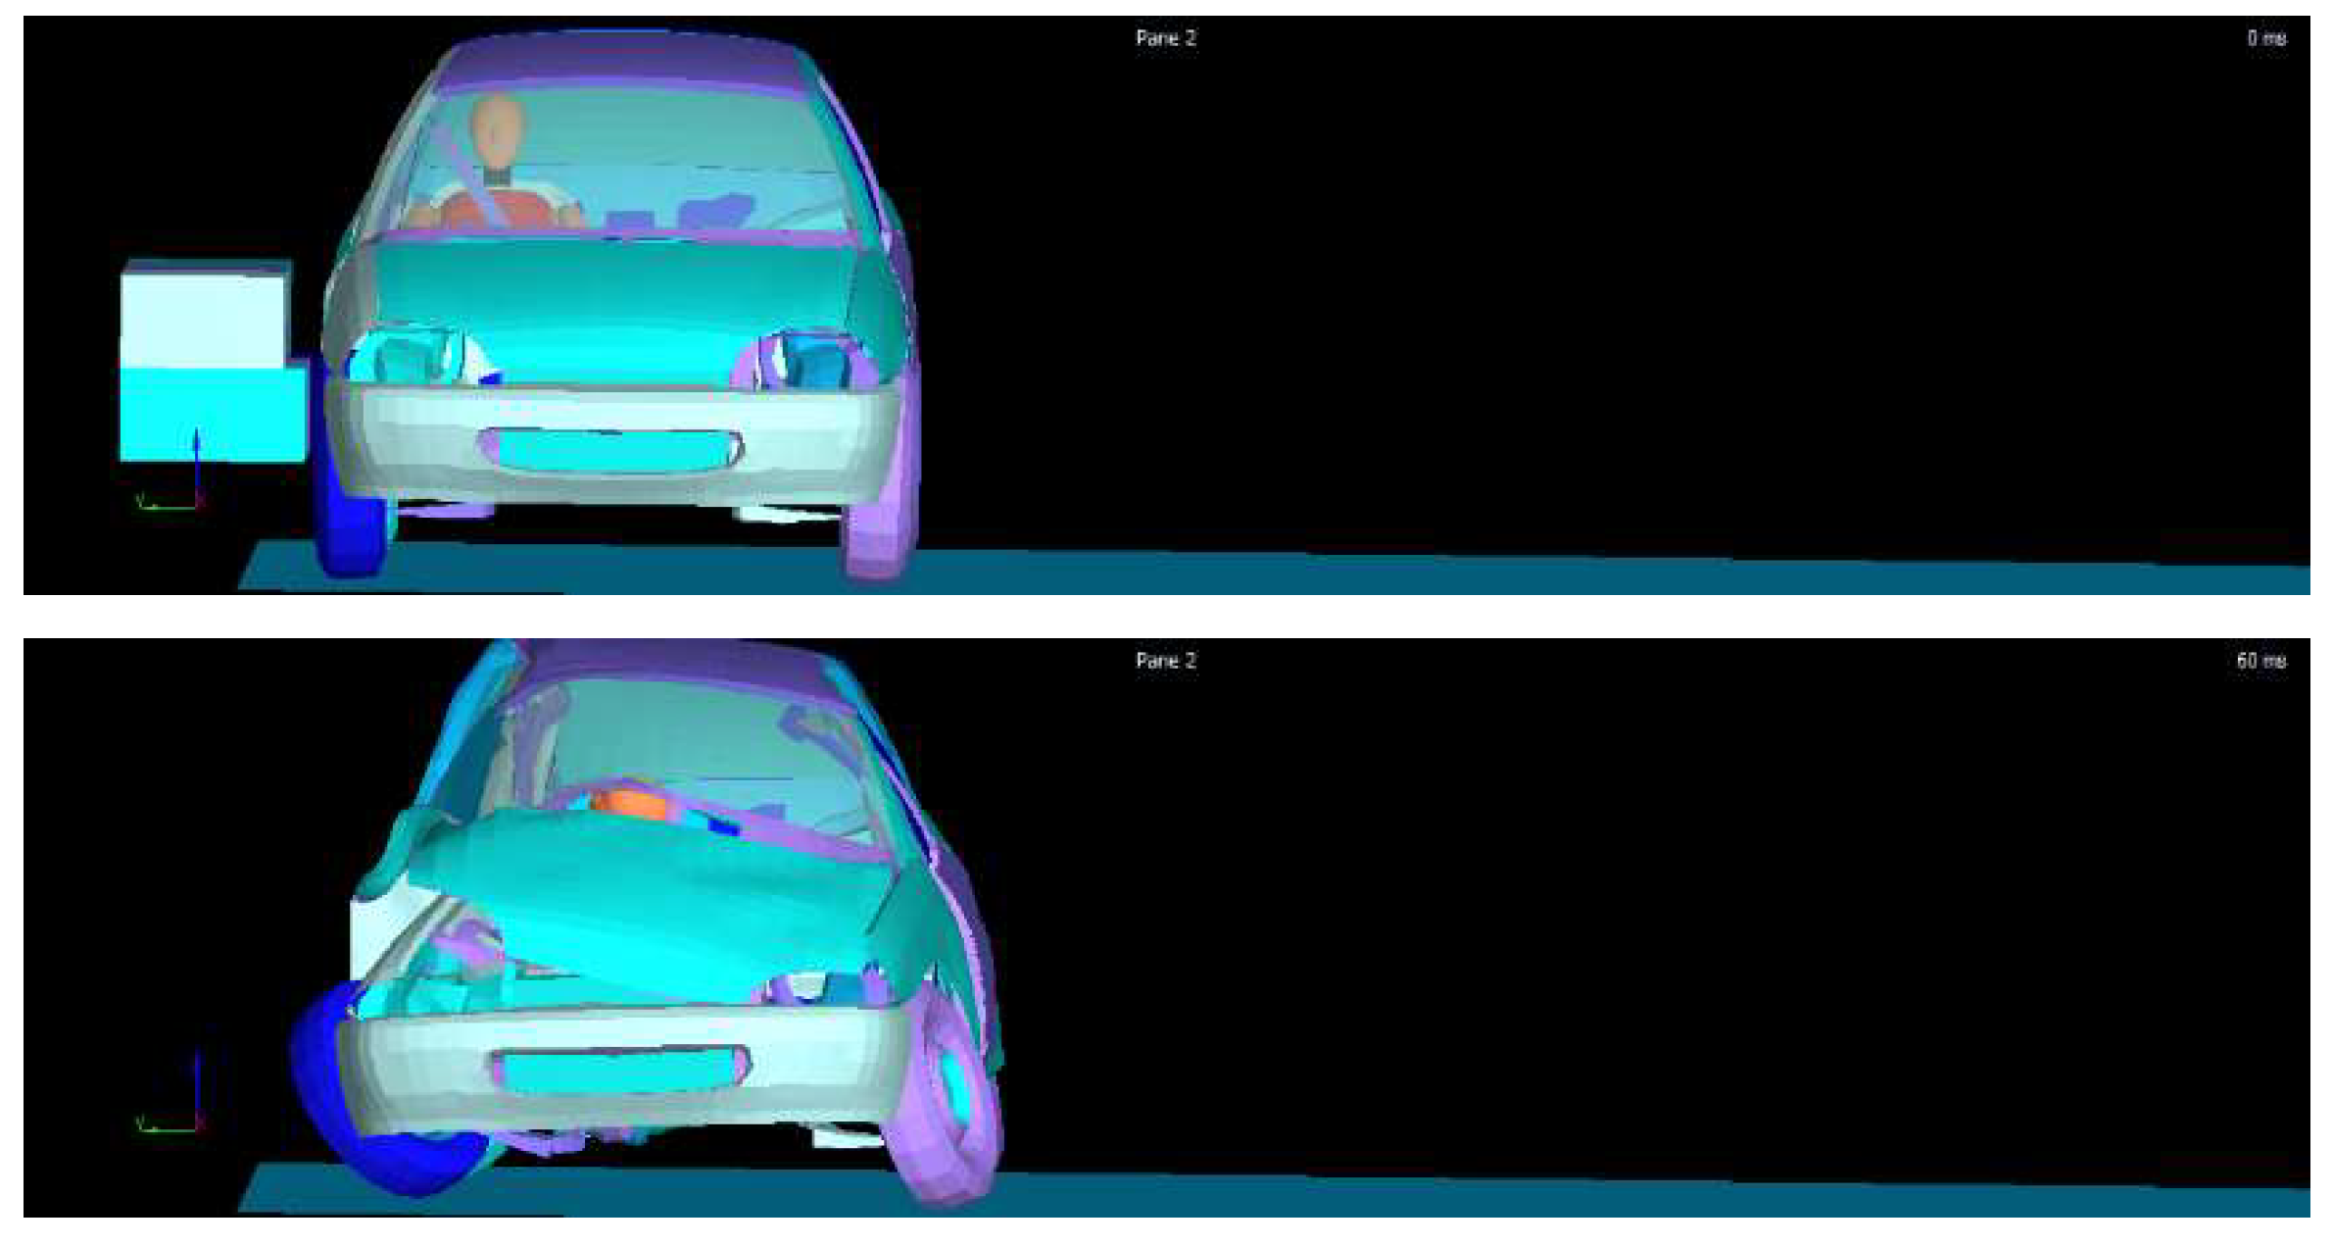
Figure 25.
Kinematics of the co-driver on an electric vehicle configuration 1 with energy absorbers, subjected to a lateral collision according to ECE Regulation R95, using the ES-2 dummy.
Figure 25.
Kinematics of the co-driver on an electric vehicle configuration 1 with energy absorbers, subjected to a lateral collision according to ECE Regulation R95, using the ES-2 dummy.
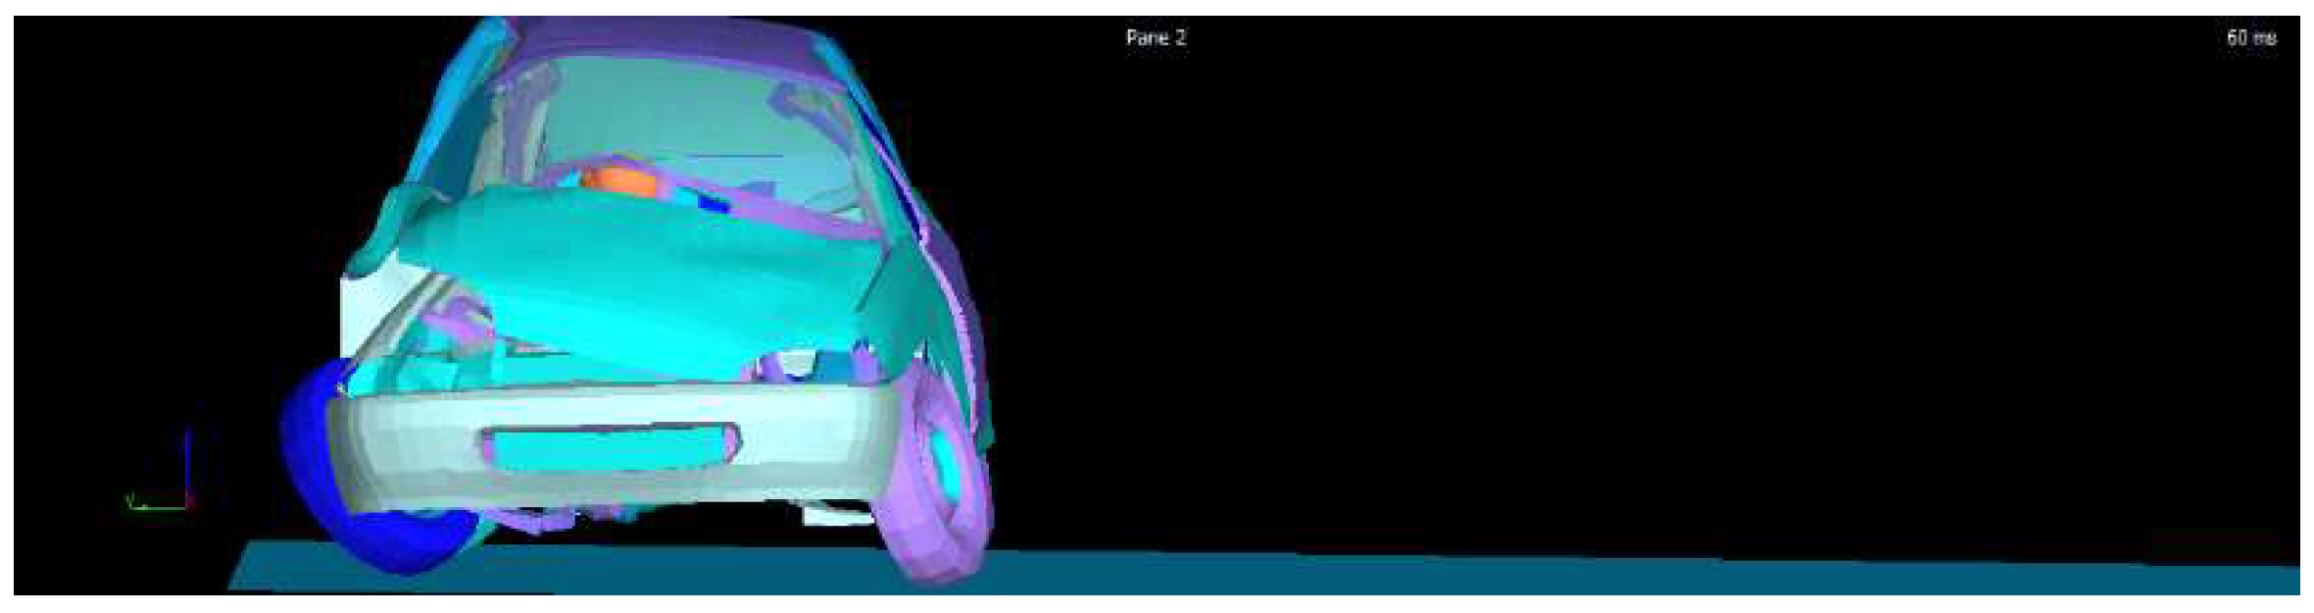
3.3.5. Co-Driver Kinematics on an Electric Vehicle: Configuration 2 with Energy Absorbers
Figure 26.
Kinematics of the co-driver on an electric vehicle configuration 2 with energy absorbers, subjected to a lateral collision according to ECE Regulation R95, using the ES-2 dummy.
Figure 26.
Kinematics of the co-driver on an electric vehicle configuration 2 with energy absorbers, subjected to a lateral collision according to ECE Regulation R95, using the ES-2 dummy.
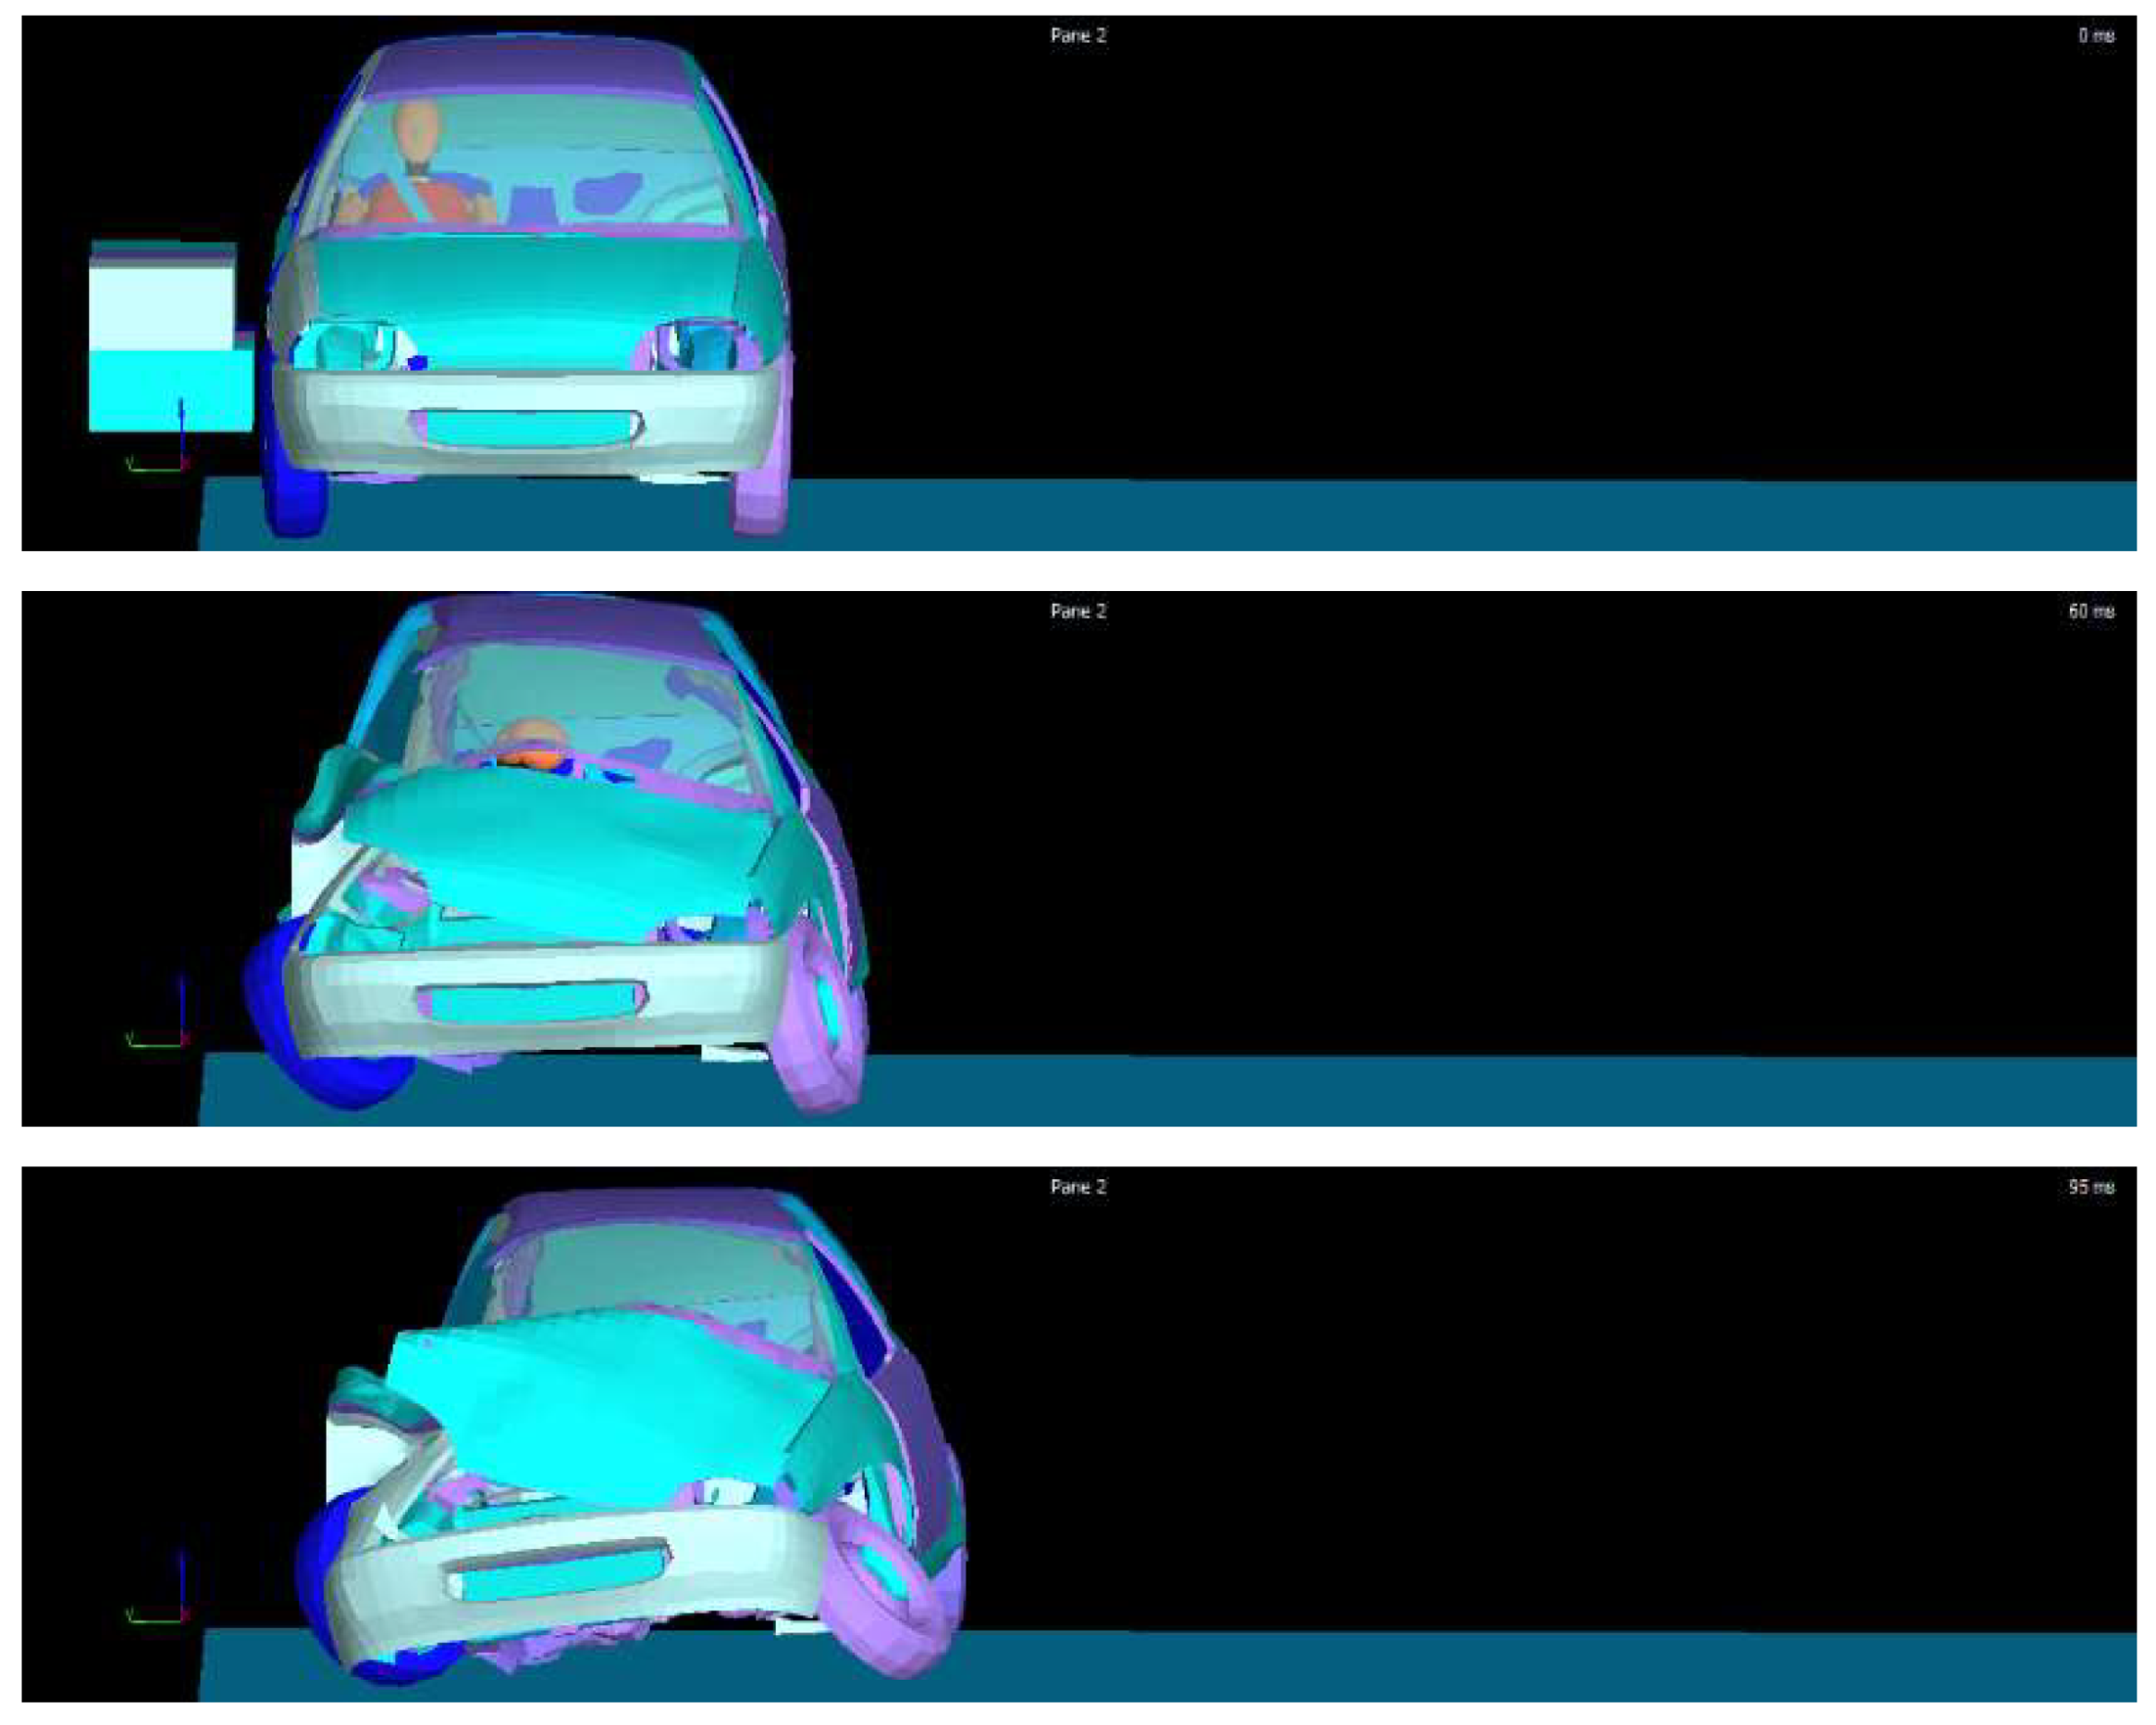
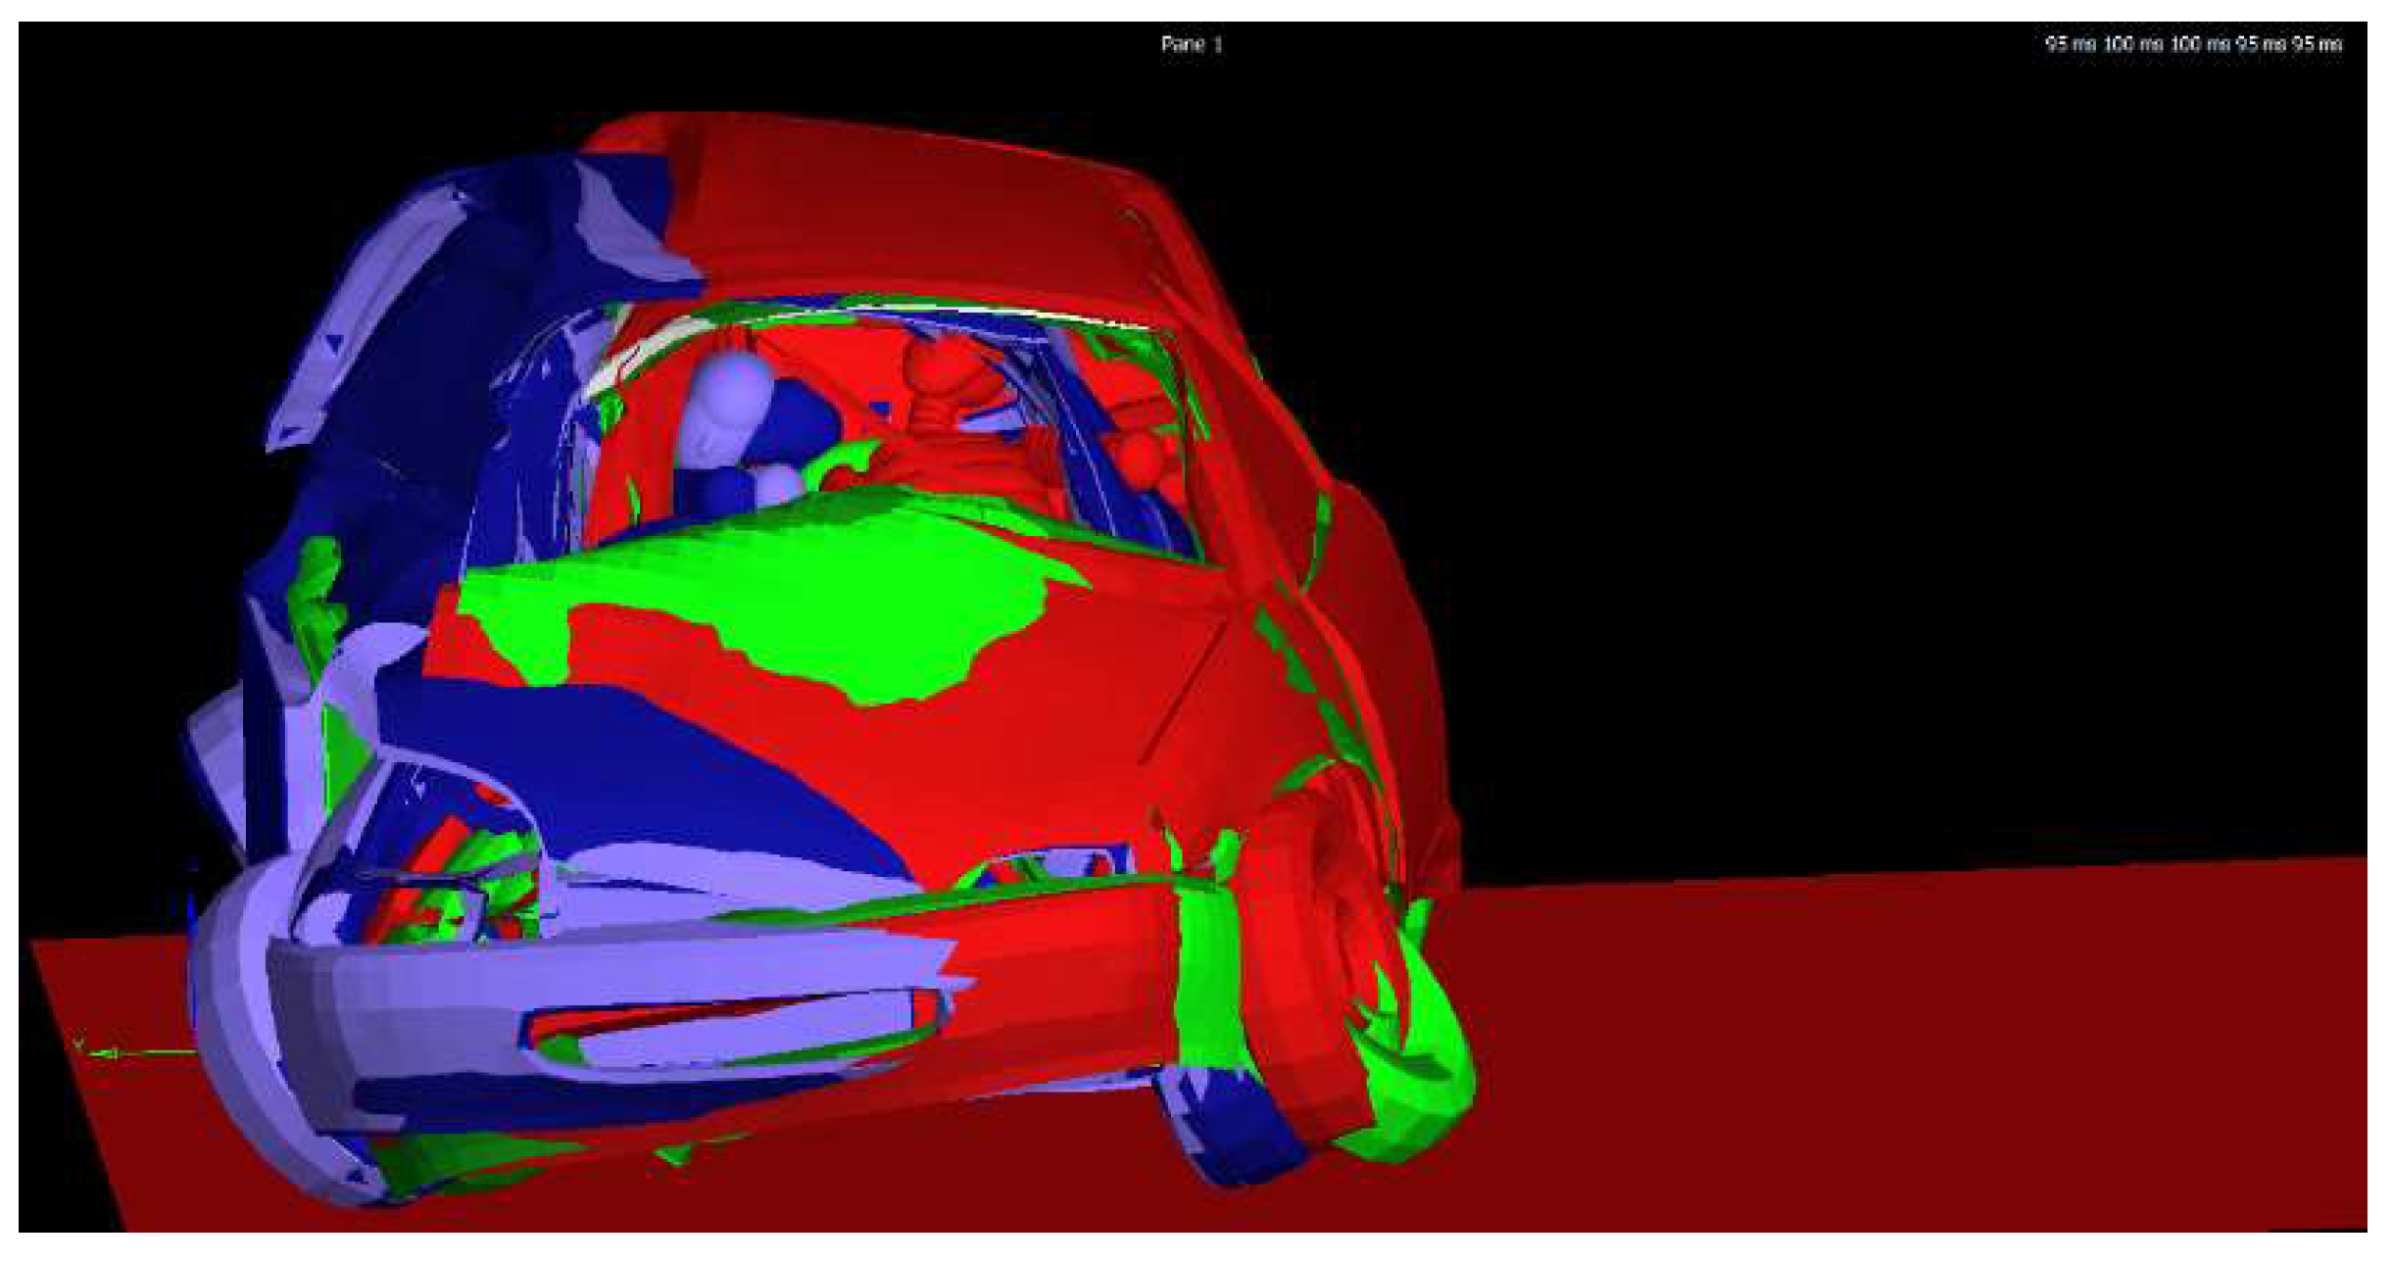
A comparison of the movement shows that in the case of the combustion vehicle the deformation of the lower part of the vehicle is greater and the occupant moves more to the side opposite to the side on which the vehicle is impacted. In the case of configuration 1 and configuration 2 with energy absorbers, the occupant moves more towards the side opposite to the side on which the vehicle receives the impact than in the case of the two configurations without absorbers. This is because the traction battery with absorbers stiffens the area and in the case of not including crash absorbers has a small clearance that allows it to deform and not directly receive the impact, while in the case of having absorbers there is no space before impacting against the traction battery plus absorbers assembly.
Figure 27.
Co-driver kinematic comparison for the different vehicle configurations analyzed.
3.4. Influence of Battery Layout on the Risk of Injury
The influence of battery layout and the presence or absence of energy absorbers on the risk of injury to the co-driver is explained below.
3.4.1. Analysis of Head Injuries
According to the ECE R95 Regulation, the Head Performance Criterion (CCC) applies when there is contact with the head. The CCC is the maximum value of the following formula (1):
where "a" is the resultant acceleration at the center of gravity of the head, in meters per second squared, divided by 9,81, measured as a function of time and filtered with a channel frequency class of 1 000 Hz; "t1" and "t2" are any two moments between the initial and final contact.
This formula corresponds to HIC (Head Injury Criterion) (2):
where t1 is the start time, t2 is the end time, and R(t) is a(t), the acceleration curve experienced by the struck head, where (t) is measured in seconds and a is measured in g's.
A value of 1000 is cited as the injury threshold in aviation regulations. First, the HIC calculation was limited to a 36 ms interval (HIC36) with an injury threshold of 1000. Subsequently, it was revised, limiting the maximum time interval to 15 ms and reducing the injury threshold to 700 (referred to as HIC15). A HIC15 value of 700 represents a 5% risk of serious injury or AIS (Abbreviated Injury Scale) of 4.
The CCC (Head Performance Criterion) should be less or equal to 1000; when there are not head contact. In that case, CCC is not measured or calculated. On the contrary, "no head contact" is indicated.
The following table shows the HIC36 value experienced for each of the configurations analyzed:
Table 14.
HIC36 experienced by the dummy for each of the configurations analyzed.
| Without battery | Config.1 | Config.2 | Config.1 with shock absorbing elements | Config.2 with shock absorbing elements | |
|---|---|---|---|---|---|
| HIC36 | 37.972 | 13.424 | 20.681 | 113.706 | 79.038 |
The values are well above the injury threshold (1000), which is the reason why the curtain airbag and the side airbag have been included in the vehicles.
To obtain an explanation for the difference between the HIC achieved in the different configurations, the acceleration experienced by head of the dummy in each configuration is analyzed.
Figure 28 shows how the maximum acceleration value experienced by the occupant of a combustion vehicle is reduced when a traction battery is added. Moreover, this maximum deceleration is also reached later. The lowest acceleration value is reached in the case of configuration 1. However, by adding crash absorbers and reducing the space between the running board (where the deformable moving barrier is impacted) and the traction battery plus absorbers, the maximum value is reached earlier. However, when that area is stiffened the maximum head acceleration value is higher.
3.4.2. Analysis of Thorax Injuries
According to the ECE R95 Regulation, maximum chest deformation is the maximum deformation value in any rib as determined by the chest displacement transducers, filtered with a channel frequency class of 180 Hz.
The Viscosity Criterion is applied. The maximum viscosity result is the maximum value for the viscosity criterion at any rib, calculated from the instantaneous product of the relative compression of the thorax with respect to the semi thorax and the compression speed derived by compression differentiation, filtered with a channel frequency class of 180 Hz. The normalized width of the half-thoracic cage is considered as 140 mm. Where D (in m) is the rib deformation:
The performance criteria for the thorax shall be:
(a) in the case of the rib deformation criterion, less than or equal to 42 mm.
(b) in the case of the soft tissue criterion (viscosity criterion, VC), less than or equal to 1,0 m/s.
During a transitional period of two years from the date specified in the Regulation, the Viscosity Criterion value shall not be a determining value for passing the approval test but shall be recorded in the test report and registered by the approval authority. After the transitional period has elapsed, the Viscosity Criterion value of 1,0 m/s shall be applied as a pass criterion.
The following chest injury criteria values were obtained in the upper, middle, and lower rib area with MADYMO software:
Table 15.
Rib compression and VC (Viscosity Criterion) for each of the configurations analyzed.
| Without battery | Config.1 | Config.2 | Config.1 with shock absorbing elements | Config.2 with shock absorbing elements | |
|---|---|---|---|---|---|
| Upper Rib Compr. (mm) | 59,47 | 52,24 | 55,08 | 75,90 | 67,26 |
| Mid Rib Compr. (mm) | 69,51 | 46,13 | 48,39 | 48,82 | 42,25 |
| Lower Rib Comp. (mm) | 68,70 | 56,66 | 64,15 | 38,37 | 30,18 |
| Upper Rib VC (m/s) | 1,57 | 1,38 | 1,33 | 3,71 | 2,61 |
| Mid Rib VC (m/s) | 1,94 | 1,15 | 1,34 | 1,46 | 1,03 |
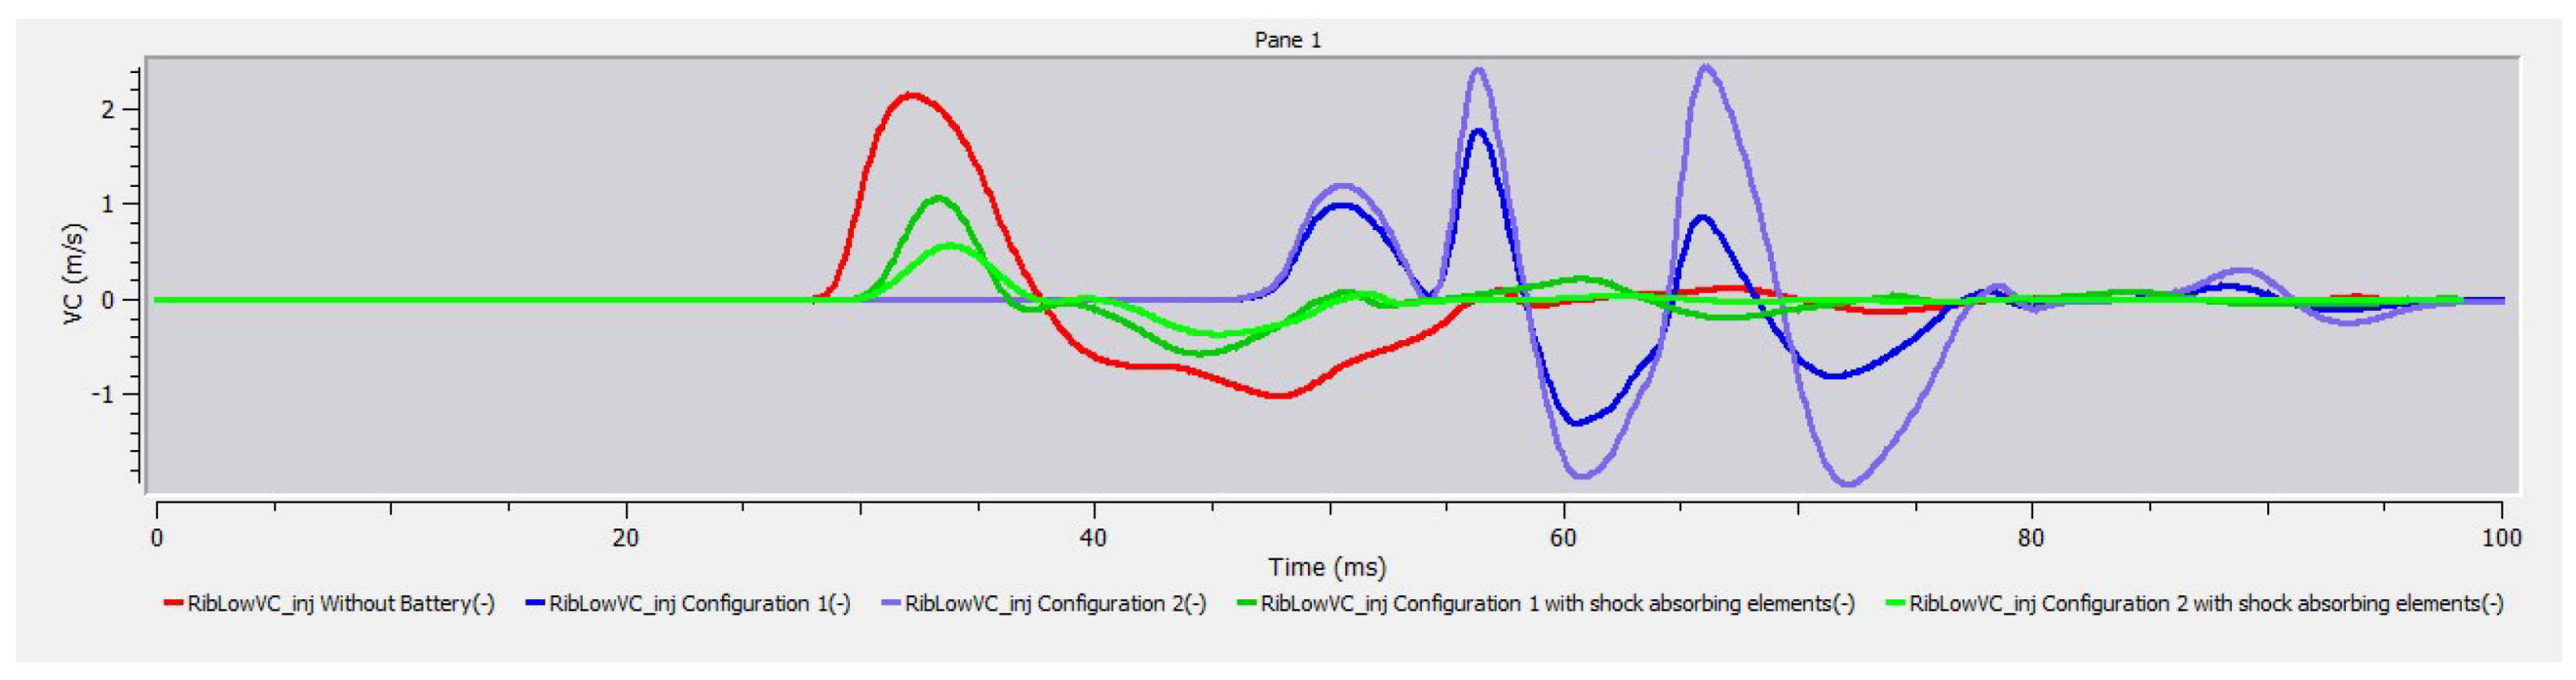
| Lower Rib VC (m/s) | 2,14 | 1,78 | 2,43 | 1,06 | 0,57 |
VC value in the upper part of the ribs reaches the lowest value in the case of configuration 2 and the maximum value in the case of configuration 1 with shock absorbers. In the middle part of the ribs, it reaches the lowest value for the case of configuration 2 with shock absorbers and the maximum value in the case of the combustion vehicle. While in the lower part of the ribs it reaches the lowest value in the case of configuration 2 with shock elements and the maximum value in the case of configuration 2.
Figure 29.
VC at upper ribs for each of the configurations analyzed.
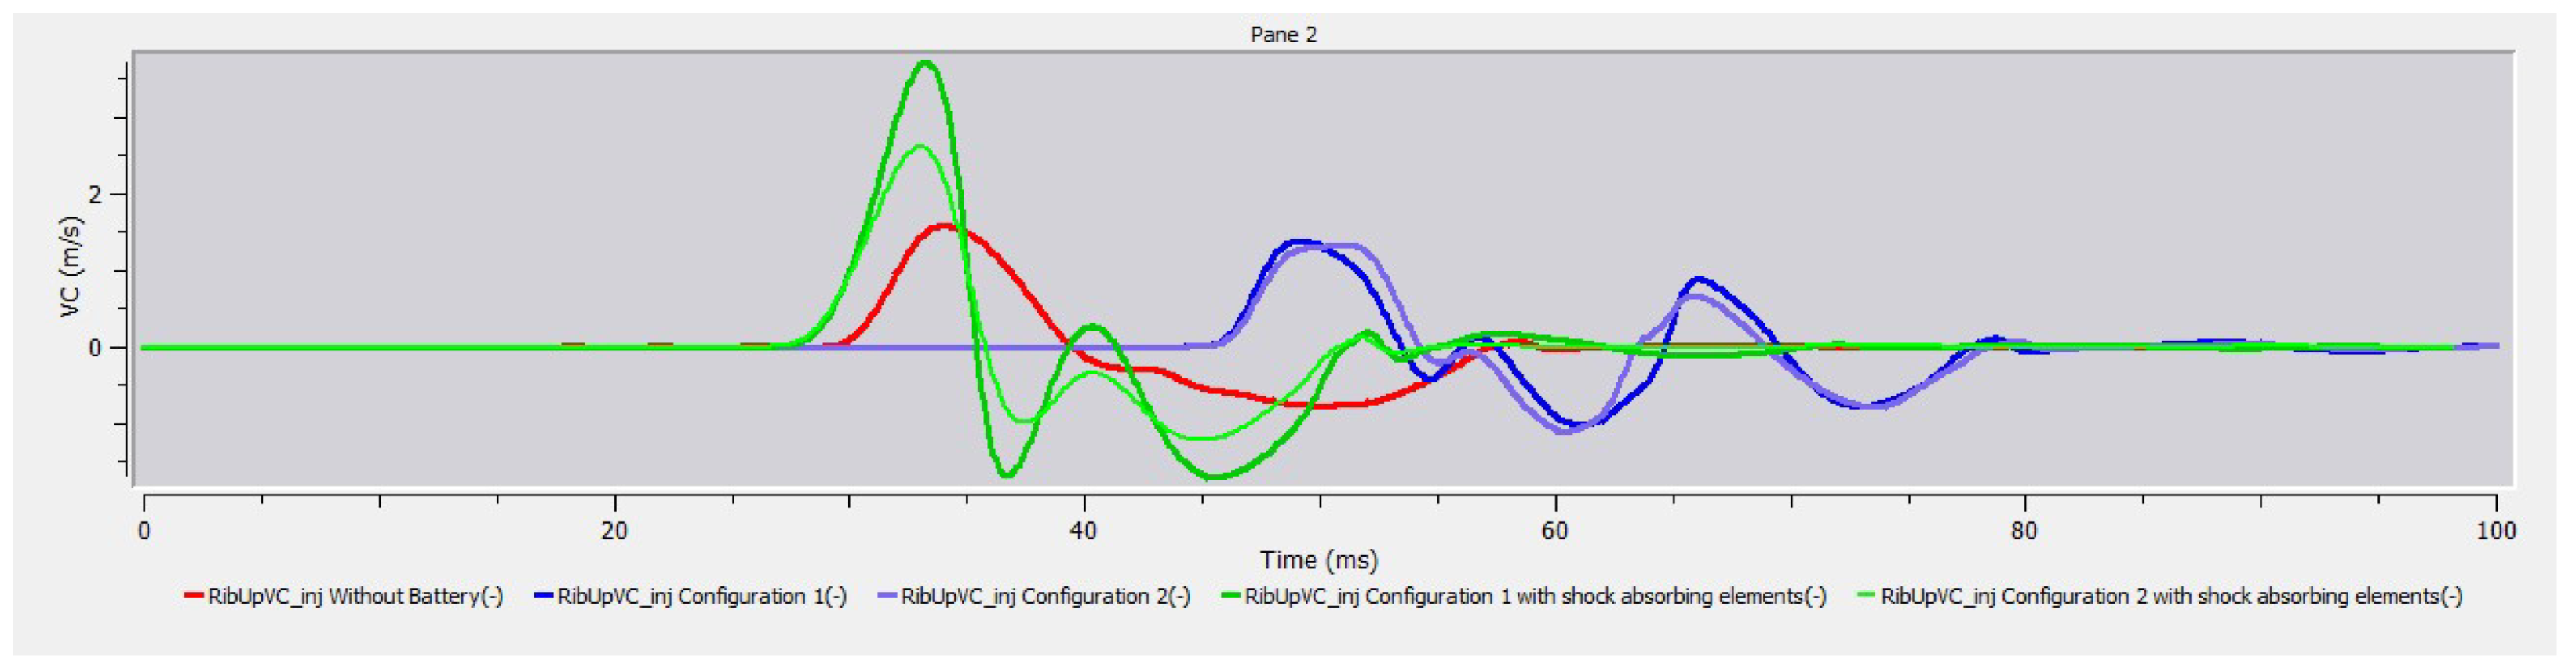
Figure 30.
VC at mid ribs for each of the configurations analyzed.
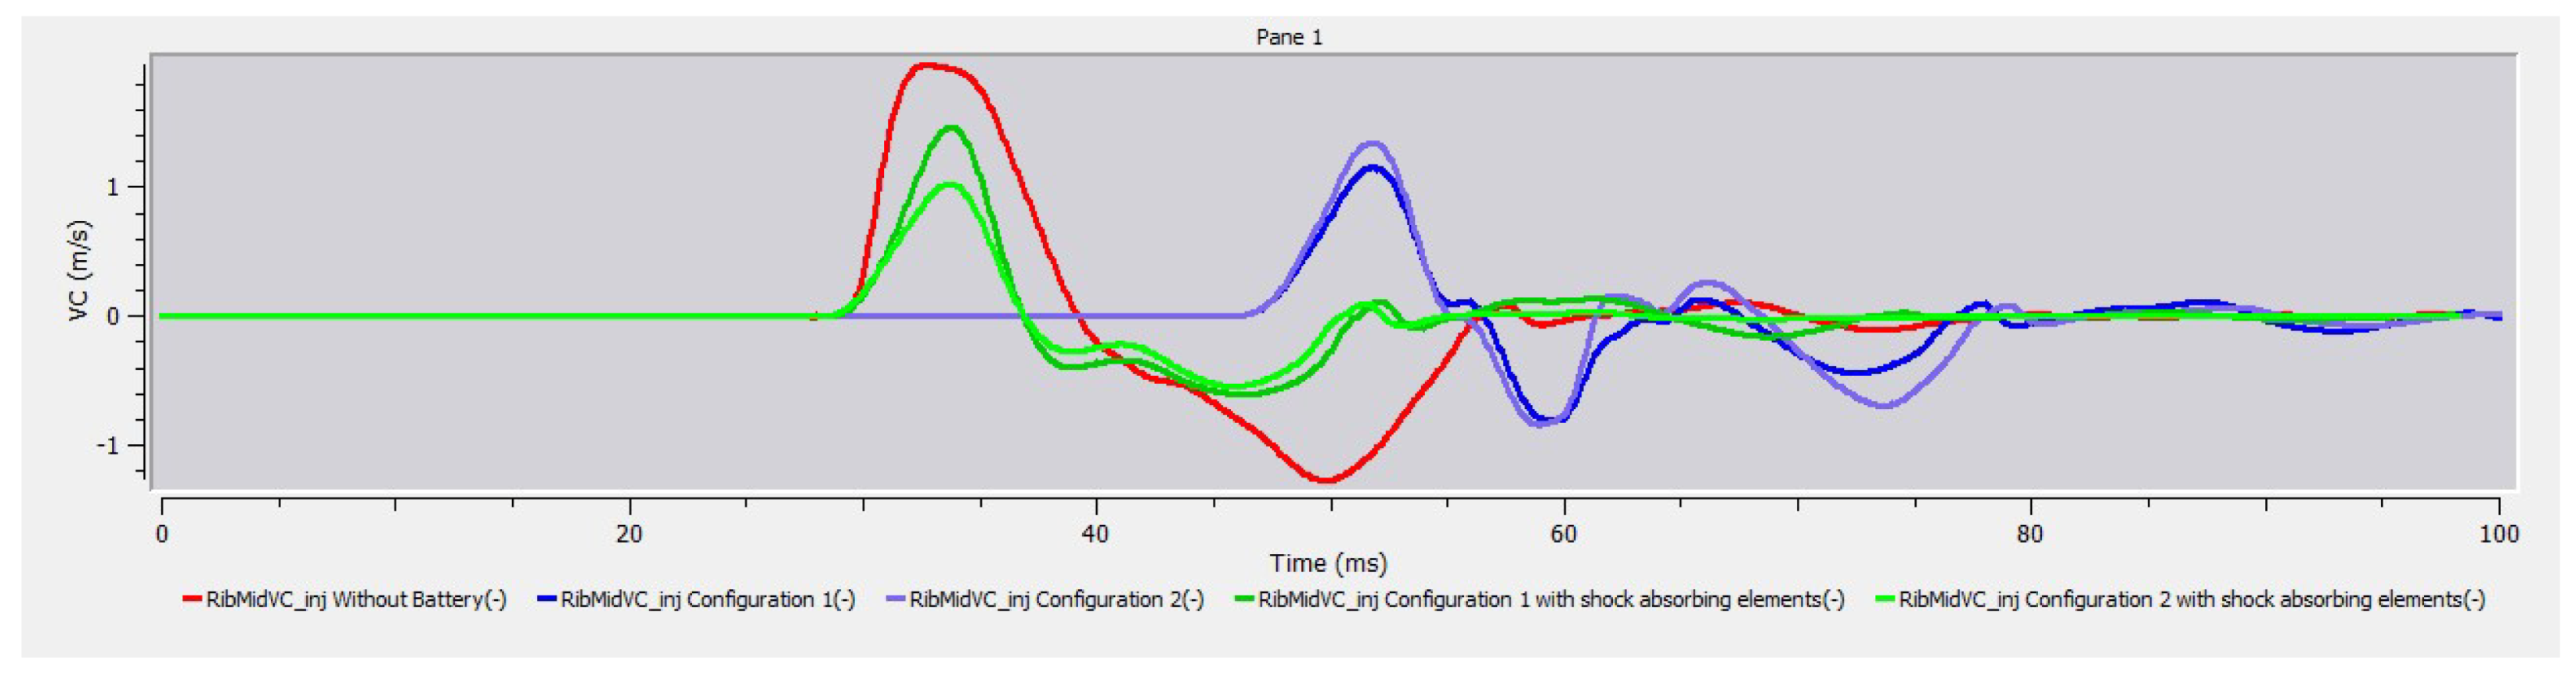
Figure 31.
VC at low ribs for each of the configurations analyzed.
3.4.3. Analysis of Abdomen Injuries
According to ECE Regulation R95, the maximum force on the abdomen is the maximum value of the sum of the three forces measured by transducers mounted 39 mm below the surface of the impacted side, with a CFC of 600 Hz.
The abdominal performance criterion according to ECE Regulation R95 states a maximum force on the abdomen that must be less than or equal to 2,5 kN of internal force (equivalent to an external force of 4,5 kN).
Table 16.
APF value (maximum force in the abdomen) for each of the configurations analyzed.
| Without battery | Config.1 | Config.2 | Config.1 with shock absorbing elements | Config.2 with shock absorbing elements | |
|---|---|---|---|---|---|
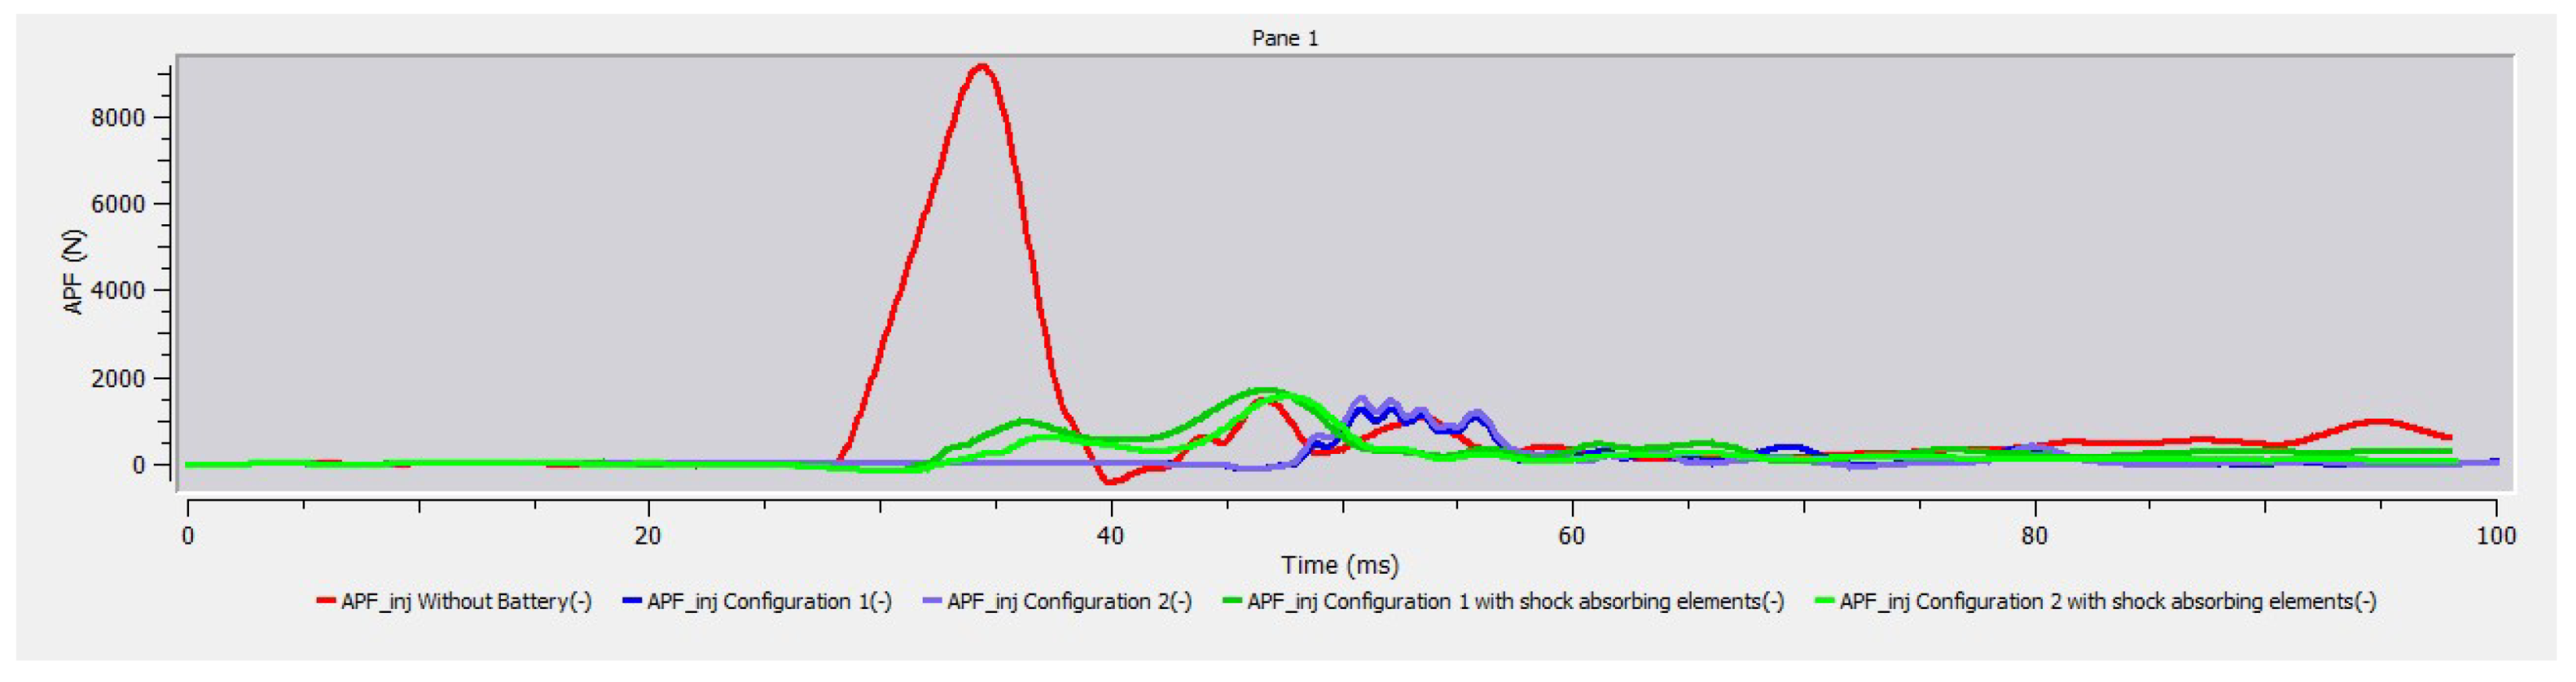
| APF (N) | 9.168,0 | 1.277,0 | 1.539,9 | 1.707,0 | 1.558,9 |
It is observed that the inclusion of the traction battery greatly reduces the value of the maximum force in the abdomen (APF), reaching values that are below the injury threshold value (2.5 kN). The minimum value is reached in the case of configuration 1.
Figure 32.
APF value for each of the configurations analyzed.
3.4.4. Analysis of Pelvis Injuries
According to ECE Regulation R95, the maximum force on the pubic symphysis is the maximum force measured by means of a load cell on the pubic symphysis of the pelvis, filtered with a channel frequency class of 600 Hz.
The criterion for the pelvic behavior according to ECE Regulation R95 states the maximum force on the pubic symphysis that must be less than or equal to 6 kN.
Table 17.
Maximum value of maximum force on the pubic symphysis (PSPF) for each of the configurations analyzed.
Table 17.
Maximum value of maximum force on the pubic symphysis (PSPF) for each of the configurations analyzed.
| Without battery | Config.1 | Config.2 | Config.1 with shock absorbing elements | Config.2 with shock absorbing elements | |
|---|---|---|---|---|---|
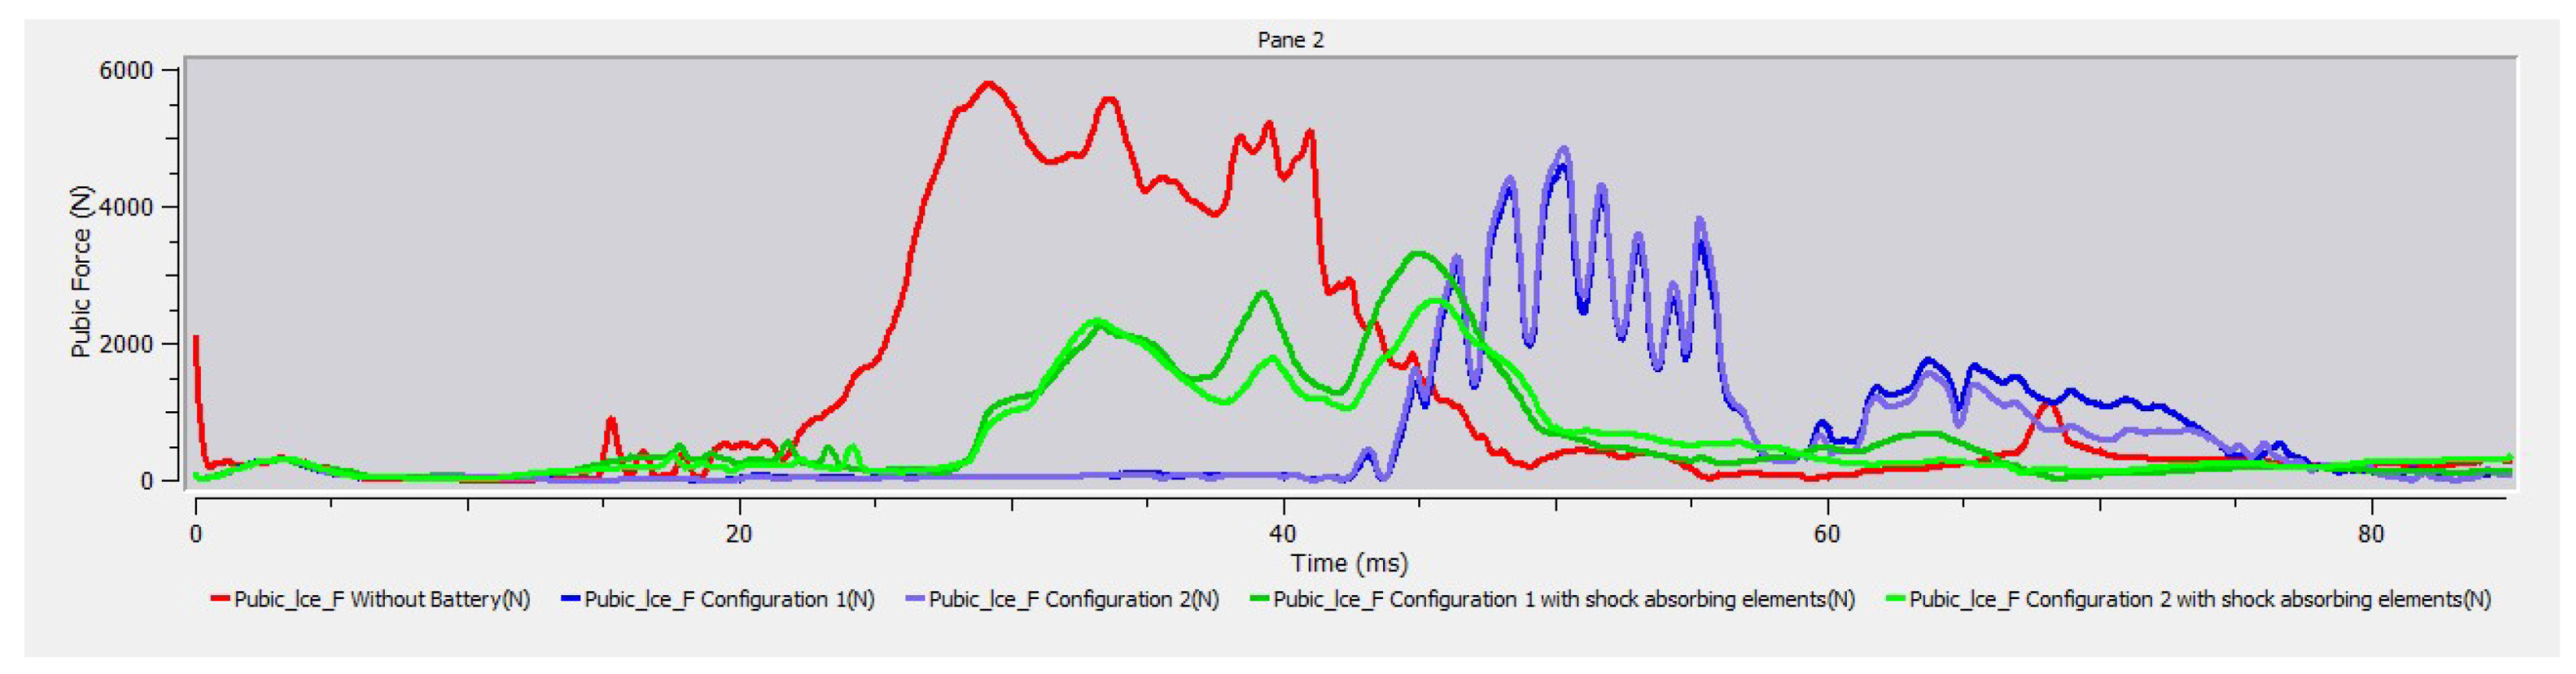
| PSPF (N) | 5792,11 | 4.609,2 | 4.864,3 | 3.323,9 | 2.642,9 |
Including the traction battery, regardless of the configuration, reduces the PSPF value. However, it is below the injury threshold (6 kN) for all cases. The configuration with the lowest PSPF value is configuration 2 with shock absorbers.
Figure 33.
PSPF value for each of the configurations analyzed.
Modifying parameters of the EuroNCAP assessment protocol, Backplate force, T12 vertebra force and T12 vertebra moment, are also obtained.
Table 18.
Value of the modifier parameters for each of the configurations analyzed.
| Without battery | Config.1 | Config.2 | Config.1 with shock absorbing elements | Config.2 with shock absorbing elements | |
|---|---|---|---|---|---|
| Fy force in Backplate | 3.648,2 | 797,77 | 1.194,1 | 3722,3 | 954,81 |
| Fy force in T12 | 10.493,0 | 3.161,2 | 5.071,2 | 7.036,6 | 6.576,8 |
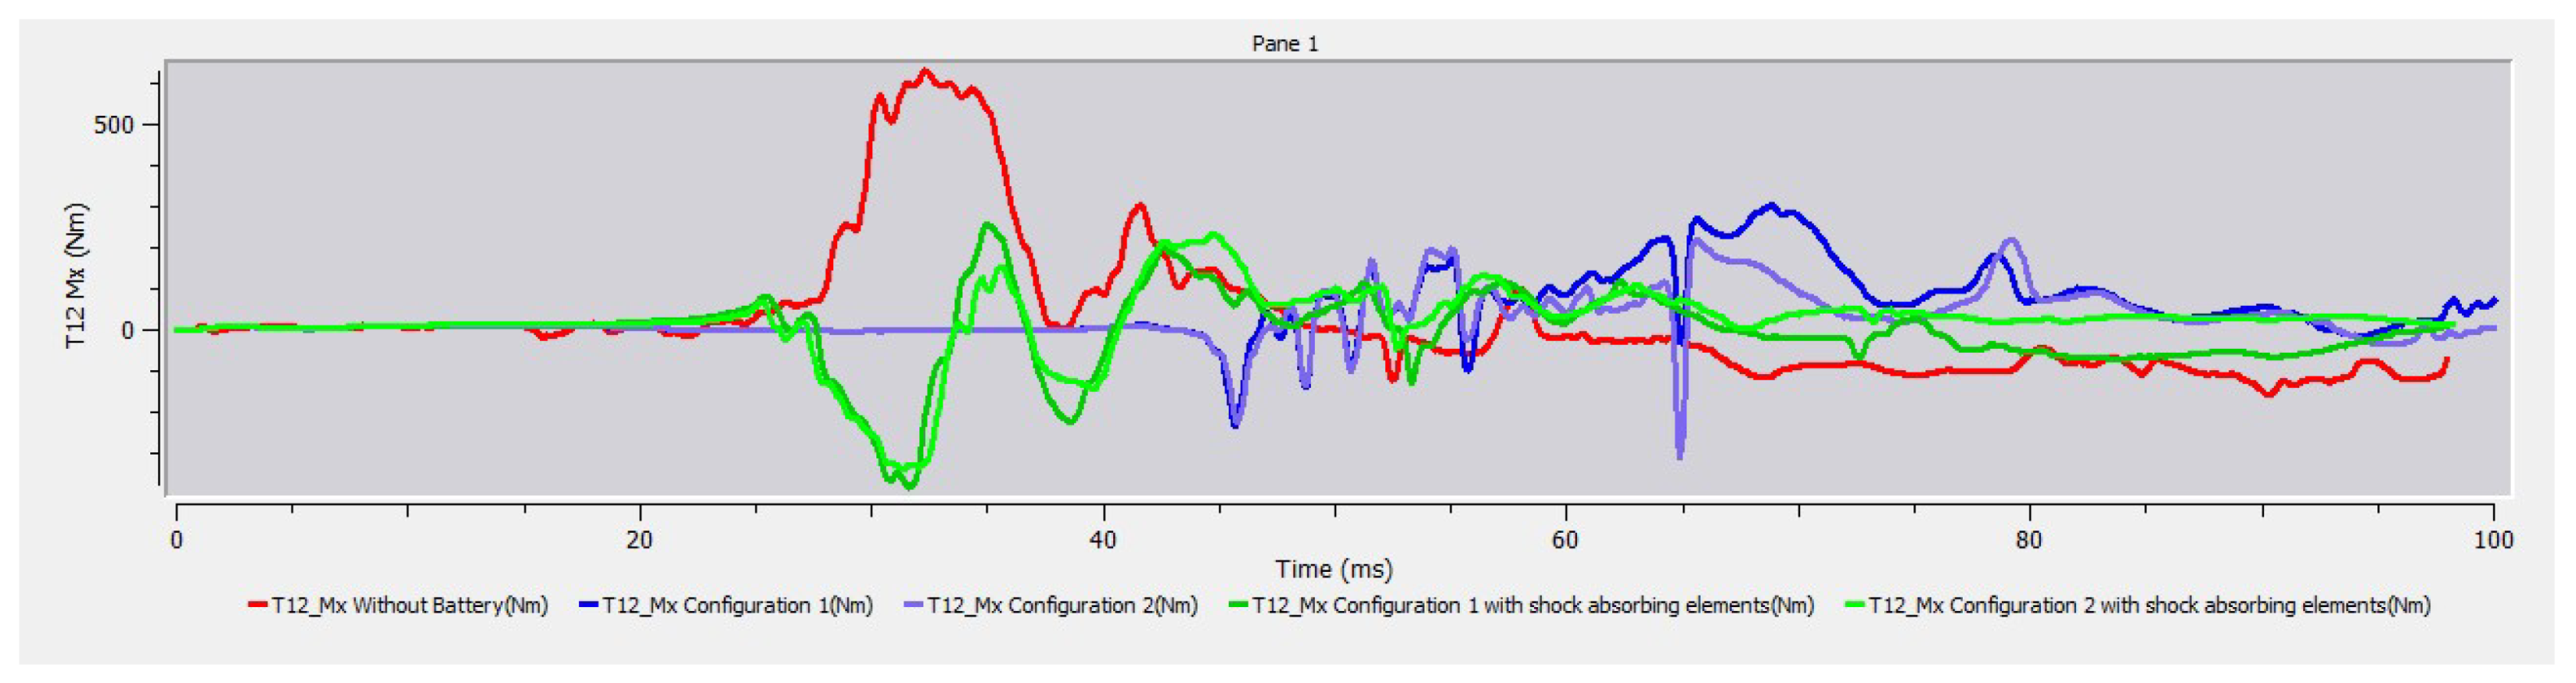
| Mx torque in T12 | 630,57 | 305,85 | 310,55 | 379,45 | 335,50 |
Figure 34.
Fy in the Blackplate for each of the configurations analyzed.
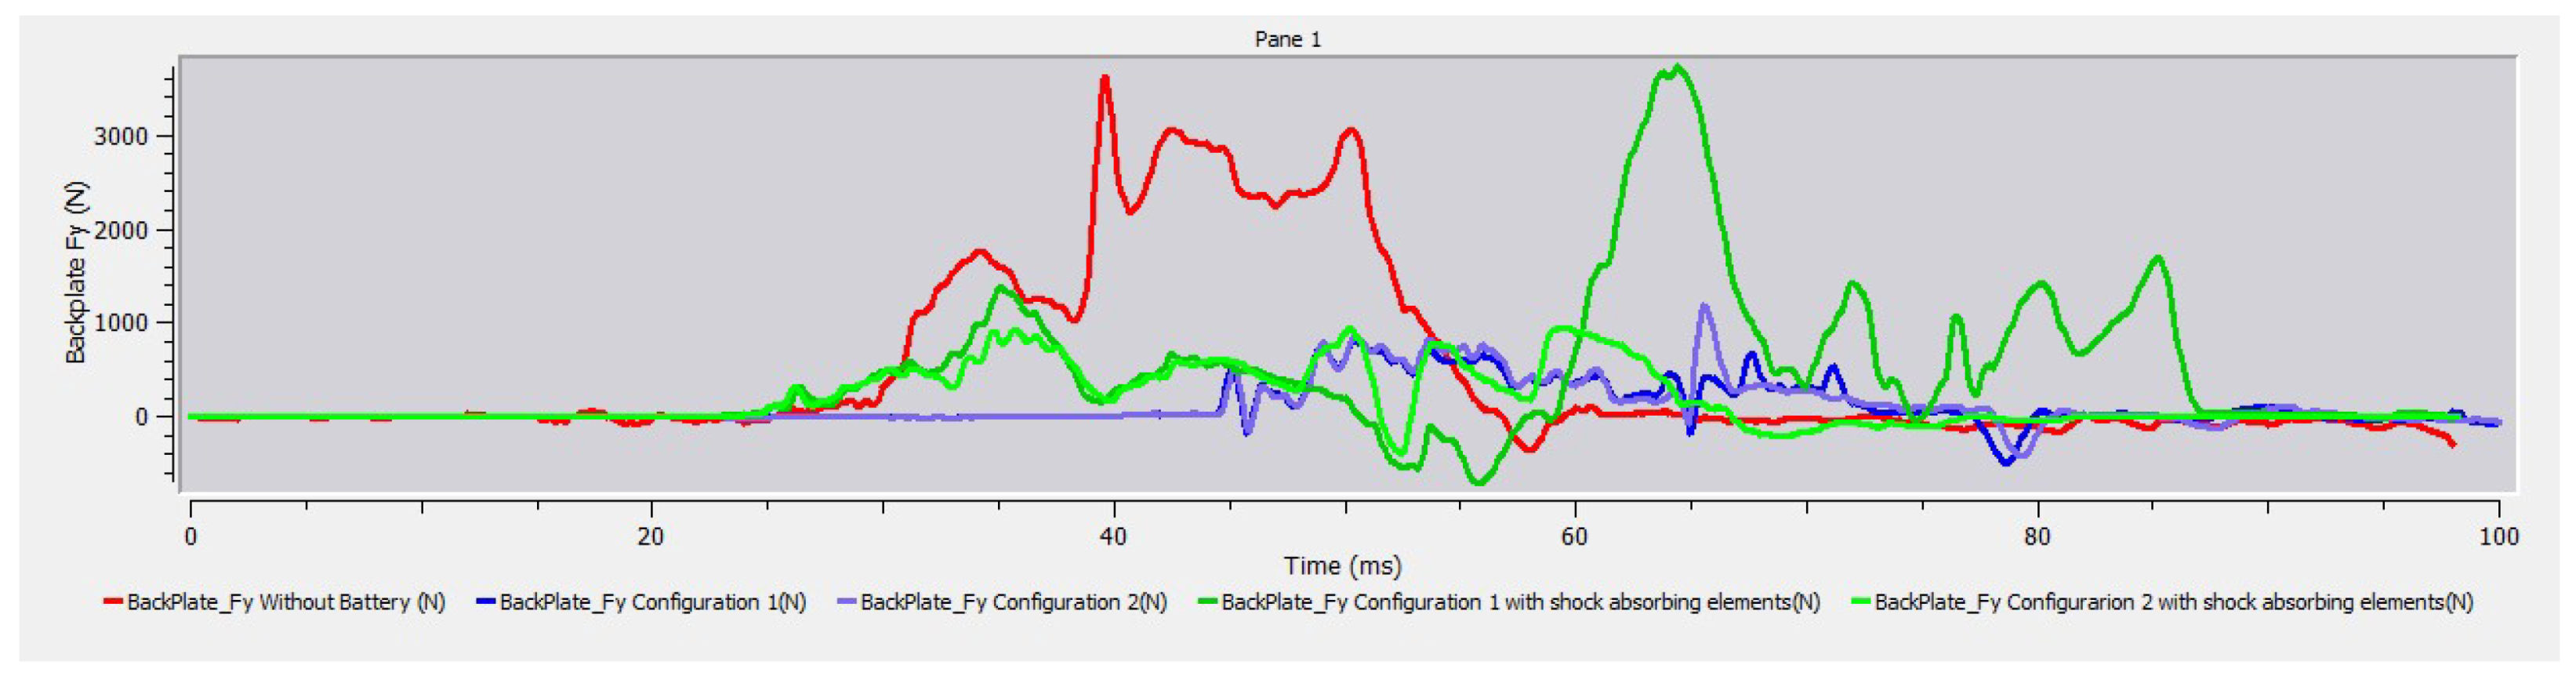
It is observed that the inclusion of the traction battery reduces the value of the force on the backplate, reaching the lowest value in the case of configuration 1.
Figure 35.
Fy at the T12 vertebra for each of the configurations analyzed.
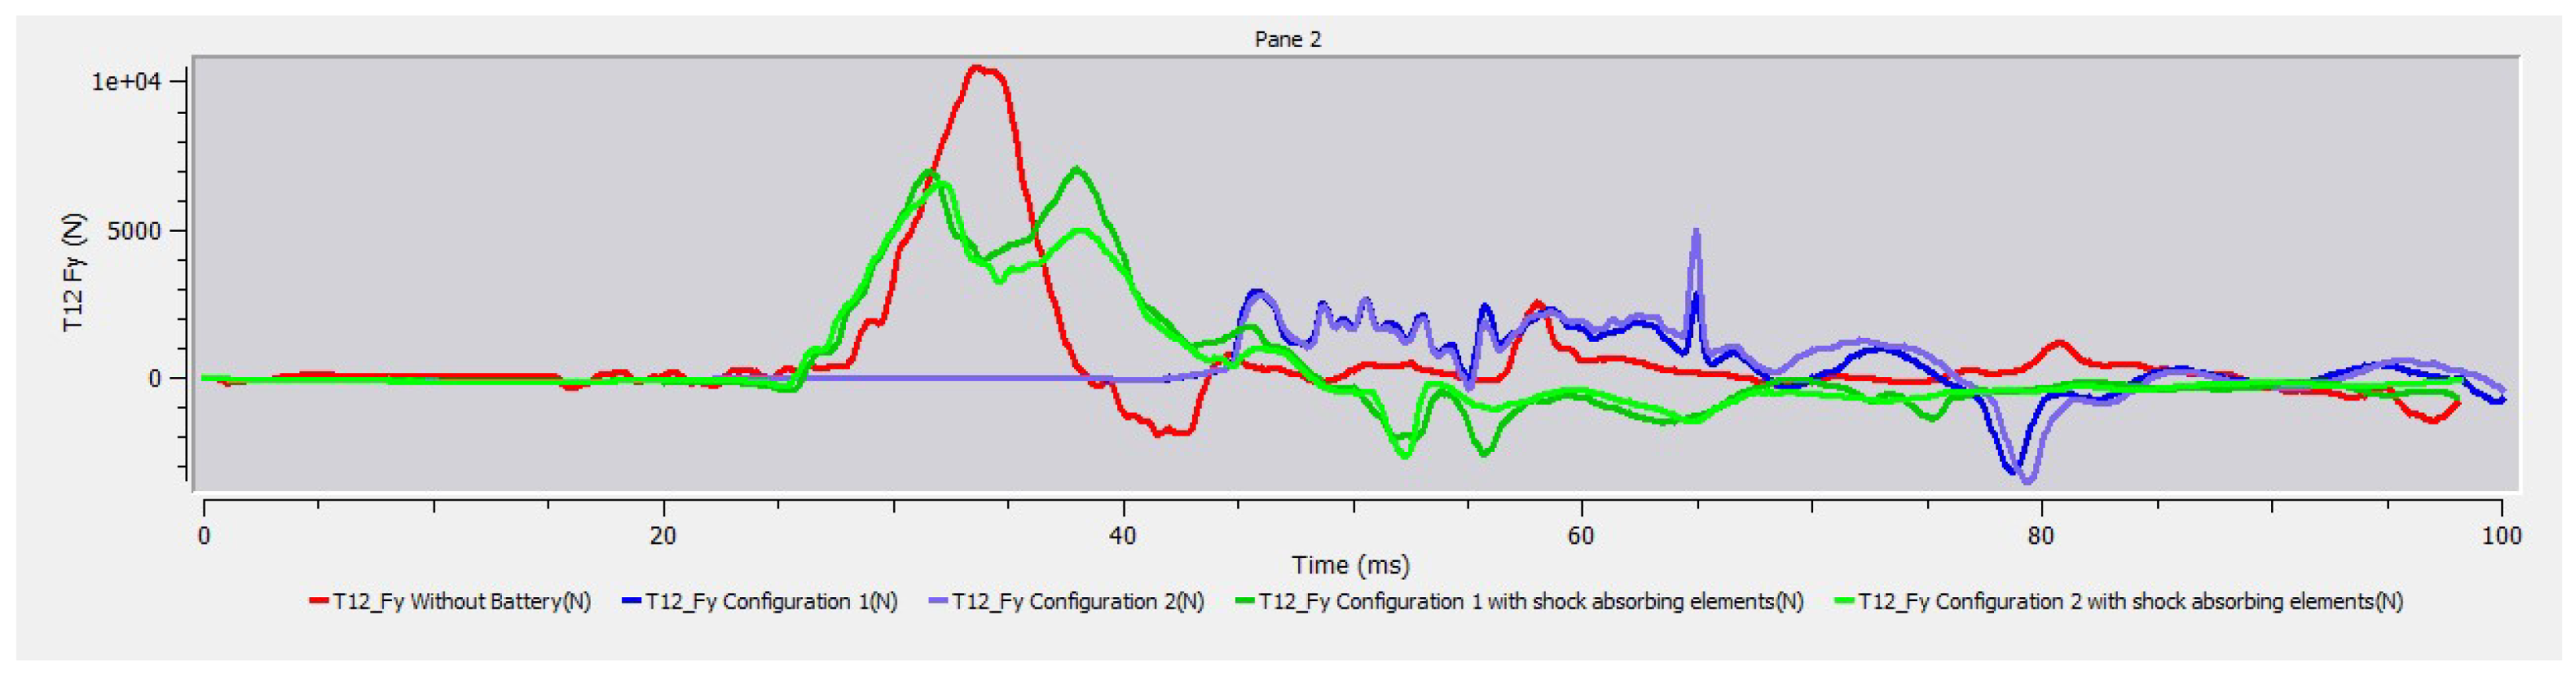
It can be observed that the inclusion of the traction battery reduces the value of the Fy of the T12 vertebra, reaching the lowest value in the case of configuration 1, and reduces the value of the Mx of the T12 vertebra, reaching the lowest value in the case of configuration 1.
Figure 36.
Mx at the T12 vertebra for each of the configurations analyzed.
4. Conclusions
After analyzing the results obtained for each configuration, initial vehicle without battery, configuration 1 and 2 with battery, and both configurations with battery plus absorbers, the following conclusions are reached:
- -
- By including the battery pack in the vehicle, the stiffness of the car floor has been increased, resulting in smaller intrusions into the passenger compartment, which implies and increment in the occupant safety.
- -
- None of the configurations demonstrated enough safety against the Thermal Runaway phenomenon. For all cases, the most critical module type was the one with the largest surface area facing the direction of impact.
- -
- Based on the results obtained, the best option for electrifying the Geo Metro model, used in this study, is configuration 1 with shock absorbers. In this configuration, the lowest intrusions into the passenger compartment are obtained.
- -
- Although the second configuration has a distribution of the modules in such a way as to minimize heat transmission in case of thermal runaway, it performs worse than the first configuration because it is narrower.
- -
- The materials chosen for the body of the model (DOCOL1000 steel) and for the battery casing (DC01 steel) prove to be insufficiently resistant to side impact for some of the models.
- -
- When comparing the movement, it is observed that in the case of the combustion vehicle the deformation of the lower part of the vehicle is greater and the occupant moves more towards the opposite side to the impacted lateral. While in the case of configuration 1 and configuration 2 with absorbers, the occupant moves more towards the side opposite to the impact side on, than in the case of the two configurations without absorbers. This is because the traction battery with absorbers stiffens the area and in the case of not having absorbers has a small clearance that allows it to deform and not directly receive the impact, while in the case of having absorbers there is no space before impacting against the traction battery plus absorbers assembly.
- -
- By including the battery pack in the vehicle, the maximum acceleration value at the occupant head is reduced and the maximum acceleration value is reached later. Configuration 1 is the case where the maximum acceleration value at the occupant head is reduced the most. However, by adding the absorbers, and reducing the space between the running board (where the deformable moving barrier is impacted) and the traction battery plus absorbers, the maximum value is reached earlier and by stiffening the area the maximum head acceleration value is higher.
- -
- The VC value is also reduced when the battery pack is included. Its lowest value is reached at the upper part of the ribs for configuration 2. However, the lowest value at the middle part of the ribs corresponds to configuration 2 + absorbers. Moreover, the lowest value at the lower part of the ribs takes place for configuration 2 + absorbers.
- -
- The inclusion of the traction battery also greatly reduces the maximum force in the abdomen (APF), reaching values that are below the injury threshold (2.5 kN). The minimum value is reached for configuration 1.
- -
- Including the traction battery reduces the PSPF value but in all configurations, reaching values below the injury threshold (6 kN). The configuration with the lowest PSPF is configuration 1 + absorbers.
- -
- On the other hand, including the traction battery also reduces the values of Fy in the backplate and in T12, and reduces the value of Mx in T12, reaching the lowest value of the three analyzed variables for configuration 1.
- -
- Taking all the results into account, the best option for electrifying the studied Geo Metro car is configuration 1, which would produce the lowest injuries to the right front occupant.
- -
- There is not a direct impact on the battery pack for any configuration. This demonstrates that the compact designs proposed in this project makes possible to implement a narrow battery that does not suffer a direct collision. In addition, the structural elements of the vehicle itself and the components of the battery pack can absorb the impact energy so that the impact does not hit the modules. However, in general, when energy absorbers are included, loads suffered by the occupant are reduced.
- -
- Since in all configurations a thermal runaway has been initiated in the same type of module, it would be necessary to protect the modules facing the impact direction from deformations above the defined maximum shortening. For this purpose, one or more of the following solutions can be implemented:
- -
- Change the material of the module shells and/or increase their thickness.
- -
- Reinforcing the battery casingE by changing the material or increasing the thickness.
- -
- Increasing the energy absorbed by deformation before it reaches the modules through thicker shock absorbing elements, however, this option is limited to the space available.
- -
- Another solution would be to include absorption elements inside the doors. These would be closer to the impact area, ensuring their effectiveness and thus further reducing intrusion into the passenger compartment during impact.
- -
- Place a thin absorber element between the floor of the housing and the floor of the vehicle to reduce stresses on the battery. This element would also reduce the stresses produced when rolling over uneven ground, providing cushioning.
- -
- Avoid contact between the casing and the ground by raising the casing. This could be combined with a bar structure under the battery which would additionally provide stiffness to the vehicle floor.
- -
- Additional work on the absorbers would be necessary to further reduce the stresses on the occupant.
- -
- To reduce head and rib injuries, restraint, and protection systems such as curtain airbags or side airbags, as well as absorber elements in the door panel, should be incorporated into the model.
Author Contributions
Conceptualization, A.O. and L.C.; Data curation, A.O. and L.C.; Formal analysis, A.O. and L.C.; Funding acquisition, A.O. and L.C..; Investigation, A.O. L.C. and D.V.; Methodology, A.O. and D.V.; Project administration, L.C.; Resources, A.O. L.C. and D.V.; Supervision, L.C.; Writing—original draft, A.O. and L.C.; Writing—review & editing, A.O. All authors have read and agreed to the published version of the manuscript.
Acknowledgments
The authors are grateful for the support received through the Industrial Doctorate financed by the University of Zaragoza (DI 4/ 2020) and Centro Zaragoza, in which the work presented in this article is framed.
References
- Bakker J., Sachs C., Otte D., Justen R., Hannawald L., Friesen F. Analysis of fuel cell vehicles equipped with compressed hydrogen storage systems from a road accident safety perspective. SAE Int. J. Passeng. Cars Mech. Syst. 4(2011) pp. 332-343. [CrossRef]
- Xuning F., Minggao O., Xiang L., Languang L., Yong X., Xiangming H. Thermal Runaway mechanism of lithium ion battery for electric vehicles: A review. Energy storage materials, 2018, Volume 10, pp. 246-267. [CrossRef]
- Dirección General de Tráfico (DGT). Siniestralidad mortal en vías interurbanas 2022 (cómputo de personas fallecidas a 24 horas): Datos provisionales. 2023. Observatorio Nacional de Seguridad Vial.
- NHTSA, U.S. Department of Transportation, National Highway Traffic Administration.Laboratory Test Procedure for FMVSS No. 214, Dynamic Side Impact Protection. 2012.
- BOE. Reglamento n°95 de Naciones Unidas – Prescripciones uniformes sobre la homologación de los vehículos en lo realtivo a la protección de sus ocupantes en caso de colisión lateral (2021/1861). 2021. Available online: https://www.boe.es/buscar/doc.php?id=DOUE-L-2021-81479 (accessed on 3 April 2023).
- Bahouth G.T., Murakhovskiy D., Digges K.H., Rist H., Wiik R. Opportunities for reducing far-side casualties. 24th International Technical Conference on the Enhanced Safety of Vehicles (ESV). 2015. Gothenburg, Sweden, National Highway Traffic Safety Administration.
- Gabler H.C., et al. Far-side impact injury risk for belted occupants in Australia and the United States. 2005. Proceedings of the 19th International Conference on Enhanced Safety of Vehicles, 2005, Washington DC, USA.
- Trumph. El reto: una fabricación rentable y fiable en cuanto a los procesos de baterías de iones litio de alto rendimiento para la electromovilidad. 2023. Available online: https://www.trumpf.com/es_MX/soluciones/sectores/automocion/electromovilidad/celdas-de-bateria-y-modulos/ (accessed on 12 April 2023).
- Marklines. Nissan Leaf Teardown: Lithium-ion battery pack structure. 2023. Available online: https://www.marklines.com/en/report_all/rep1786_201811 (accessed on 12 April 2023).
- Maluf, N. Qnovo, 2023. Available online: https://www.qnovo.com/blogs/inside-the-battery-of-a-nissan-leaf (accessed on 12 April 2023).
- Wang, Z.; Mao, N.; Jiang, F. Study on the effect of spacing on thermal runaway propagation for lithium-ion battery. Springer 2019. Environmental Science. Engineering Journal of Thermal Analysis and Calorimetry. [CrossRef]
- Setiawan R, Salim M.R. Crashworthiness Design for an Electric City Car against Side Pole Impact. Journal of Engineering and Technological Sciences, 2017, Vol. 49. [CrossRef]
- Air Force and Naval Air Systems Command. Technical manual. Engineering Series for Aircraft Repair.1967. Aerospace Metals - General Data and Usage Factors.
- Knight Group. 2017. Available online: https://www.knight-group.co.uk/wp-content/uploads/PM%20Files/Spanish/Materials/PMQR78%20Spanish%20Knight%20Group%20Carbon%20and%20Mild%20Steels.pdf. (accessed on 12 April 2023).
- ASM International. Volume 2: Properties and Selection: Nonferrous Alloys and Special-Purpose Materials. 1400 Crystal Drive, Suite 430, Arlington, VA 22209: s.n., 1990.
- Yue Q., Louis G.H., Christine J. Lithium Concentration Dependent Elastic Properties of Battery Electrode Materials from First Principles Calculations. 2014. Journal of the electrochemical Society, 161 (11) F3010-F3018. [CrossRef]
- Simcenter MADYMO Model Manual. Siemens Version 2212 Model Manual, 22. 20 December.
- Wang Z., Mao N., Jiang F. Study on the effect of spacing on thermal runaway propagation for lithium-ion battery. Springer 2019. Environmental Science, Engineering Journal of Thermal Analysis and Calorimetry. arXiv:10.1007/s10973-019-09026-6.
- Brooke, L. SAE International. 2021. Available online: https://www.mobilityengineeringtech.com/component/content/article/ae/pub/features/articles/45150?r=40733 (accessed on 9 May 2023).
Figure 13.
ES-2(re) ellipsoid dummy (left), used in the simulation, and ES-2(re) faceted dummy (right) in its reference position [17].
Figure 13.
ES-2(re) ellipsoid dummy (left), used in the simulation, and ES-2(re) faceted dummy (right) in its reference position [17].
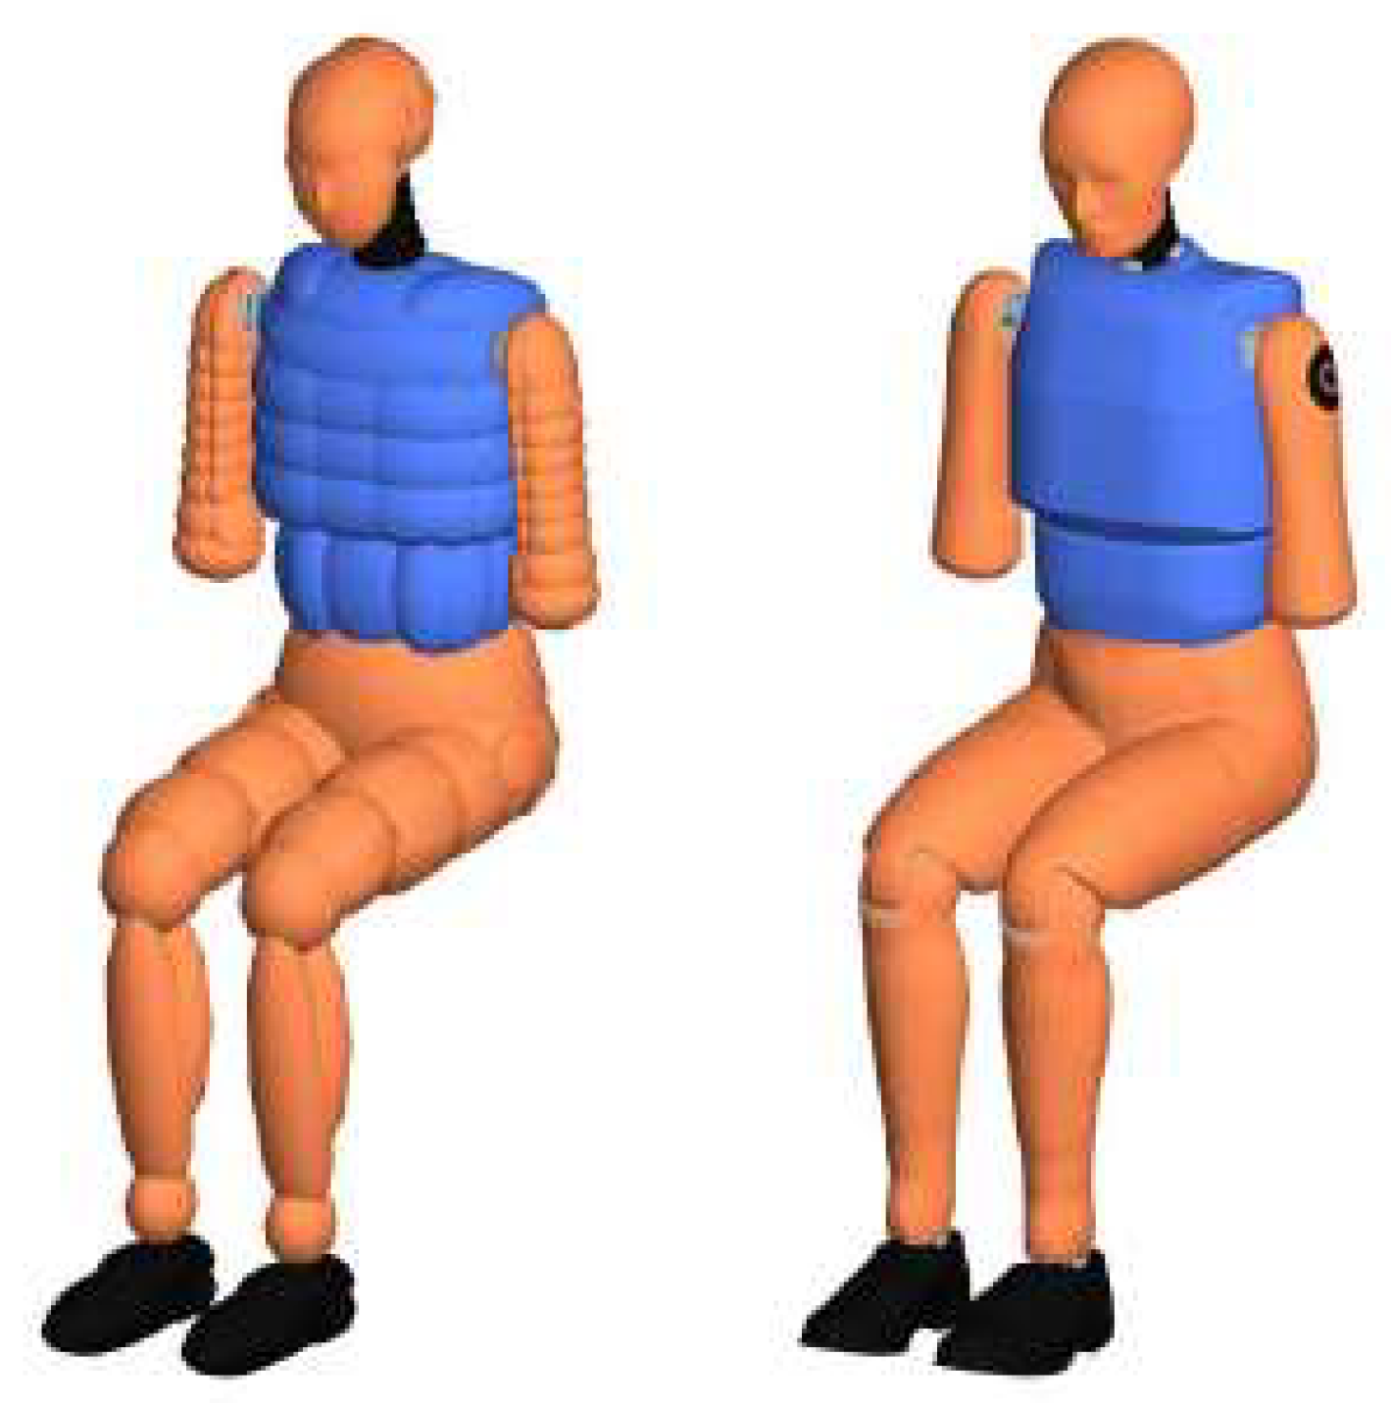
Figure 15.
Whole model to be simulated according to ECE Regulation R95 using the EuroSID-2 dummy.
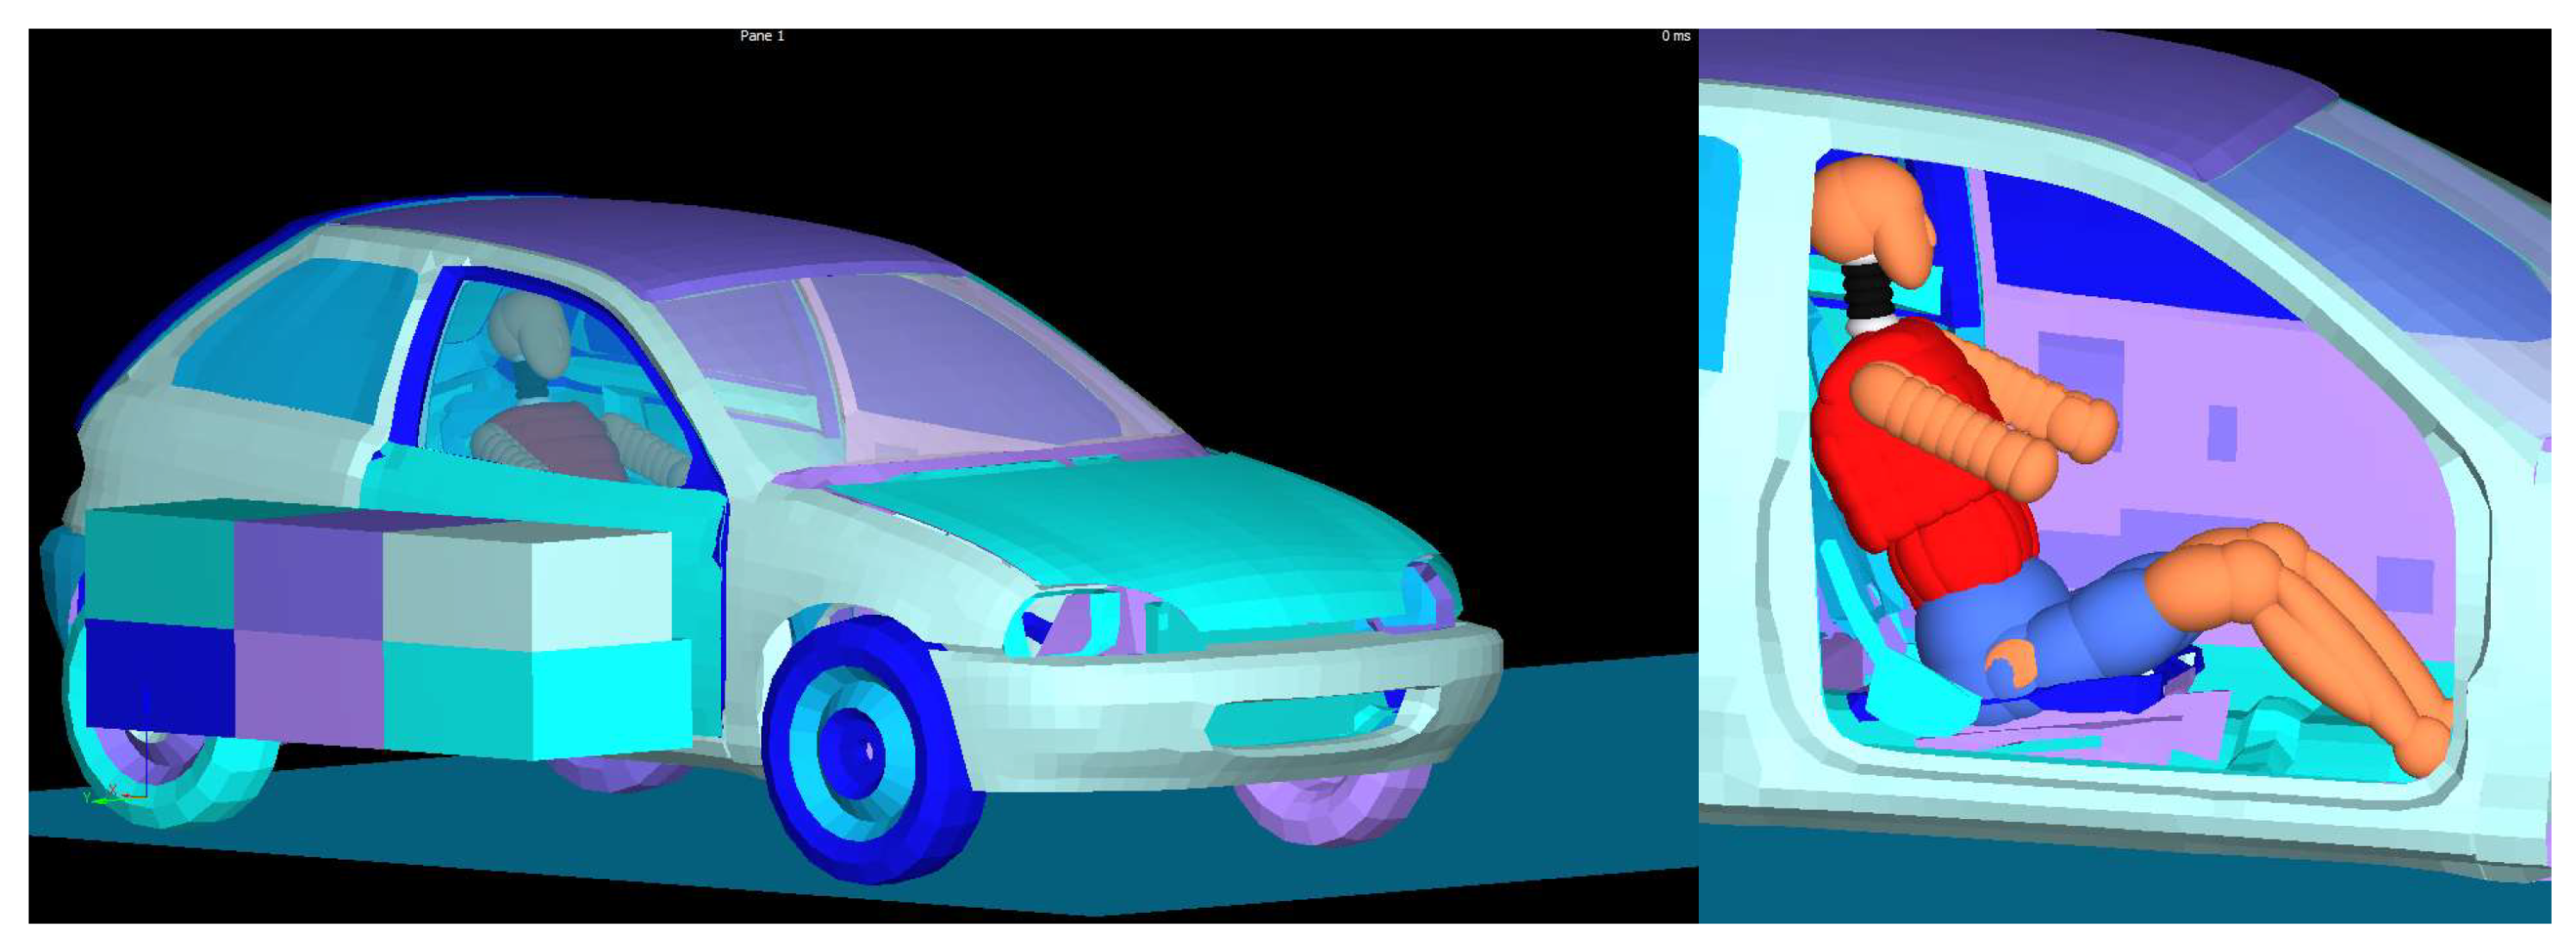
Figure 16.
Deformed car model at the instant of maximum deformation. From left to right and from top to bottom: configuration without battery, configuration 1, configuration 2, configuration 1 with absorbers and configuration 2 with absorbers.
Figure 16.
Deformed car model at the instant of maximum deformation. From left to right and from top to bottom: configuration without battery, configuration 1, configuration 2, configuration 1 with absorbers and configuration 2 with absorbers.
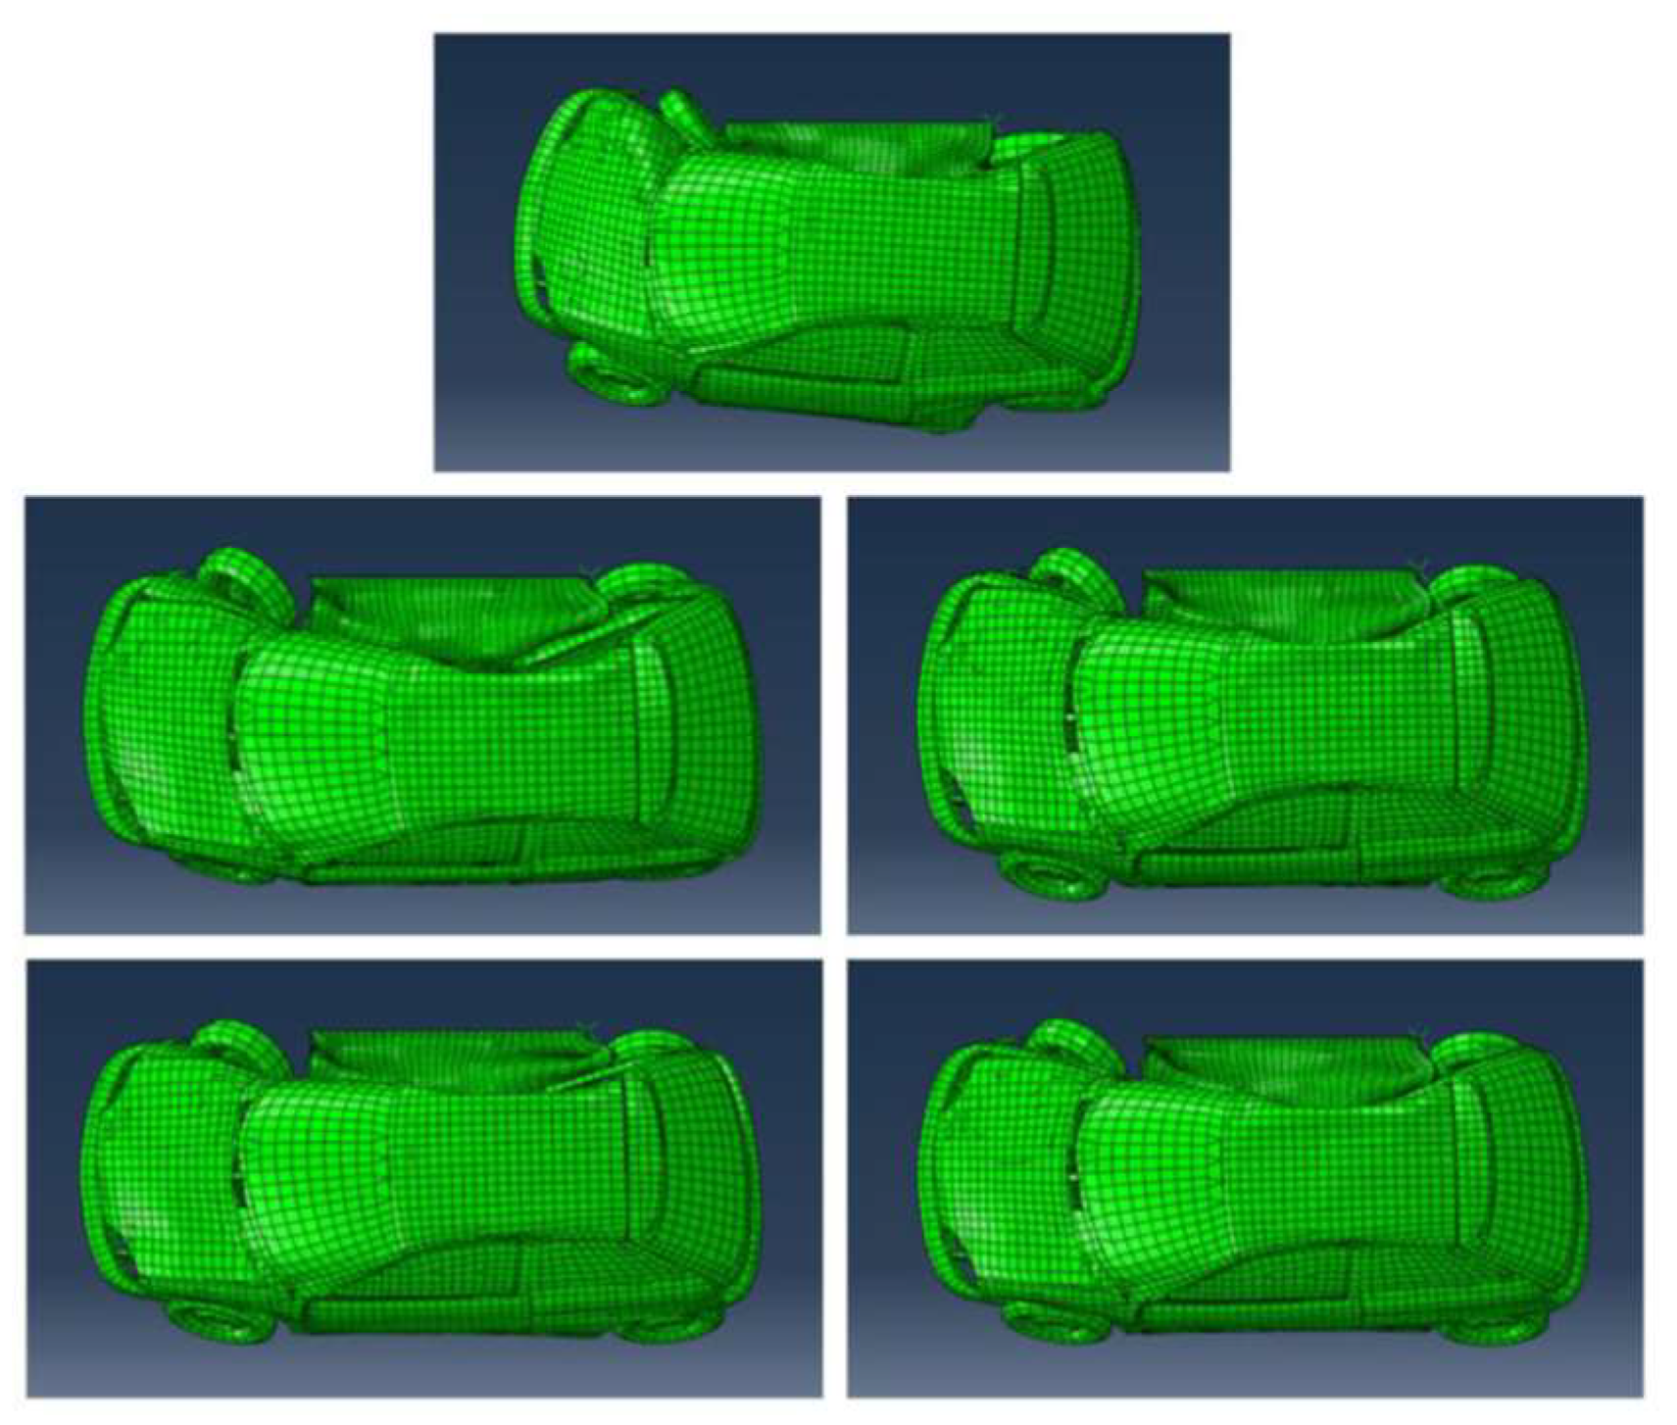
Figure 19.
Nodes selected for the calculation of dTmax and dTmean at the instant of maximum penetration.
Figure 19.
Nodes selected for the calculation of dTmax and dTmean at the instant of maximum penetration.
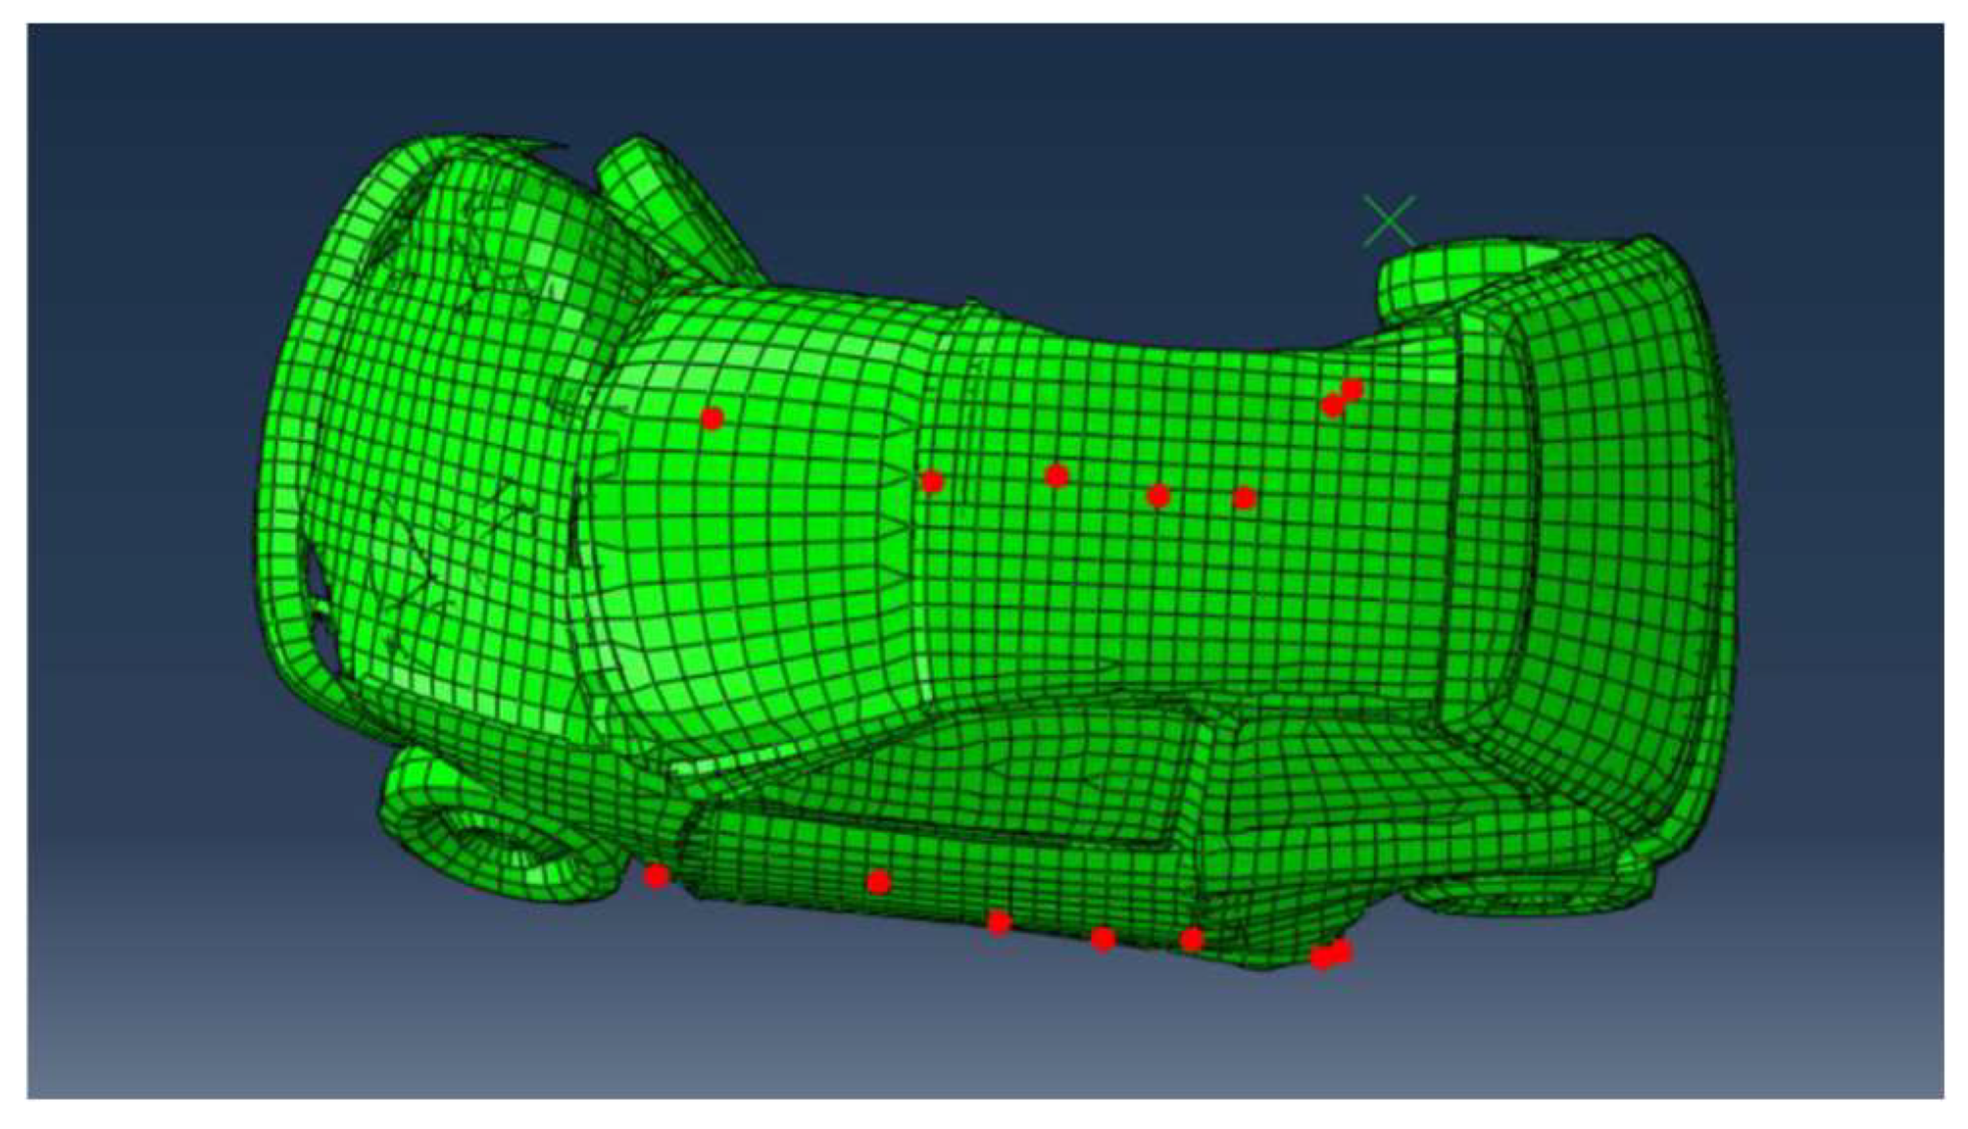
Figure 20.
Nodes selected for the calculation of dH at the instant of maximum deformation.
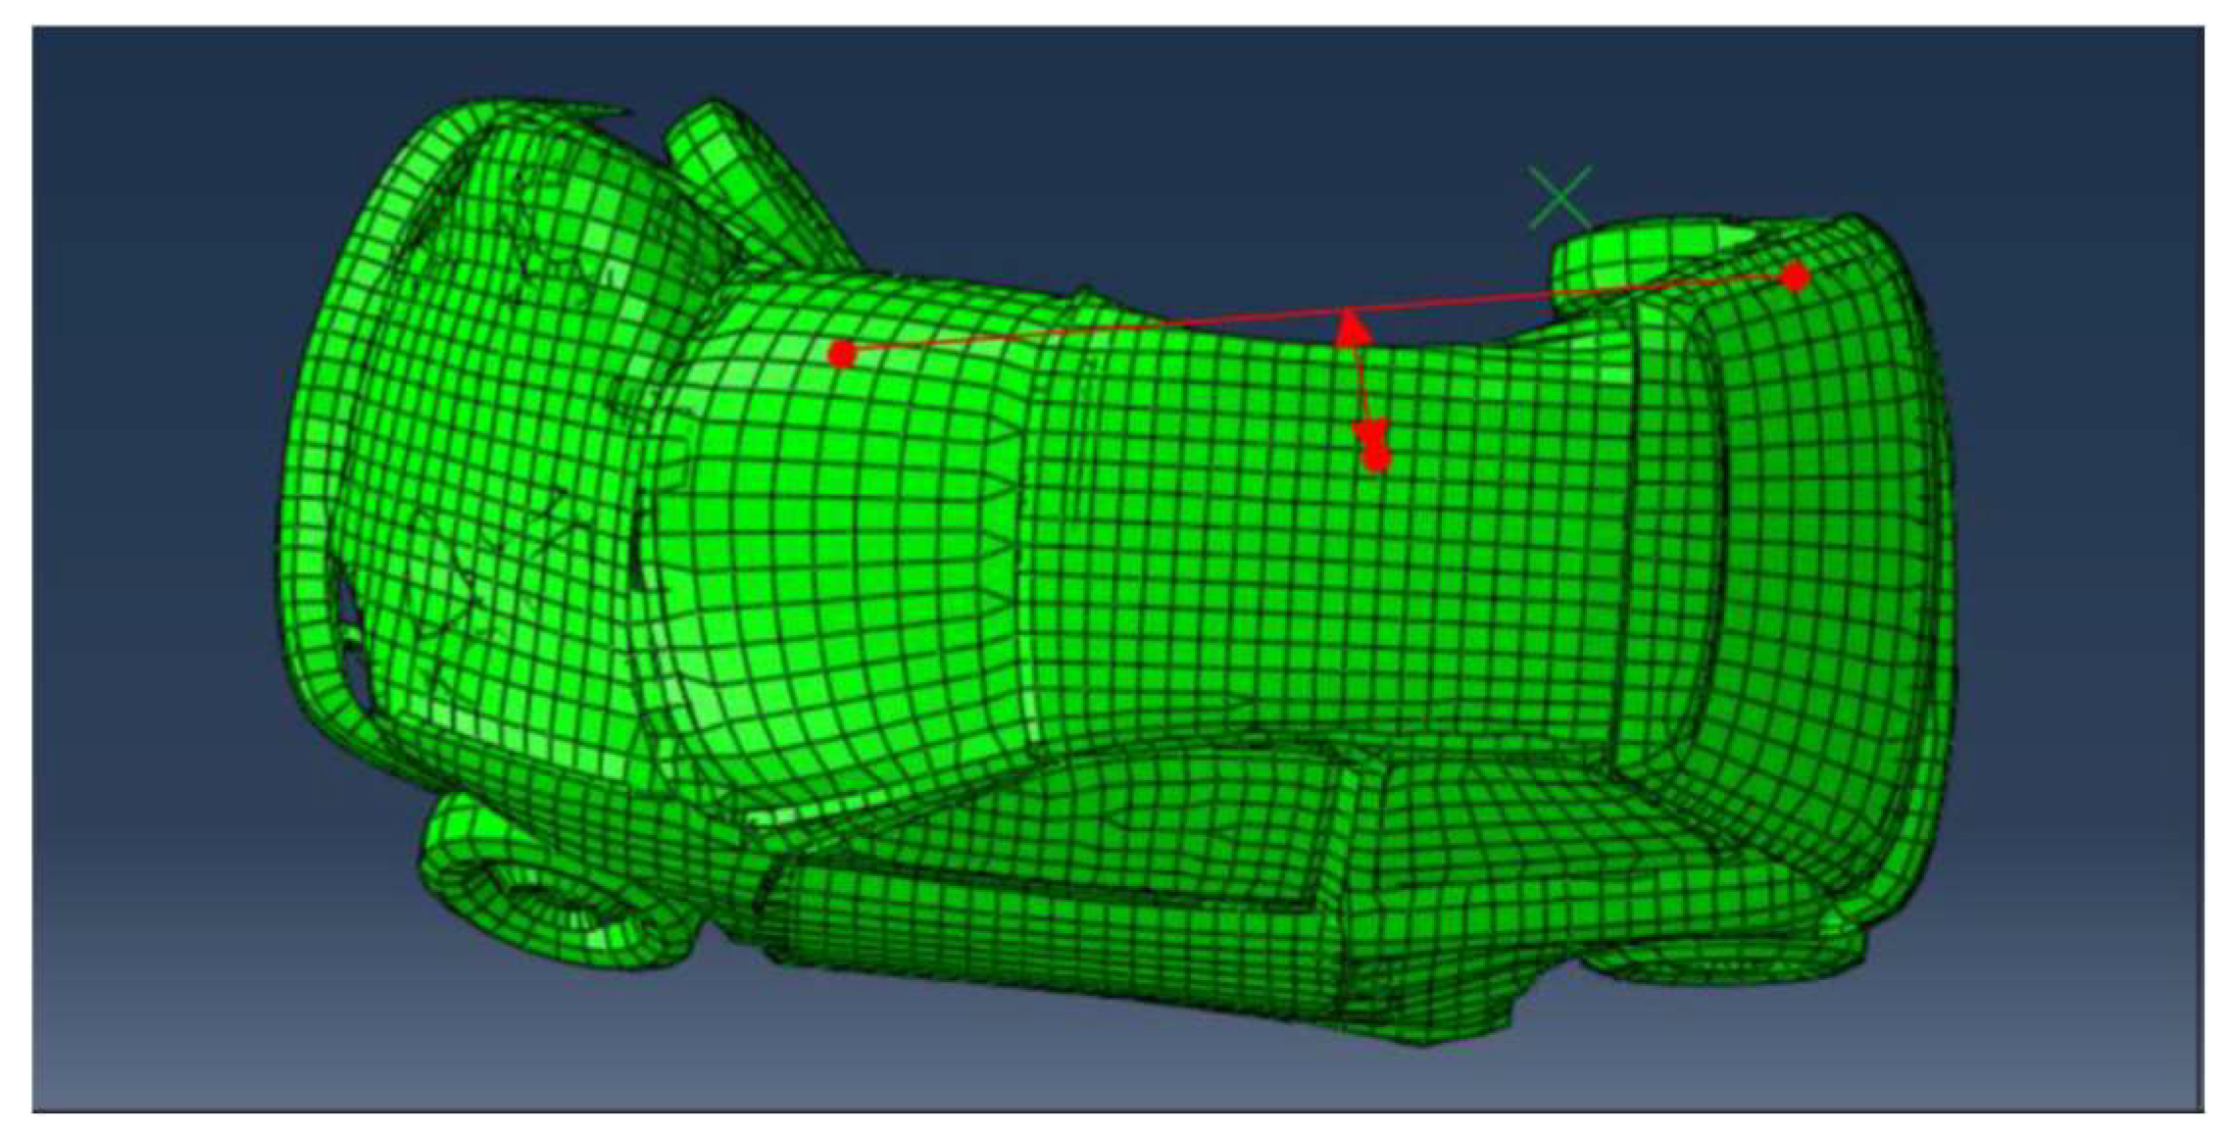
Figure 21.
Nodes chosen for the calculation of dV at the instant of maximum deformation. The best configuration is configuration 1 with absorbers (Config.1 with shock absorbing elements).
Figure 21.
Nodes chosen for the calculation of dV at the instant of maximum deformation. The best configuration is configuration 1 with absorbers (Config.1 with shock absorbing elements).
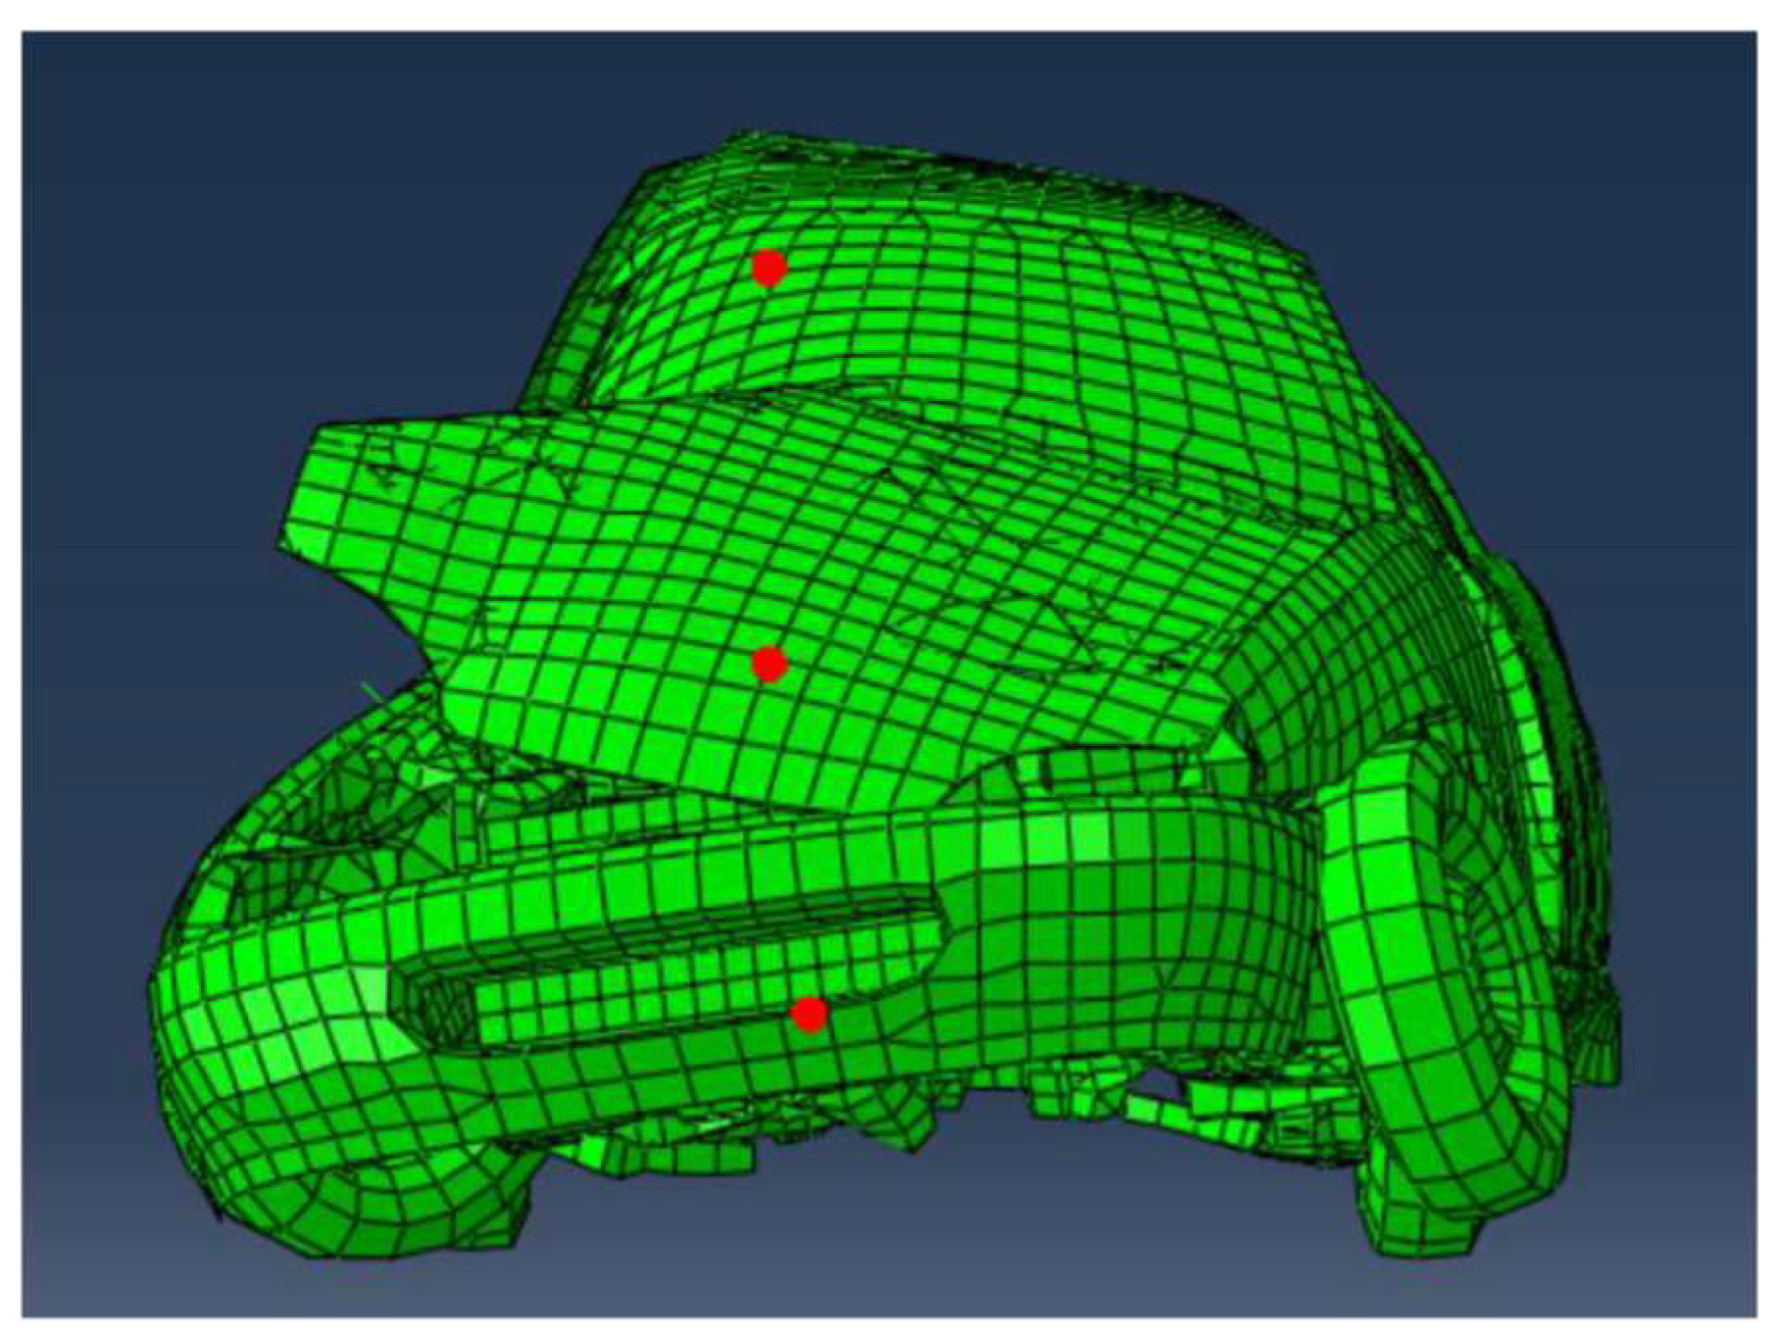
Figure 28.
Comparison of head acceleration in each of the configurations analyzed.
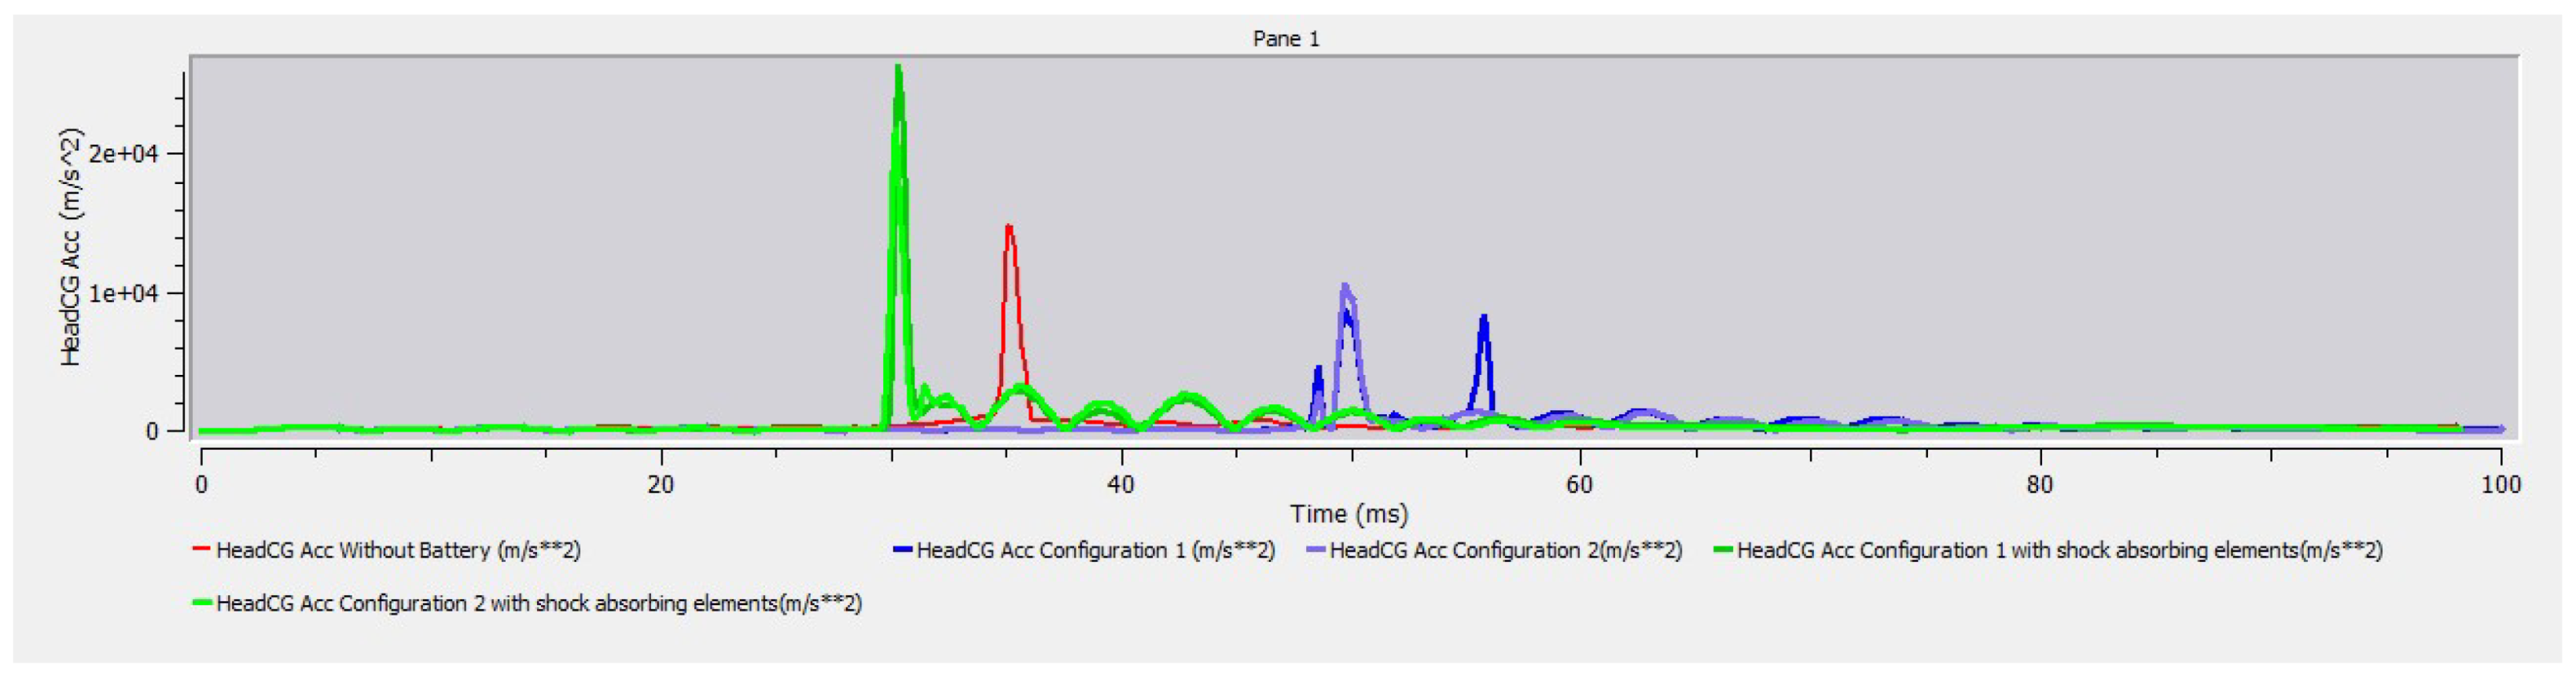
Table 1.
Properties of Aluminum Foam.
| Density (kg/m3) | 390 |
| Young’s Modulus (GPa) | 0,175 |
| Poisson’s ratio (-) | 0,05 |
Table 3.
Properties of DC01 steel.
| Density (kg/m3) | 7850 |
| Young’s Modulus (GPa) | 210 |
| Poisson’s ratio (-) | 0,3 |
Table 4.
Plastic behavior of DC01 steel.
| Yield and Ultimate Strength (MPa) | Associated plastic strain |
|---|---|
| 330 | 0 |
| 365,7 | 0,18 |
Table 5.
Properties of Aluminum 6063-T6.
| Density (kg/m3) | 2700 |
| Young’s Modulus (GPa) | 69 |
| Poisson’s ratio (-) | 0,33 |
Table 6.
Plastic behavior of Aluminum 6063-T6.
| Yield and Ultimate Strength (MPa) | Associated plastic strain |
|---|---|
| 215 | 0 |
| 240 | 0,10 |
Table 7.
Equivalent properties of the interior of the modules.
| LiMn2O4 (25%) | LiNiO2 (25%) | Graphite (50%) | Equivalent module Material |
|
|---|---|---|---|---|
| Density (kg/m3) | 4140 | 4650 | 2300 | 3347,5 |
| Young’s Modulus (GPa) | 194 | 194 | 109 | 151,5 |
| Poisson’s ratio (-) | 0,26 | 0,26 | 0,24 | 0,25 |
Table 11.
Comparison of the behavior of the modules. *The maximum shortening is exceeded.
| Config.1 | Config.2 | Config.1 with shock absorbing elements | Config.2 with shock absorbing elements | ||
|---|---|---|---|---|---|
| Edeformmax (J) | 154,48 | 1407,57 | 69,93 | 1370,20 | |
| σVMmax (MPa) | 181,8 | 214,9 | 214,1 | 166,1 | |
| Modules shortening | ∆lminimum(mm) | 0,0061 | - | 0.0034 | - |
| ∆lmeanmm) | - | 0,0239 | - | 0,0012 | |
| ∆lmaximum(mm) | 0,0264* | 0,0417* | 0,0098* | 0,0208* | |
Disclaimer/Publisher’s Note: The statements, opinions and data contained in all publications are solely those of the individual author(s) and contributor(s) and not of MDPI and/or the editor(s). MDPI and/or the editor(s) disclaim responsibility for any injury to people or property resulting from any ideas, methods, instructions or products referred to in the content. |
© 2023 by the authors. Licensee MDPI, Basel, Switzerland. This article is an open access article distributed under the terms and conditions of the Creative Commons Attribution (CC BY) license (http://creativecommons.org/licenses/by/4.0/).
Copyright: This open access article is published under a Creative Commons CC BY 4.0 license, which permit the free download, distribution, and reuse, provided that the author and preprint are cited in any reuse.


