
Submitted:
01 April 2025
Posted:
01 April 2025
You are already at the latest version
Abstract
This article presents an educational game that would familiarize the user with the methodology and equipment used in the laser alloying process. The aim of the game is to introduce the player to laser welding technology. During the game, the player must prepare the material, select appropriate parameters for the laser alloying process and carry out the process itself on a virtual simulator. This simulation is part of the larger project of the virtual materials engineering laboratory. Therefore, the material obtained in the game can later be used for metallographic tests. The game was developed using the Unity environment, where all three-dimensional machine models, as well as the necessary virtual environment and gameplay scenario, were created. Thanks to the use of virtual reality, students can now learn how to use laser alloying and preparation devices without being physically present in the laboratory. This method is both attractive and safe, as there is no risk of damaging materials or equipment, and there is no danger to the user's health. The use of a 3D game in this study offers an interesting alternative to traditional teaching aids, making it beneficial for not only students but also teachers and others who are interested in learning more about the functioning and methods of operation of laboratory equipment.
Keywords:
education and research trends in materials science and engineering
; computer aided teaching
; laser alloying
; simulation of research equipment
; interactive 3D educational game
; virtual laboratory
1. Introduction
Changes in the education of young people, particularly through the integration of computer technology, have necessitated the development and implementation of new virtual tools for knowledge transfer. This was especially evident during the coronavirus pandemic, when such tools became essential for maintaining educational continuity. Currently, the processes of acquiring knowledge, skills, and abilities occur outside traditional classrooms and laboratories, having transitioned into virtual environments. The evolving teaching methodologies, supported by telecommunications technologies, have prompted the design and creation of a new type of electronic training materials. Various e-learning systems have been developed to facilitate knowledge acquisition in the virtual realm. These environments are highly flexible, and the online materials provided enable students to learn anytime and anywhere [1,2,3,4,5,6,7,8].
A special category of such materials is virtual laboratory. These are specialized educational platforms that contain simulations of research equipment, replicating the operation of real scientific or laboratory devices used for scientific, research, and educational purposes at technical universities. Through these platforms, students can learn the fundamentals of working with such devices completely safely, without the risk of health hazards associated with incorrect operation. Furthermore, the improper use of a virtual device does not lead to damage, which can be costly in the case of real equipment. However, it is important to recognize the limitations of this technology. Each simulation is merely a more or less accurate simplification of the actual equipment and never fully reproduces its complete functionality [9,10,11,12,13].
When creating a machine simulator, the programmer's task is to accurately reproduce the operation of the machine or the phenomena of the simulated equipment. The user must be able to interact with the virtual machine, input data, observe the progression of the simulated process, and obtain results. Models can be created using any software that supports 3D modeling, animation, and rendering. In the development of simulators, pre-existing game engines are often utilized, as they provide programming environments specifically designed for such tasks. These engines facilitate the designer's work by offering a wide array of specialized tools and ready-made templates. They also handle many computational tasks, thereby relieving the programmer of some burdens. One engine that has recently gained significant popularity is the Unity engine [14,15,16]. With Unity, users also gain access to the MonoDevelop script editor, which allows for scripting in several widely-used programming languages. The most notable advantage of Unity is its multiplatform capability; games developed with this engine can run on various platforms, including both desktop and mobile devices. Additionally, Unity is free software, enabling its use for commercial purposes as well [17,18,19,20,21,22].
Educational software is often presented in the form of games, as their engaging and enjoyable format enhances content retention. Educational games are designed with rules that require users to apply and improve their knowledge and skills. They are highly valued for their effectiveness in delivering information. By combining entertainment with education, these games offer a more enjoyable alternative to traditional teaching methods. By stimulating the limbic system, which is associated with positive emotions, they encourage the brain to function and develop more effectively. Overall, educational games provide an excellent way to make the learning process more enjoyable for users [1,2,4,6,9,17,20].
2. Simulation of Laser Alloying Device
The laser alloying process enhances the properties of steel, making it suitable for applications that were previously unfeasible. However, like any specialized process, it requires a qualified technician who is well-versed in the equipment and technology to utilize it effectively in an industrial setting. While employees can gain knowledge and experience through hands-on interaction with the equipment and by observing the outcomes of their actions, this traditional method of acquiring experience can be costly. The continuous repetition of specific processes, along with the expenses associated with materials and potential machine maintenance, can accumulate significantly. In such cases, modern technology offers a solution by enabling the simulation of certain phenomena and the generation of experimental results. This technology demonstrates to employees how to configure the machine and predict its behavior during operation under various parameters. Various types of educational software are employed for this purpose.
To address the issue of inadequate software, efforts were made to develop a laser alloying process simulator. The primary objective of this software is to ensure user-friendliness, enabling users with limited knowledge of the technology to operate the simulator effectively. The core features have been designed to enhance the understanding of the fundamental principles of the process.
The simulated machine is a diode laser from Rofin-Sinar, model DL020 [23,24,25,26] presented in Figure 1. Founded in 1975 in Hamburg, Rofin-Sinar is a well-known manufacturer of devices that utilize laser technology. The DL020 laser is part of the high-power diode laser family and features a head composed of two diode packages, each powered by separate voltage sources. The advantages of these lasers include significantly greater radiation absorption compared to previously used lasers, such as CO2 or Nd:YAG, as well as high energy efficiency and reliability.
The laser is mounted on a numerically controlled linear guide from ISEL Automation. Both the laser and the guide are operated using Mach3 CNC Controller software and the standardized G-code command language, which is commonly used to control CNC devices. The simulated station, in addition to the table and laser, also includes a nozzle with a powder feeder for enrichment or surfacing, a protective gas nozzle, a power supply, cooling systems, and a computer system that manages the position of the work table. Alloying occurs in a protective gas atmosphere, typically argon, to safeguard the substrate from oxidation. The simulated process is conducted on steel samples, specifically X40CrMoV 5-1 hot work tool steel. This type of steel is known for its high heat resistance, excellent wear resistance at elevated temperatures, good electrical and thermal conductivity, and high ductility. The samples prepared for alloying were attached to a movable table operated by a computer using specialized grippers.
The models used to develop the simulator were created using two software programs: AutoDesk Inventor Professional [27] and Blender [28]. In Inventor, the models were prepared based on photographs taken in the laboratory of the Faculty of Mechanical Engineering and Technology at the Silesian University of Technology. During the photo sessions, the dimensions of the machine were also recorded to create the most realistic models possible. The model is an assembly consisting of many smaller parts that were created and connected using Inventor. The most complex element of the entire laser system is the frame on which it is mounted. The laser model is fully movable, meaning that each component visible in the photo moves exactly as its counterpart does in the actual laser. For example, the grippers responsible for holding the sample in place during processing can be lifted by raising the lever at their end. The table on which the sample is placed has a range of motion limited by the rail on which it moves.
The next step in developing a realistic laser model involved finalizing the design using the 3D graphics program Blender. This software was utilized to create cables with a limited number of vertices, ensuring compatibility with the Unity engine. Textures were applied, and all elements were colored within Blender. After creating and saving the models in *.blend format, they were imported into the Unity game engine. The creation of a simulator begins with designing a scene where all the action will take place. The subsequent step was to plan the layout of the room that would house the laser and other essential devices. The walls, floor, and tables on which the models are placed were constructed using the Unity engine itself. The final model of the device is presented in Figure 2.The next step was to insert and animate the machines.
Animating machines involves attaching appropriate scripts to them, which move the elements of the models once the user meets the necessary conditions. These scripts were developed using the C# programming language and were written in the MonoDevelop environment, provided by the manufacturer alongside the Unity engine. The scripts are responsible for various functions, including moving the character within the created scene, navigating the camera that observes the scene, activating the machine, and animating its operation during the alloying process. The final script created for simulating the entire process is responsible for displaying the current action that the user must perform to successfully complete the task.
The animations were created using the Animator tool provided by the Unity editor. This tool enables efficient recording of an object's movements and allows for playback through the appropriate script. When working with multiple animations, it is possible to establish dependencies between them. These dependencies are configured in the Animator window by inserting the relevant animations and object position states, followed by drawing the dependency lines between them. A comparison of the appearance of the virtual machine and its physical counterpart is presented in Figure 3.
3. Gameplay
The program is launched using the Laboratorium.exe file located in the main game directory. Once initiated, a window appears that allows for the configuration of game parameters. Selecting the "Start" option takes you to the main gameplay. Upon entering the game, the container with elements is positioned on the left side of the player, and the player must approach it to collect the appropriate element. The character is moved using the "W" key (forward), "A" key (left), "S" key (backward), and "D" key (right), while rotation is controlled through mouse movements. The object manipulation menu can be accessed by pressing the "E" key, which opens or closes the currently displayed menu. After collecting the element, the player must approach the laser table and place the element on it. When the menu key is pressed upon reaching the table, a menu with two options appears. This menu allows the player to place the element in the machine and retrieve it once the process is complete.
Before beginning the process, ensure that the element is securely positioned on the laser work table. After placing it in the laser, proceed to the computer that controls the laser. Press the action key to bring up the control panel, which will allow you to select the processing conditions. The control panel for the laser is illustrated in Figure 4. The "Load G-Code" button opens a window where you can select the appropriate file containing the laser settings. After selecting the file, press the "Open" button to close the selection window. Next, review the alloying process parameters displayed on the panel, and then press the "Cycle Start" button to initiate the alloying process. Once this process has started, you can close the menu and return to operating the laser. During the process, you can monitor the machine's status; an example preview is shown in Figure 5. The laser and the finished element, after the completion of the process, are illustrated in Figure 6.. After completing the process, remove the sample and proceed to test the processed material.
After the alloying process is complete, the processed element should be removed from the laser table and transferred to the materials testing section, located in the same room on the opposite side of the device and consisting of four instruments, as shown in Figure 7. Before examining the sample under a light microscope, several preparatory steps must be performed to enable effective observation. These steps include taking a sample fragment, mounting it, grinding it, polishing it, and etching it. Taking a sample fragment typically involves cutting it out with a saw from the processed element. Mounting involves embedding the sample in a polymer material to facilitate its storage and subsequent processing. The purpose of grinding and polishing the samples is to smooth the surface that will be observed, thereby improving the reflection of light from the sample. The purpose of etching the samples is to reveal the structure of the observed surface, which cannot be achieved through mechanical methods.
The player who has collected the element should approach the cutting machine, to cut the material. Once positioned in front of the machine, the player must open the machine cover, insert the sample, secure it, and then close the cover. Next, the player needs to start the cutting disc and pull down the lever to lower the rotating blade onto the sample. After cutting the sample, the lever should be pushed back up, the saw should be stopped, and the cut sample should be removed from the cutter. With the cut sample from the element, the player proceeds to the hydropneumatic press for hot mounting. To operate the machine, first unscrew the piston cover, then slide out the table and place the sample on it. Next, slide the table back into the machine, add resin, and secure the cover. The process can then be initiated by pressing the "Start" button. Once the sample is ready, it can be removed from the machine by reversing the previous steps and transferred to the next device. To grind the sample, attach it to the machine head, place it on the grinding disc, and activate the grinder by pressing the green button. Repeat these steps for the polishing and etching processes. After completing these tasks, turn off the machine using the red button on the control panel and carefully remove the sample from the machine.
Finally, the player can approach the microscope to observe the metallographic cross-section of the prepared sample. After placing the sample on the microscope stage, the image should be focused using the "plus" and "minus" buttons, which adjust the coarse and fine focus screws. The successful completion of this task will be indicated by the message "Mission accomplished".
4. Discussion
The simulation of a laser alloying device presented in this study effectively demonstrates the methodology for operating such a device. Its straightforward design is tailored for individuals who are new to this field. This simulation allows users to gain practical insights into laser alloying, understand the fundamentals of operating the device, familiarize themselves with process parameters, and learn about the engineering materials used in this technology, as well as the methods for preparing samples for research purposes. The simulation can be run on any device connected to the Internet, and high computing power is not required. Using the simulation is straightforward and intuitive, posing minimal challenges for users. As in most adventure games, players must perform the appropriate actions in the correct order to achieve success, and this game is no exception.
The objective is to observe the microstructure of the processed material under a light microscope. Before this can occur, participants must first enter the virtual laboratory, locate a container with elements made of engineering materials intended for laser alloying, select one of the elements, place it on the laser table, choose the appropriate processing parameters, initiate the alloying process, and then remove the element once it is complete. Next, they must cut a sample from the processed element, mount it in resin, and properly prepare the metallographic cross-section. Only after these steps can the prepared sample be placed under a microscope for structural examination. Throughout the game, participants gain knowledge about how to perform these activities. Consequently, when players later work with real equipment in a company that specializes in laser alloying, they will be able to apply the skills they have acquired and understand the necessary actions and their sequence in the real world.
It is important to emphasize that computer simulations, particularly those of technical devices, will never fully replicate the functionality of real equipment. Working with a simulator should not be considered a substitute for hands-on experience with actual machinery. Instead, simulators should serve as an introductory stage in the educational process, allowing users to familiarize themselves with the methodology of operating specific equipment, especially in situations where working with real devices is risky, costly, or even impossible due to limited access.
5. Conclusions
A virtual laboratory is a contemporary educational tool that is accessible to all users with internet-connected devices. The three-dimensional format of the simulations used in this study provides an engaging alternative to traditional teaching aids, with the goal of enhancing the educational experience. This resource can be utilized not only by students in higher education institutions but also by educators and anyone interested in expanding their knowledge of laboratory equipment and methods for operating such equipment. Thanks to advanced computer tools for three-dimensional modeling, it is now possible to recreate the appearance of any production or research device, including scientific instruments found in laboratory settings. This capability allows for the presentation of work that is far removed from their actual counterparts, enabling training to be conducted using just one computer and a projector. With the integration of appropriate educational software, computers have become one of the most effective teaching aids, offering significant opportunities to enhance knowledge, skills, and abilities. Working with simulators should be regarded as the initial stage of education. This approach is beneficial because it allows learners to acquire practical knowledge, rather than just theoretical understanding, on a given topic in a safe and cost-effective manner. The subsequent stage should involve hands-on experience with real equipment under the guidance of a supervisor.
Funding
This research received no external funding.
Institutional Review Board Statement
Not applicable.
Informed Consent Statement
Not applicable.
Data Availability Statement
The data are not publicly available due to privacy.
Conflicts of Interest
The author declare no conflicts of interest.
References
- Honysz, R., Dobrzański, L.A. Virtual laboratory methodology in scientific researches and education. J. Achiev. Mater Manuf. Eng. 2017, 2, 76–84. [CrossRef]
- Honysz, R. Simulation of the preparation laboratory for light microscopy in the form of a 3D educational game, J. Achiev. Mater Manuf. Eng, 2022, 113.2, 78-85. [CrossRef]
- Dobrzański, L.A. Engineering Materials and Materials Design. Fundamentals of Materials Science and Physical Metallurgy; WNT: Warsaw, Poland; Gliwice, Poland, 2006. (In Polish).
- Dobrzański, L.A., Honysz, R. The idea of material science virtual laboratory, J. Achiev. Mater Manuf. Eng. 2010, 42,1-2, pp. 196-203.
- Beer, M., Brom, C., Dignum, F., Soo, V.W. Agents for educational games and simulations: International Workshop, AEGS 2011, Taipei, Taiwan, 2012.
- Dobrzański, L.A., Honysz, R. On the implementation of virtual machines in computer aided education, J. Mater. Educ, 2009, 31,1-2, pp. 131-140.
- Gonzalez, C., Student Usability in Educational Software and Games: Improving Experiences: Improving Experiences, Hershey, 2012.
- Distance Education Platform of the Faculty of Mechanical Engineering. https://platforma.polsl.pl/rmt/?lang=en (accessed on 02.03.2025).
- L.A. Dobrzański, R. Honysz, Informative technologies in the material products designing, Arch. Mater. Sci. Eng, 2012, 55,1, pp. 37-44.
- T.S. Mujber, T. Szecsi, M.S.J. Hashmi, Virtual reality applications in manufacturing process simulation, J. Mater. Process. Technol, 2004, 155–156, 2004, pp. 1834-1838.
- A. Barbacki (red.), Methods and techniques of structural metal research, Publishing House of the Poznań University of Technology, Poznań 1994.
- Honysz, R, Modeling the Chemical Composition of Ferritic Stainless Steels with the Use of Artificial Neural Networks, Metals 2021, 11(5), 724. [CrossRef]
- A. Weroński (red.), Laboratory classes in materials engineering, Lublin University of Technology, Lublin, 2002. (in polish).
- Unity Real-Time Development Platform | 3D, 2D, VR & AR Engine. https://unity.com/ (accessed on 02.03.2025).
- W. Goldstone, Unity 3.x Game Development Essentials, Packt Publishing, 2011.
- Ross, J, Unity and C#. Game Programming Practice, Helion, Warsaw, Poland, 2020. (In Polish).
- L.A. Dobrzański, R. Honysz, Materials science virtual laboratory as an example of computer aid in materials engineering, J. Achiev. Mater Manuf. Eng, 2007, 24,2, pp. 219-222.
- M.A. Bossak, Simulation based design, J. Mater. Process. Technol, 1998, 76, pp. 8-11.
- M.D. Koretsky, D. Amatore, C. Barnes, S. Kimura, Enhancement of Student Learning in Experimental Design Using a Virtual Laboratory, IEEE Transactions on Education 51/1 (2008) 76 – 85.
- Honysz, R. Optimization of Ferrite Stainless steel mechanical properties prediction with artificial intelligence algorithms. Arch. Metall. Mater. 2020, 65,2, 749–753. [CrossRef]
- Metallographic products, knowledge and service. https://www.struers.com/ (accessed on 02.03.2025).
- Payal, J., Virtual Laboratory in Science Classroom: An Exploratory Study, Int. J. Emerg. Sci, 2024, 3, pp. 1014-1019. [CrossRef]
- J. C. Ion, Laser processing of engineering materials: principles, procedure and industrial application, Butterworth-Heinemann, Oxford, 2005.
- Global Leaders In Materials and Lasers. https://www.coherent.com/ (accessed on 02.03.2025).
- A. Klimpel, Laser technologies. Welding, surfacing, alloying, heat treatment and cutting, Silesian University of Technology Publishing House, Gliwice, Poland, 2012, (In Polish).
- G.G. Gladush, I. Smurov, Physics of Laser Materials Processing: Theory and Experiment, Springer Series in Materials Science, 146, 2011.
- Autodesk, 3D Design, Engineering and Construction Software. https://www.autodesk.com/ (accessed on 02.03.2025).
- Home of the Blender project - Free and Open 3D Creation Software. https://www.blender.org/ (accessed on 02.03.2025).
Figure 1.
Rofin-Sinar diode laser, model DL020.
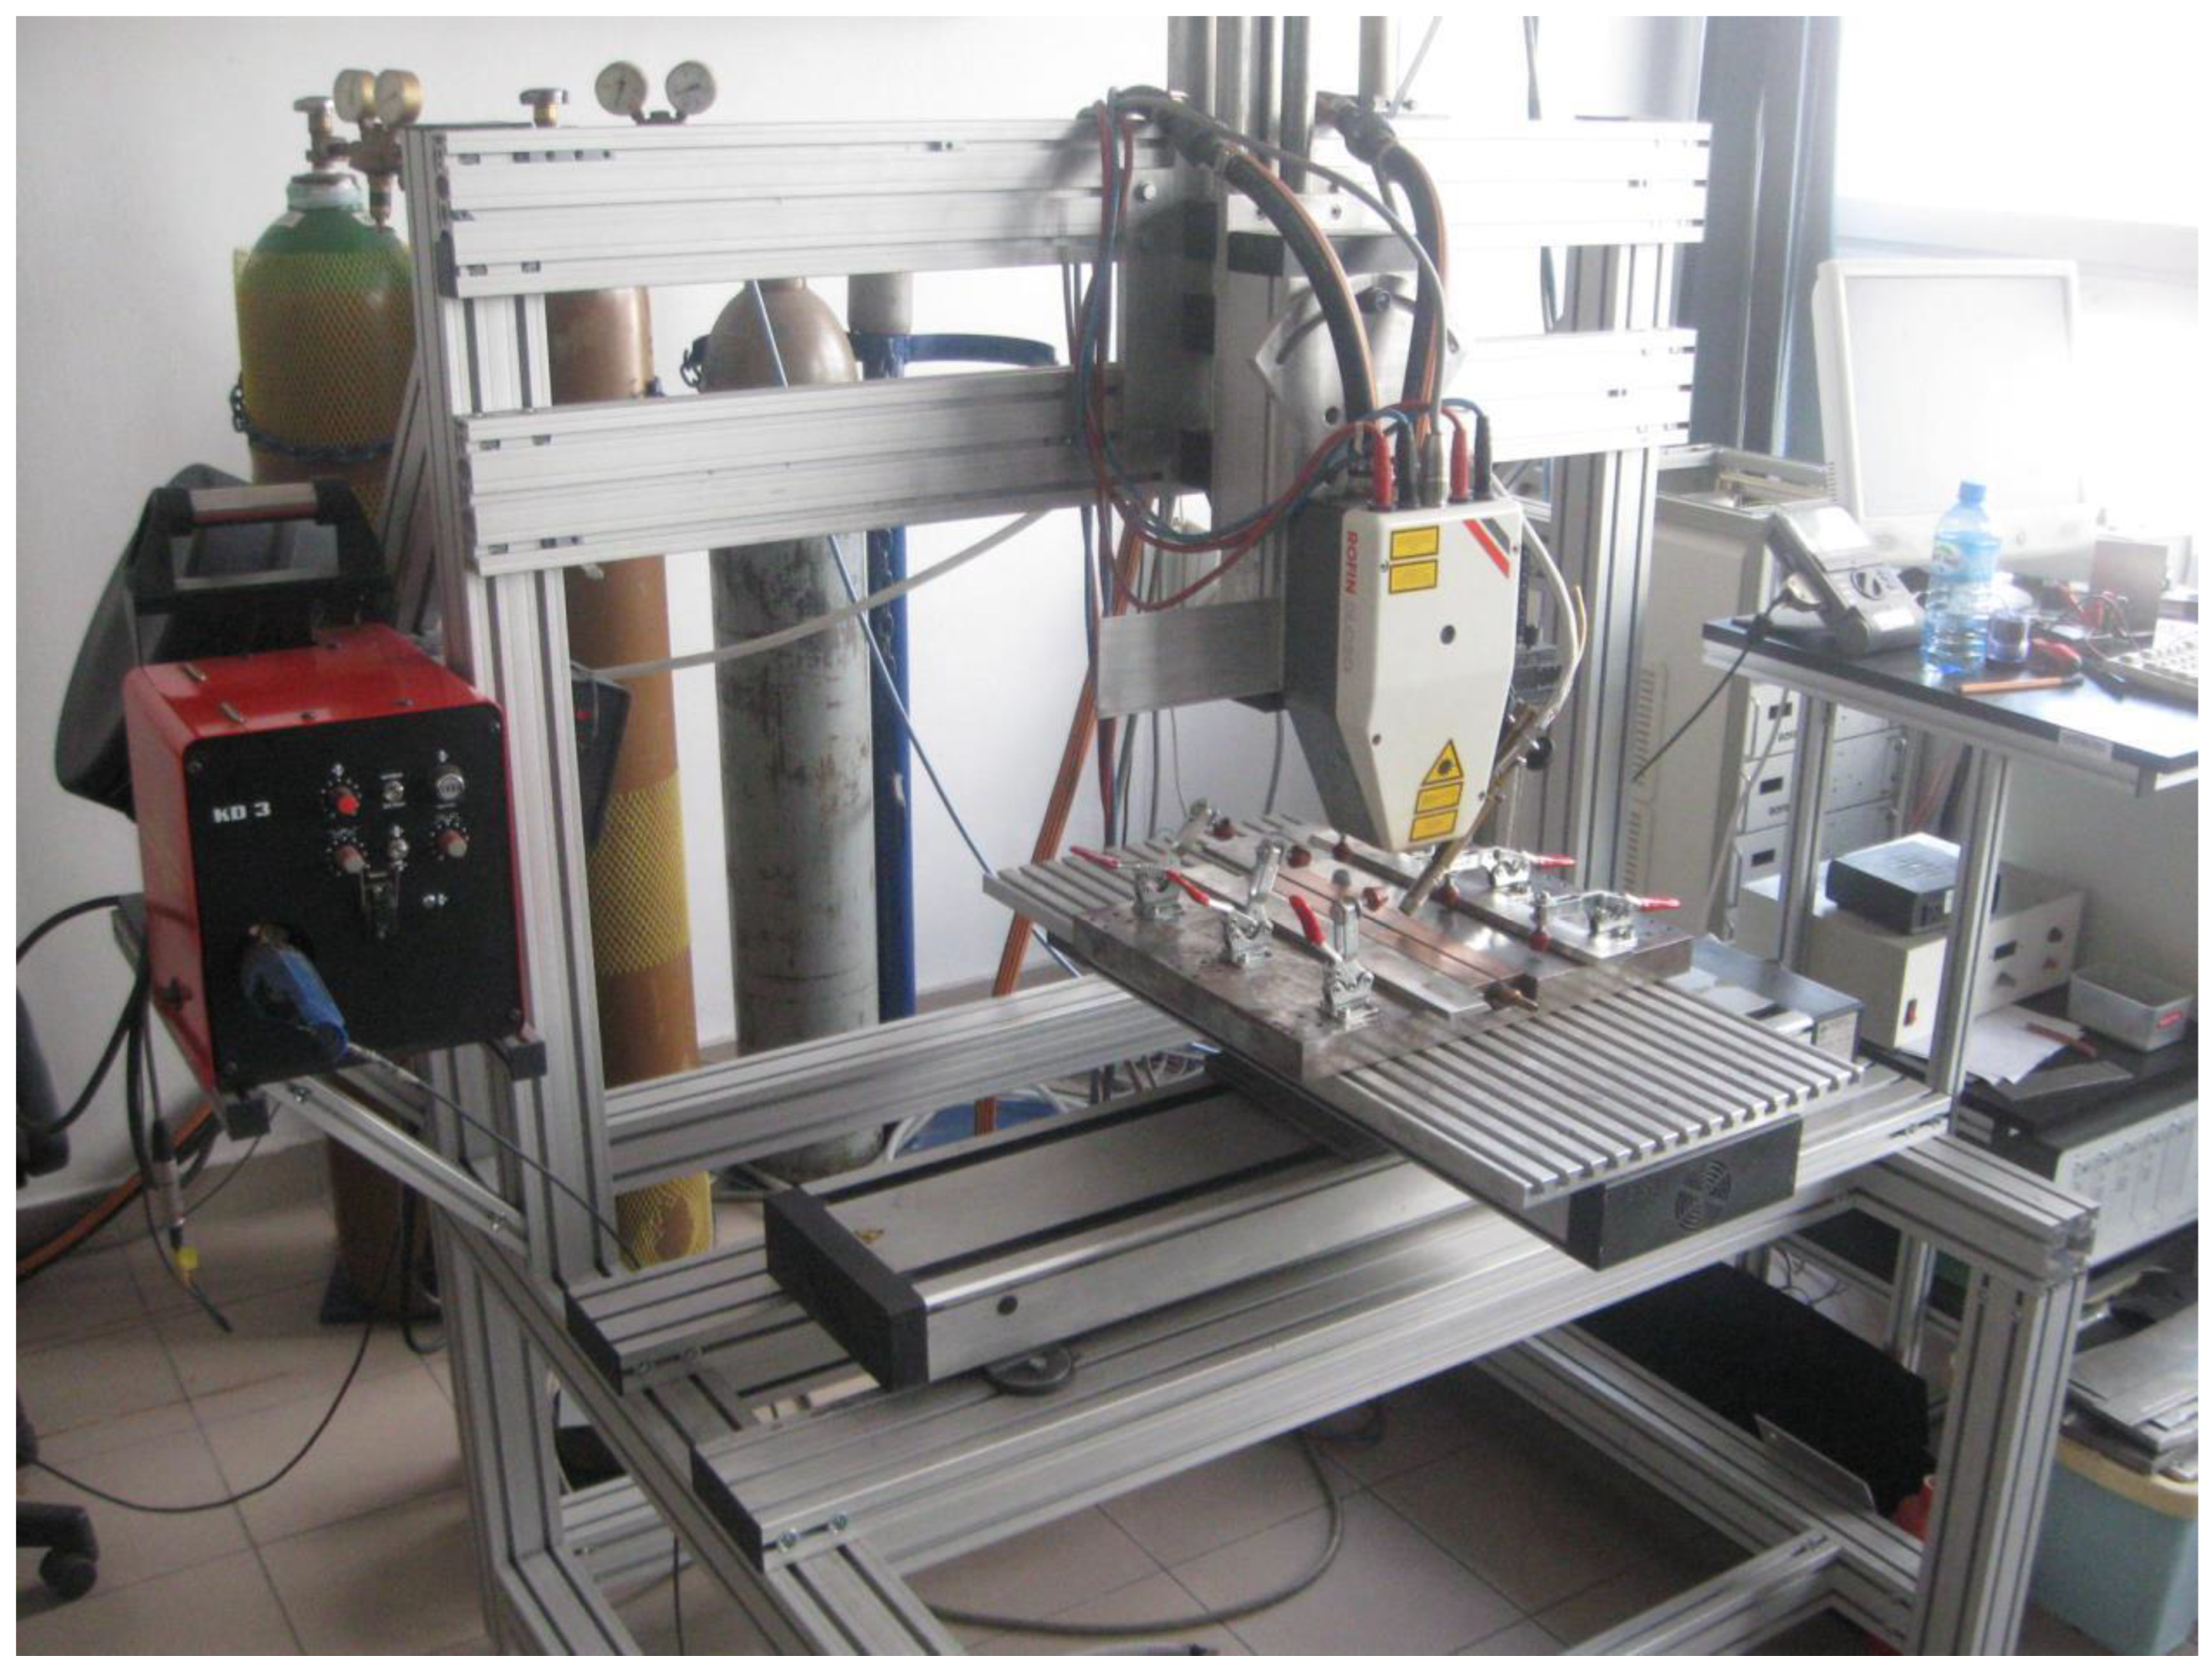
Figure 2.
Virtual simulation of Rofin-Sinar diode laser, model DL020.
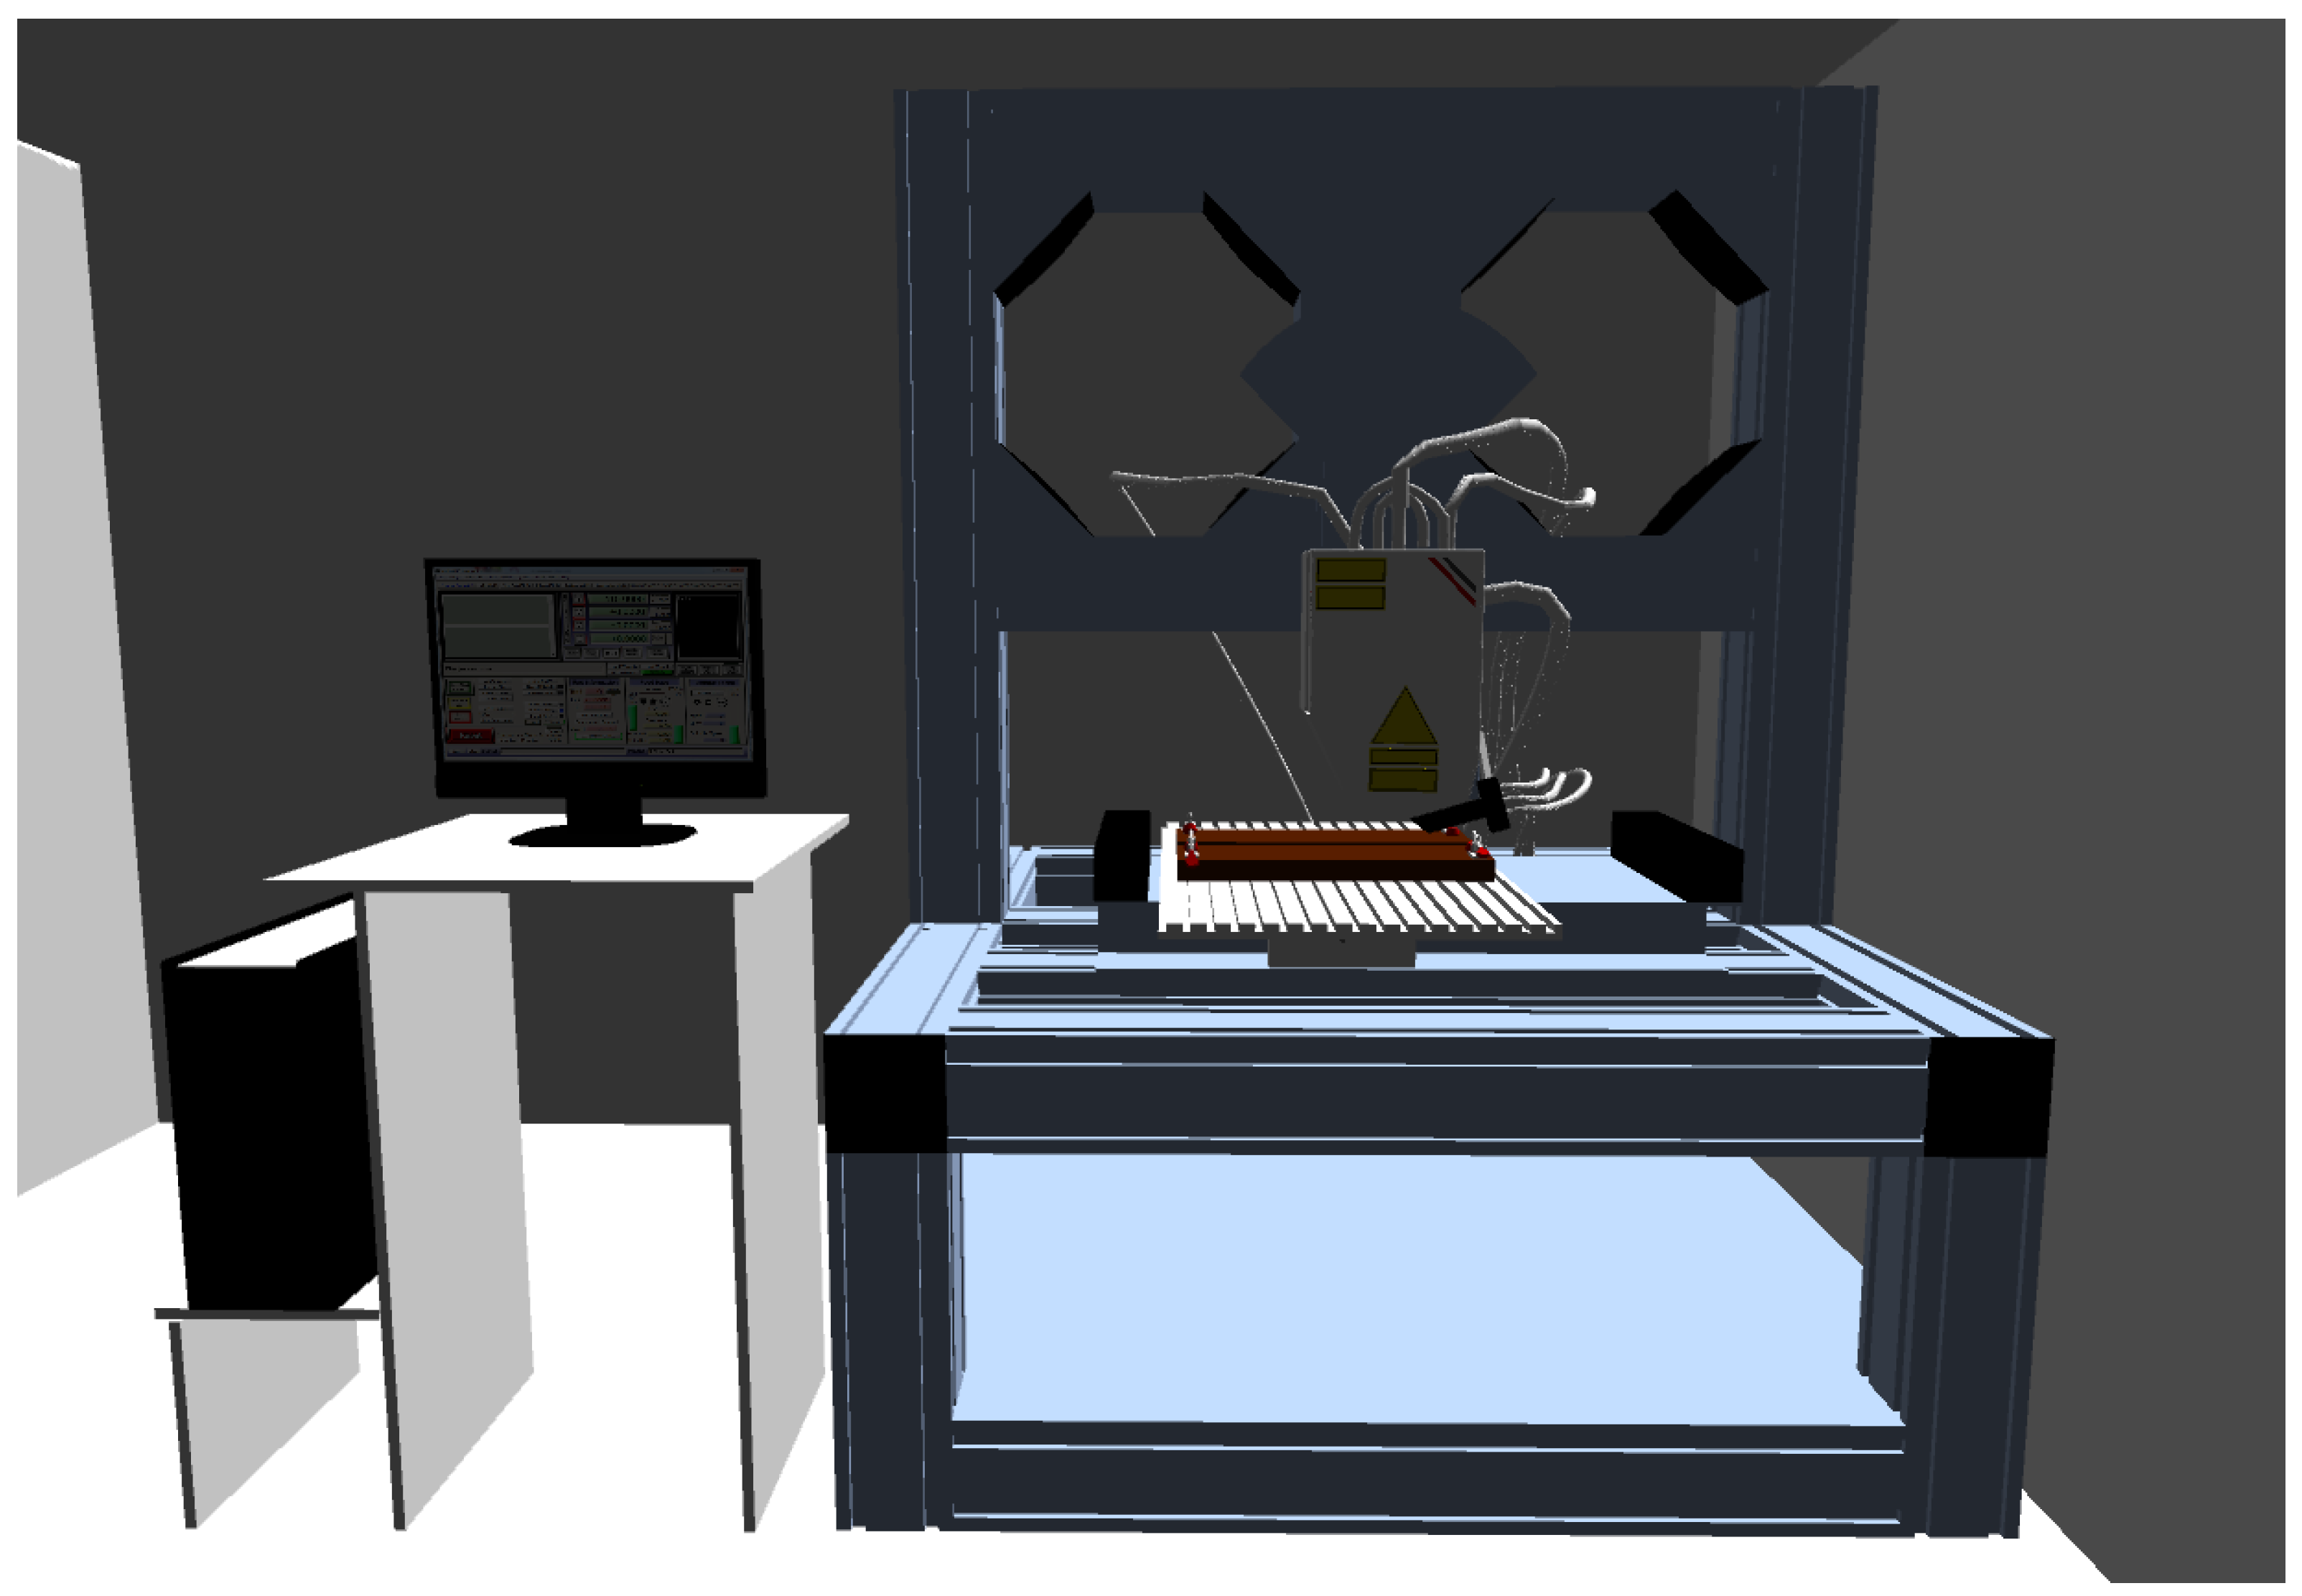
Figure 3.
Comparison of the 3D laser simulation with the actual laser located at the Faculty of Mechanical Engineering.
Figure 3.
Comparison of the 3D laser simulation with the actual laser located at the Faculty of Mechanical Engineering.
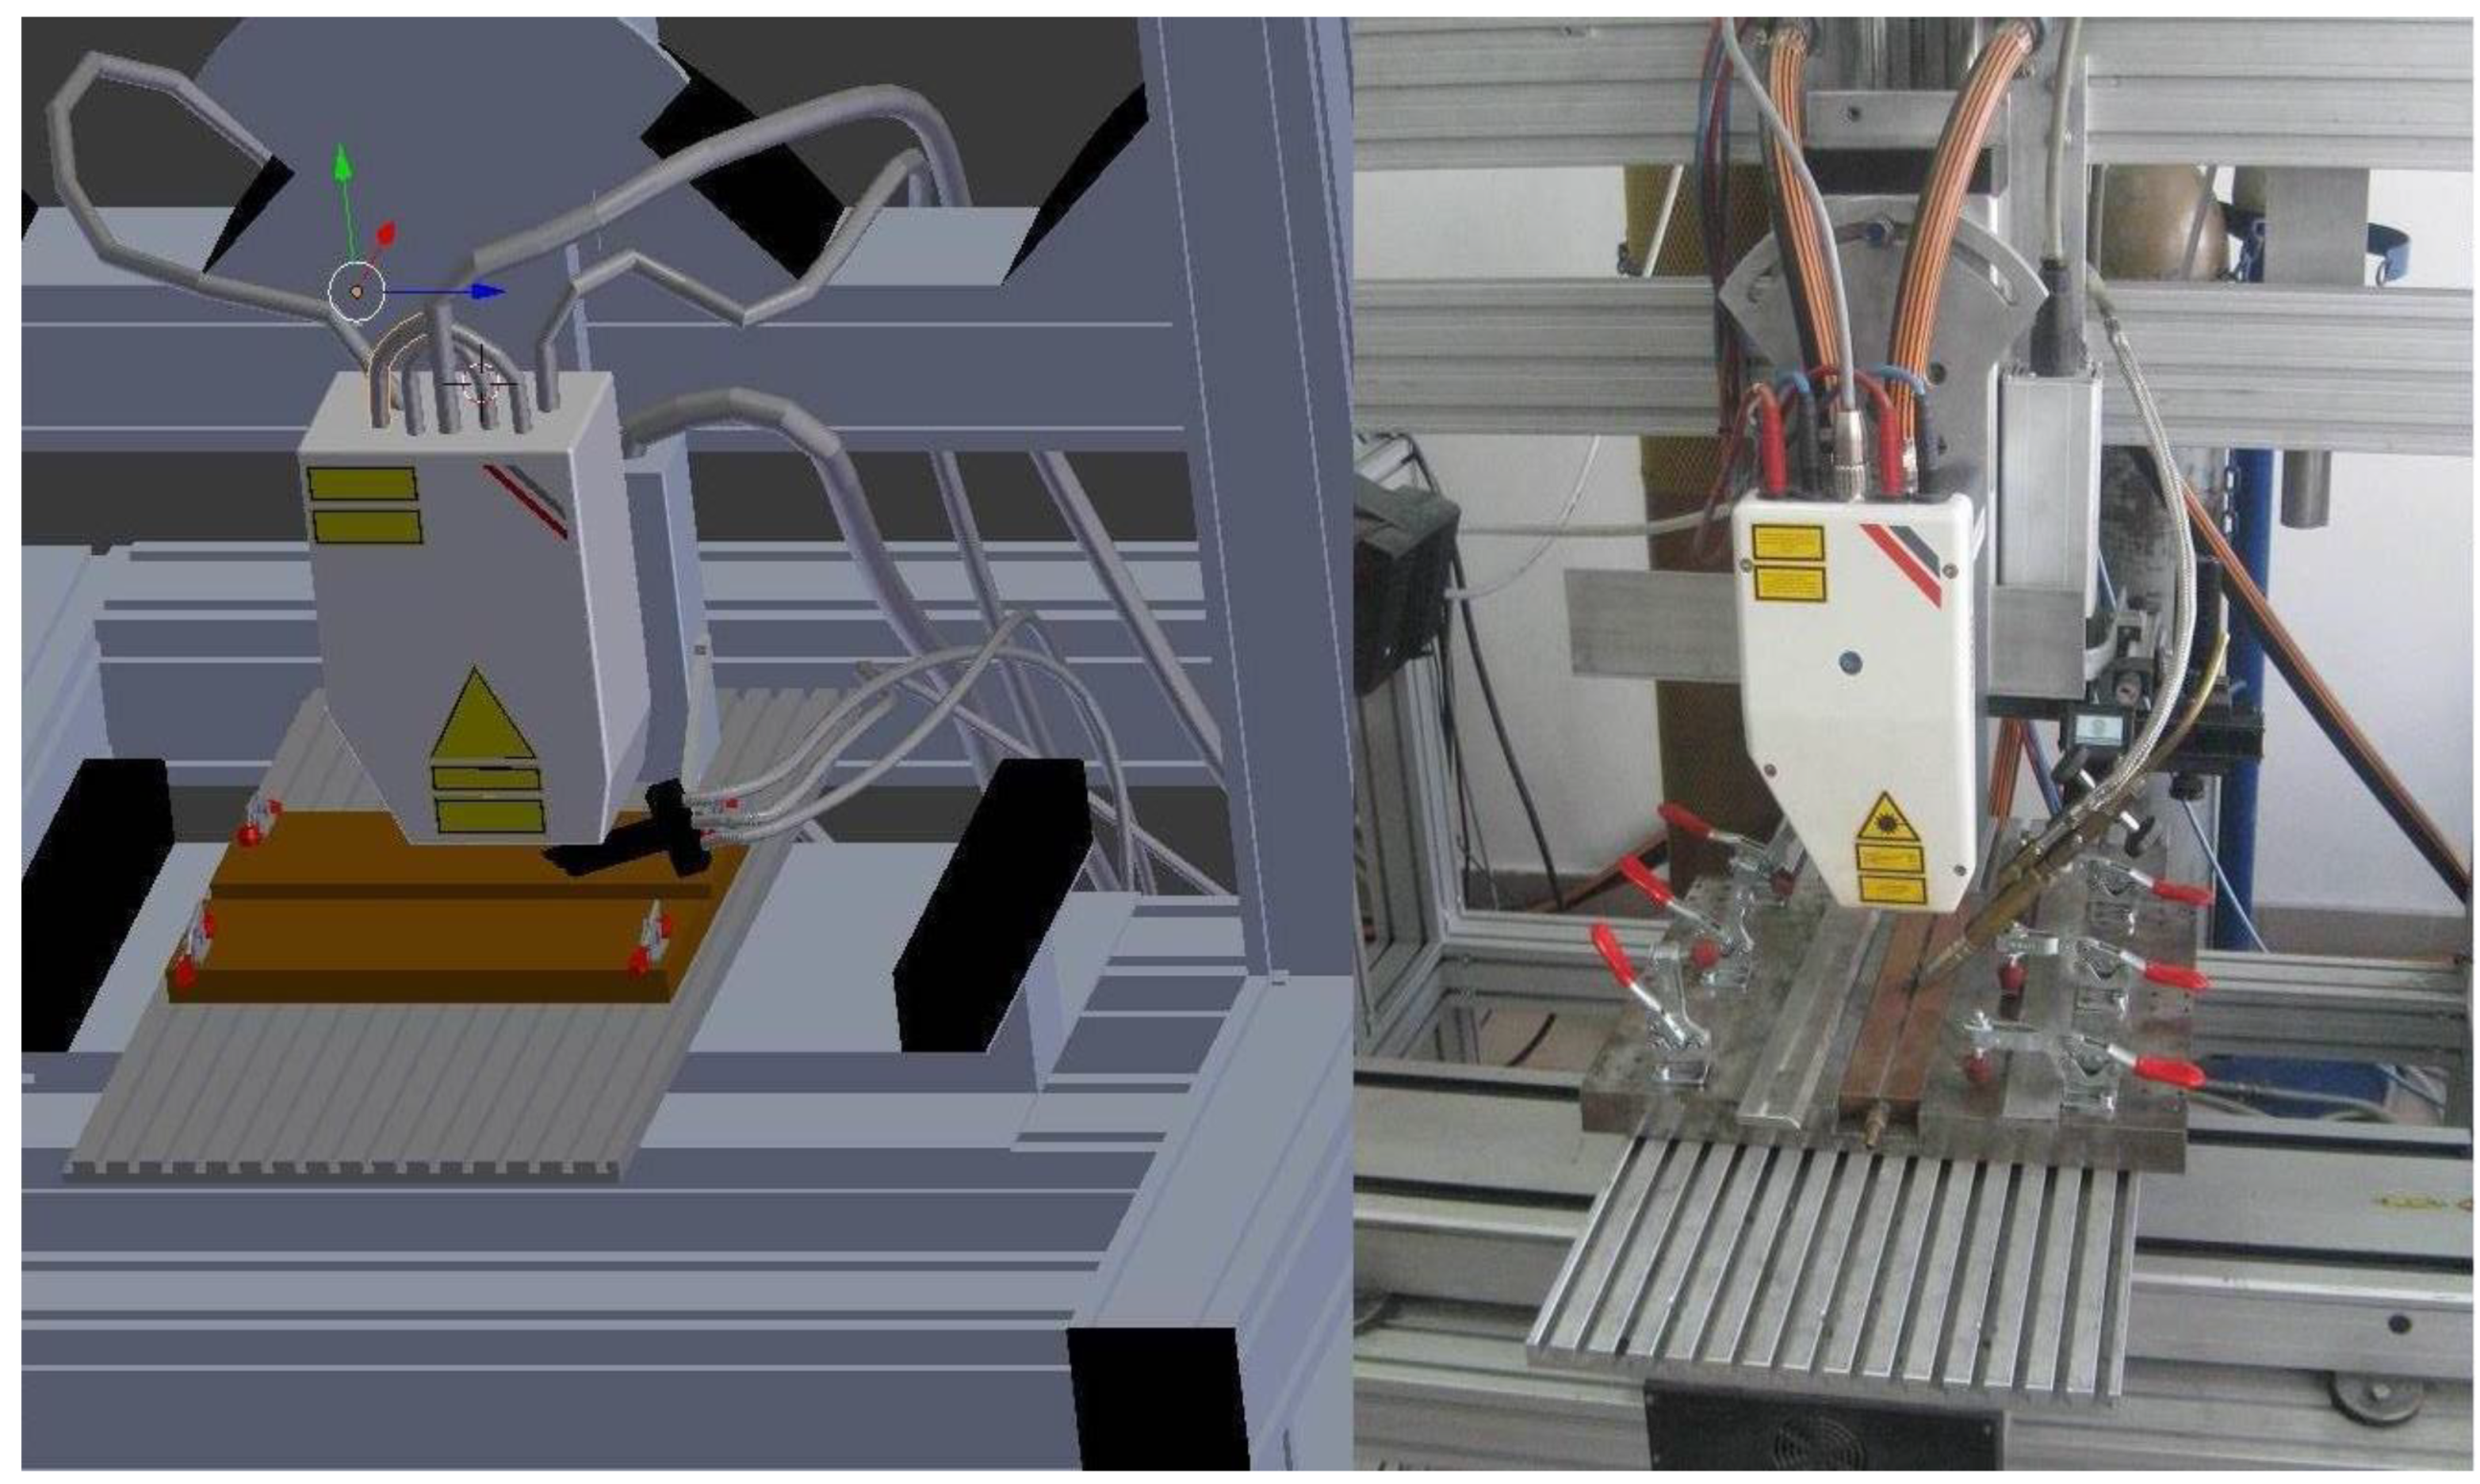
Figure 4.
Control panel for operating the laser.
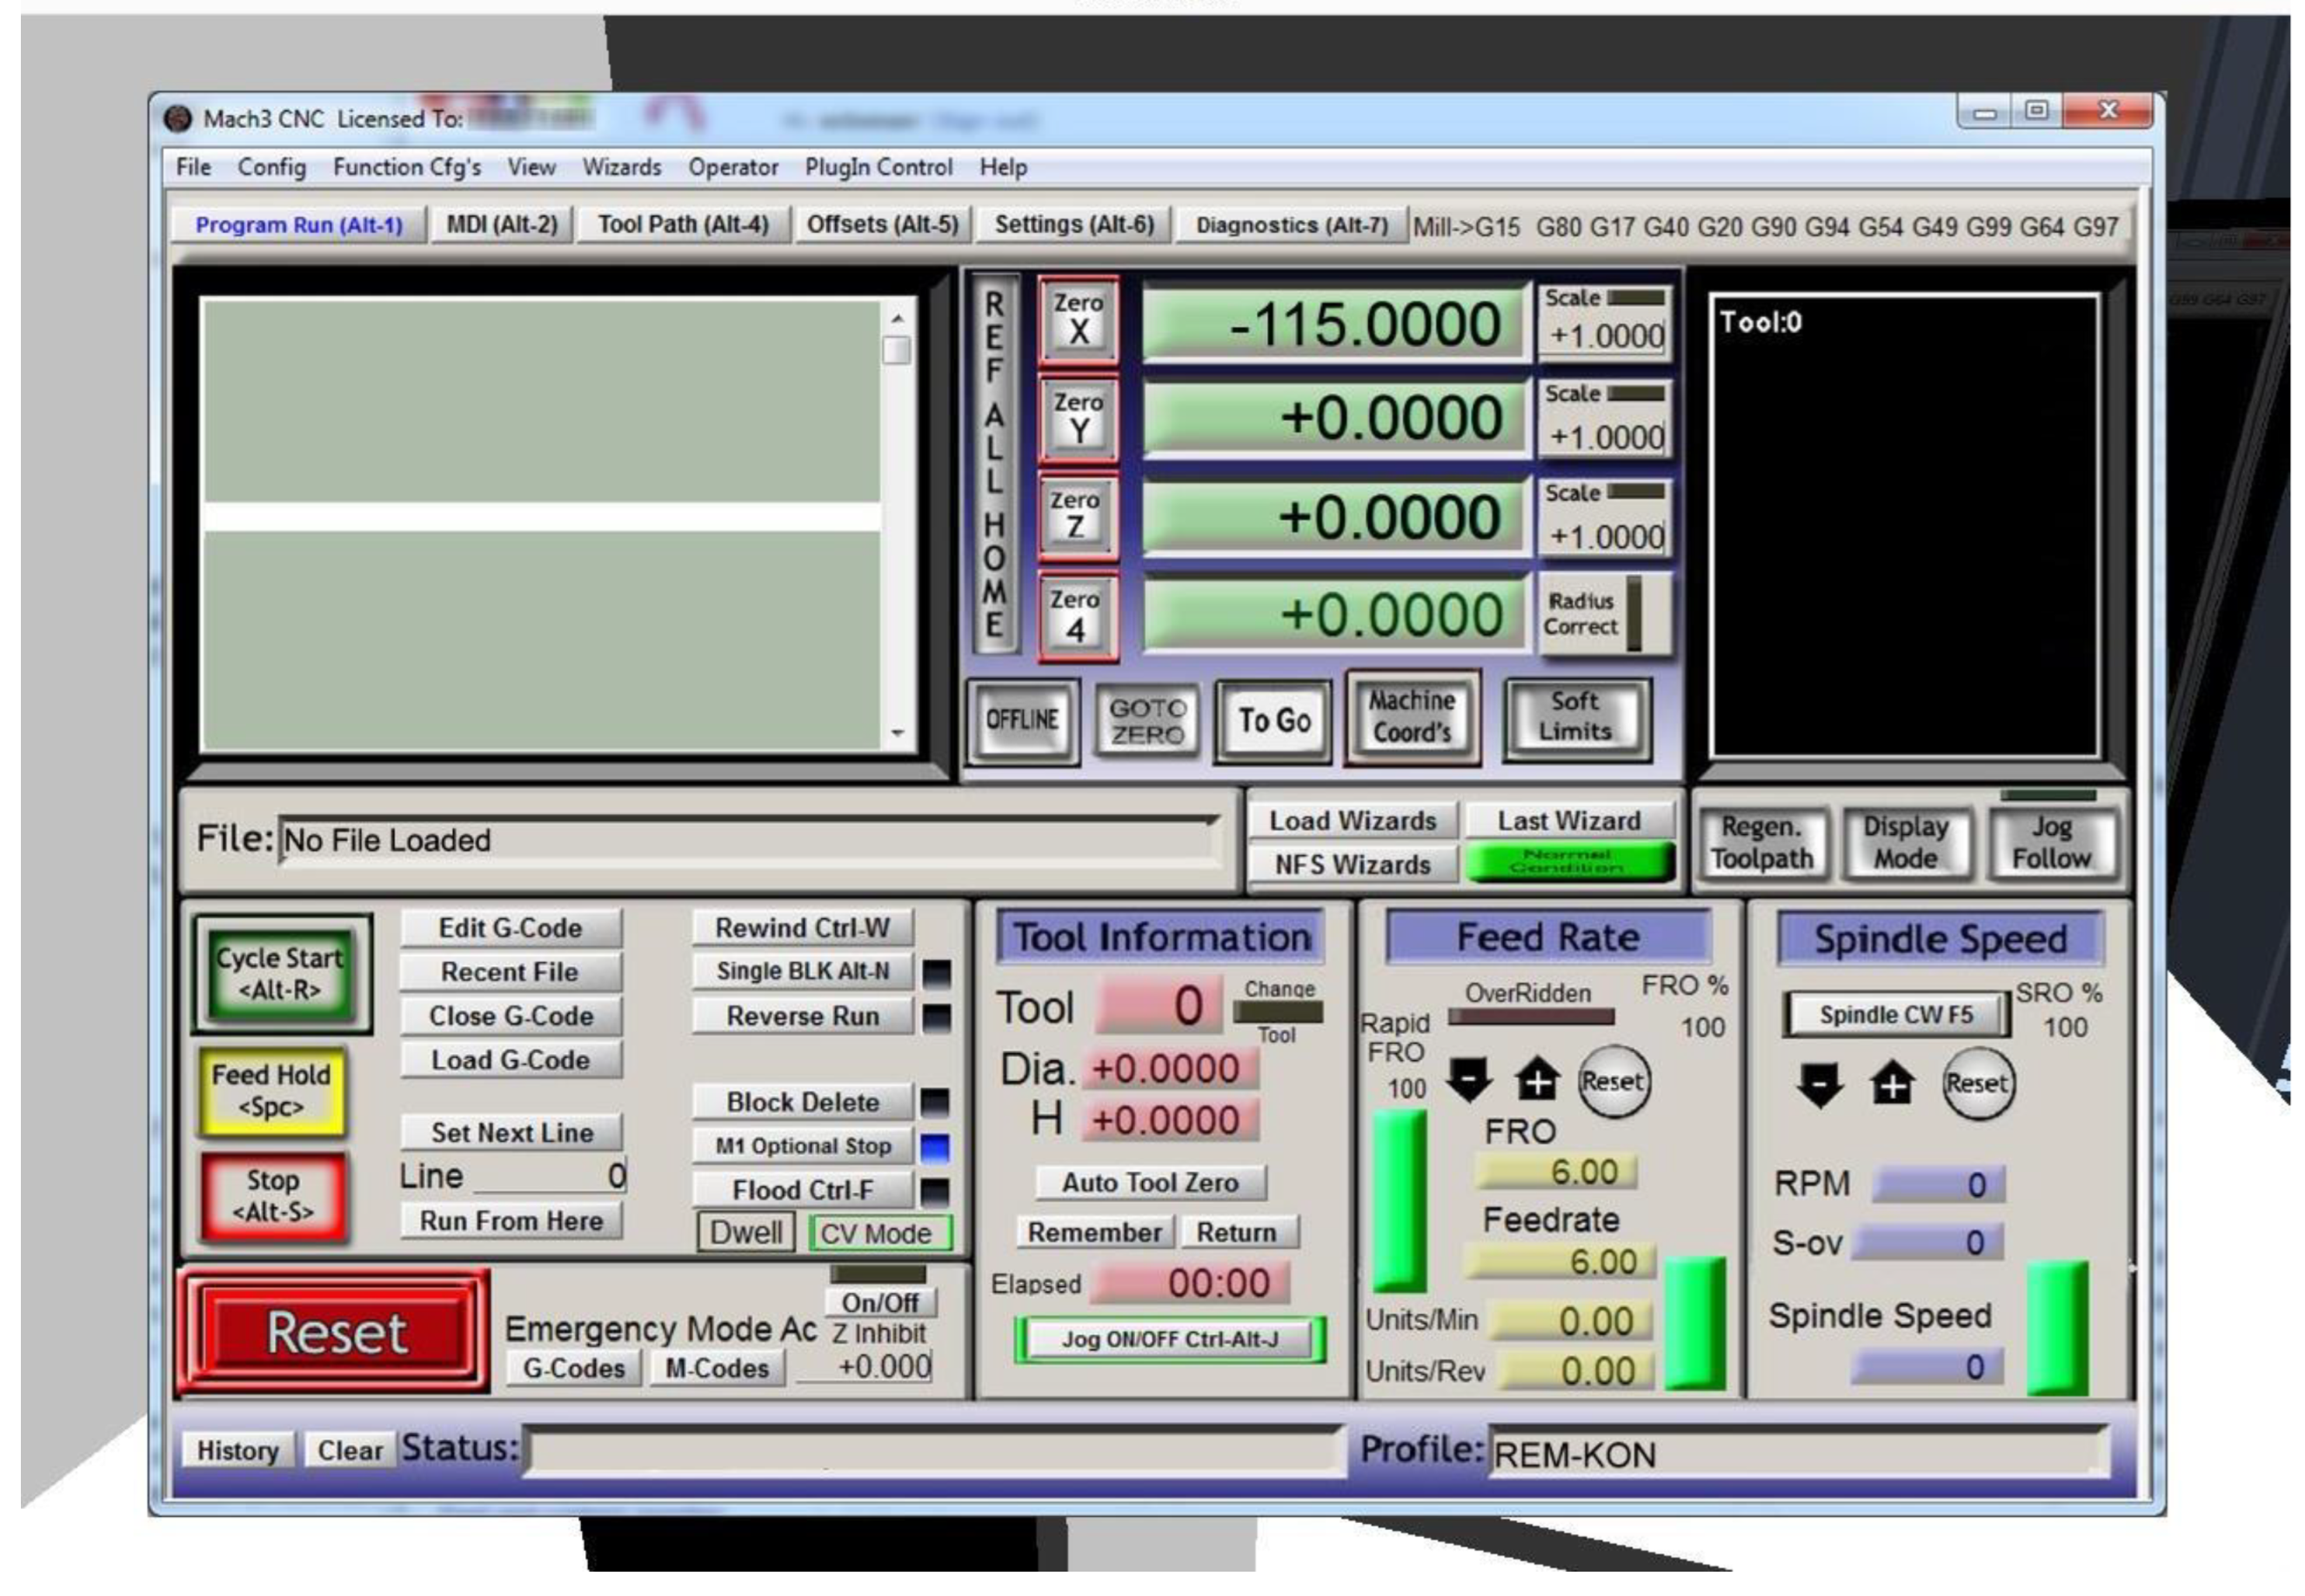
Figure 5.
Laser alloying process in progress.
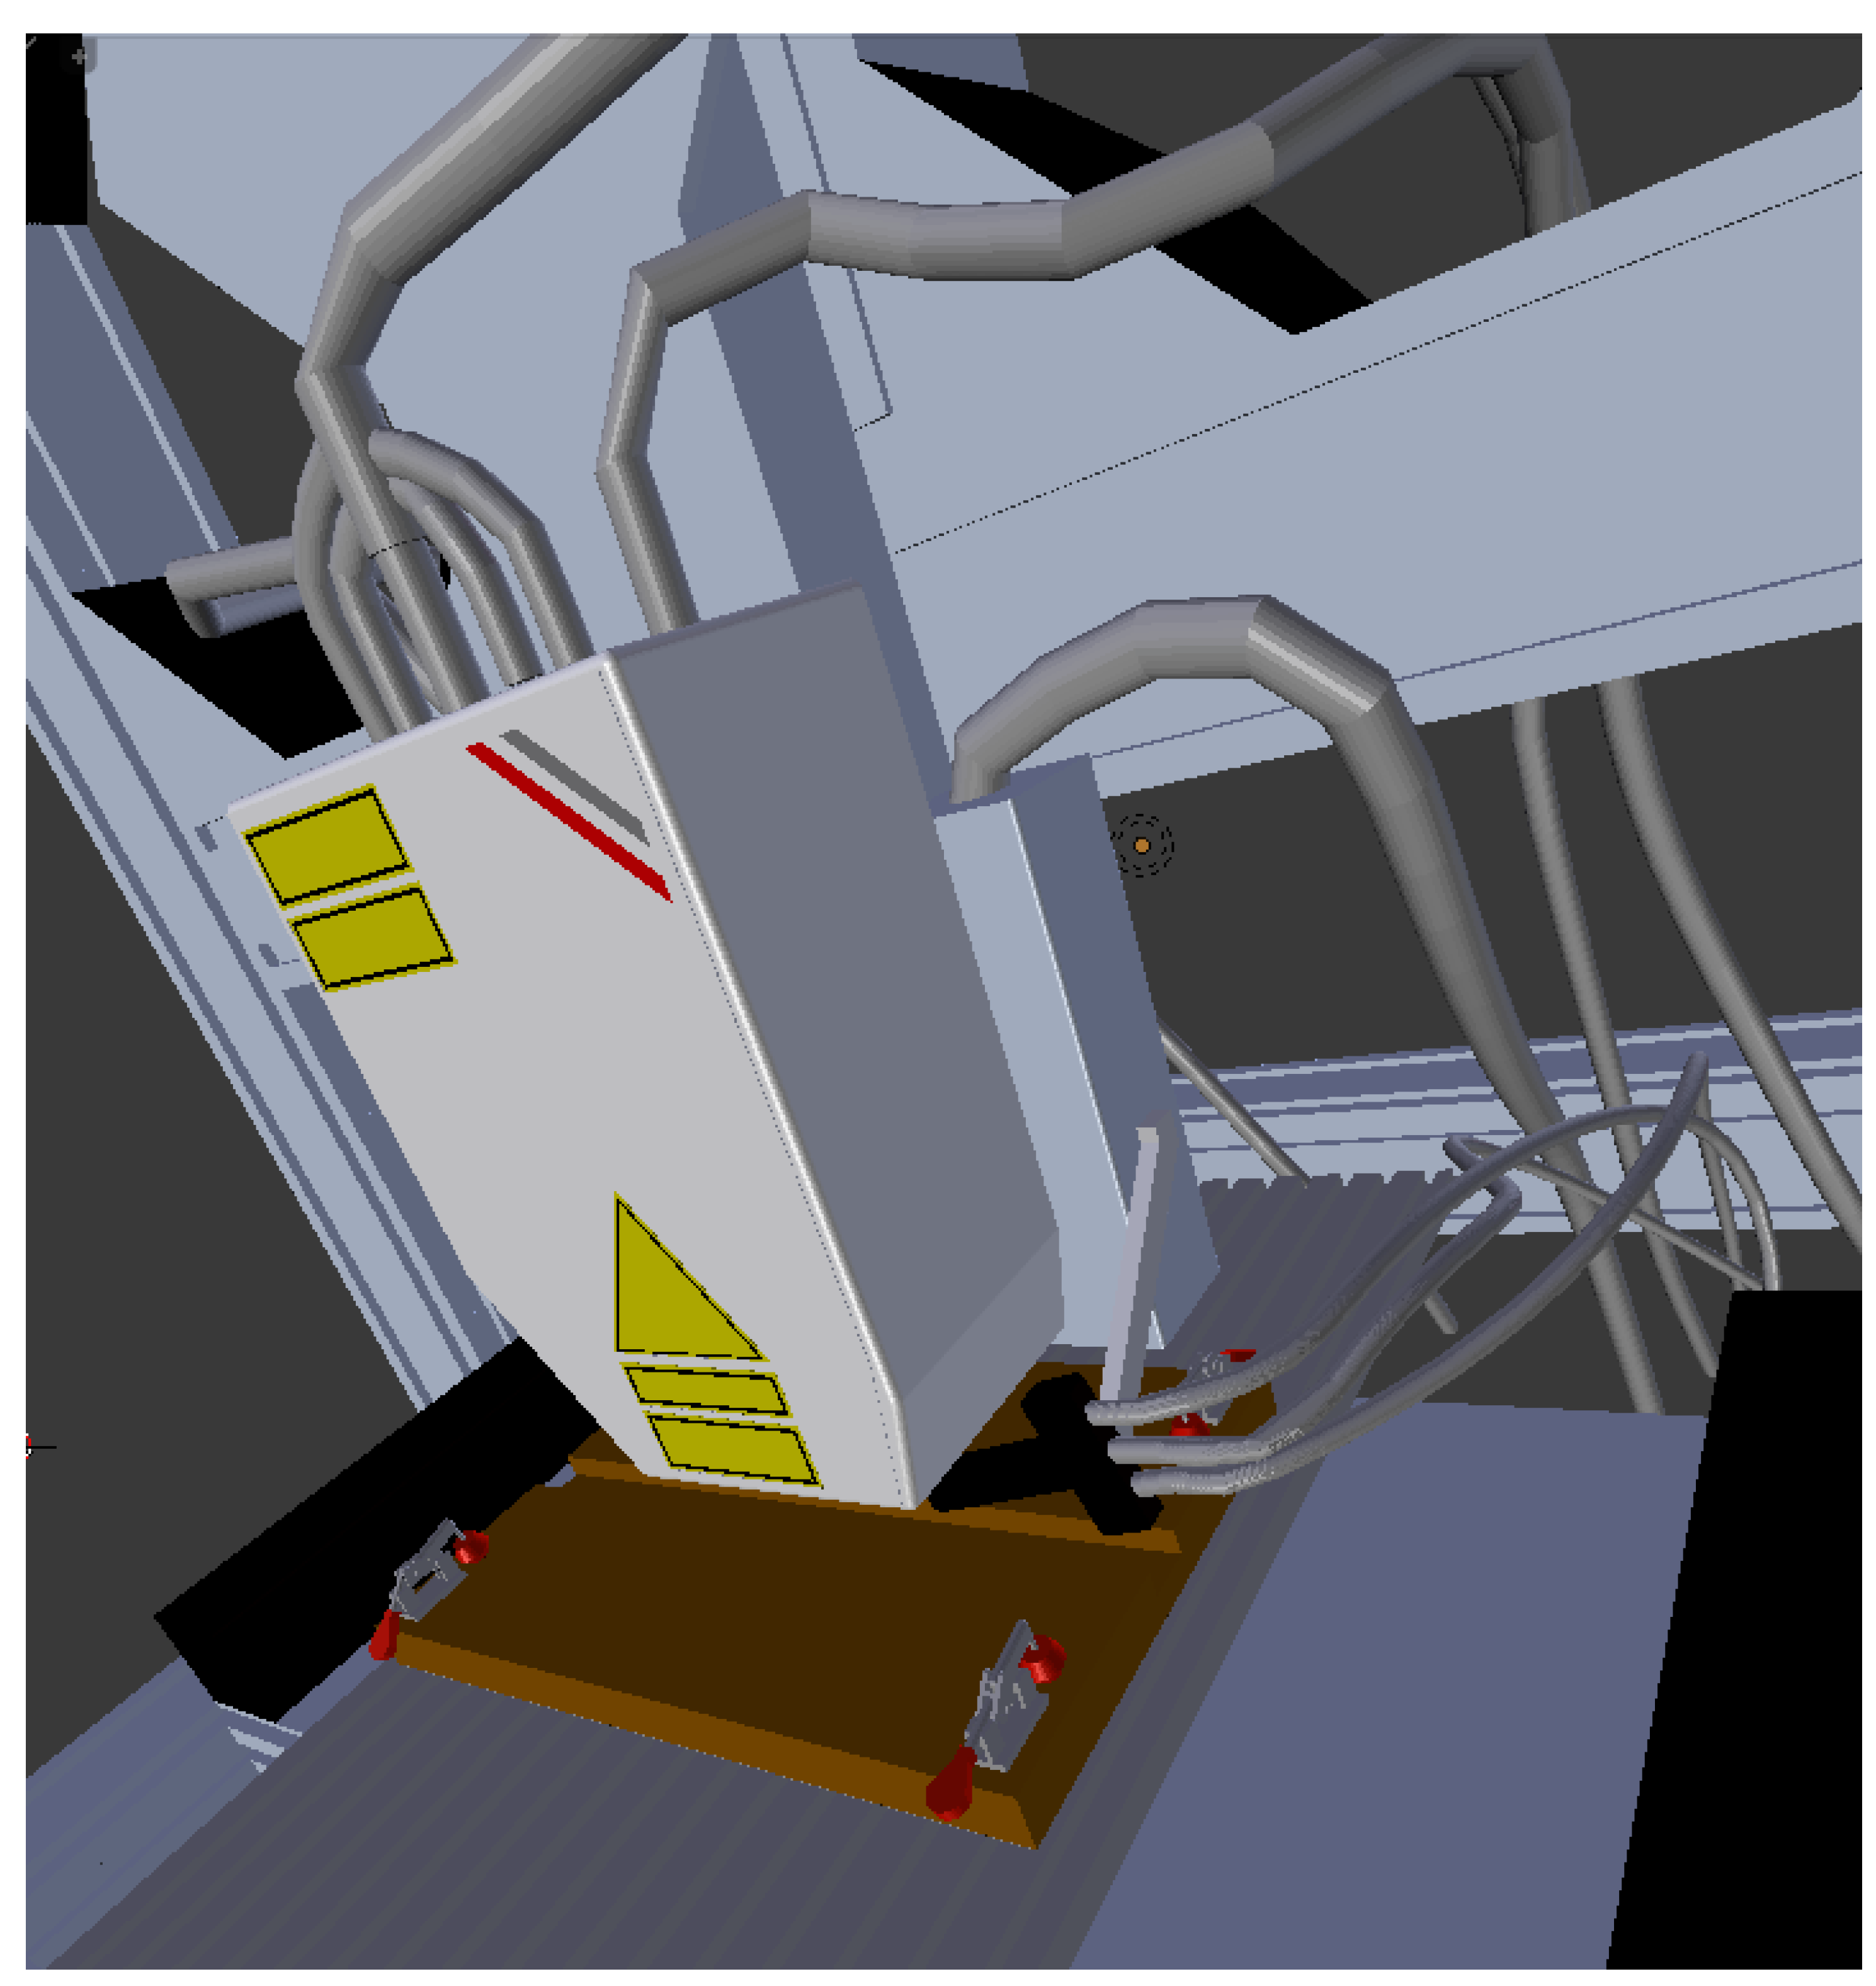
Figure 6.
The laser and the finished element after the completion of the alloying process.
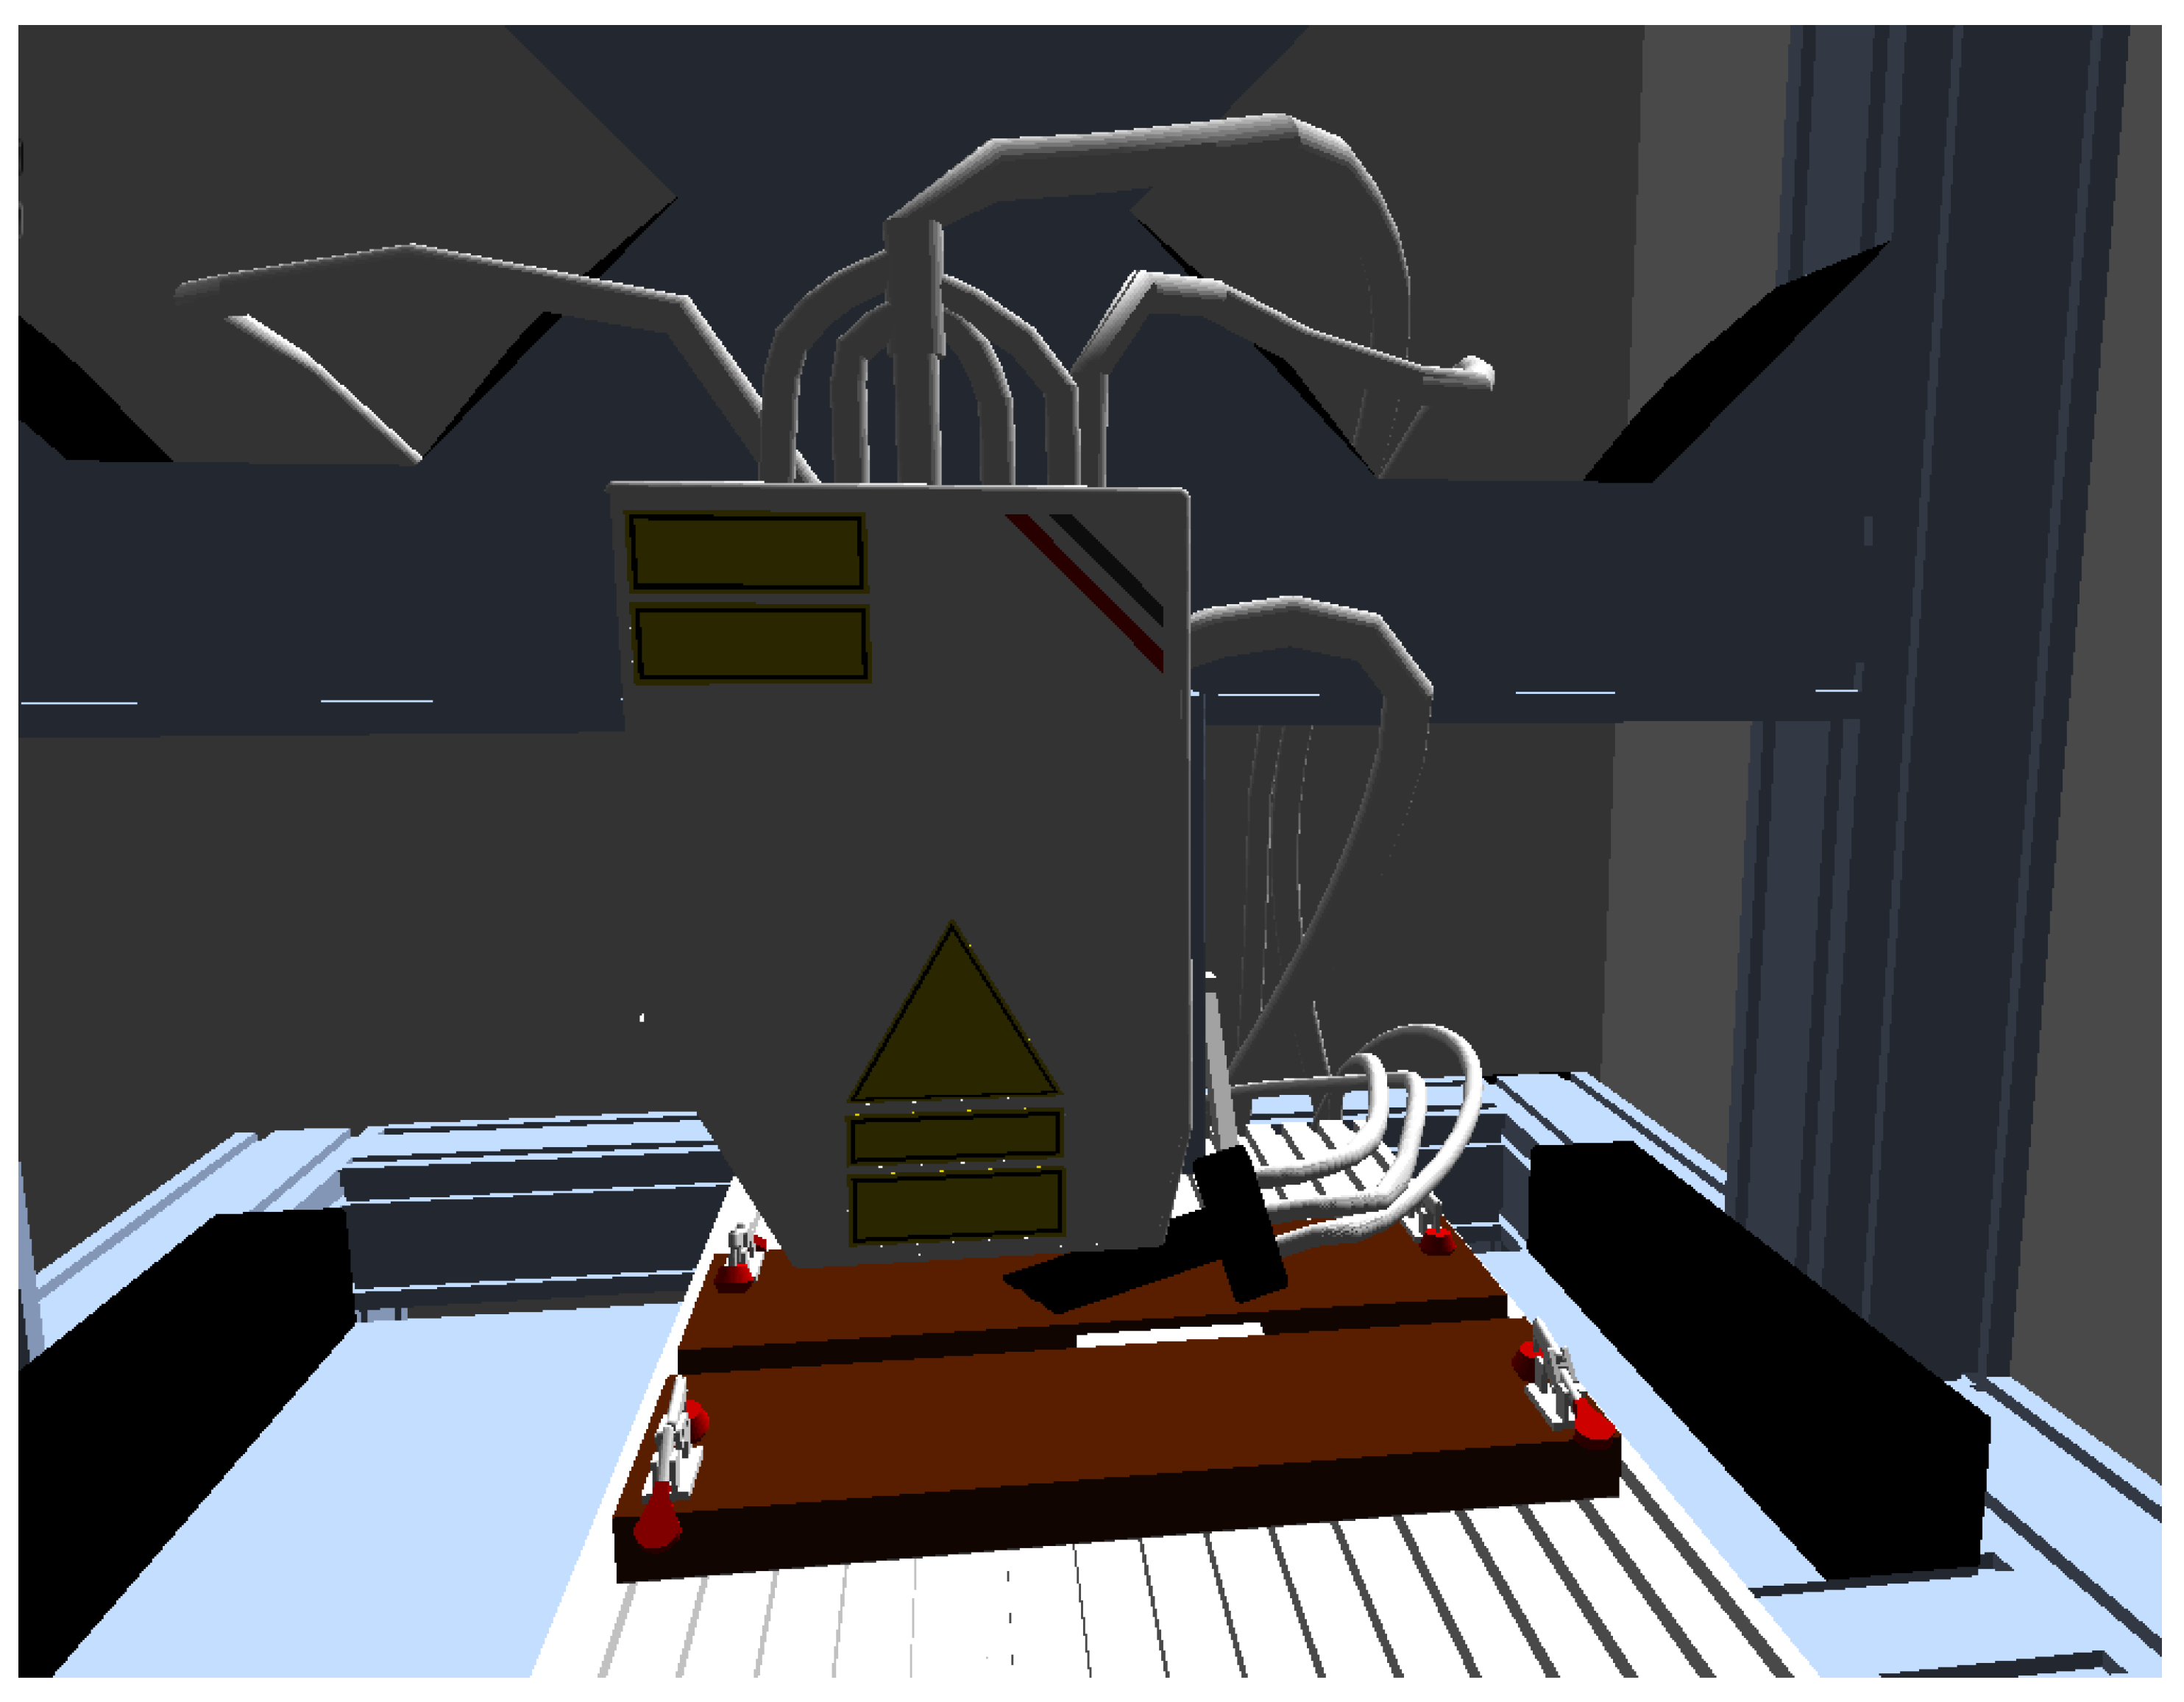
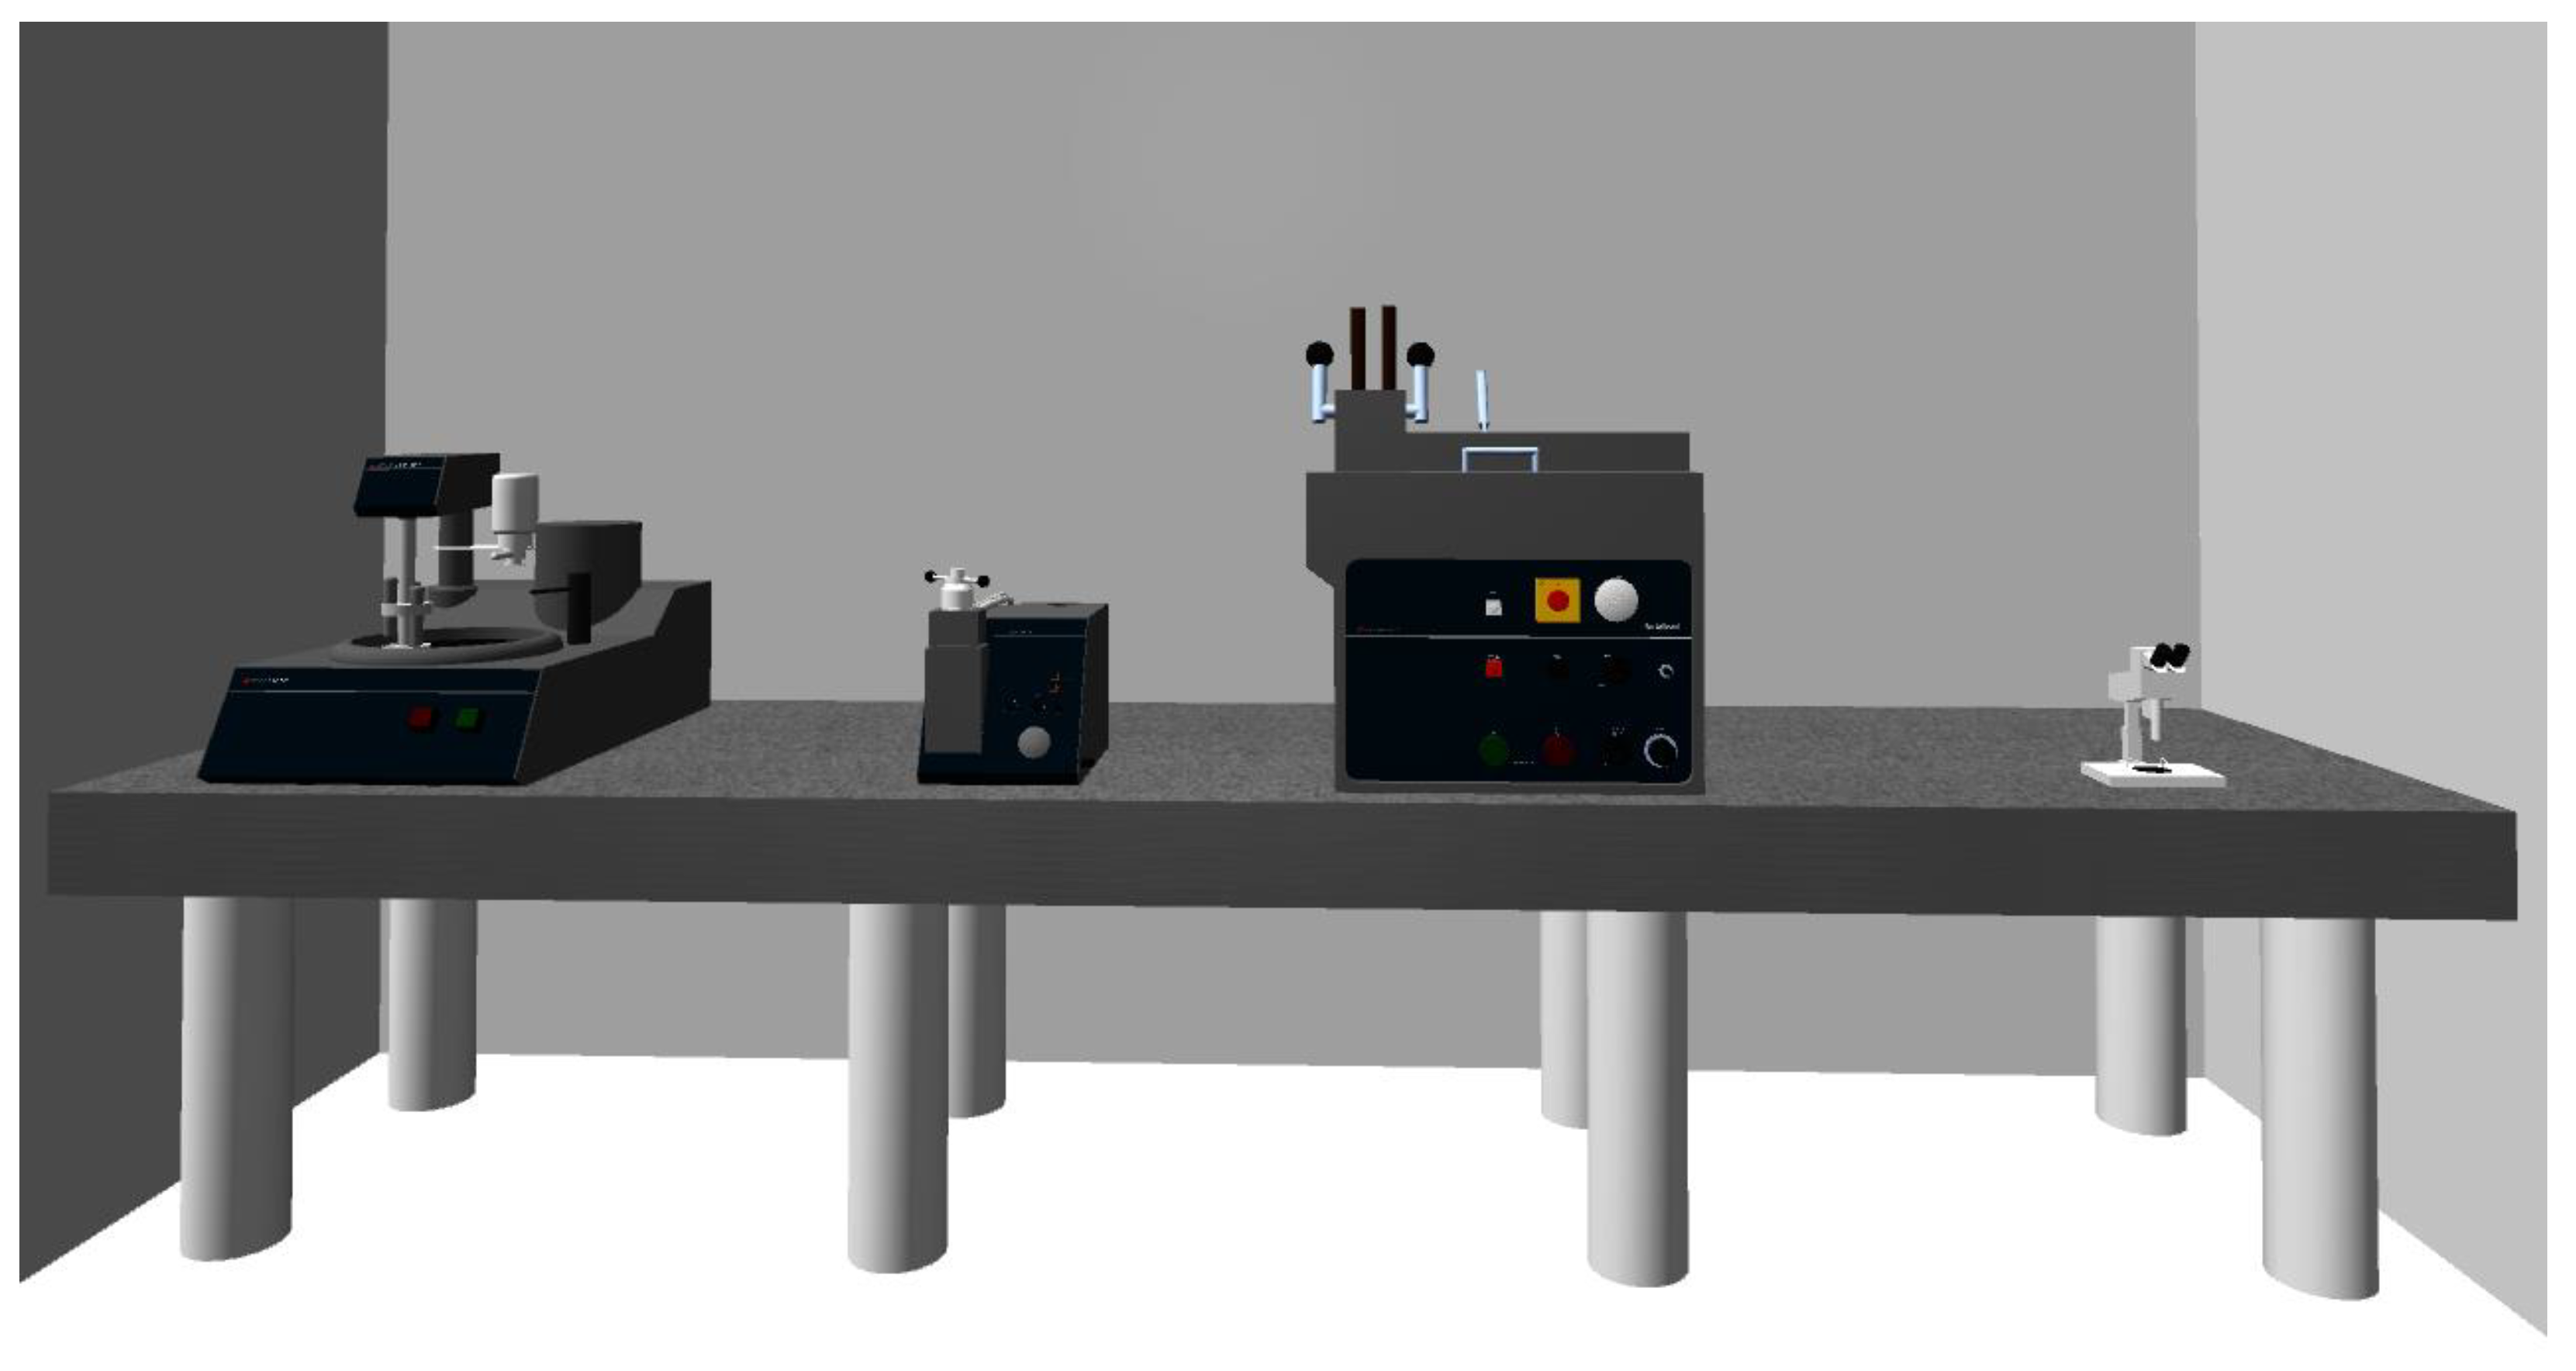
Figure 7.
Virtual devices for sample preparation, from left to right: grinding and polishing device LaboPol-1, hydro-pneumatic press for hot mounting Predopress, cut-off device Discotom-2, Olympus SZX9 microscope.
Figure 7.
Virtual devices for sample preparation, from left to right: grinding and polishing device LaboPol-1, hydro-pneumatic press for hot mounting Predopress, cut-off device Discotom-2, Olympus SZX9 microscope.
Disclaimer/Publisher’s Note: The statements, opinions and data contained in all publications are solely those of the individual author(s) and contributor(s) and not of MDPI and/or the editor(s). MDPI and/or the editor(s) disclaim responsibility for any injury to people or property resulting from any ideas, methods, instructions or products referred to in the content. |
© 2025 by the authors. Licensee MDPI, Basel, Switzerland. This article is an open access article distributed under the terms and conditions of the Creative Commons Attribution (CC BY) license (http://creativecommons.org/licenses/by/4.0/).
Copyright: This open access article is published under a Creative Commons CC BY 4.0 license, which permit the free download, distribution, and reuse, provided that the author and preprint are cited in any reuse.


