1. Introduction
Today, oil and gas extraction, and in particular drilling, is a key process for a number of applied industries that play a strategic role in guaranteeing economic stability. In particular, this is exploration and extraction of hydrocarbons, geothermal and mineral resources; environmental monitoring and scientific research of the subsoil; underground archaeological excavations and infrastructure development of large cities, etc. [
1,
2,
3,
4]. Drilling and casing strings and pipelines are complex, of great length, elastic mechanical systems made of metallic and non-metallic materials, with a large number of threaded connections [
5,
6,
7], which interact with the rock [
8].
Threaded connections are used to maintain the structural integrity and tightness of pipe columns in wells and pipelines, so the quality of their materials [9, 10] and the reliability of the structure are subject to increased requirements [
11,
12,
13]. A key advantage of threaded connections compared to other methods of connecting pipes and tools in the drill string is that they can be disassembled and reused many times. At the same time, this advantage can become a source of problems for the entire structure due to unintentional self-unscrewing of the threaded connection [
14,
15,
16]. This phenomenon can lead to significant financial losses in the industry due to the need for regular maintenance of connections, as well as cause emergency situations [
17].
In most cases, threaded connections for drill string elements work in aggressive and abrasive environments under the influence of intense dynamic and long-term cyclic loads [18, 19]. The increase in drilling depths and the construction of wells with a complex spatial configuration require the use of modern materials, intelligent structures and advanced technologies for designing and manufacturing drill tool joints [
20,
21,
22,
23]. The stress state of pipes and cylindrical shells near sharp-end concentrators under the conditions of contact interaction was studied in papers [
24,
25,
26,
27,
28,
29].
Operating experience shows that most problems and destruction of threaded connections can be eliminated by improving the perfection of their design [
30,
31,
32], a smaller part of failures is caused by technological aspects [
33] and operational errors [34, 35].
The technology of manufacturing helical and toothed surfaces requires an analytical approach to their shaping [
36], optimization of the technological route [37, 38], study of the latest approaches to stabilization of turning processes [
39] and development of special designs of cutting tools to ensure their shaping with minimal errors [40, 41]. Optimization of high-performance cutting modes in the manufacture of threads requires an analysis of the tools wear and the nature of changes in the roughness and accuracy of the thread, as well as the development of new methods of thread formation [
42].
The purpose of this study is to establish a model for ensuring the accuracy of forming a thread with a given triangular or trapezoidal profile, functionally depending on its pitch, diameter and geometric parameters of the turning tool that performs it, using an analytical method.
Chapter 1 of the paper shows the relevance of the research; chapter 2 describes the modern theoretical provisions on ensuring the accuracy of thread manufacturing; chapter 3 presents the proof of the mathematical model of a tapered thread profile as a function of the geometric parameters of the cutter which performed it; chapter 4 shows the results of the research obtained using the algorithm, which was created on the basis of the mathematical model; chapter 5 presents the conclusions of study.
2. Modern Approaches to Ensuring the Accuracy of the Production of Large-Step Drill Pipe Tapered Threads
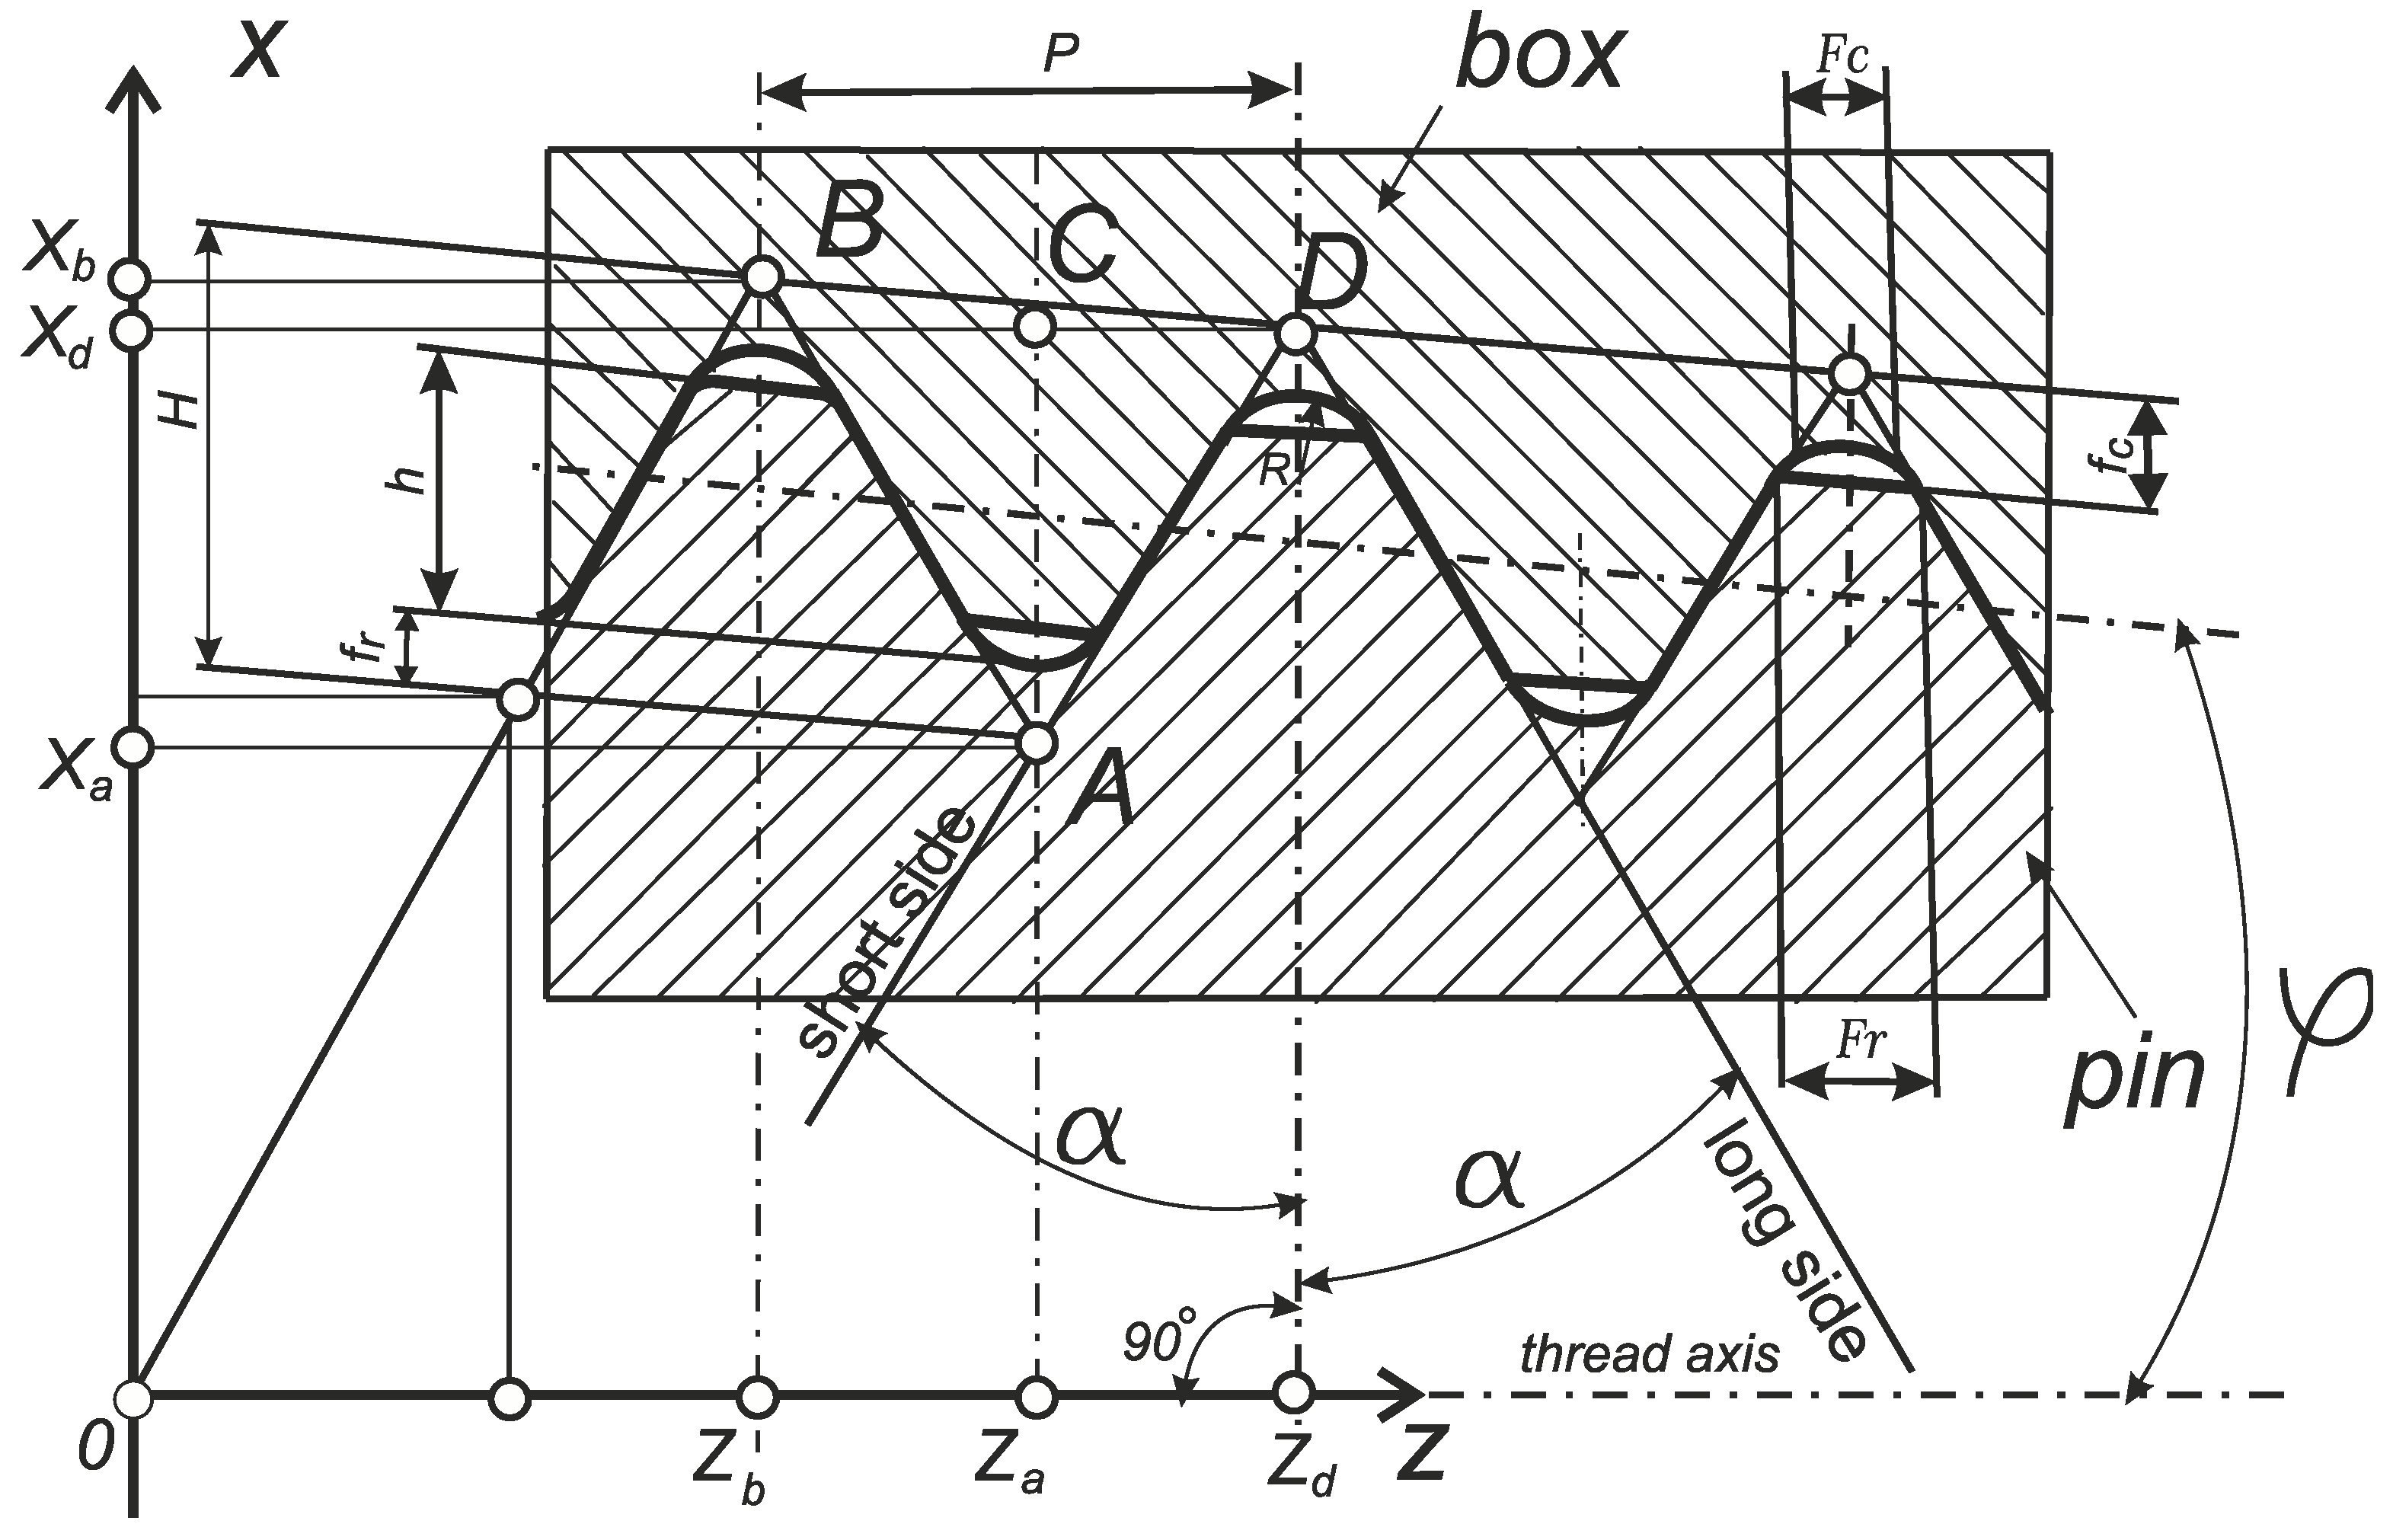
Drill pipe joints (also known as tool-joints) are large-pitch threaded male-female conical joints (nipple-coupling) with a diameter of 30 to 200 mm and of a triangular profile (
Figure 1).
One of the requirements for the accuracy of the drill-string tool-joint thread is the accuracy of its half-profile angle α, which according to the standard [
43] is the same for all its standard sizes and is 30°±0.75° (
Figure 1). Drill-string thread connectors are made using lathes, and thread cutters are used to turn their threaded surfaces. Modern manufacturers recommend using cutting tools with a full profile, which is similar to the profile and pitch
P of one of the standard sizes of threading the tool-joint [
44]. At the same time, tool manufacturers offer a variety of materials and coatings for cutting inserts, recommend different tool feeding schemes to achieve better productivity or stability of the cutter. In scientific works [45-46], methods of cutting in the process of thread turning from hard-to-machine AISI 304L stainless steels are investigated for aim to reach a high stability of the cutter. At the same time, the geometry of the rake surface of the cutter is never regulated by manufacturers, that is, their rake angle is actually always equal to 0. Despite the established approach of manufacturers, there are scientific studies that indicate the feasibility of using a non-zero value of the rake angle γ for turning in general and for turning oil and gas conical threads, in particular, threads made of high-alloy steel with a content of 13% Cr [47-48] (
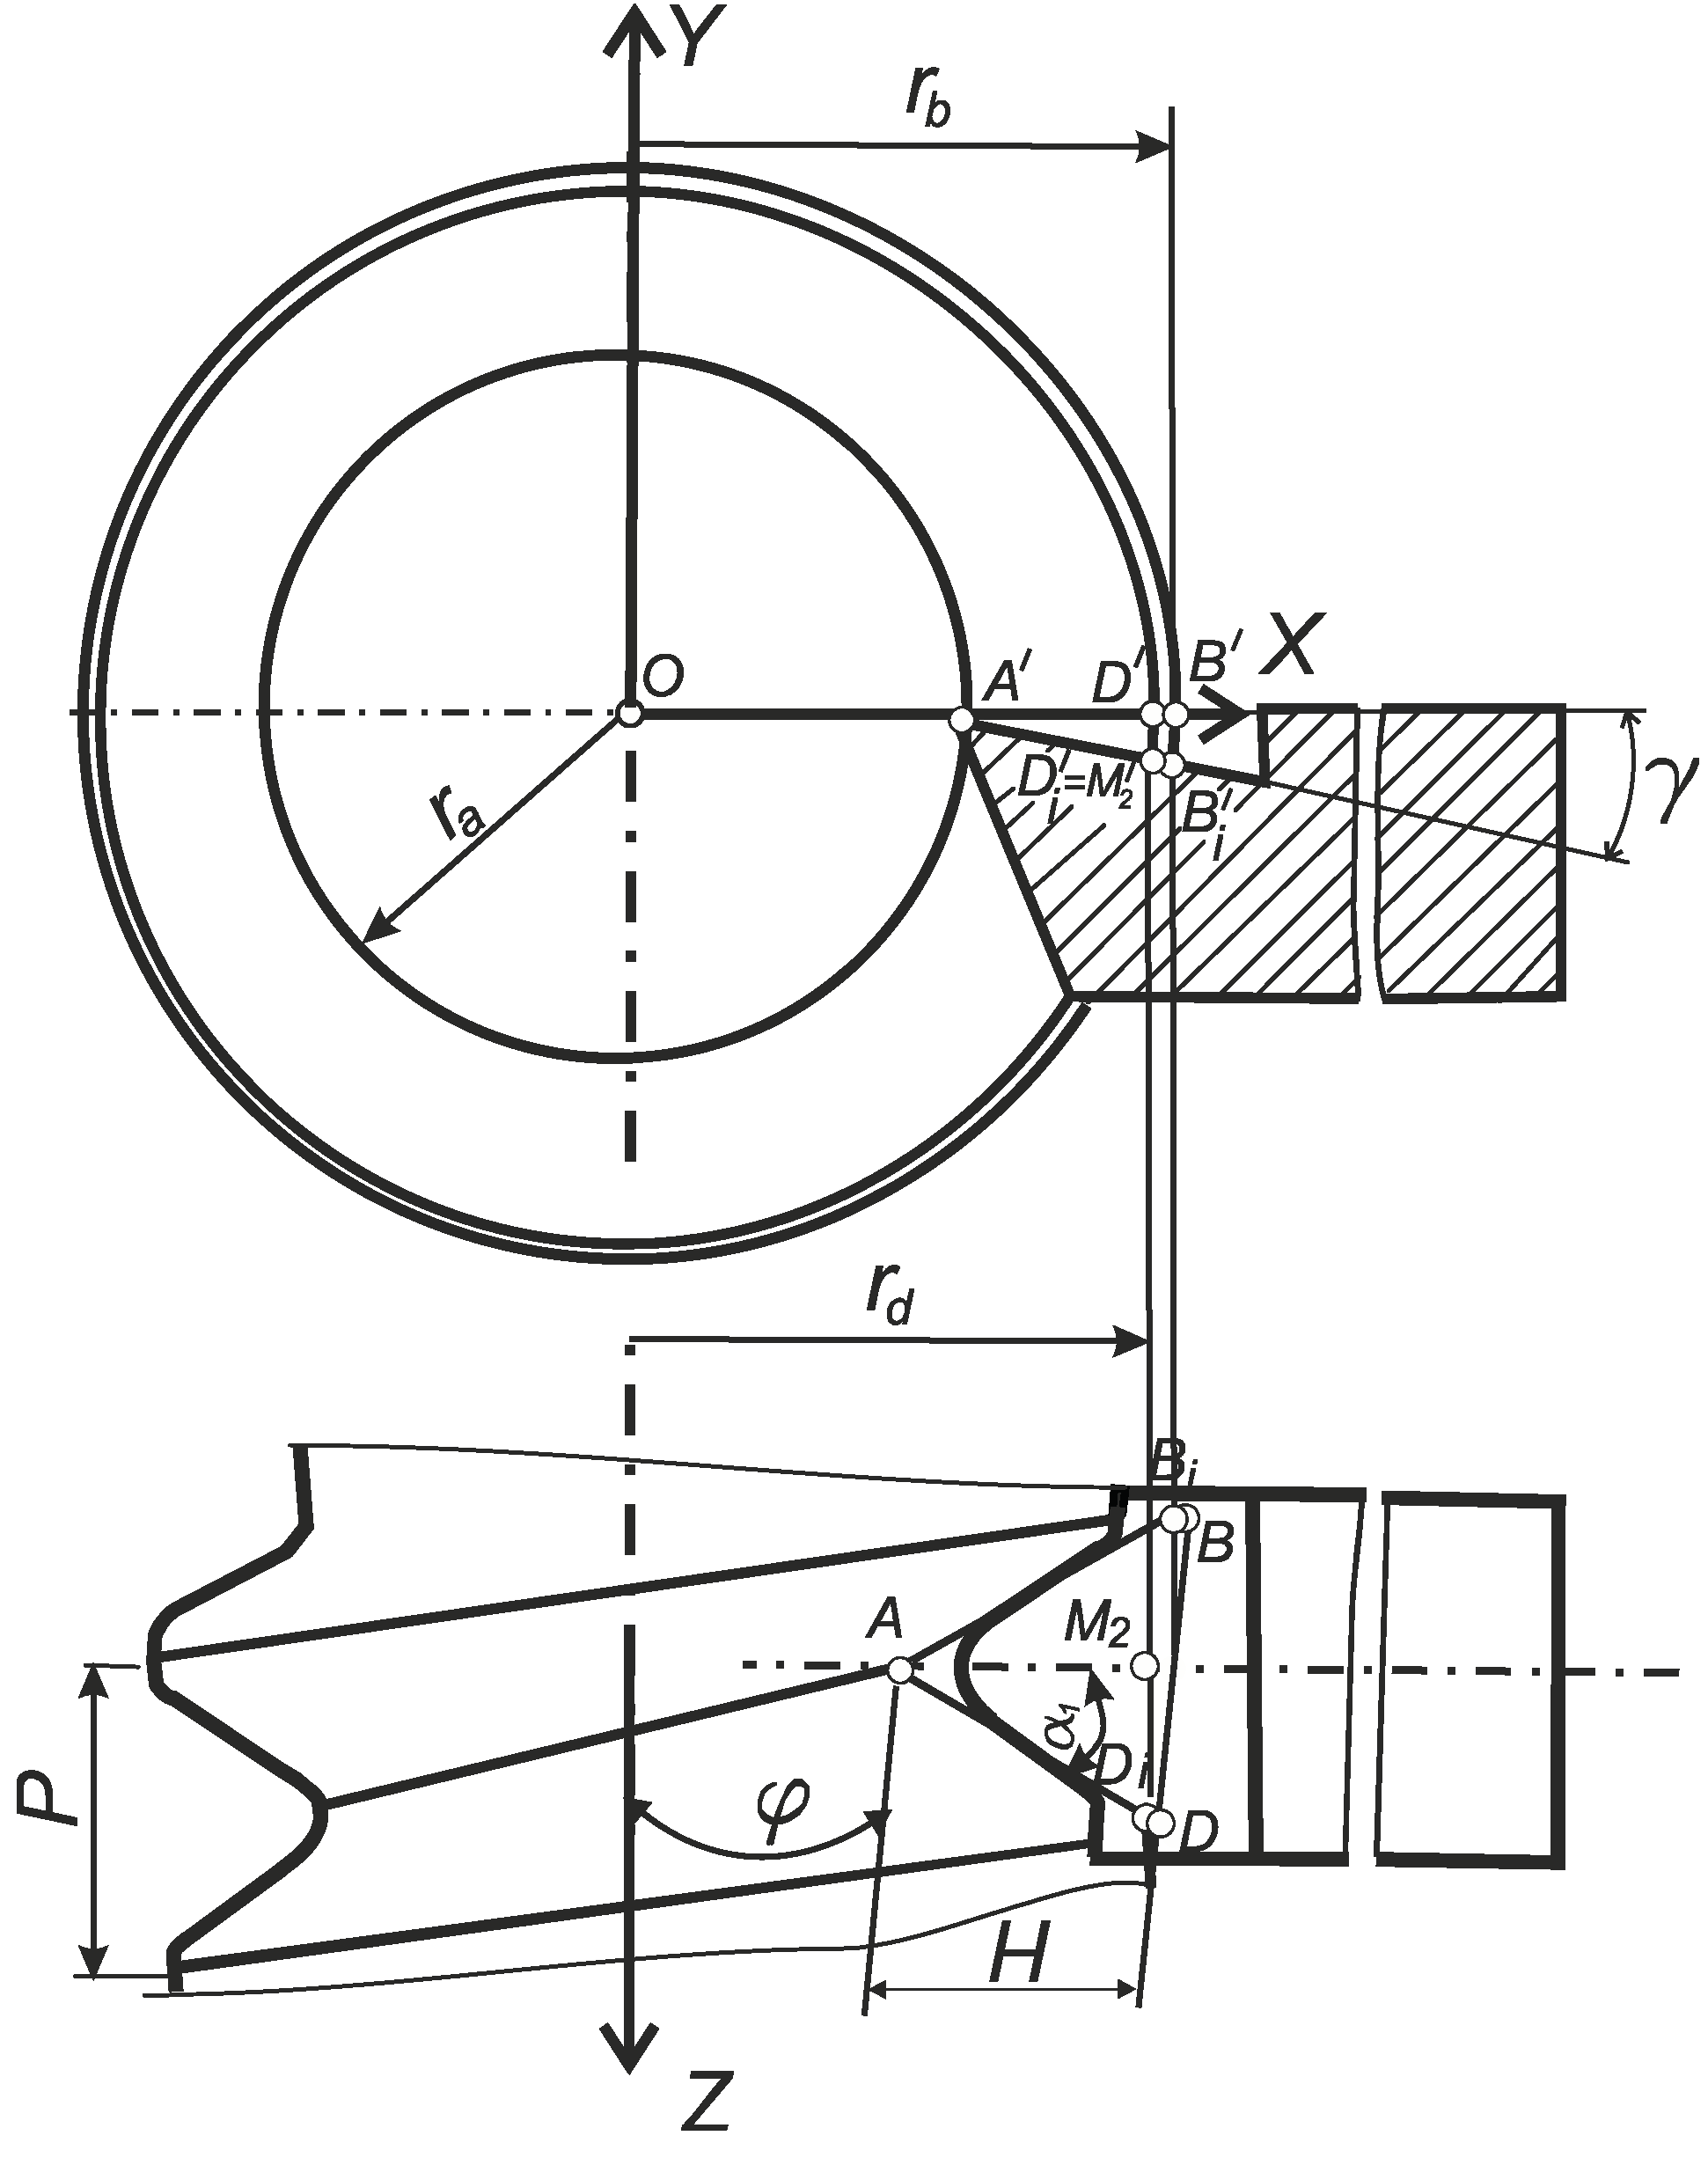
Figure 2).
The zero-value rake angle of the cutters offered by the manufacturers is obviously related to compliance with the precision of the drill-string tool-joint thread regulated by the standard [
43]. Theoretical studies of the kinematics of the process of turning tapered thread using a tool with a non-zero value of the rake angle are presented in studies [
49,
50]. However, the scientific results in these works concern the analytical calculations of the accuracy of the kinematics of turning the thread [
49] and its predicted lead angle [
50], and not its profile. Experimental studies of the influence of the error of setting the threaded cutter on the deviation of the real profile of the thread were carried out in [
51]. The input data in this study are the tangential deviation of the cutter installation relative to the axis of the thread, as well as the angular displacement relative to the longitudinal axis of the tool. An analytical study of the effect of tool kinematics on the profile of the screw was carried out by the authors [
52], but the object of the study is a cylindrical worm screw, and the subject is the profile and kinematics of the end mill, not the geometric angular parameters of its cutting edge. The work [
53] contains analytical dependences of the tool profile depending on its rake angle, but the tool is intended for the manufacture of a roller-gear cam and not a conventional worm (screw) shaft.
In cutters with a non-zero rake angle, the rectilinear section of the cutting edge of the tool does not cross the axis of the thread (
Figure 2). In this case, as a result of the helical movement of the straight L, that is, the straight
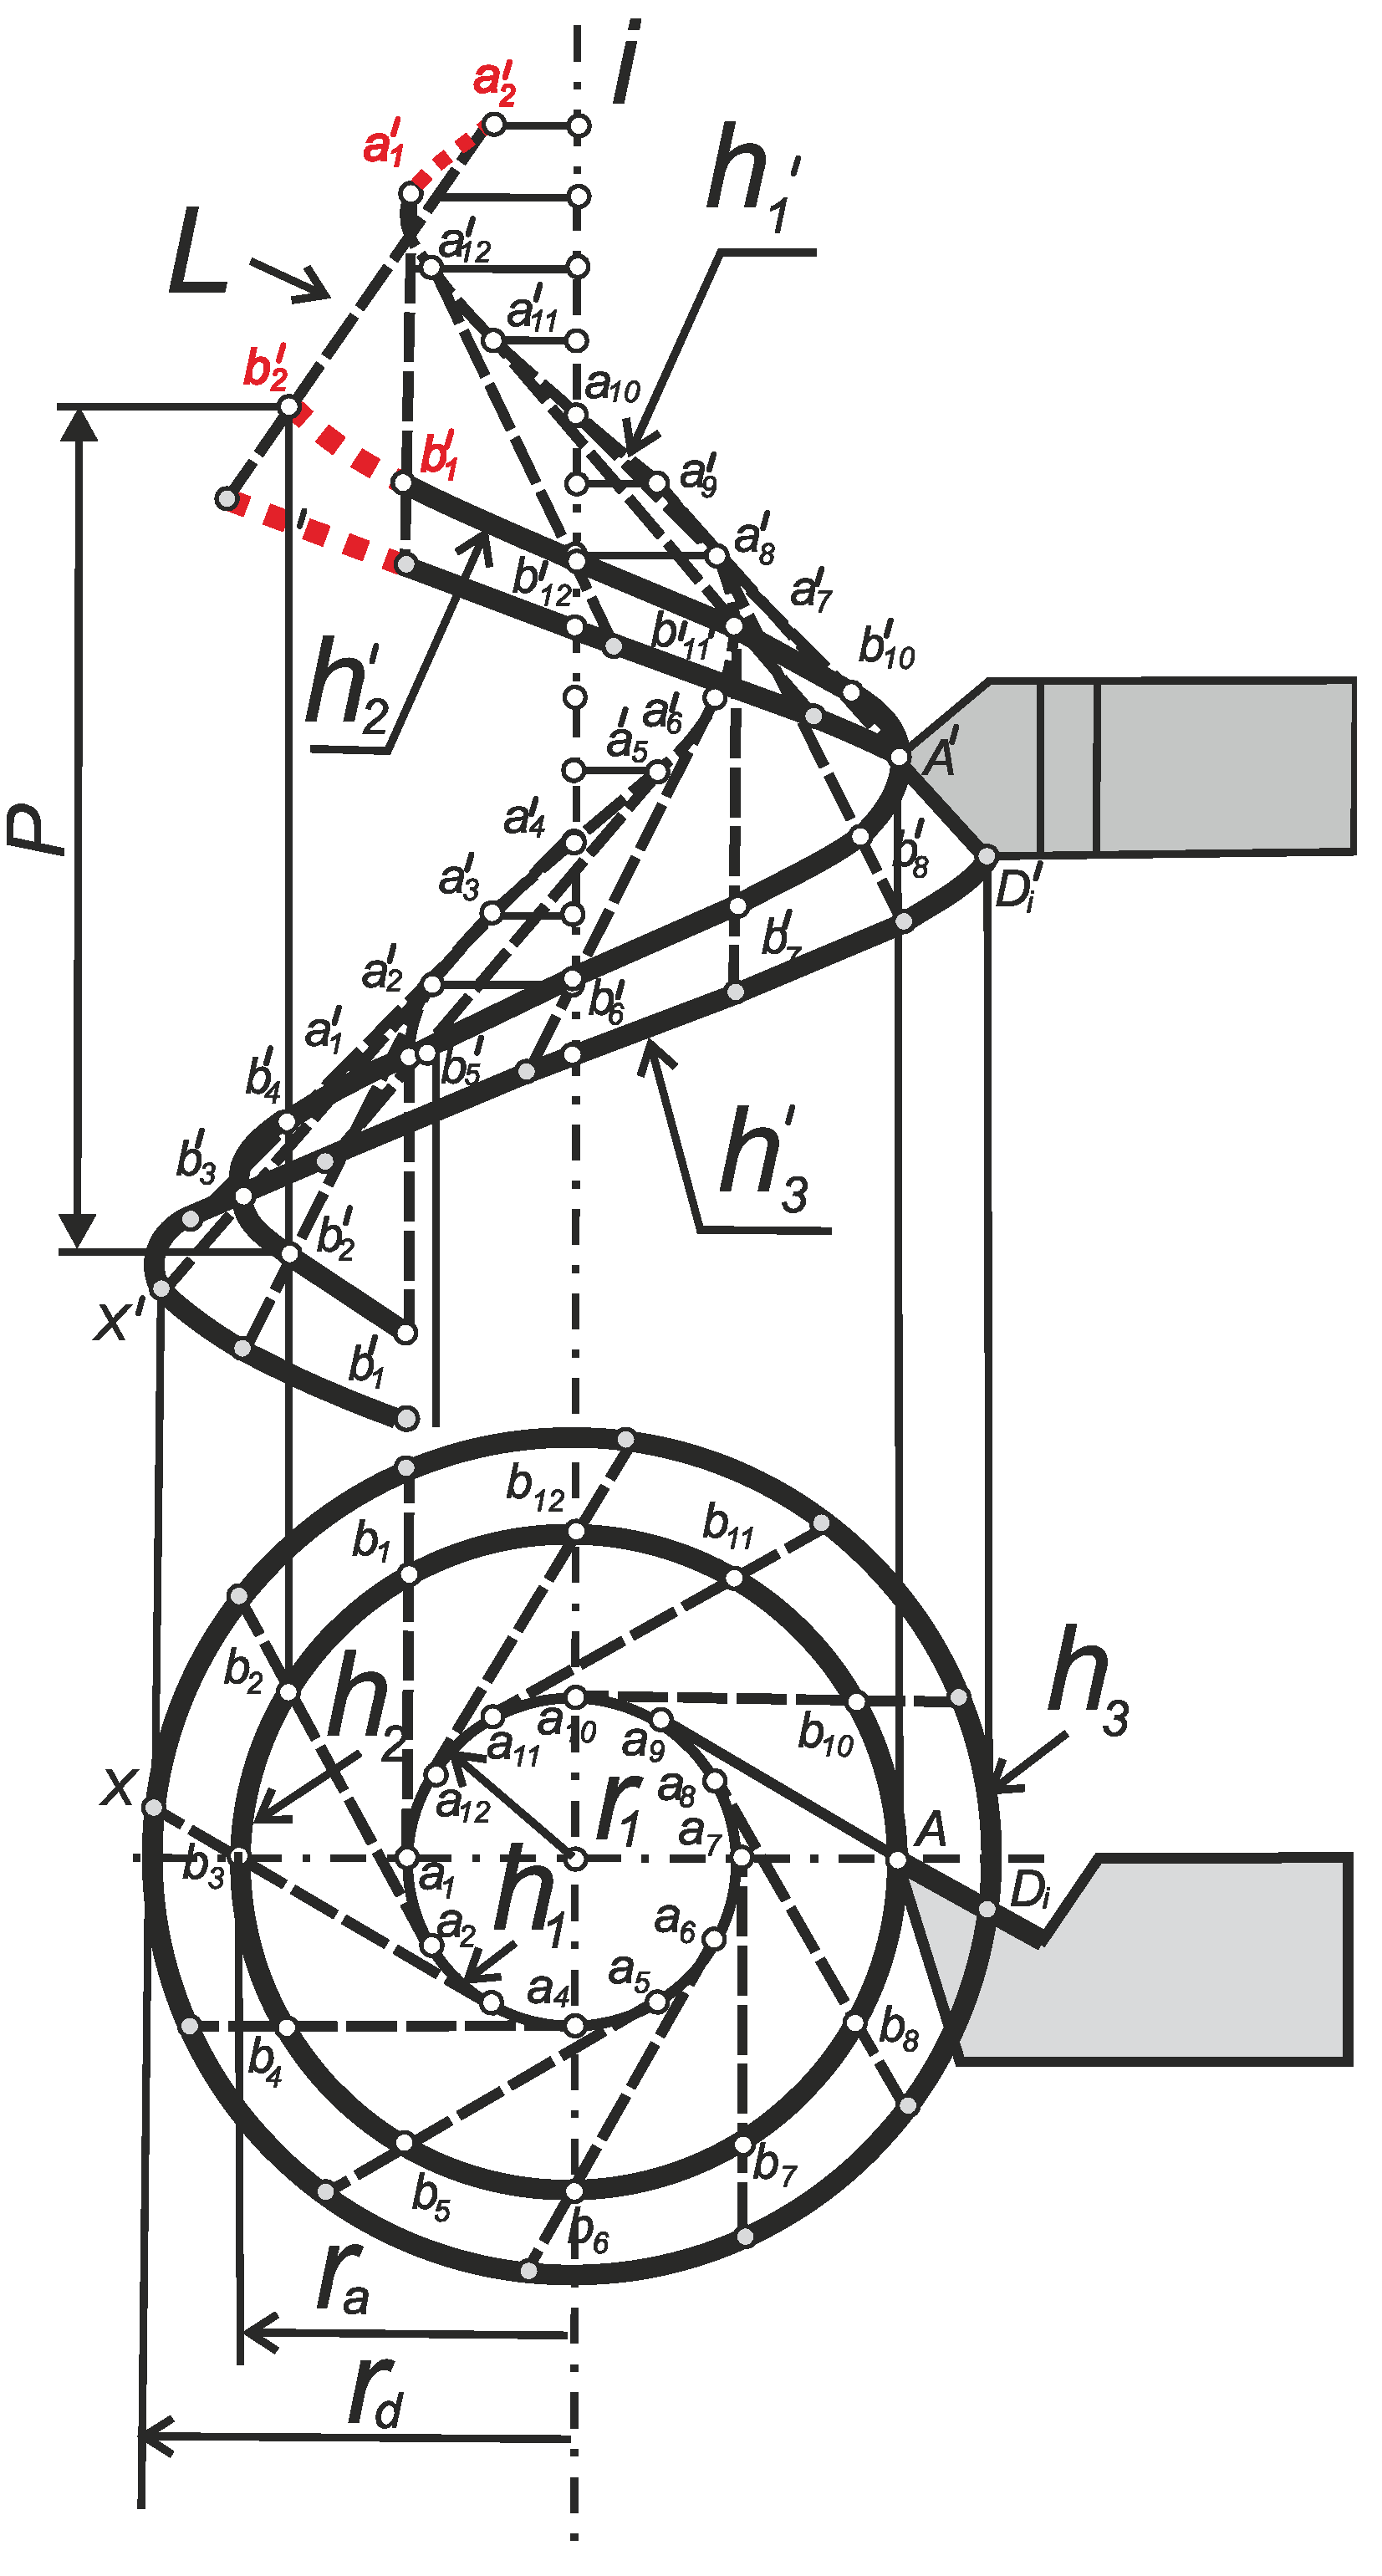
AD where the straight section of the cutting edge is located, a surface topology other than that prescribed by the standard is formed, i.e. instead of the Archimedean helicoid (
Figure 3), a convoluted helicoid (
Figure 4) is formed.
As it is known, helices are the guides of screws, so the drawings in
Figure 3 and
Figure 4 show the inner helix
h2, on which the points of the inner radius of the thread
ra are theoretically located, and the outer helix
h3, on which the points of the outer radius of the thread
rd are theoretically located. The axis of screws
i corresponds to the thread axis
Z in
Figure 2.
Additional characteristics for a convolute screw are as follows: an output cylinder with a radius
r1 and a helix
h1 on it (
Figure 4).
Analogous constructions apply to and can be performed for another perpendicular section of the cut, located on the line
АВ, which is shown in
Figure 2.
Based on the data of the draftsman of the standard [
43], the starting point for designing the profile of the cutter is the Archimedean spiral surface, since the left
AD and right
АВ of its lateral sides of its profile are rectilinear and such a cut is called triangular. Therefore, the axial profile of this surface is described by the equation of an algebraic linear function (
Figure 1)
where the angle α = 30° is the half-profile angle of the triangular thread.
To determine the theoretical profile of a cut formed by a cutter, the cutting edge of which does not lie in its axial section, it is necessary to have an analytical dependence of the axial section of the convolute helicoid on the value of the rake angle γ at the tool nose and the thread diameter, and to carry out its analytical comparison with the profile formula of the given thread (1).
Since the thread is conical, the variable nature of the values
ra, rb, r1 should be taken into account in the calculations:
where
ramin,
rbmin, r1min are minimum values of radii
ra, rb, r1;
l is the distance from the beginning of the screw thread with the small cone base to a certain turn of it.
2.1. Methodology of the Study of the Effect of the Value of the Back Rake Angle of the Lathe Cutter Nose on the Profile of Tapered Thread Obtained with Using it
In
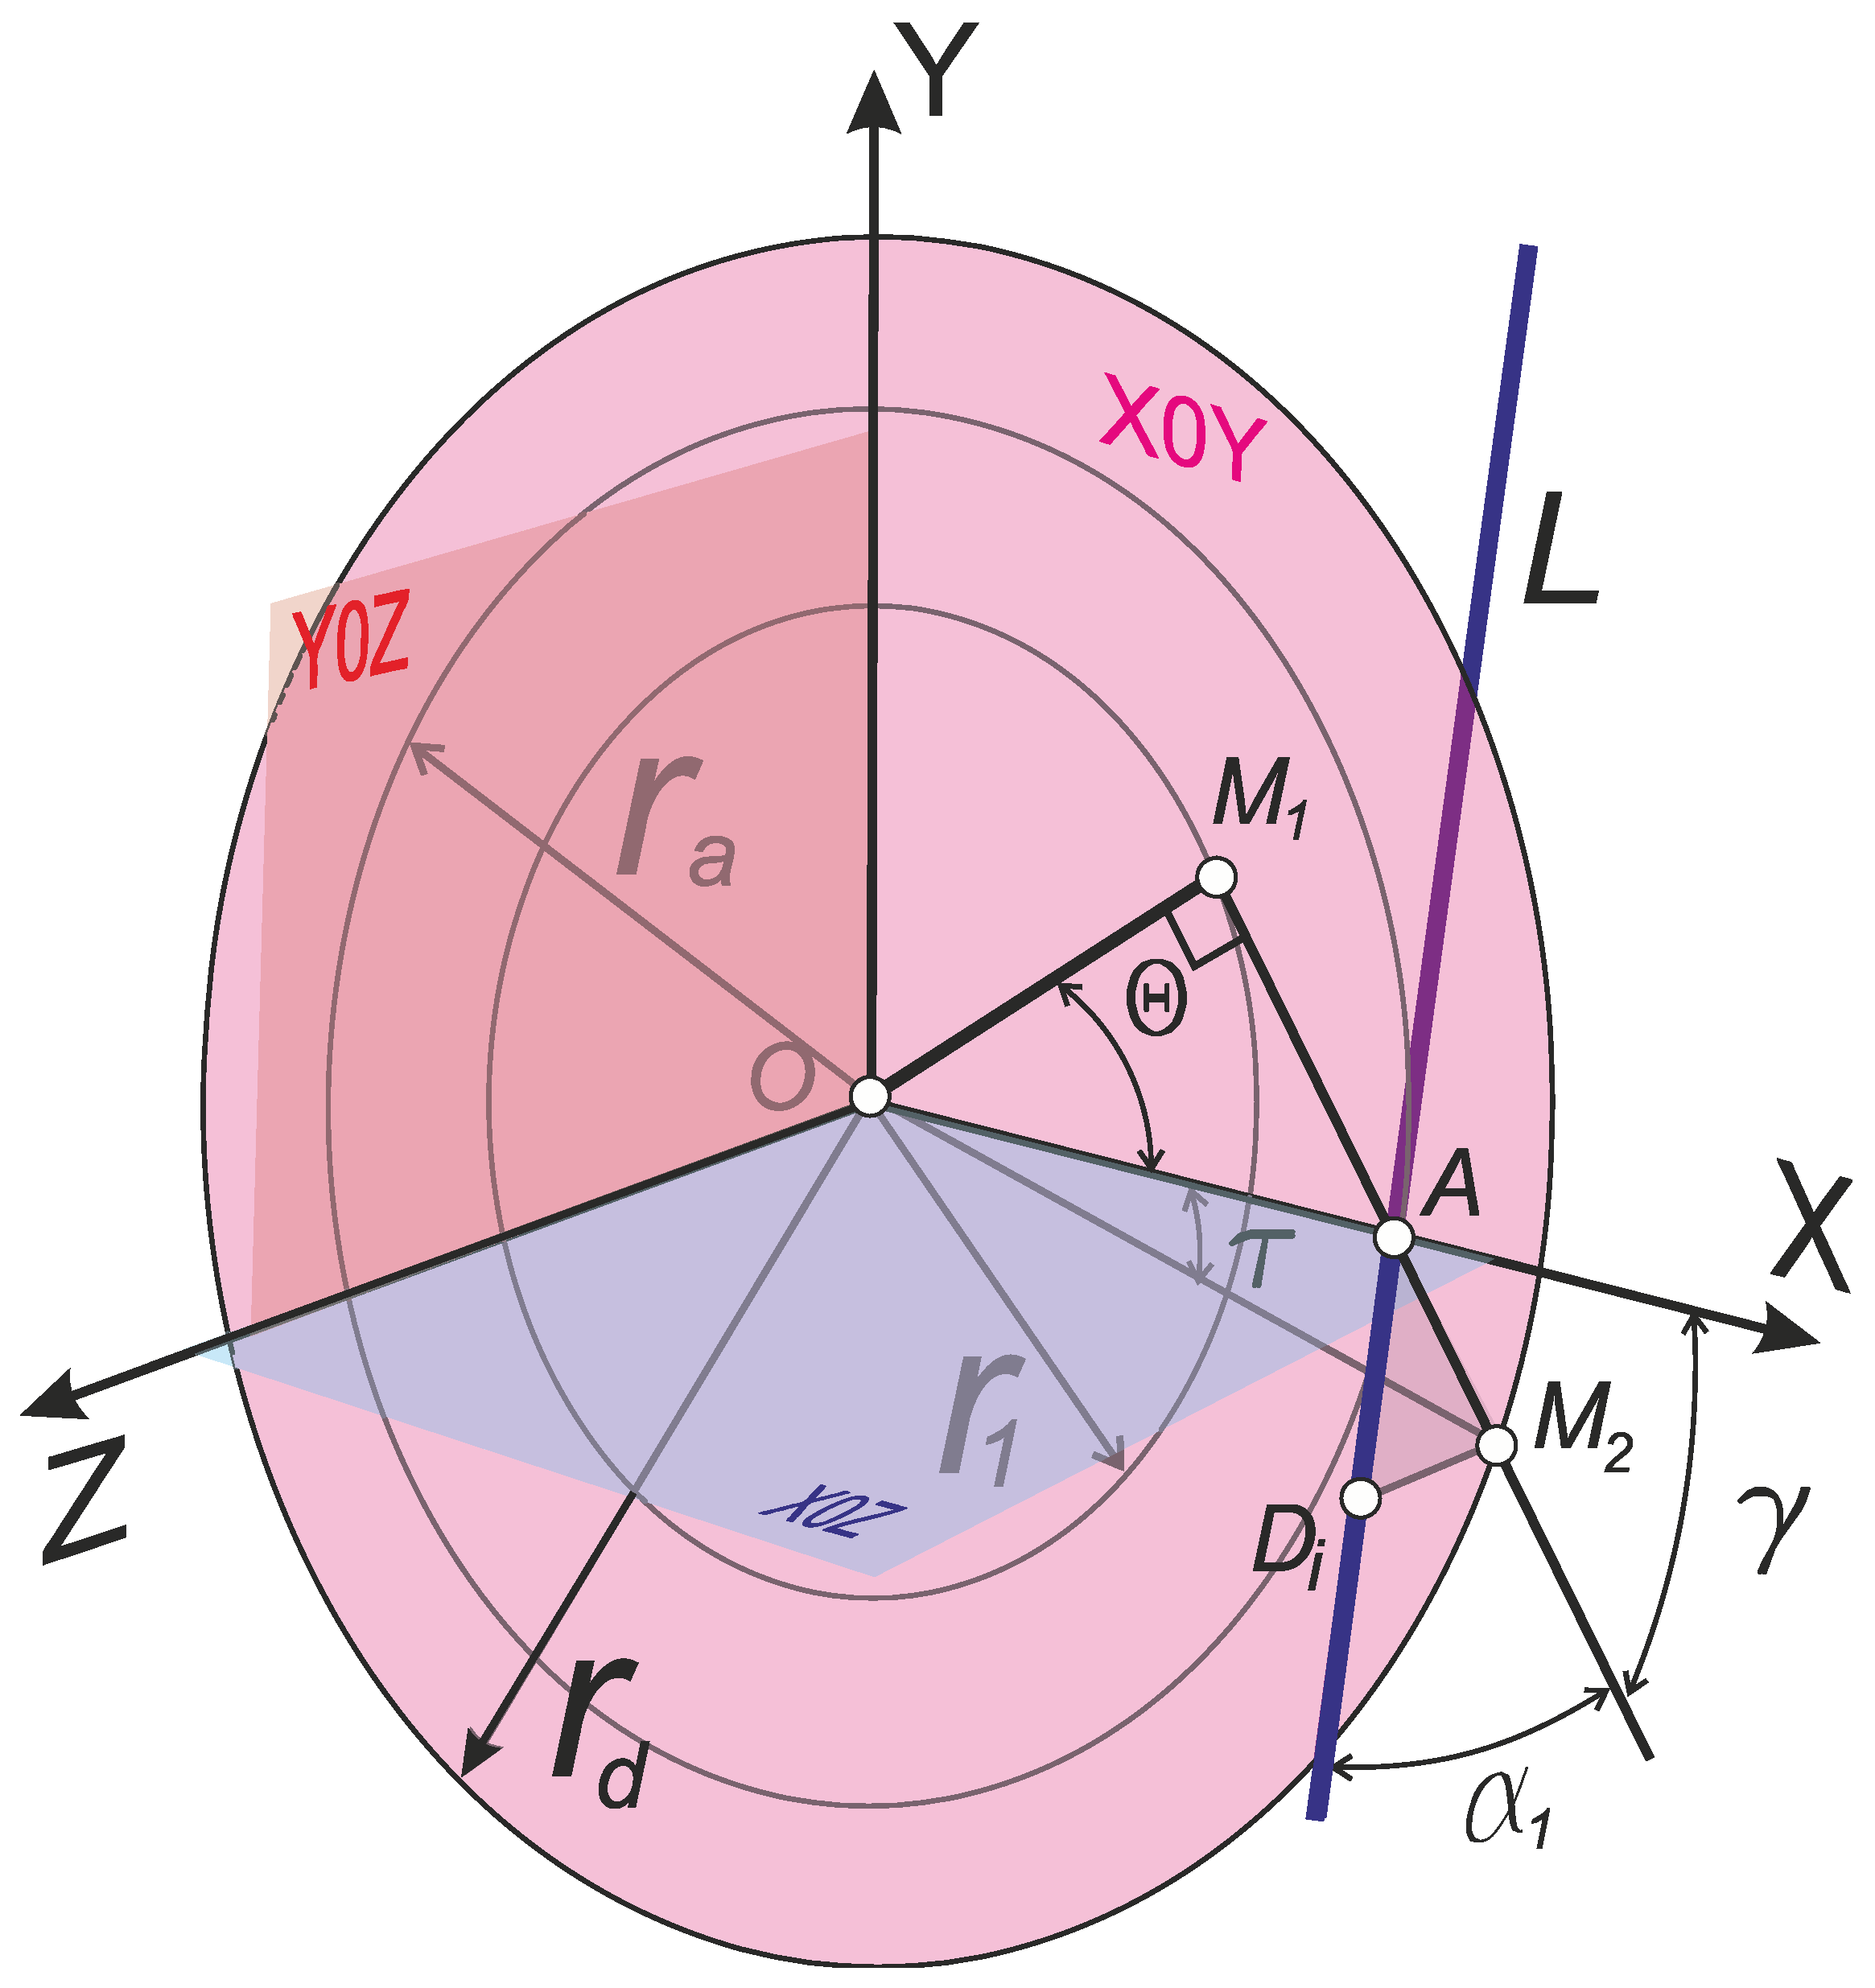
Figure 5, the generator
L of the convoluted helicoid is constructed in cylindrical coordinates and at the same time in Cartesian coordinates. The
XY plane is perpendicular to the
Z axis, which coincides with the thread axis and contains the starting point of coordinates
O. Cylindrical coordinates are the most suitable for modelling the process of forming a helical surface with a turning tool.
The generator
L of the convolute screw intersects the
X axis at point
A, and it is inclined to the
X0Y plane at an angle
α1 (
Figure 5). In the case of using a conventional cutting tool, the profile angles of the thread and the cutter are identical, i.e.
α1 =
α. The projection of the generating
L onto the coordinate plane
X0Y is the straight line
M1M2. The segment
АDi lies on the generating
L and it is the cutting edge of the cutter. The plane defined by the triangle
ADiM2 is the rake plane of the thread lathe tool. At the same time, the segment
ADiM2 is parallel to the
Z axis, and its length is
determines the
Z coordinate of point
D. The segment
АМ2 is the projection of the cutting edge
АDi on the
X0Y plane. Point
M1 is the point of contact of the straight
M1M2 to the initial cylinder with radius
r1 [
54].
2.1.1. Parametric Equations of the Helical Surface and Equations of Its Axial Section in General Form
If the generatrix
L is set by a system of equations in cylindrical coordinates:
where the projection of
L onto the
X0Y plane (line
М1М2) is defined in polar coordinates by the equation:
where
ρ is the distance of an arbitrary point of segment
AM2 to point
О, then the helical surface is written in a follow system of equations:
where:
— parameters τ and Ɵ determine the position of a point on the surface and are its curvilinear coordinates. At the same time, the parameter τ determines the position of an arbitrary point of the line М1М2 on the projection of the generating line L on the X0Y plane. The parameter Ɵ determines the amount of rotation of the generator L around the Z axis;
— the value p is a parameter of the screw and is determined by the formula
𝑝=𝑃2𝜋,
where P is the pitch of helicoid.
If we solve equation (4) with respect to the parameter
τ:
then the system of equations (3) of the generatrix
L in cylindrical coordinates will take the following form:
where
F1(ρ) denotes a certain complex function:
Thus, the system of equations (5) of the helical surface will have the following form:
where the parameter
τ must be replaced by formula (6). The coordinate lines are: at
θ=
const is the generating line
L, and at
τ=
const is the spiral line, which is placed on a cylinder with a radius of
ρ.
Let's bring the system of equations (8) to new curvilinear coordinates by making a substitution:
The system of equations of the helical surface (8) will take the following form:
where:
Here (
ρ,
ϕ) are the curvilinear coordinates of a point on a helical surface, if
ϕ=
const, then we have the generating
L, and if
ρ=
const, then we have a helical line. The function
F(ρ) determines the law of change of the
Z coordinate of the current point of the guide
L and it can be written as follows:
The geometric content of the function (10) is easy to find if we substitute ϕ=0.
into the system of equations (9). Then we will get the following equation system in parametric form:
or, which is the same after removing the parameter
:
The system of equations (11) determines the line of intersection of the helical surface with the X0Z plane, i.e., they analytically describe the axial section of the convolute helical surface.
2.1.2. The Influence of the Back Rake Angle at the Nose of Lathe Tool on the Profile of the Helical Convoluted Surface Obtained with Help of it
Looking at the triangle
ОМ1М2 (
Figure 6), we can determine the value of the radius of the main cylinder
r1:
Since the axis OX is taken as the polar axis, the polar coordinates (, τ) will determine the position of the segment АМ2, which is the projection of the cutting-edge AD on the X0Y plane.
Let the point
М2 be one of the arbitrary points of the segment
AM2, then the curvilinear coordinate
ρ will be the segment of variable value |
OM2|. Using the triangle
ОМ1М2 and using formula (12), we find the variable value
ρ:
The obtained expression (13) corresponds to formula (4), that is, the first of the equations system (3) of the cutting edge АDi in cylindrical coordinates.
Using the theorem of sines, we find the value of the segment
ОАМ2 from the triangle (
АМ2):
From the right-angled triangle
ADiM2, we can obtain the value of the segment length (
DiM2):
Since the point
М2 is accepted by us as arbitrary, it can be assumed that the length of the segment
DiM2 is a variable value and corresponds to З-coordinate of an arbitrary point of the cutting edge
АDi in cylindrical coordinates. So instead of |
DiМ2| we substitute
Z(τ):
The obtained equation (14) corresponds to other of the system of equations (3), which describes the generatrix L in cylindrical coordinates.
According to formula (6) and using formula (13), we solve that equation with respect to
τ:
The next step according to formula (7) should be the solution of Z coordinate with respect to
ρ, that is, formula (15) should be substituted into equation (14). Therefor we get the following dependence:
After some reductions, the resulting equation will take the following form:
To obtain the system of equations of the helical surface according to formulas (9), the function (16) should be transformed according to formula (10) and as a result, according to formula (11), the equation of the axial section of the convoluted helical surface should be obtained [
52]:
where:
τ is one of the curvilinear coordinates of the cutting edge, determined by the formula:
P is the pitch of the specified thread;
γ is the rake angle;
is the half-profile angle of the cutting edge in the rake plane.
The received transcendental equation (17) of the axial profile of the convolute helical cut made by the cutter indicates its theoretical discrepancy with the profile of the Archimedean thread given by the standard, which is described by the algebraic equation of the first order (1).
However, τ=0, , and if the angle γ approaches 0, and then equation (17) becomes equivalent to equation (1).
The authors in the study [
55], due to the algorithm developed by the authors, concluded that it is admissible to use threaded cutters with a back rake angle of
γ=12° for the manufacture of a tool-joint thread 2 7/8 Reg. At the same time, the deviation from the nominal half-profile angle is less than 0.1°, which is less than 15% of the tolerance. In the article [
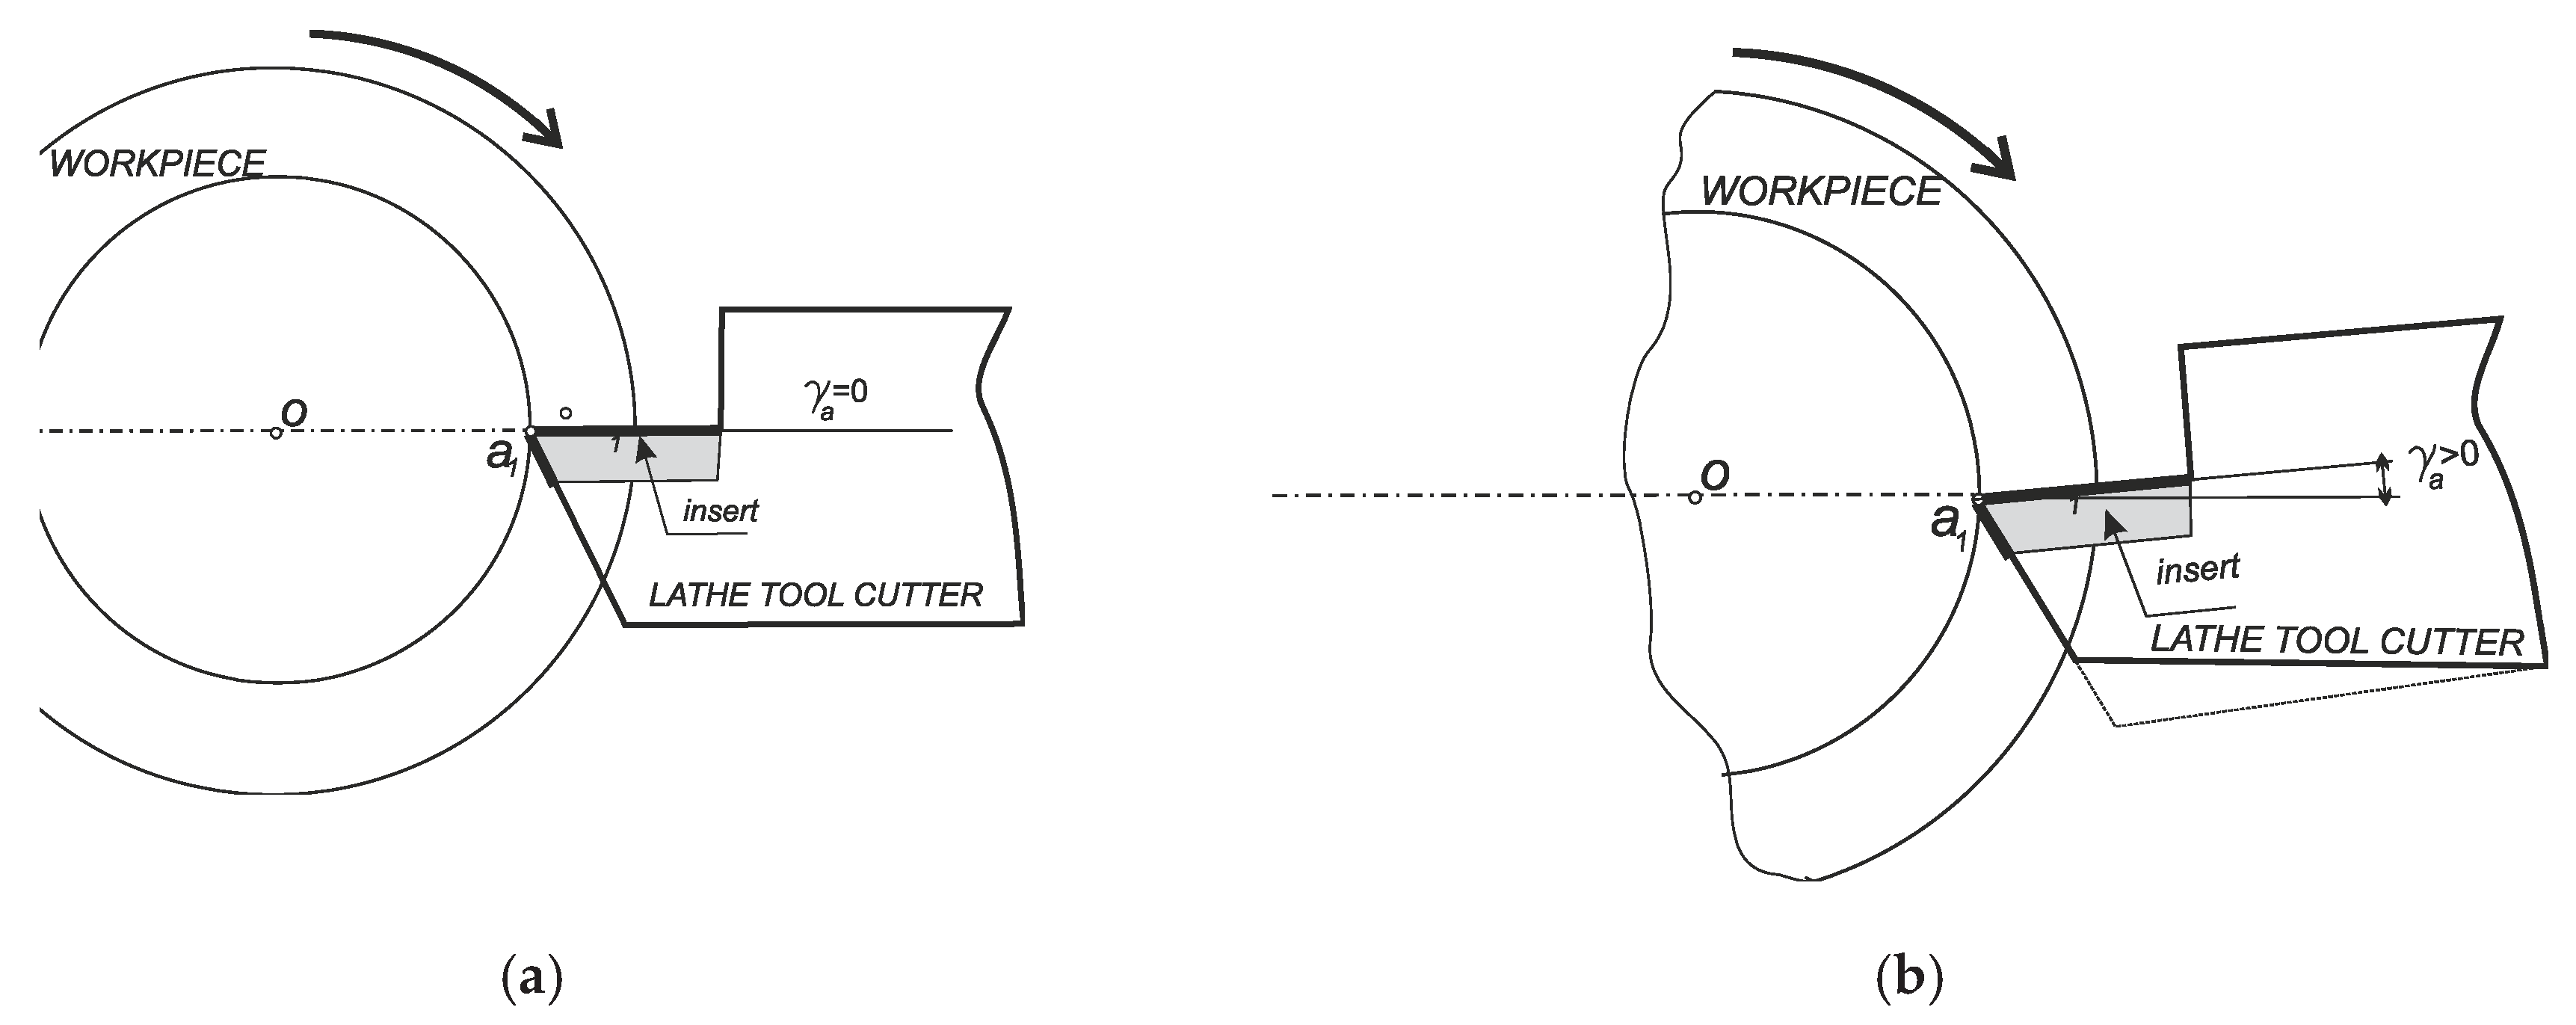
48], the authors proposed a scheme for ensuring a negative rake angle due to a simple geometric change of the holder of a conventional thread cutter (
Figure 6). With such a change, there is no need to create a new cutting insert or a method of its attachment at a certain back rake angle
γ.
2.1.3. The Influence of the Inclination Angle of the Cutting Edge of the Thread Cutter on the Profile of the Helical Convolute Surface Obtained with it
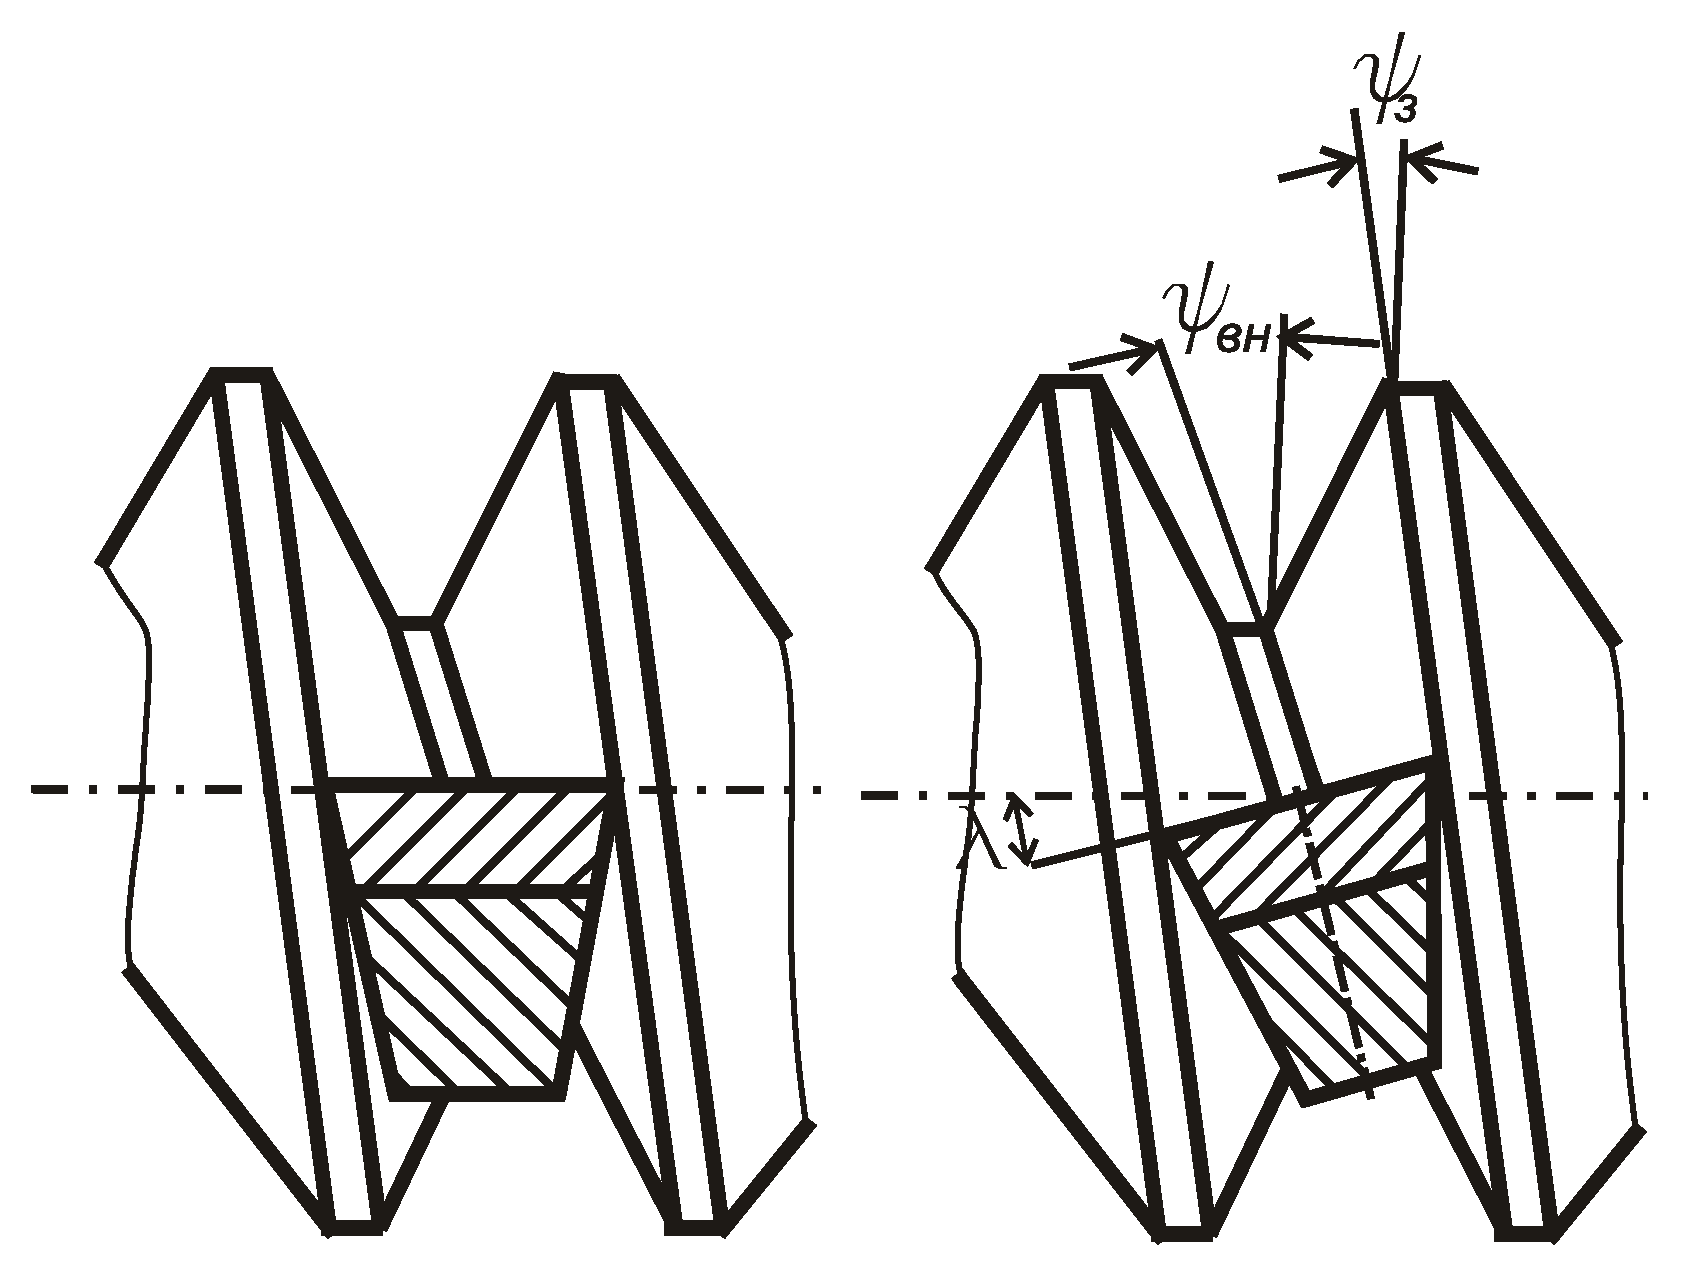
In fact, the surface of the convoluted helicoid is also obtained due to the inclination of the cutting insert at an angle
λ relative to the axis of the thread, which is recommended to improve the operating conditions of the cutter (
Figure 7). The angle
λ is chosen so that it corresponds to the rang between the angle of inclination of the screw on the depressions
ψBH and on the protrusion
ψ3 (
ψBH <
λ <
ψ3).
Such an angle for tool-joints is quite insignificant, it does not cause alarm among manufacturers regarding the influence on the accuracy of the thread profile, and therefore the operating instructions for threaded cutters contain the method of using tools containing a plate installed at an angle relative to the axis of the thread. However, for large-pitch screw surfaces, including conical ones, the influence of the angle of inclination of the tool on the accuracy of their axial cross-section, that is, the thread profile, turns out to be quite significant [
22,
56]. The study proves that for high-precision worm drives, reducing the backlash with a high degree is quite a difficult task. This work is based on the analysis of the accuracy of the kinematics of manufacturing convolute and involute worm screws, but does not focus on the geometric parameters of the tools for their manufacture. In the study [
57], the authors Onysko and Kopei prove by calculations that the presence of a screw lead angle of
λ = 2.24° for the NC10 tool-joint thread (the smallest size among drill-string connect thread), and accordingly, the angle of inclination of the cutting edge of the cutter
λz=2.24° causes a decrease of the half-profile angle
α/2 by 0.24°, which is more than 30% of the tolerance. The methodology of the theoretical part of that research is essentially a continuation of the approaches presented in
Figure 5 and described by equation (17).
In
Figure 8 presents a scheme for compiling an algorithm for calculating the deviation of the received profile of the convolute surface from the profile of the thread specified by the standard, depending on the angle of inclination of the cutting edge of the thread cutter
λz. The scheme is built in cylindrical coordinates. The
Z axis of the coordinate system coincides with the axis of the screw. The value
r1 denotes the radius of the main cylinder on which the guide helix of the convolute screw is placed, and
ra and
rd correspond to the scheme of the conical cut in
Figure 2. The
X0Y plane is perpendicular to the
Z axis and contains the point of origin of coordinates
O.
The generator АDi of the convolute screw crosses the X axis at point A, and it is inclined to the X0Y plane at an angle σ. The projection of the generatrix АDi on the X0Y coordinate plane is the straight line AM2, which forms an angle η with the X axis. The segment АDi belongs to the creation and is the left cutting edge of the cutter. The right cutting edge ABi together with the left АDi form a flat rake surface of the BiADi cutter, which is highlighted in gray. The BiADi plane is inclined to the XZ plane at an angle λ.
In polar coordinates, which are part of the cylindrical system, the line AM can be defined by the rotation angle τ of an arbitrary point М2, lying on this line around the origin of the coordinate system О, as well as the length of the radius vector ОМ2.
In the
X0Z plane, similarly to formula (17), we obtain the analytical expression of the axial section of the convoluted helical surface:
where:
τ is one of the curvilinear coordinates of the cutting edge, determined by the formula
P is the pitch of the specified thread.
Since the input data are the angle of inclination of the cutting edge λz and the height of the fundamental triangle of the cut H, the functional dependence of the values ŋ and σ on them should be detected.
Since the cutter is full-profile, then
From the triangle
CDiM2 (
Figure 8) we have
.
From the triangle ACM
2 we have
. So:
From the triangle
DiAM2 we get the following ratios
Analytical dependences (18) – (21) obtained in this way describe the axial section of the convolute helical surface, which is obtained by a cutter with a non-zero angle of inclination of the cutting edge.
The obtained dependences (18) – (21) under the condition of zero value of the angle λz describe the profile of the Archimedean screw according to equation (1).
However, = 0, , and , , if λz approaches 0 and then equation (18) becomes equivalent to equation (1).
The study [
58] proves the functional influence of the angle of inclination of the grinding tool on the profile of the resulting screw and proposes an algorithm for obtaining the axial profile of a polished worm screw. The angle of inclination of the grinding profile tool is one of the parameters of the methodology and application support presented in the study [
59] for accurate processing of conical worm screws with various curved axial profiles.
Profiling of tools for the process of whirling turning of worm shafts
ZA (Archimedean profile) and
ZI (involute profile) is presented in the study [
60]. This work does not contain analytical studies on convoluted helical surfaces. Functional dependencies of worm surface profiles and cutting-edge profiles of tools for their production, the rake angle always has only zero value.
Therefore, the combined influence of the angle of inclination of the cutting edge and the rake angle of the tool on the value and accuracy of the half-profile angle based on the convolute approach to the formation of the conical large-pitch thread is an unsolved problem. Therefore, the goal of this study is to build an analytical model of profiling a triangular conical section using cylindrical coordinates and its verification based on the created algorithm and thread profile computer modeling. Attention should be paid to the fact that the cylindrical coordinates most accurately correspond to the model of the formation of helical surfaces, since they fully correspond to the movements of forming: the translational movement of the cutting edges along the Z axis of the thread, and at the same time their rotational movement around it.
3. Mathematical Modelling of the Profile Flanks of the Tool-Joint Drill-String Tapered Thread, as a Function of the Geometric Parameters of the Cutting Tool with a Double Inclination of the Rake Plane: Rake Angle and Inclination of Cutting Edge
Since the drill-string thread is tapered, the fundamental triangle thread
BAD (
Figure 1) has its sides of not the same in length.
Length of short side
AD:
where
ϕ is the taper angle of the thread.
These formulas are necessary to establish the desired algorithm in relation to the drill-string tapered thread.
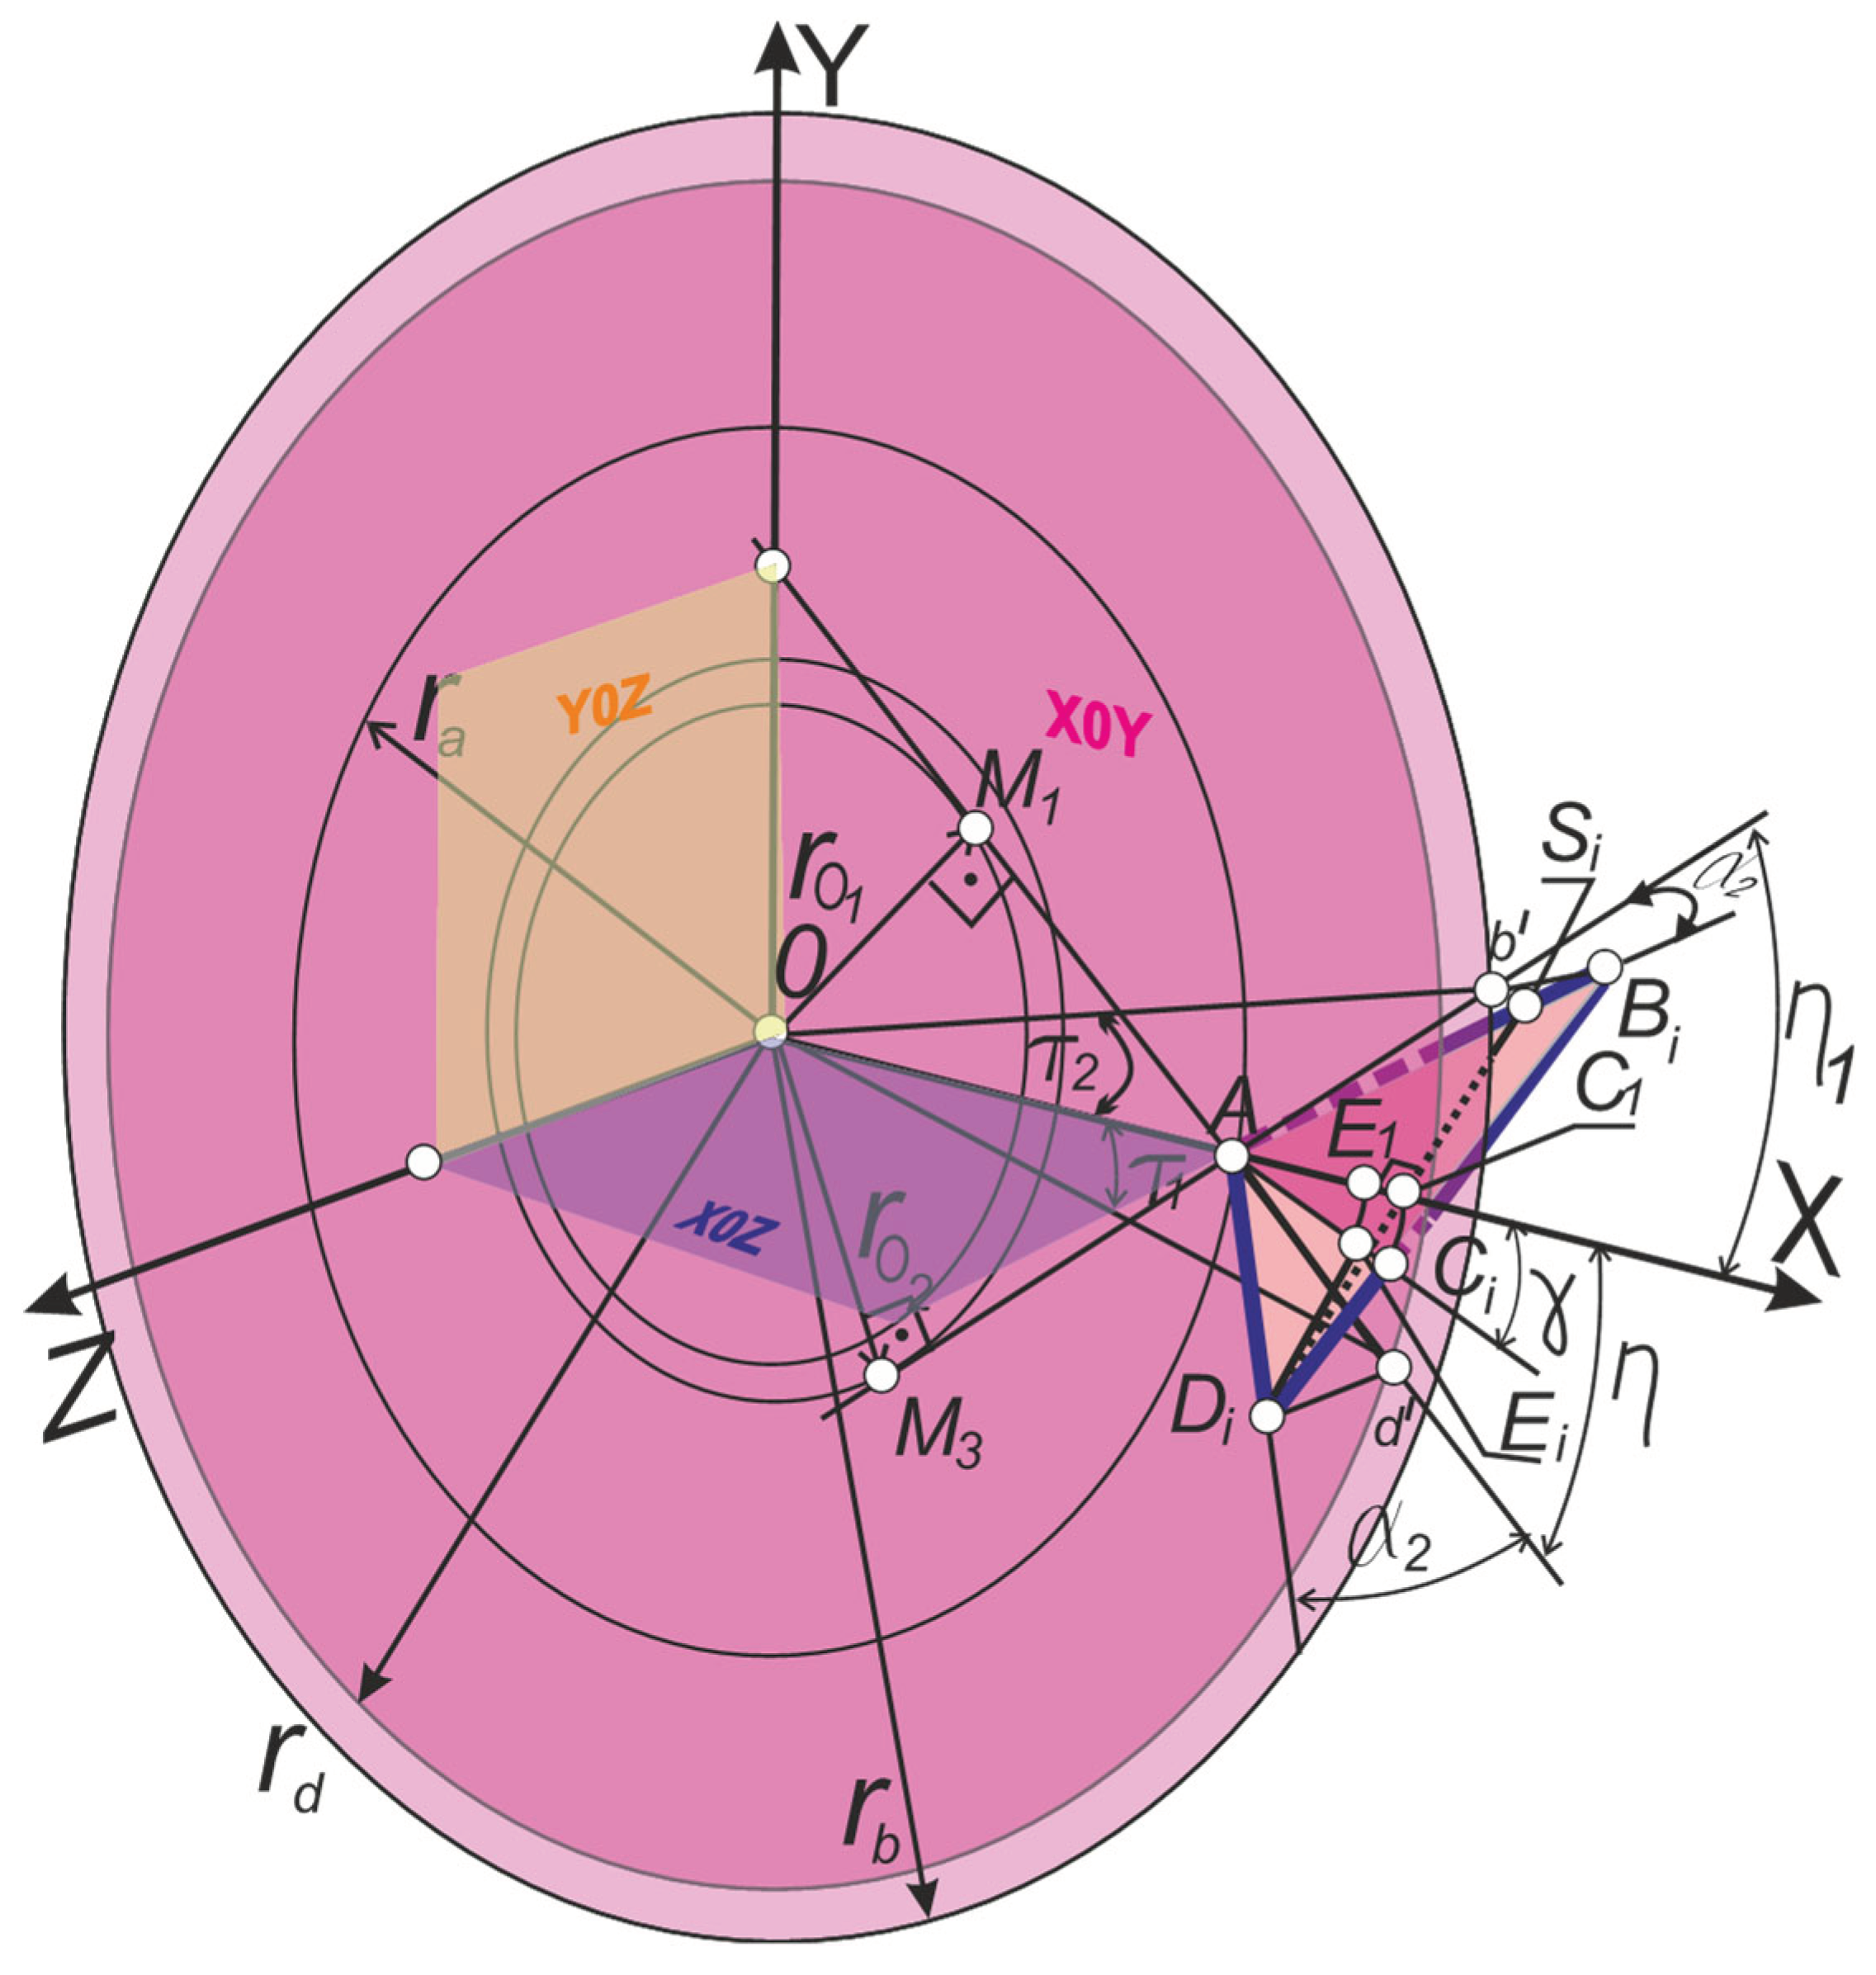
Therefore, the calculation scheme for placing the plane of the rake surface of the
ABiDi of the lathe cutting tool (light pink color) is built in the cylindrical coordinate system and the Cartesian coordinate system
XYZ combined with it, with the coordinate planes
X0Z (purple color),
Y0Z (lime color),
X0Y (pink) (
Figure 9).
3.1. Placement of the Rake Plane of the Lathe Thread Cutting Tool in the Cylindrical and Cartesian Coordinate System
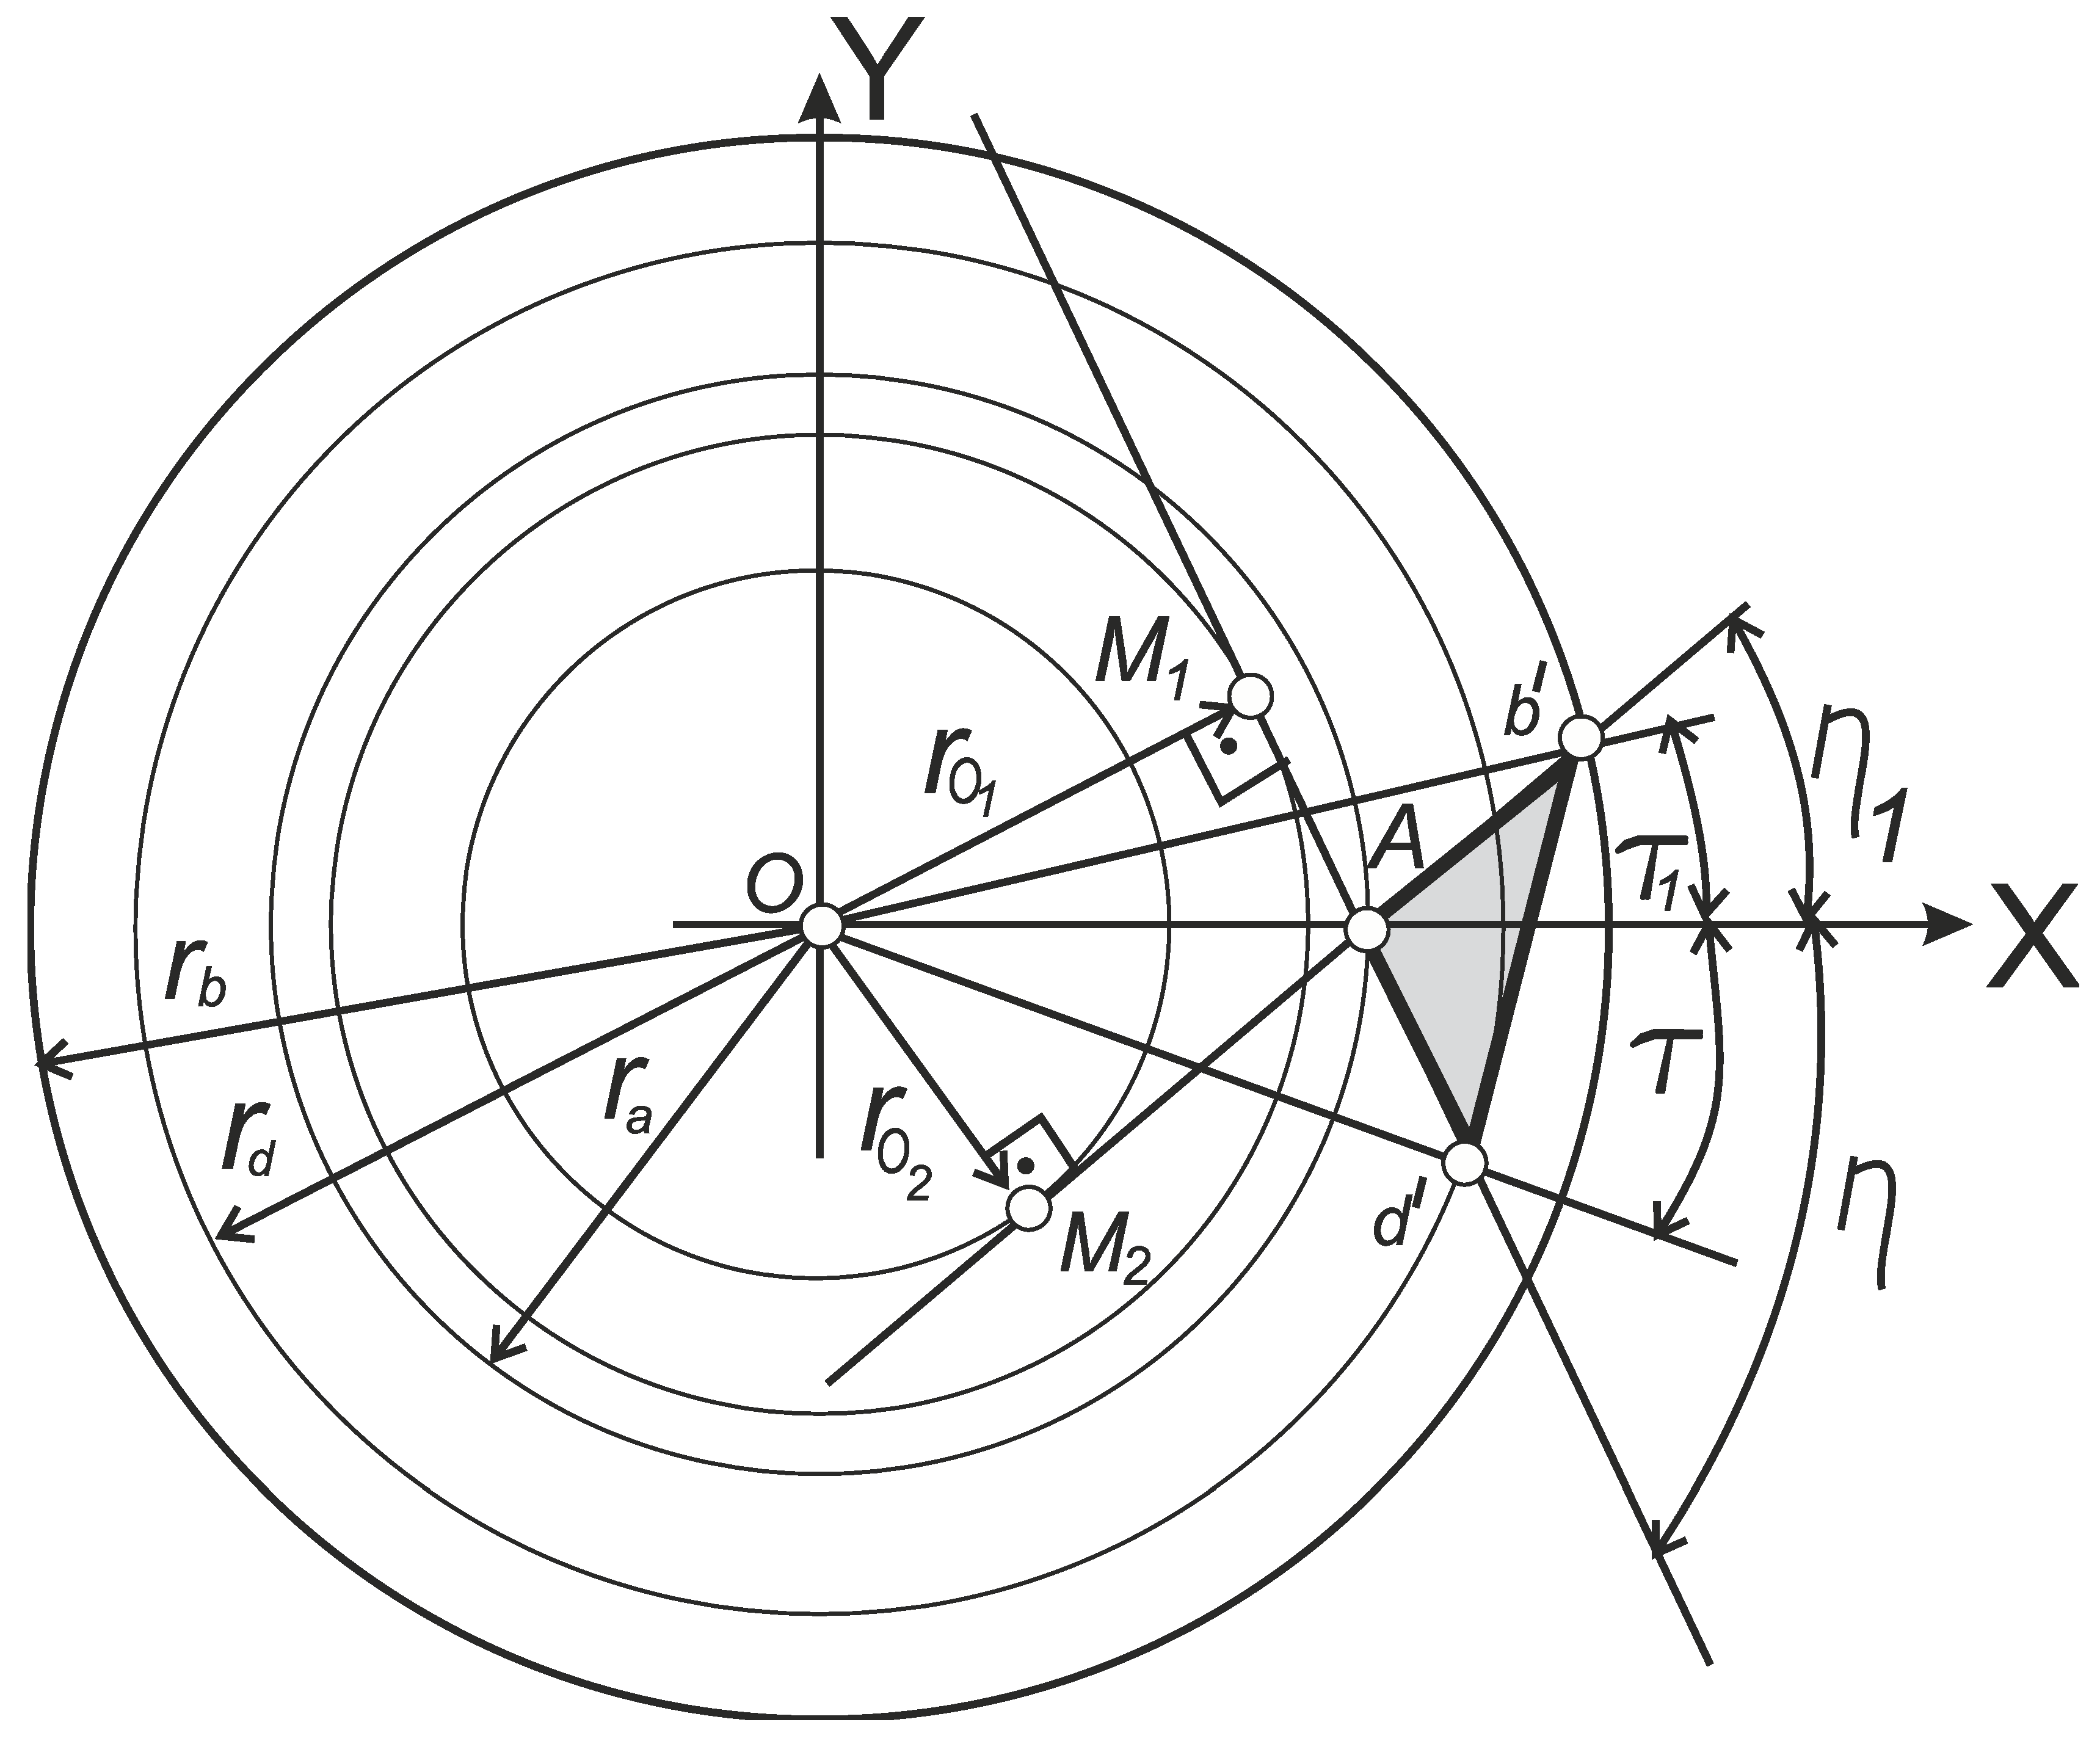
Mutually perpendicular segments (DiSi) and (ACi) are placed on the front plane. The segments intersect at the point Ei. Points A, Ei, Ci lie in the coordinate plane X0Y (pink). The angle between the axis X and the straight line ACi is the rake angle γ at point A. The segment Ad' is the projection of the segment ADi on the XOY plane. The segment Ab' is the projection of the segment ABi on the plane XOY. Each of the specified projections is inclined to the X axis at angles η and η1, respectively. The length of the segment Did' is the applicate (coordinate on the Z axis) of the point Di. The length of the segment Dib' is the applicate (coordinate on the Z axis) of the point Bi.
The segment
ADi is the left-hand cutting edge of the cutter, and therefore the generator of the helicoid. It is placed at an angle
α2 to the
X0Y plane. Segment
AВi is the right-hand cutting edge of the cutter, and therefore it is also the generating edge of the screw. It is also placed at an angle
α2 to the
X0Y plane. For ordinary cutters, the values of these angles are equal to the standard half-profile angle
α = 30°. Point
M1 is the point of contact of line
d'M1 to the main cylinder with radius
ro1. Point
M2 is the point of contact of the line
b'M2 to the main cylinder with radius
ro2. The angle
τ is the polar angle of an arbitrary point of the segment
Ad', and the angle
τ1 is the polar angle of an arbitrary point of the segment
Ab' (
Figure 9,
Figure 10).
3.2. Determination of The Axial Cross-Section of Tapered Thread as a Convoluted Helical Surface Depending on the Geometric Parameters of the Lathe Cutter: the Rake Angle at the Nose and the Inclination Angle of the Cutting Edge
So, by analogy with formula (14), the
Z coordinates of the points of the generating
ADi depending on the angle of rotation
τ, the
X coordinates and the value of the radius
ra can be found by the equation:
where:
So, by analogy with formula (14), the
Z coordinates of the points of the generating
ABi depending on the angle of rotation
τ1, the
X coordinates and the value of the radius
rb can be found by the aquation:
where:
For the completeness of expressions (24-27), it is necessary to establish the algorithms for finding angles η, η1.
3.2.1. Definition of Angles η and η1
3.2.1.1. A Sketch of the Front Plane of the Cutting-Tool as a Plane of General Position in Cartesian Coordinates
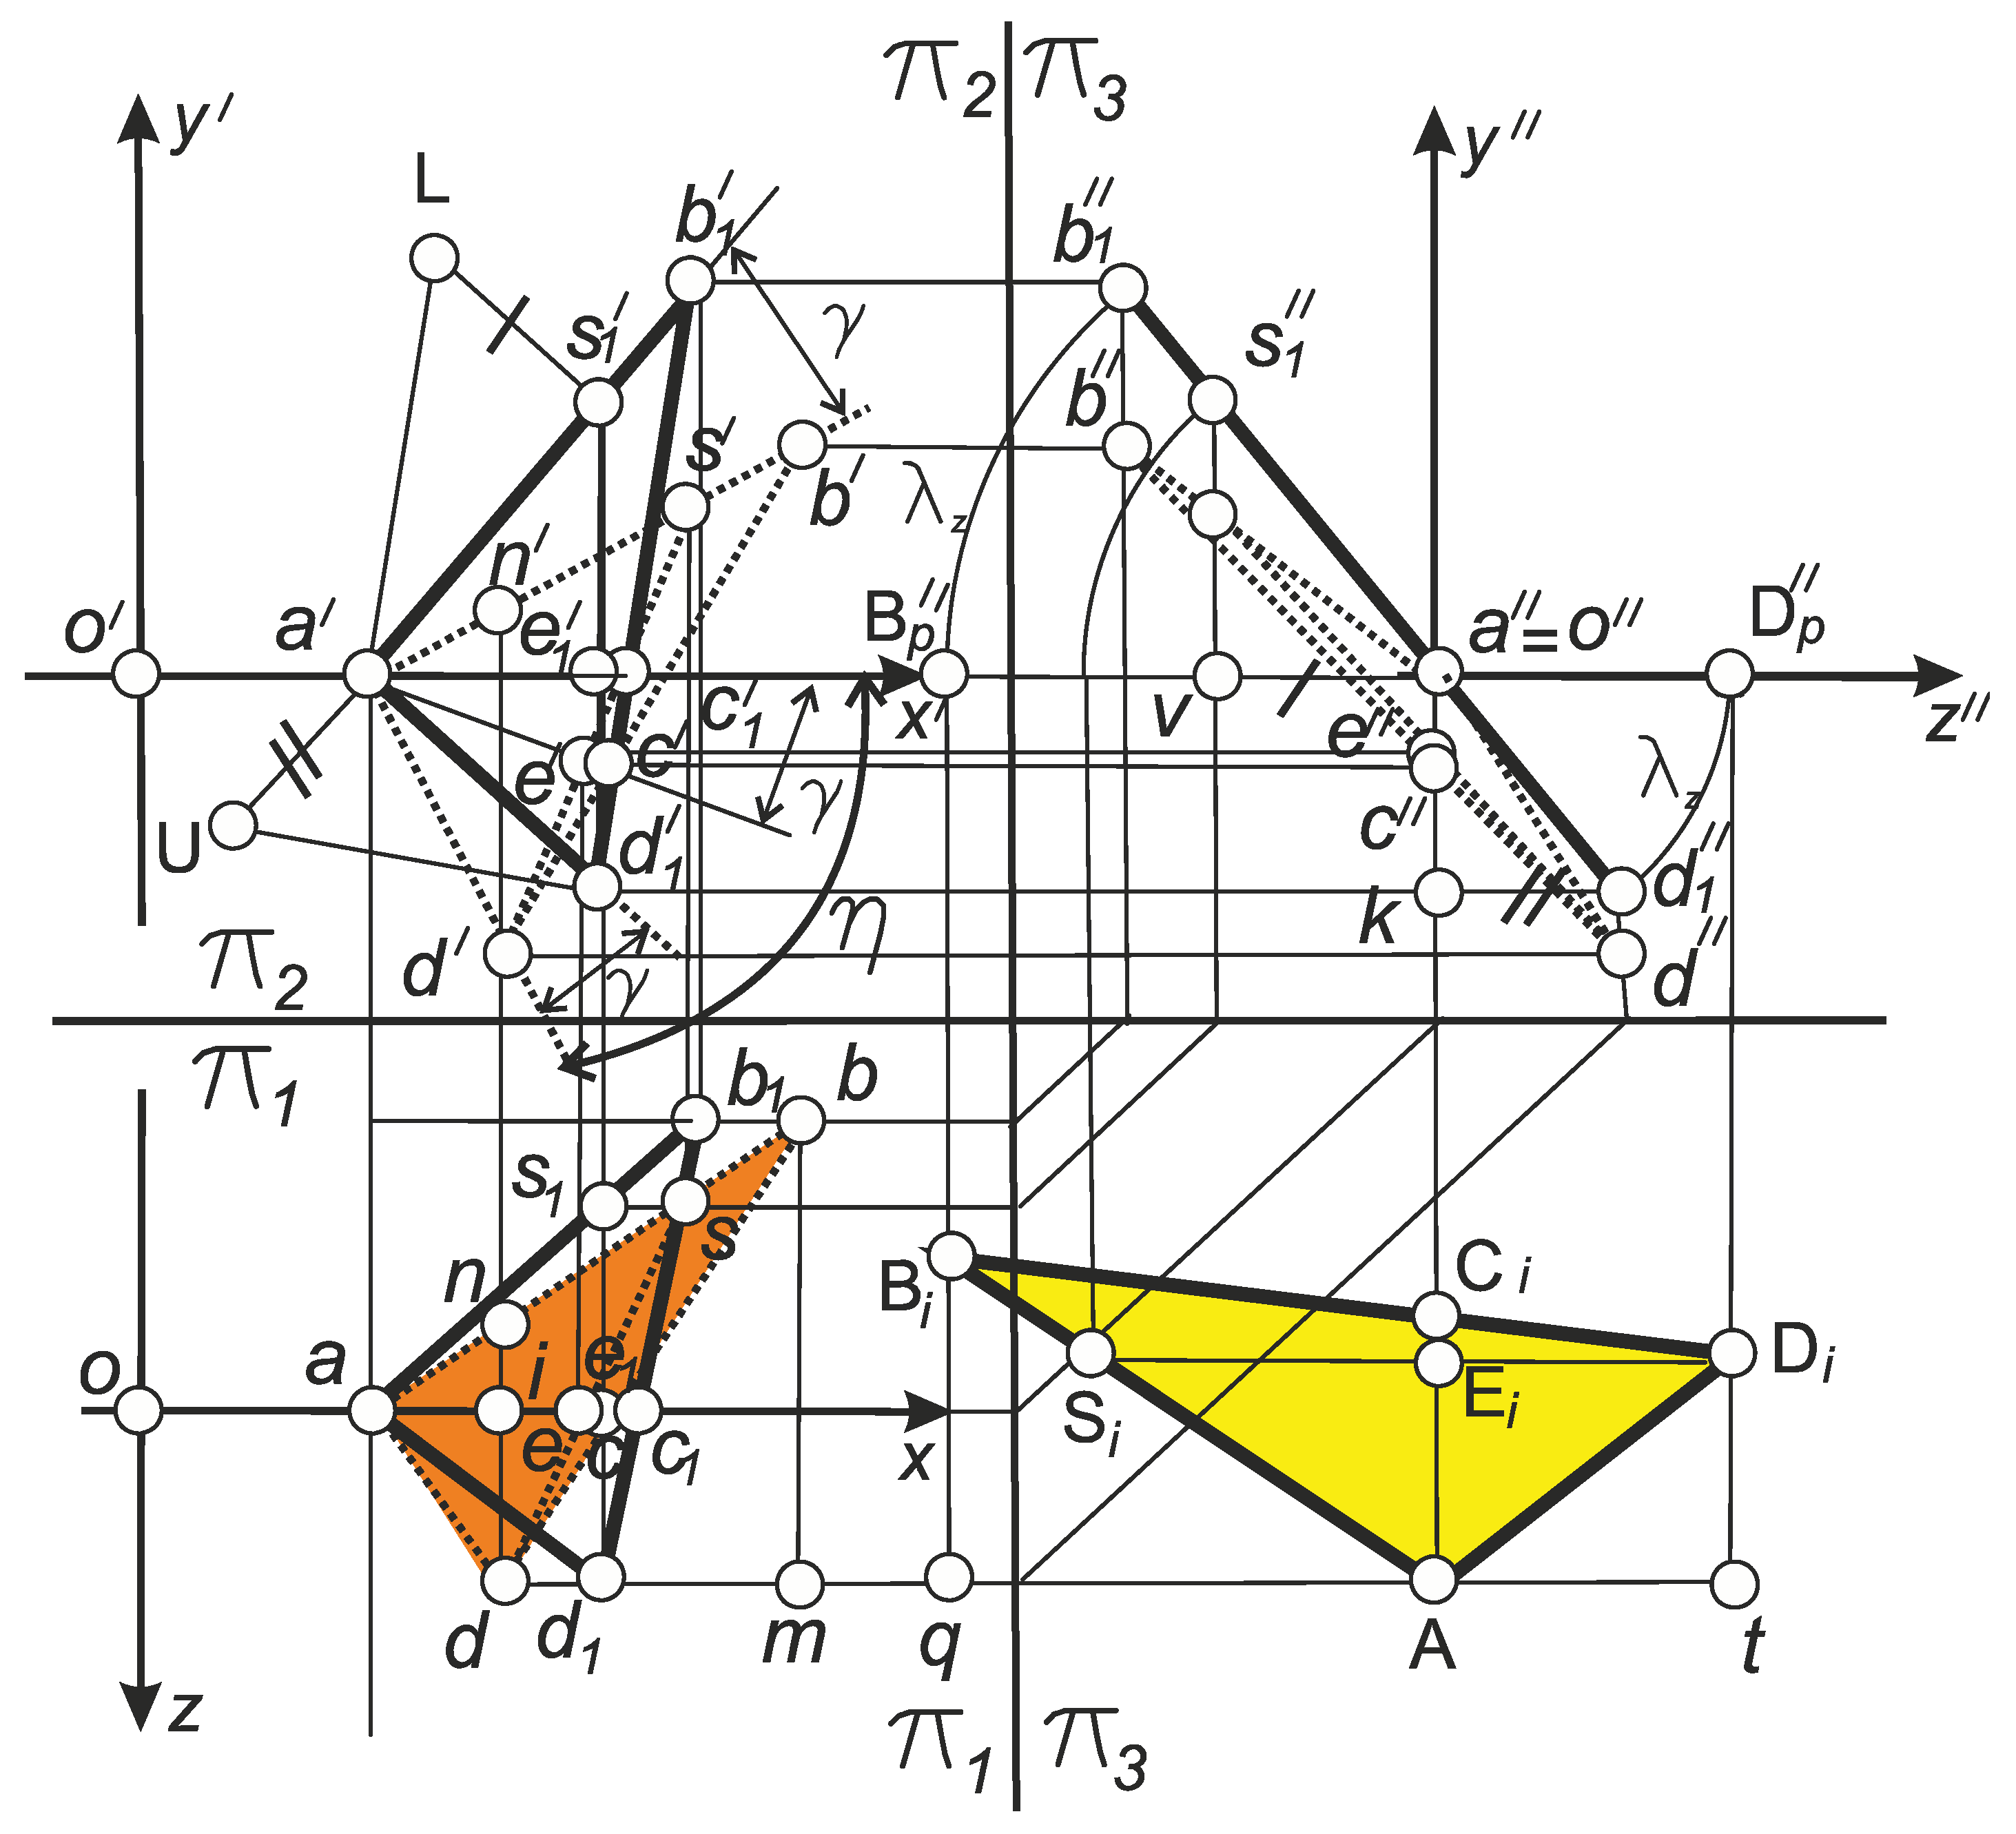
In
Figure 11 shows a complex drawing of the plane
ABD of the rake surface of the thread cutting tool of the general position. The projection plane π
1 corresponds to the reference plane at the nose point
A. Through point
A, the
X axis is drawn, which corresponds to the
X axis illustrated in
Figure 9 and
Figure 10. The axes
Y and
Z also correspond to the axes of the same name in
Figure 9. The
XOY plane is parallel to the frontal plane of the π
2 projections. The plane
XOZ coincides with the main reference plane at point
A, i.e. it is parallel to the horizontal plane of projections π
1. The
YOZ plane is parallel to the π
3 projection plane.
The rake plane of the cutting tool AB1D1 is constructed as a plane that is perpendicular to the plane of projections π3. This plane is marked with bold lines. Its projection onto the π3 plane is denoted by b1’’a’’d1’’. The natural value of the angle λz is placed on the projection plane π3. This angle corresponds to the angle of rotation of the specified plane around the X axis. Considering the fact that the Z axis in the cylindrical coordinate system is constructed as the axis of the screw thread, it means that the angle λz is the angle of setting the plane AB1D1 relative to the plane of the axial section of the screw.
Within the AB1D1 plane, the segment АС1 is constructed, which lies on the X axis and the segment D1S1 is perpendicular to it. The segments intersect at point E1.
The rotation of the plane
AB1D1 by an angle
γ is carried out in the plane
XOY, which coincides with the reference plane at point
A. Thus, all points of the plane
AB1D1 are rotated by an angle
γ around an axis that is parallel to the
Z axis and passes through point
A. Therefor on the
π2 projection plane, the angle
γ is reflected in its natural form. As a result of the rotation, the plane
ABD was formed (it is highlighted with dashed lines). The specified plane is the desired plane of the rake surface of the thread cutting tool, and its horizontal projection
abd (orange) corresponds to the given fundamental triangle of the tapered thread
ABD from
Figure 1 and
Figure 2.
The natural appearance of the triangle of the cutting edge of the cutter, which is intended to form the fundamental triangle
ABD, is shown in
Figure 11 in the form of a triangle
ABiDi (yellow). The specified triangle is constructed by combining the projection
a''b1''d1'' with the plane
XOZ, i.e. by turning the plane
ABiDi around the
X axis by an angle
λz, which is naturally equal to the lead angle of the helix
ψ.
3.2.1.2. Trigonometric Definition of an Angle η and η1.
The angle
η is the angle of inclination of the frontal projection of the cutting edge
ADi to the
XOZ plane (
Figure 9), which means
a'd1' to the
x' axis (
Figure 10,
Figure 11). It can be defined as the sum of the angle
γ and the angle
d1'a'e1'. So, we will determine the indicated angle according to the equation:
From the right triangle
d1'a'e1', the angle
d1'a'e1' can be determined using the following formula:
where:
|
d1'e1'| equals |
a''k| (
Figure 11), that can be determine from right triangle
d1''ka'' as follows:
where:
|di| is determined from right triangle
dai (
Figure 11):
So, after inserting equation (31) into it, formula (30) will look like this:
|a'e1'| is defined from right triangle
d1'a'e1' due to expression (
Figure 11):
where:
|d1'e1'| is defined by equation (30);
|a'd'1| can be determined using a right triangle ua'd'1, in which the segment (ua') is set at right angles to the segment a'd'1 and its size is equal to the length of the segment kd''1, i.e. equal to the difference in the coordinates of the points k and d''1 in the plane of projections π3.
Based on the method of finding the actual values of the segment lengths in the sketch geometry, the constructed right triangle contains the segment
ud'1, which is the real value of the segment
ADi, i.e. it is the real value of one of the two lateral cutting edges of the cutter. Since in
Figure 11 the real appearance of the triangle of the cutting edge of the cutter is displayed as
ABiDi figure, then we have the following expression:
Thus, the length of the segment
a'd'1 from the triangle
ua'd'1 will be determined by the following equation:
where:
where:
So, taking into account that the profile of the cutting edge and thread profile are the same, i.e. |
ADi|=|
AD|, we get follow expression:
Thus, formula (33) will take the following form:
And after certain manipulations, this equation received the following definition:
According to formulas (28), (29) and taking into account expressions (32), (33), (37)
η defines as follows:
Using
Figure 11 in similar way, the formula for determining the angle
η1 can be derived:
So, the group of equations (24-27) and (38) is the mathematical model of the side profile of a tapered thread with a given triangular or trapezoidal profile, which is a function of the thread diameter and pitch, as well as the geometric parameters of the cutting tool: the rake angle, the angle of inclination and the half-profile angle of its cutting edge.
According to formula (38), the angle η=η1=0, if γ=λz=0, and therefore according to formulas (24, 25): Z(x)=tan(α)x, which corresponds to formula (1).
4. Modelling of a Tapered Thread Profile for Drill-Strings
On the basis of the algorithm (24-27, 38), a visual application program was developed for obtaining the calculated drill-string tool-joint thread profile, the standard sizes of which are regulated by the standard [
59]. The standard regulates 31 standard sizes of tool-joint tapered threads, which are formed as external threads for the pin (
Figure 12 (a)) and as internal threads for the box (
Figure 12 (b)).
4.1. Geometrical Model of NC23 Drill-String Tool-Joint Thread Profile
The example concerns the standard size of the tool-joint thread NC23 based on the application of a special visual application program developed by the authors of this paper (Onysko, Kopey) based on the application of the algorithm (24 – 27, 38). The program provides for calculating the coordinates of the points of rectilinear sections - the sides of the thread fundamental triangle
AB and
СD (
Figure 1). The input data for calculating the coordinates of the points of the thread fundamental triangle are the values of the parameters of a certain standard size and the values of the rake angle
γ and the inclination angle of the cutting edge
λ. This modelling example concerns one of the most common threaded profiles in the practice of using drill strings V-0.038R (
Table 1). This profile is used for the NC23 drill-string thread, which has the smallest diameter of the smaller base of the cone
d3 and at the same time the largest value of the step
P, which means the largest value of the thread lead angle
ψ, which is usually close or equal to the inclination angle of the cutting edge
λ.
It is convenient to place the original point (0, 0) of the orthogonal coordinate system
XZ for determining the profile of the thread on the axis of the thread and in relation to the root of the first turn at the point corresponding to the coordinate of point
A on the
Z axis (
Figure 13). Therefore,
Za=0. For the convenience of profiling and evaluation of the profiled longer and shorter flanks of the thread, two opposite oriented axes are used:
- Z and
+Z (
Figure 13). The points of thread fundamental triangle are signed as in
Figure 1:
A, B, D and an additional point
C. The points of the thread profile that indicate its straight sections are marked by numbers: (3, 4) are points of the smaller flank, (5, 6) are points of the larger flank. The half-profile angles of the tool cutting- edge are the same and have the designation
α1. For ordinary cutting-tools it is obvious that α
1 is equal 30°. Half-profile angles of the obtained thread are signed differently:
αl is the half-profile angle formed by the larger flank of the thread profile,
αsh is the half-profile angle formed by the smaller flank of the thread profile.
With such a coordinate plan, the coordinates of the vertices of the fundamental triangle for each thread turn
n can be determined by the following formulas:
4.2. Modeling of the Fundamental Triangle Profile of the NC23 Drill-String Tapered Thread Obtained Using Turning-Tool at Its Zero Parameters: Rake Angle γ and the Inclination Angle of the Cutting Edge λ
According to aquations (39-41), the
X coordinates of the vertices of the fundamental triangle
A,
B,
D are as follows (
Figure 14 and
Figure 15):
Basing on the algorithm (24 – 27, 38) and the data
Xa,
Xd,
Xb as well as the values
γ=0 and
λz=0, the values of the
Z coordinates of the vertices of the fundamental triangle
A,
B,
D were obtained:
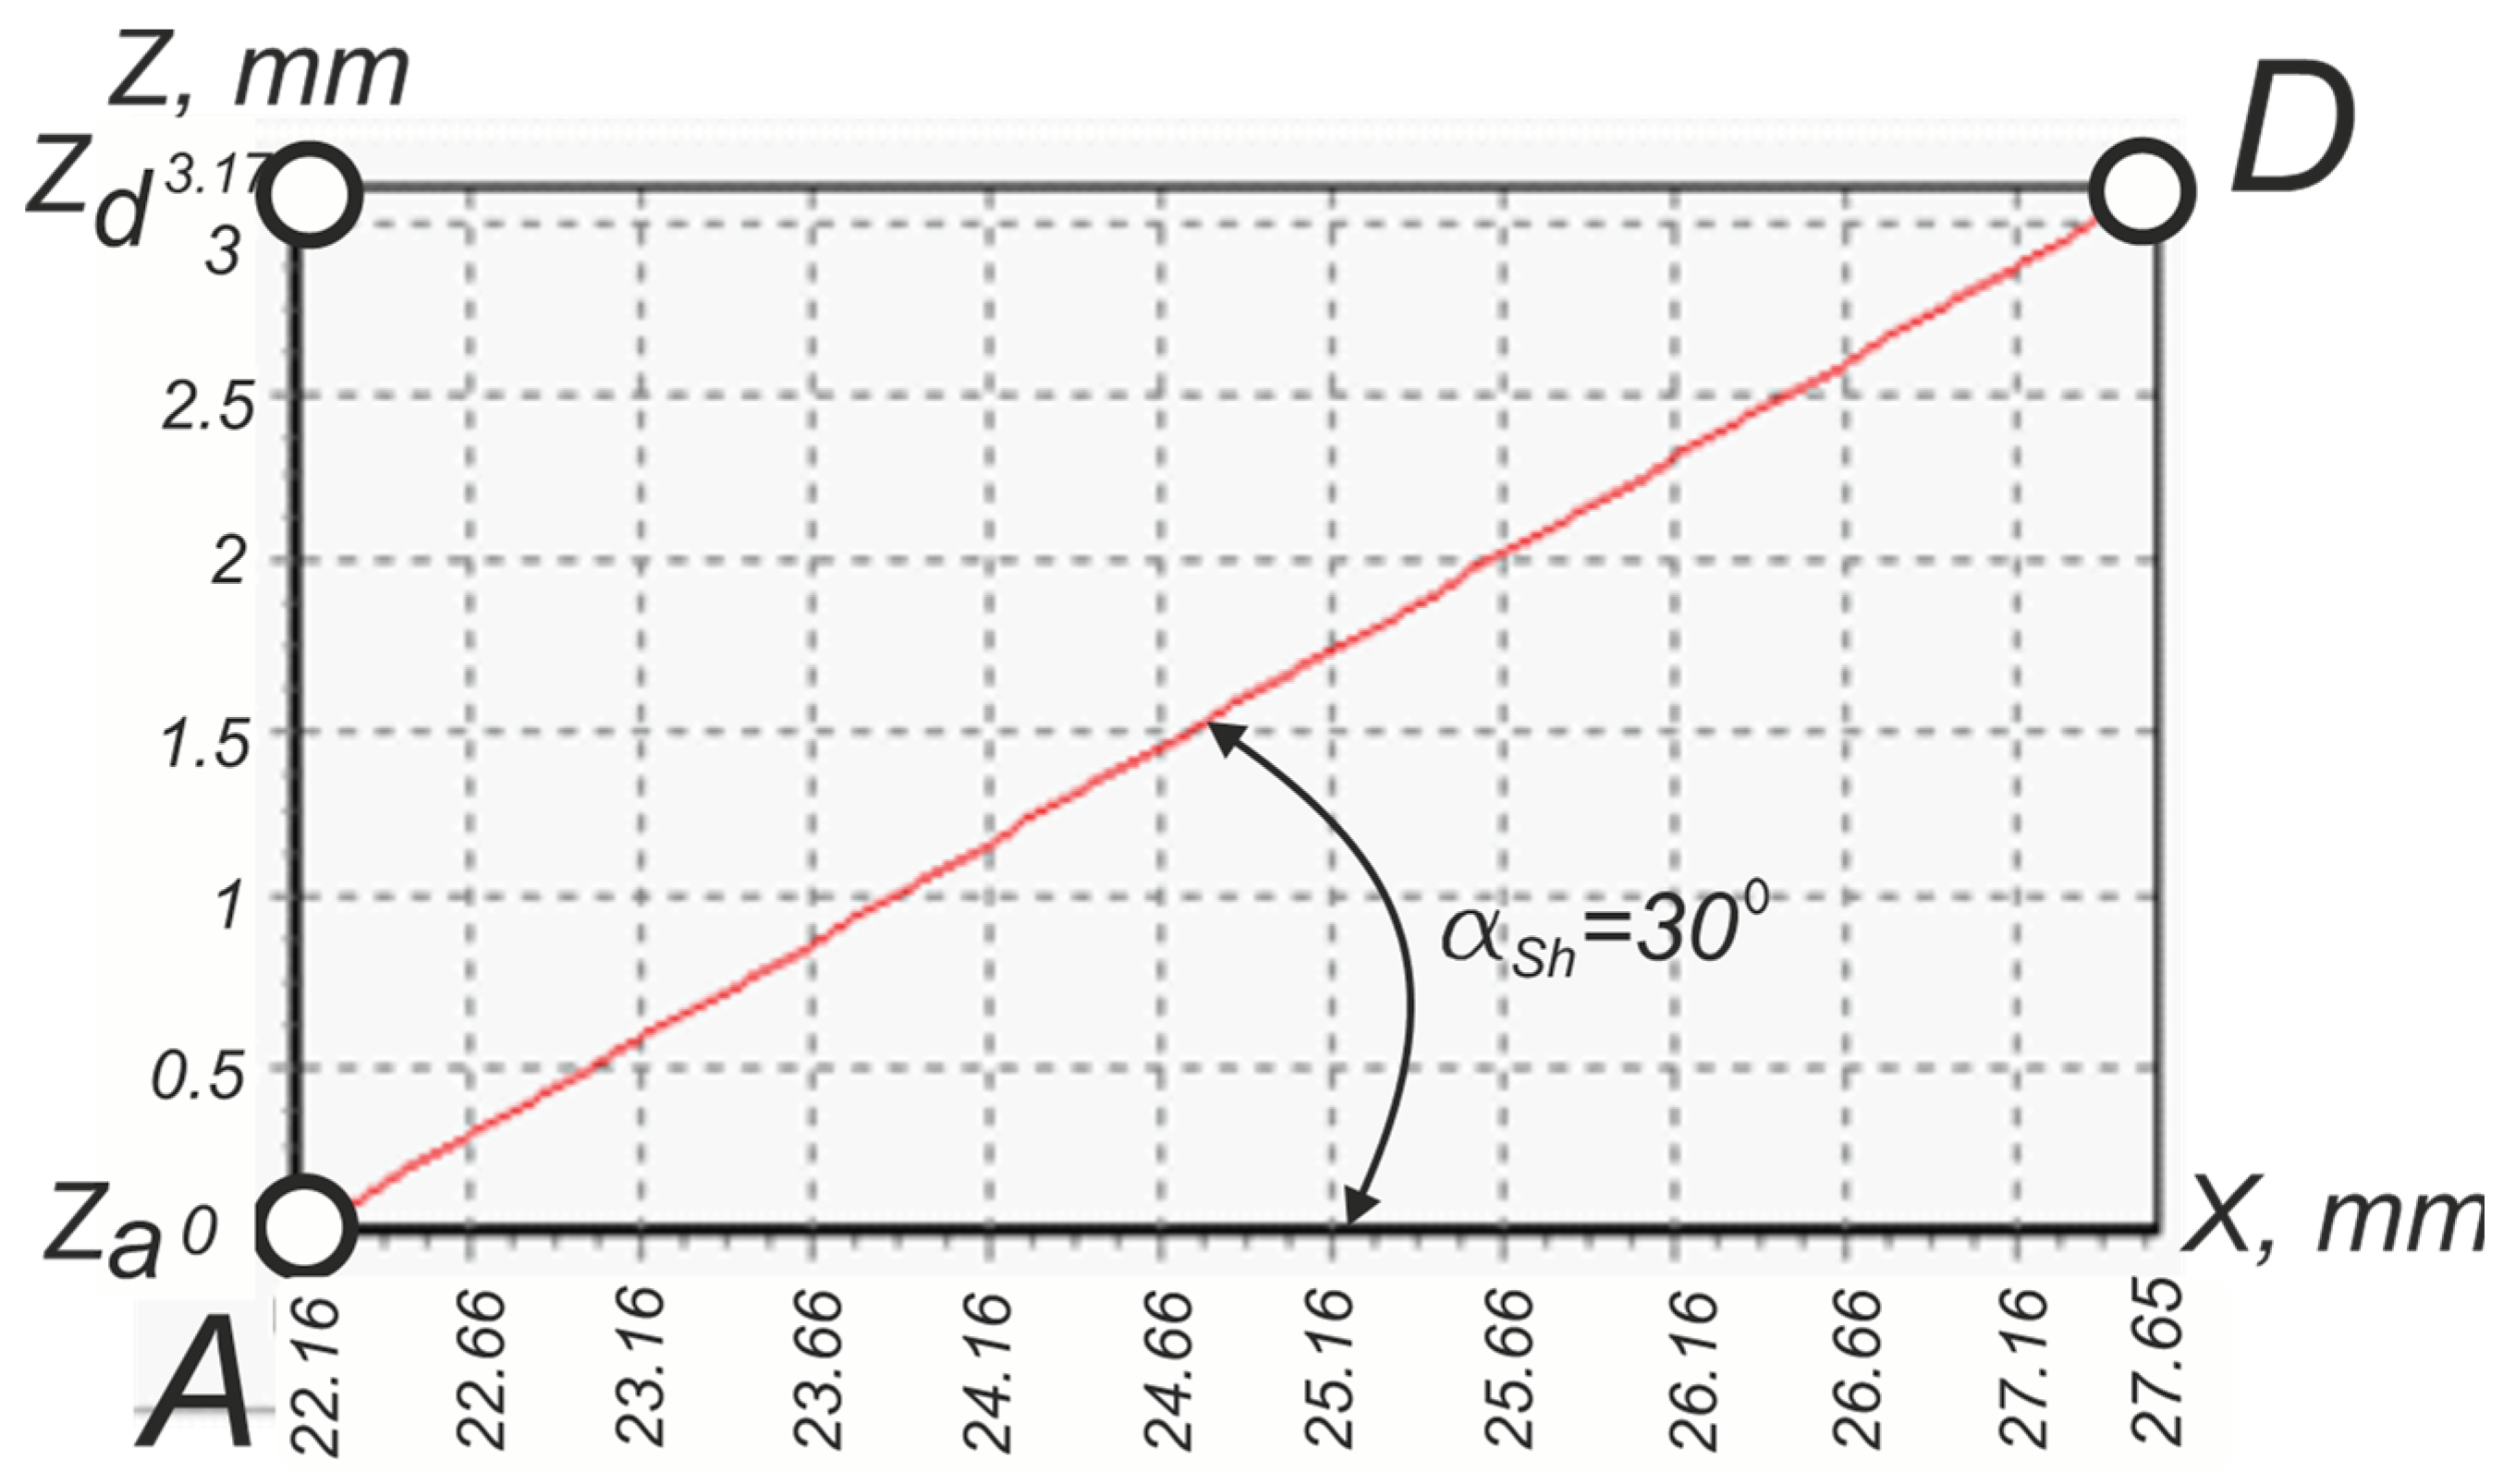
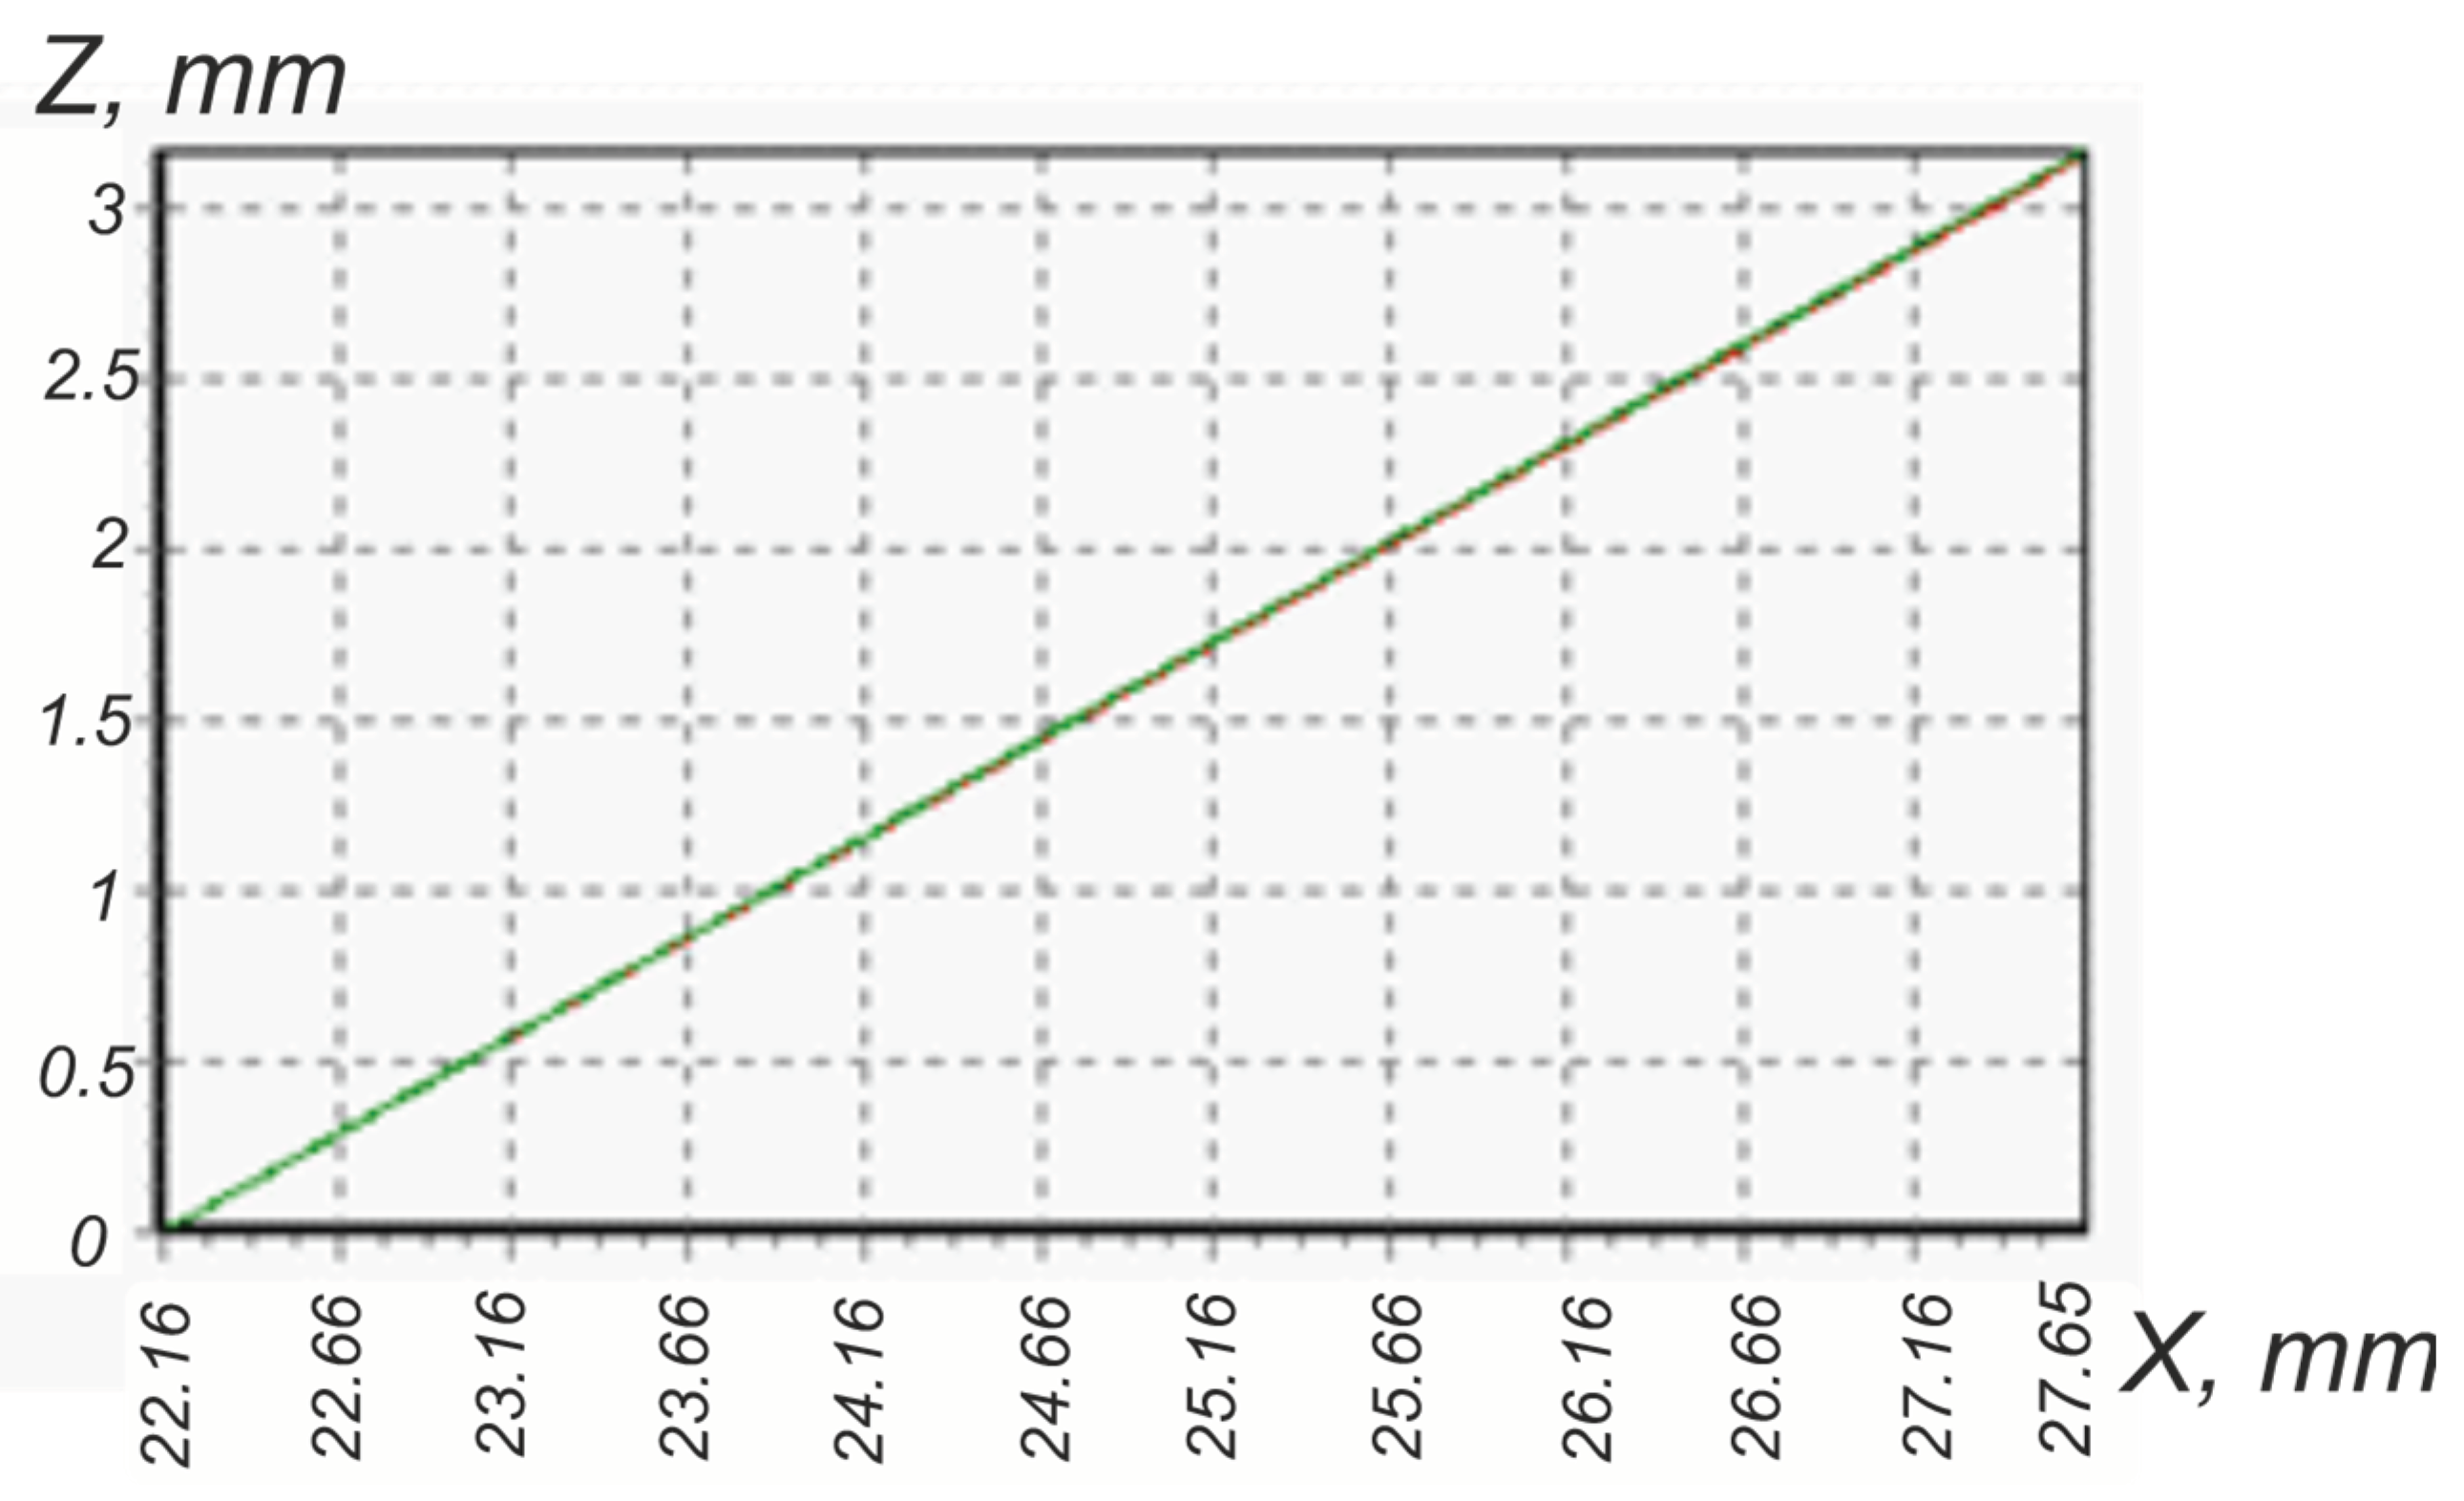
Zd = 3.17 mm (
Figure 14),
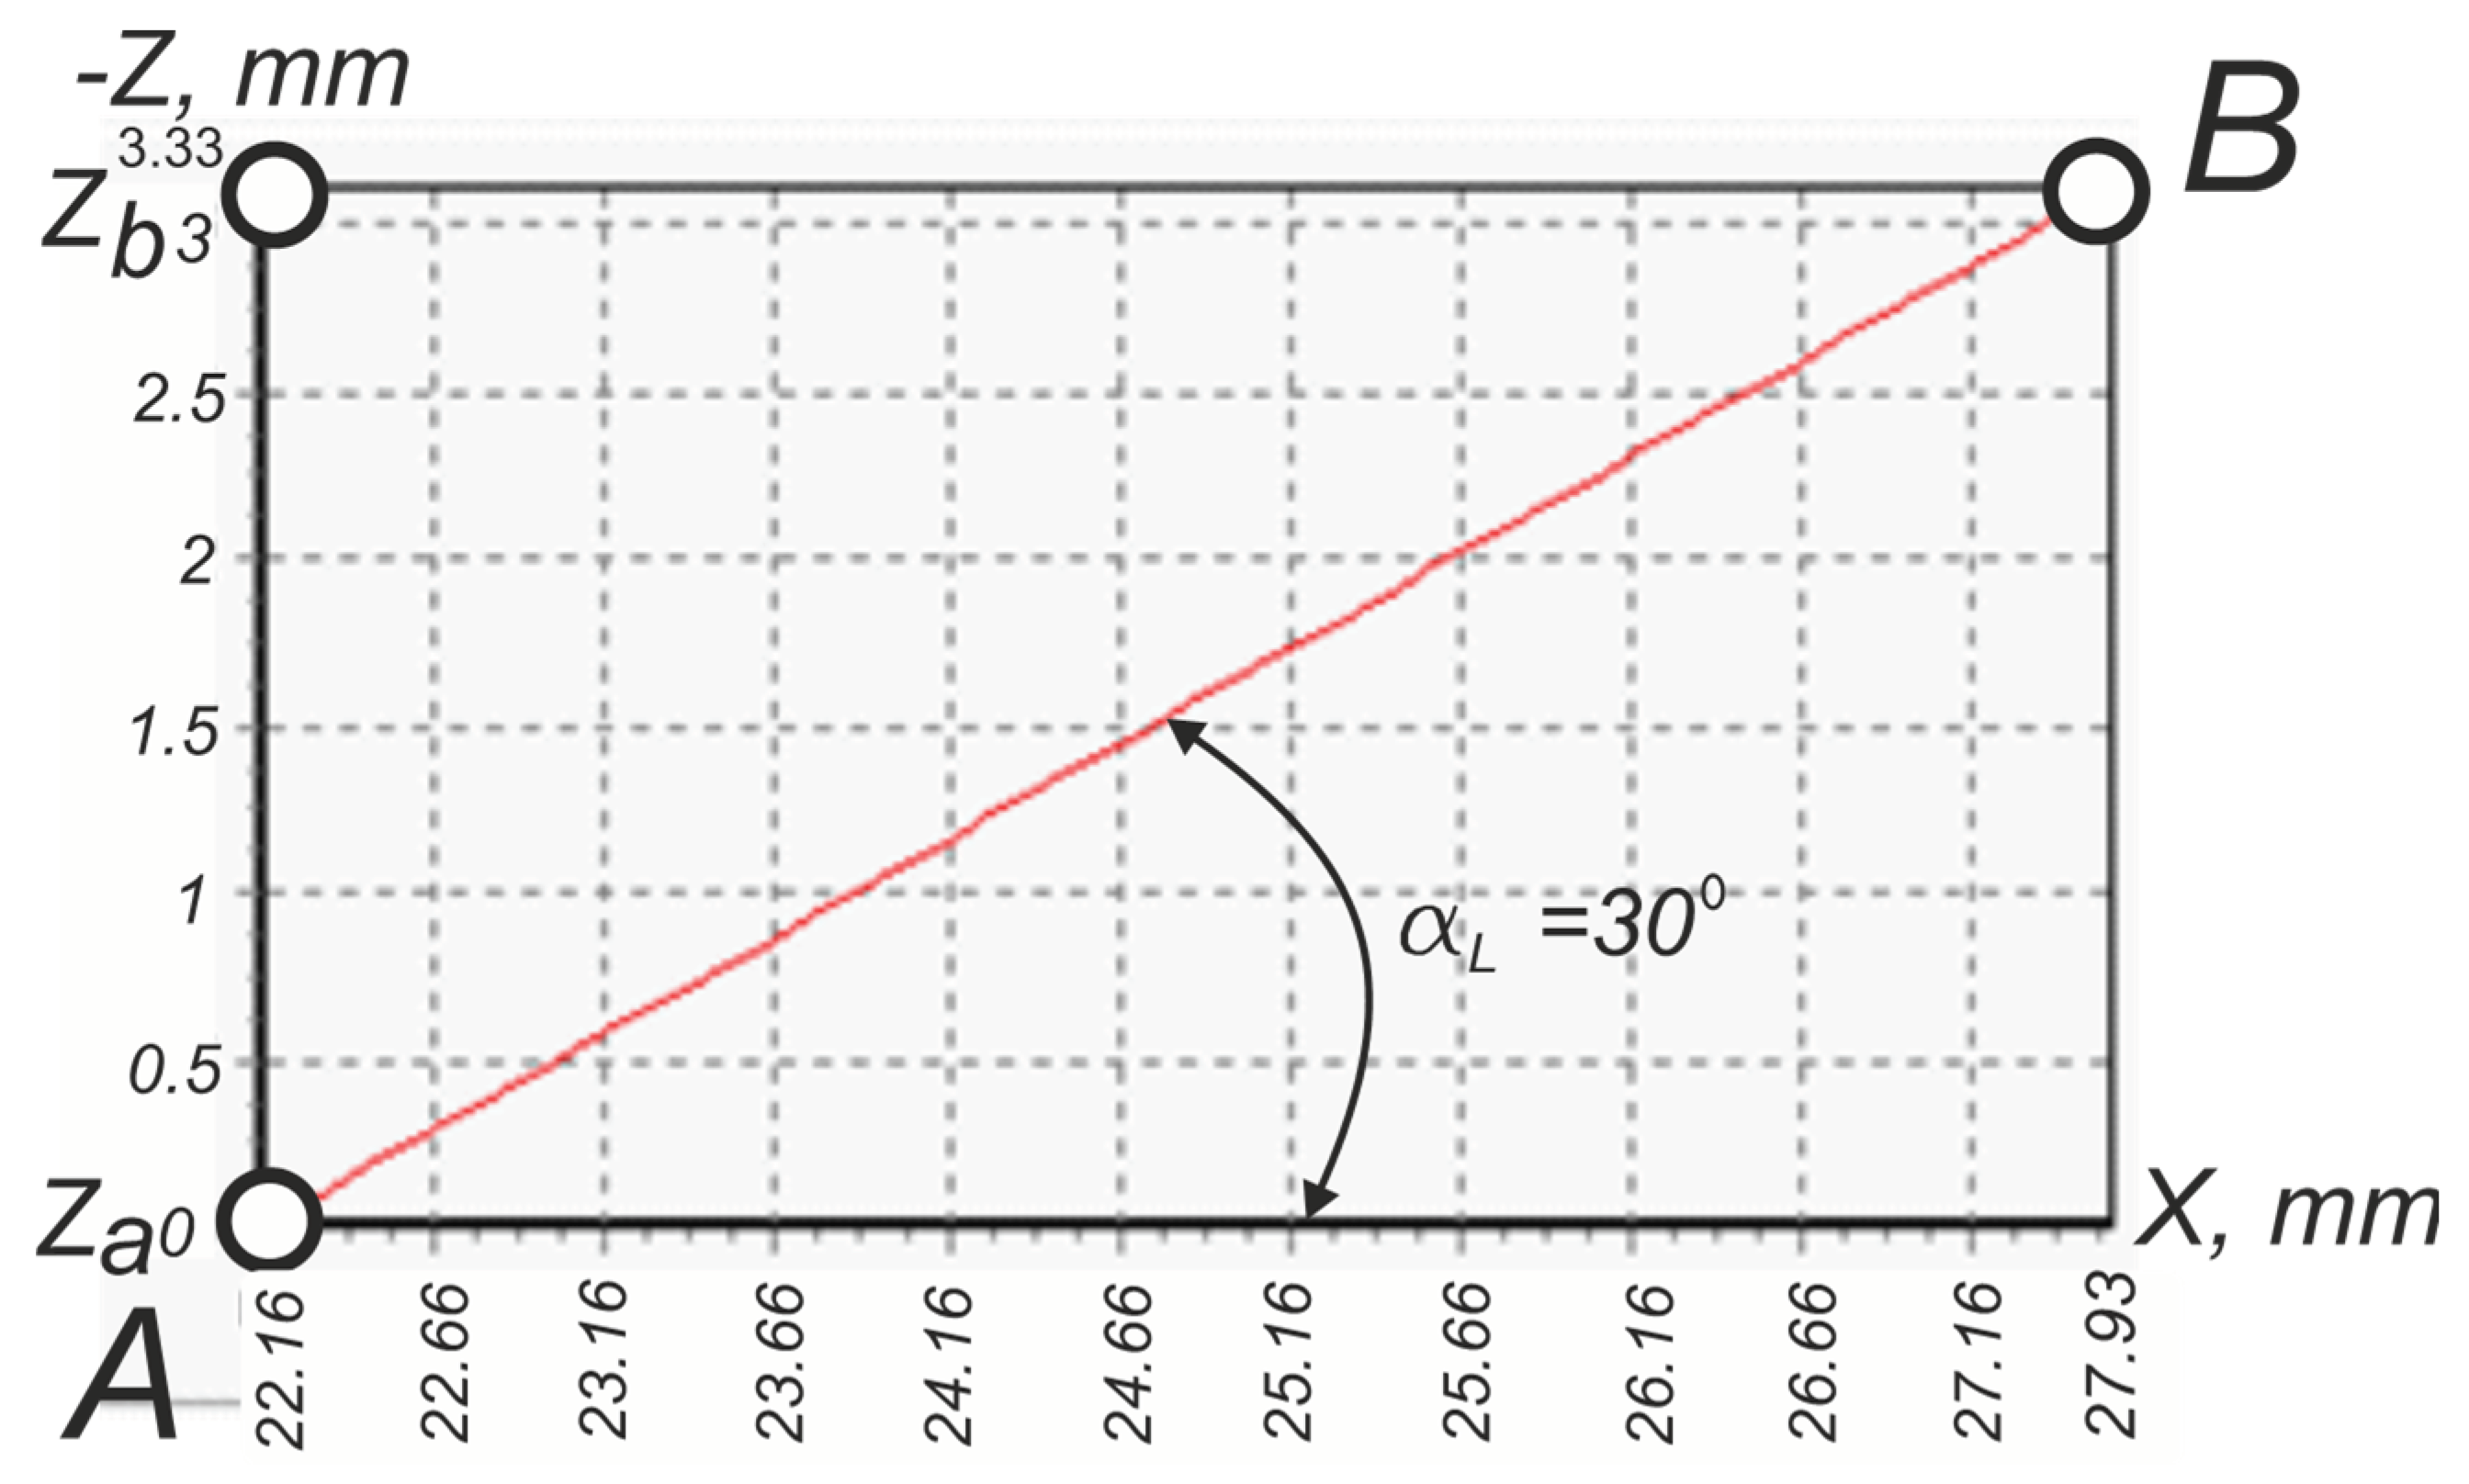
Zb=3.33 mm (
Figure 15).
Diagrams (
Figure 14 and
Figure 15) obtained on the basis of visualization of the algorithm (24 – 27, 38) show the rectilinear nature of the lateral fundamental profile of the NC23 thread under the condition of using a conventional threaded cutter with zero values of the rake angle
γ=0 ° and the angle of inclination of the cutting edge
λ=0°.
The exact values of the coordinates
Zd = 3.17 mm and
Zb = 3.33 mm were obtained using algorithm (24 – 27, 38). Half-profile angles
αL, αsh (
Figure 14 and
Figure 15) are determined by the formulas:
After substituting the data:
Xa = 22.16 mm,
Xd = 27.65 mm,
Xb = 27.93 mm,
Zd = 3.17 mm,
Zb = 3.33 mm in formulas (42, 43) we get:
That is, both angles have the value prescribed by the standard. Therefore, according to equation (1), the graphs in
Figure 14 and
Figure 15 show the algebraic linear dependence:
4.3. Modeling of the NC23 Drill-String Tool-Joint Thread Profile Obtained Using Thread-Turning Tool with Its Geometric Parameters: Rake Angle γ=50° and Inclination Angle of the Cutting Edge λz=2.61°
4.3.1. Modelling of the Flank Part of Profile of the Thread
The inclination angle of the cutting edge
λz is defined as equal to the lead angle of the screw on the outer diameter at a given turn of the thread
ψз (
Figure 7), which is determined by the formula:
where
l is the distance from the smaller base of the cone to a specific turn of the thread.
The value of the thread lead angle ψз can be determined at any distance l from the smaller base of the cone of the tapered thread to its larger base. If the distance l=0, then the lead angle of is maximum and its effect on the nature of the profile curve is obviously maximum (45). For the NC23 thread, it is ψз = 2.61°. Therefore, it is accepted that inclination angle of cutting edge is equal to this one: λz= ψз = 2.61°.
For reasons of graphical persuasiveness of the influence of the rake angle on the character of the side profile of the obtained thread, an excessively large value of the rake angle
γ=50° was adopted (
Figure 16).
4.3.2. Analysis of the Flank Profile Models of Thread
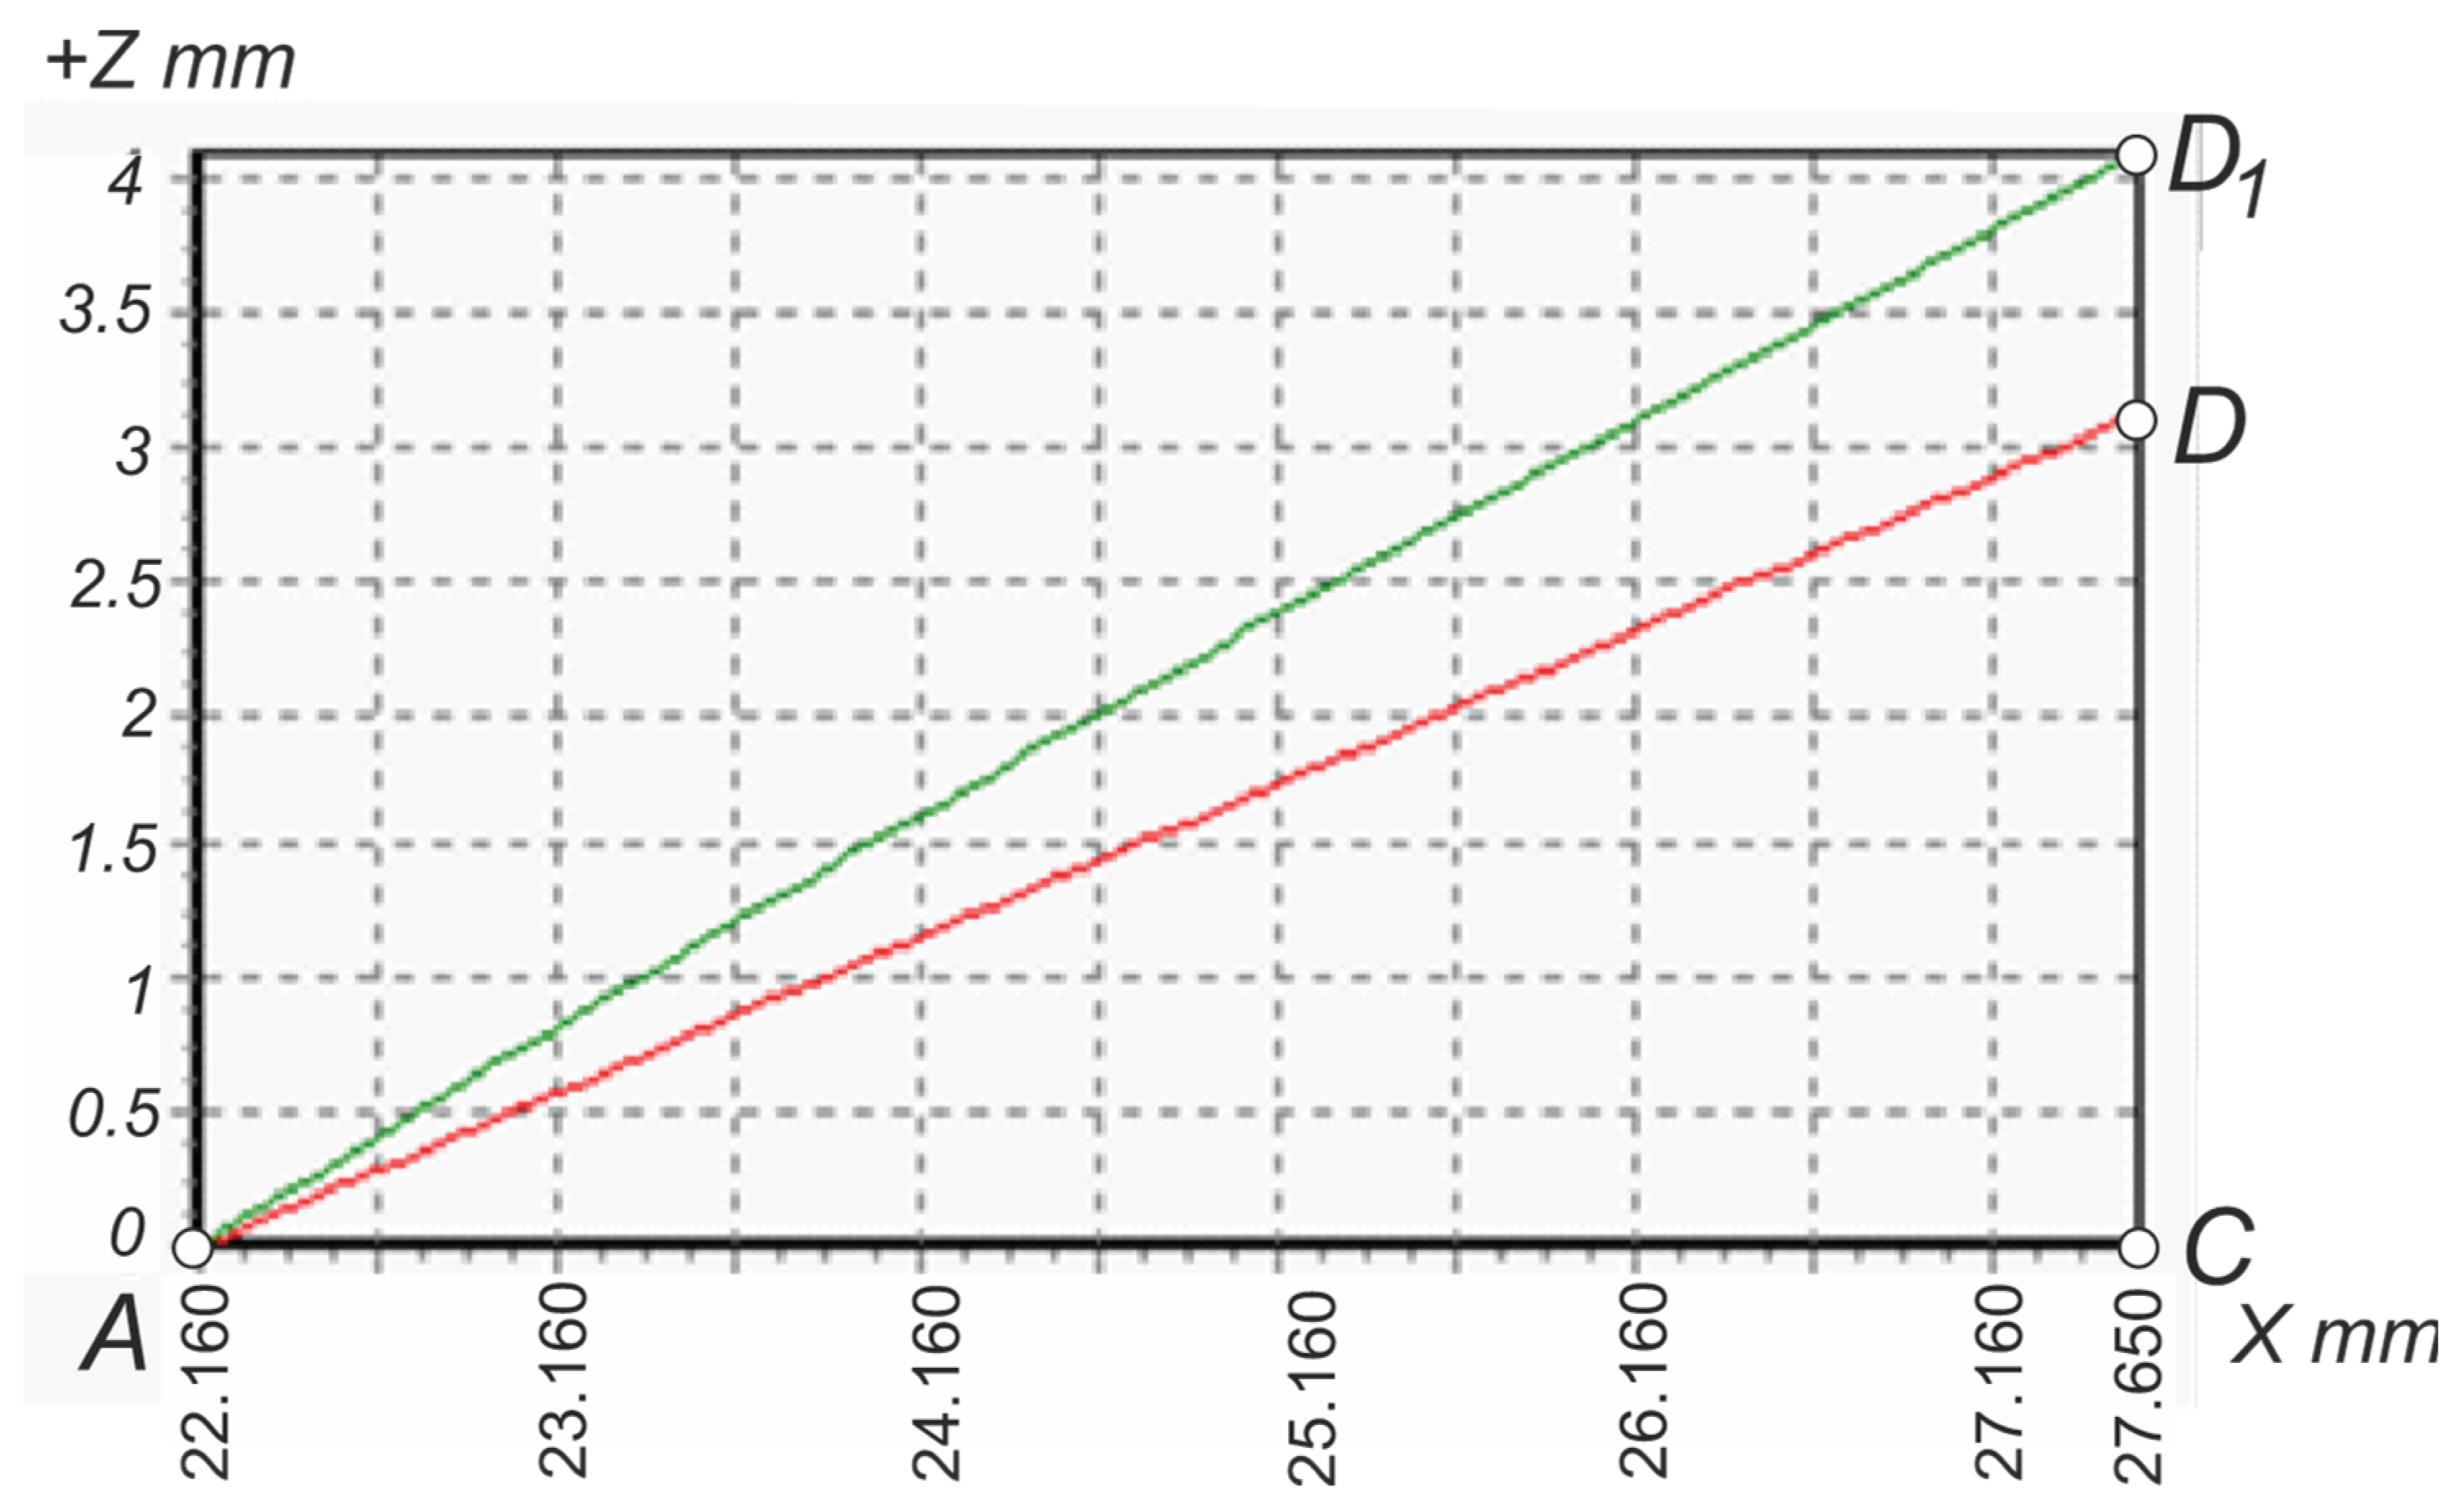
The large visual difference between the standard profile and the predicted profile obtained under the condition of using the parameters
γ=50°,
λz=2.61 proves the importance of analyzing the obtained data. The red line
AD is the standard view of the side profile of the starting triangle of the conical keyhole. The inclination angle of the line
AD relative to the
X axis is 30°, which corresponds to the standard value of the thread half-profile angle
αsh near its short side (
Figure 17).
The green line
AD1 is a curve obtained according to the algorithm (24 – 27, 38) of the profile of the fundamental triangle side according to the applied parameters of
Table 1 and the geometric parameters of the cutting tool
γ=50°,
λz=6.51°. The black line
AD1 is an interpolation of the two extreme points of the green curve. It is inclined to the
X axis at an angle
αsh, according to formula (43), and therefore the straight line
AD1 is described by the equation (
Figure 15):
By analogy, the line
AB1 is described by the equation:
It is more correct to define the profile angle as the angle of inclination not of the lateral side
AD, which refers to the original theoretical (fundamental) triangle, but of the lateral side between points
3 and
4 (
Figure 13), which is actually part of the thread profile. On the diagram,
Figure 17 is line (
34), which is part of the green
AD1 curve. If we take it as a segment of the straight line (
34) obtained by interpolation along the two extreme points
3 and
4, then the section of the profile of the thread (
34) can be described by the equation:
where the angle
αsh'' is the actual thread half-profile angle along its shorter side, obtained by a cutter with non-zero geometric parameters.
With such orthogonal coordinate system, the coordinates of the vertices of the fundamental triangle for each turn of the thread
n can be determined by the following formulas:
where
Xd is obtained from formula (40).
Similarly, expressions can be obtained for determining the section of the actual thread between points 6 and 5 (
Figure 13):
where the angle
αl'' is the predicted actual half-profile angle of the thread along its profile longer side, obtained by a cutter with non-zero geometric parameters.
where
Xb is obtained from formula (41).
As a result of calculating the X coordinates according to formulas (48, 49) and (51, 52), as well as the corresponding Z coordinates based on the algorithm (24 – 27, 38), it is possible to give a predictive calculation of the half-profile angles of the NC23 thread obtained as a result its production with a cutting tool with geometric parameters: rake angle γ=50° and angle of inclination of the cutting edge λz=2.61°.
Table 2.
Results of the predictive software calculation of half-profile angles of drill-string connecting thread NC23 αsh', αsh'', αl', αl'' obtained as a result of turning using a cutting tool with geometric parameters: rake angle γ=50° and inclination angle of the cutting edge λz=2.61 °.
Table 2.
Results of the predictive software calculation of half-profile angles of drill-string connecting thread NC23 αsh', αsh'', αl', αl'' obtained as a result of turning using a cutting tool with geometric parameters: rake angle γ=50° and inclination angle of the cutting edge λz=2.61 °.
| Long side |
Root |
Short side |
Short side truncate |
Long side truncated |
| mm |
|
Xb1
|
Xa
|
Xd1
|
X3
|
X4
|
X5
|
X6
|
| 27.93 |
22.16 |
27.65 |
26.22 |
23.59 |
23.87 |
26.50 |
|
Zb1
|
Za= Zc
|
Zd1
|
Z3
|
Z4
|
Z5
|
Z6
|
| 4.73 |
0 |
4.17 |
3.42 |
1.28 |
1.52 |
3.64 |
| Half- profile angles, ° |
| αl’ |
|
αsh’ |
αsh’’ |
αl’’ |
| 39.34 |
|
37.22 |
39.14 |
38.87 |
4.3.3. Modeling of the Side Profile of the NC23 Drill-String Connection Thread Made Using Turning Tool with Geometric Parameters: Rake Angle γ=12° and the Inclination Angle of the Cutting Edge λz=2.61°
In a case of turning stainless steel threads, researchers often recommend a rake angle in the range of 8-10° [45, 47]. The diagrams in
Figure 18 and
Figure 19 show a certain visual difference between the actually straight standard profile and the side profile of the thread:
AB in
Figure 18 and
AD in
Figure 19. More precise numerical information obtained thanks to the predictive algorithm based on (24 – 27, 38) shows the possibility of using these geometric parameters: the rake angle
γ=12° and the inclination angle of the cutting edge
λz=2.61° for turning threads from difficult-to-machine materials and at the same time ensure the accuracy of the half-profile angle
α=30±0.75° (
Table 3). The values of the predicted half-profile angles
αsh'' = 30.04° and
αl''= 30.15° fall into this range and actually show that the excess of the angular size is less than 33% of the limit deviation tolerance. At the same time, it should be noted that the value of the angle
αl'= 30.58° indicates a deviation from the nominal, which reaches 73% of the tolerance. However, as can be seen from the diagram in
Figure 17, the angles
αl',
αsh' have exclusively research value and actually prove the non-linear nature of the predicted flank profile of the NC23 thread obtained using thread turning with geometric parameters: rake angle
γ=12° and angle of inclination of the cutting edge
λz=2.61 °.
4.4. The Results of Modelling the Side Profile of the NC56 Drill-String Thread Obtained Turning Cutting Tool with Geometric Parameters: Rake Angle γ = 8°, γ = -8°, γ = 4° and the Inclination Angle of the Cutting Edge λz = 1.06°
For a complete illustration of the effect of the diameter of the part on thread profile, let's use a drill-string thread of NС56 as example, the diameter of which is more than 117 mm (
Table 4).
The results of the predictive calculation of the half-profile angles
αsh',
αsh'',
αl',
αl'' based on (24-27, 38) are presented in the
Table 5. It refers to the application of values of rake angles
γ = 8°,
γ = -8°,
γ = 4°, which are often recommended in scientific sources. The results show that the half-profile angle along the short side, is close in value for a negative and the same modulus of a positive rake angle. Half-profile angle, along the long sides, differ significantly when using positive or negative rake angles. However, the deviation from the nominal value by 0.35° does not exceed 47% of the ±0.75° angle tolerance. At the rake angle
γ = 4°, the nominal deviation is less than 0.1°, which is 13% of the tolerance (
Table 5).
5. Conclusions
The triangular or trapezoidal shape of the profile specified by the standard cannot be performed for the surface of cylindrical and conical screw threaded parts, which are made with the help of turning cutters of high productivity. This is due to the kinematic and geometric features of the formation of helical surfaces, which are the flank surfaces of triangular, trapezoidal or rectangular threads. The guide lines of these surfaces are cylindrical or conical helixes, the creating of which is provided by the kinematics of the movement of the tool cutting edge points relatively to the workpiece. The straight-line part of the cutting edge of the lathe thread cutter is the generator of the helical surface. For the production of threaded parts from materials with different machinability characteristics, including difficult-to-machine alloy steels, there is a need to use specially oriented cutting edges relative to the axis of the parts. The such items have followed from this as a consequence:
• For an effective threading process on workpieces made of different machinability materials, cutters should be used with selected non-zero geometric parameters, namely the rake angle and the inclination angle of the cutting edge. It causes the surfaces of the conical or cylindrical threads performed with help of the specified cutters which consist of two convolute helicoids and the helical surfaces of the thread root and the thread crest connected to them;
• The axial profile of the thread formed in this way does not contains rectilinear lateral flank, but only curved ones;
• The curvilinear profile of the lateral flanks is mathematically represented as a transcendental function, in which the parameters are the actual parameters of the thread: diameter, pitch as well as geometric parameters of the thread cutter: rake angle, half-profile angle and the inclination angle of its cutting edge;
• In case of using the known or scientifically justified values of the inclination angles of the edge and rake angles of turning cutters for threading, the obtained flank profile of the thread becomes close to rectilinear, and the value of the thread half-profile angles can be within the tolerance field for angular deviation;
• As the value of the tool rake angle and the inclination angle of the its cutting-edge decreases, as well as the threaded part diameter increases, the value of the predicted thread half-profile angle approaches the nominal value;
• In the case of using zero values of the geometric parameters of the thread turning cutter, the convolute helicoid as part of the thread surface changes to an oblique closed helicoid (Archimedes' screw), and its profile contains not curved, but straight flank lines;
• In the case of exactly zero values of the geometric parameters of the thread turning cutter: the inclination angle of the edge and the rake angle, the transcendental expression describing the lateral thread profiles turns into a linear algebraic equation describing the triangular, rectangular or trapezoidal profile of standard threads.
In nearest future it is planning to study the influence of setting deviation of lathe tool on thread profile accuracy.
Author Contributions
Conceptualization, O.O.; methodology, O.O., V.K. and V.P.; software, O.O. and V.K.; validation, J.K., M.B. and V.P.; formal analysis, V.K., S.B. and V.P.; investigation, O.O., C.B. and J.K.; resources, C.B., S.B. and P.D.; data curation, C.B., M.B. and P.D.; writing—original draft preparation, O.O.; writing—review and editing, P.D. and S.B.; visualization, M.B. and V.P.; supervision, V.P.; project administration, P.D. and V.P.; funding acquisition, C.B., S.B. and M.B. All authors have read and agreed to the published version of the manuscript.
Funding
This research was funded by Ministry of Education and Science of Ukraine, grant number PK 0124U000654.
Data Availability Statement
Not applicable.
Acknowledgments
The team of authors express their gratitude to the reviewers for their valuable recommendations that have been taken into account to significantly improve the quality of this paper.
Conflicts of Interest
The authors declare no conflicts of interest. The funders had no role in the design of the study; in the collection, analyses, or interpretation of data; in the writing of the manuscript; or in the decision to publish the results.
References
- Wang, H.; Huang, H.; Bi, W.; Ji, G.; Zhou, Bo; Zhuo, L. Deep and ultra-deep oil and gas well drilling technologies: Progress and prospect. Natural Gas Industry B 2022, 9, 141–157. [Google Scholar] [CrossRef]
- Sharmin, T.; Rodoshi Khan, N.; Md Saleh Akram; Ehsan, M. A. State-of-the-Art Review on Geothermal Energy Extraction, Utilization, and Improvement Strategies: Conventional, Hybridized, and Enhanced Geothermal Systems. International Journal of Thermofluids 2023, 18, 100323. [Google Scholar] [CrossRef]
- Wu, B.; Zhang, K.; Meng, G.; Suo, X. Optimization of Recharge Schemes for Deep Excavation in the Confined Water-Rich Stratum. Sustainability 2023, 15, 5432. [Google Scholar] [CrossRef]
- Klymenko, V.; Ovetskyi, S.; Vytyaz, O.; Uhrynovskyi, A.; Martynenko, V. An alternative method of methane production from deposits of subaquatic gas hydrates. Mining of Mineral Deposits 2022, 16, 11–17. [Google Scholar] [CrossRef]
- Bazaluk, O.; Slabyi, O.; Vekeryk, V.; Velychkovych, A.; Ropyak, L.; Lozynskyi, V. A technology of hydrocarbon fluid production intensification by productive stratum drainage zone reaming. Energies 2021, 14, 3514. [Google Scholar] [CrossRef]
- Chudyk, I.; Velychkovych, A.; Grydzhuk, Ja. A Modeling of the Inertia Properties of a Drill String Section as a Continual Bent Rotating Rod. SOCAR Proceedings 2021, 2021(4), 24–32. [Google Scholar] [CrossRef]
- Vlasiy, O.; Mazurenko, V.; Ropyak, L.; Rogal, O. Improving the aluminum drill pipes stability by optimizing the shape of protector thickening. Eastern-European Journal of Enterprise Technologies 2017, 1, 25–31. [Google Scholar] [CrossRef]
- Chudyk, I. I.; Femiak, Ya. M.; Orynchak, M. I.; Sudakov, A. K.; Riznychuk, A. I. New Methods for Preventing Crumbling and Collapse of the Borehole Walls. Naukovyi Visnyk Natsionalnoho Hirnychoho Universytetu 2021, 2021, 17–22. [Google Scholar] [CrossRef]
- Prysyazhnyuk, P.; Molenda, M.; Romanyshyn, T.; Ropyak, L.; Romanyshyn, L.; Vytvytskyi, V. Development of a hardbanding material for drill pipes based on high-manganese steel reinforced with complex carbides. Acta Montanistica Slovaca 2022, 27, 685–696. [Google Scholar]
- Bembenek, M; Prysyazhnyuk, P.; Shihab, T.; Machnik, R.; Ivanov, O.; Ropyak, L. Microstructure and Wear Characterization of the Fe-Mo-B-C—Based Hardfacing Alloys Deposited by Flux-Cored Arc Welding. Materials 2022, 15, 5074. [Google Scholar] [CrossRef] [PubMed]
- Grydzhuk, Ja.S.; Dzhus, A.P.; Grydzhuk, Ja.S.; Dzhus, A.P.; Yurych, A.R.; Yurych, L.R.; Riznychuk, A.I.; Pylypaka, O.P. Approbation of the method for ensuring operational reliability and evaluating the residual life of drill string elements. In Proceedings of the 16th International Conference Monitoring of Geological Processes and Ecological Condition of the Environment, Monitoring 2022, 15-18 November 2022, Kyiv, Ukraine. European Association of Geoscientists & Engineers, EAGE 2022, 2022, pp. 1–5.
- Onysko, O.; Kopei, V.; Kusyj, Y.; Kornuta, O.; Schuliar, I. Turning of NC10 Threads for Drill Pipes: Theoretical Study of the Designed Profile. In Lecture Notes in Mechanical Engineering. Advances in Design, Simulation and Manufacturing VI. DSMIE 2023; Ivanov, V., Trojanowska, J., Pavlenko, I., Rauch, E., Piteľ, J. Eds. Springer: Cham, Switzerland, 2023; pp. 356–366.
- Kopei, V.; Onysko, O.; Kusyi, Y.; Vriukalo, V.; Lukan, T. Investigation of the Influence of tapered Thread Pitch Deviation on the Drill-String Tool-Joint Fatigue Life. In Lecture Notes in Networks and Systems, New Technologies, Development and Application V. NT 2022; Karabegović, I., Kovačević, A., Mandžuka, S., Eds.; Springer: Cham, Switzerland, 2023; Volume 472, pp. 144–154. [Google Scholar]
- Shatskyi, I.; Ropyak, L.; Velychkovych, A. Model of contact interaction in threaded joint equipped with spring-loaded collet. Engineering Solid Mechanics 2020, 8(4), 301–312. [Google Scholar] [CrossRef]
- Croccolo, D.; De Agostinis, M.; Fini, S.; Mele, M.; Olmi, G.; Scapecchi, C.; Tariq, M.H.B. Failure of Threaded Connections: A Literature Review. Machines 2023, 11, 212. [Google Scholar] [CrossRef]
- Ropyak, L.Y.; Vytvytskyi, V.S.; Velychkovych, A.S.; Pryhorovska, T.O.; Shovkoplias, M.V. Study on grinding mode effect on external conical thread quality. IOP Conf. Ser. Mater. Sci. Eng. 2021, 1018, 012014. [Google Scholar] [CrossRef]
- Mandryk, O.; Vytyaz, O.; Poberezhny, L.; Mykhailiuk, Y. Increase of the technogenic and ecological safety of the natural gas transportation due to displacement of explosive mixtures with nitrogen. Archives of Materials Science and Engineering 2020, 106, 17–27. [Google Scholar] [CrossRef]
- Wang, Y.; Qian, C.; Kong, L.; Zhou, Q.; Gong, J. Design Optimization for the Thin-Walled Joint Thread of a Coring Tool Used for Deep Boreholes. Appl. Sci. 2020, 10, 2669. [Google Scholar] [CrossRef]
- Grydzhuk, J.; Chudyk, I.; Velychkovych, A.; Andrusyak, A. Analytical estimation of inertial properties of the curved rotating section in a drill string. East. Eur. J. Enterp. Technol. 2019, 1, 6–14. [Google Scholar] [CrossRef]
- Pryhorovska, T.O.; Ropyak, L. Machining Error Influnce on Stress State of Conical Thread Joint Details. In Proceedings of the 8th International Conference on Advanced Optoelectronics and Lasers (CAOL 2019), Sozopol, Bulgaria, 6–8 September 2019; pp. 493–497. [Google Scholar]
- Tutko, T.; Dubei, O.; Ropyak, L.; Vytvytskyi, V. Determination of Radial Displacement Coefficient for Designing of Thread Joint of Thin-Walled Shells. In Lecture Notes in Mechanical Engineering, Advances in Design, Simulation and Manufacturing IV. DSMIE 2021; Ivanov, V., Trojanowska, J., Pavlenko, I., Zajac, J., Peraković, D., Eds.; Springer: Cham, Switzerland, 2021; pp. 153–162. [Google Scholar]
- Onysko, O., Panchuk, V., Kusyi, Y., Odosii, Z., Lukan, T. Impact of the Tool’s Flank Clearance Angle on the Pitch Diameter Accuracy of the Tool-Joint Tapered Thread. In Lecture Notes in Mechanical Engineering, Advances in Design, Simulation and Manufacturing V. DSMIE 2022; Ivanov, V., Trojanowska, J., Pavlenko, I., Rauch, E., Peraković, D., Eds.; Springer: Cham, Switzerland, 2022; pp. 312–321. [Google Scholar]
- Dubei, O.Y.; Tutko, T.F.; Ropyak, L.Y.; Shovkoplias, M.V. Development of Analytical Model of Threaded Connection of Tubular Parts of Chrome-Plated Metal Structures. Metallofiz. Noveishie Tekhnol. 2022, 44, 251–272. [Google Scholar] [CrossRef]
- Rong, L.; Tie, Z.; Wu, X.J.; Wang, C.H. Crack closure effect on stress intensity factors of an axially and a circumferentially cracked cylindrical shell. Int. J. Fract. 2004, 125, 227–248. [Google Scholar]
- Shats’kyi, I.P. Closure of a longitudinal crack in a shallow cylindrical shell in bending. Mater. Sci. 2005, 41, 186–191. [Google Scholar] [CrossRef]
- Shats’kyi, I.P.; Makoviichuk, M.V. Analysis of the limiting state of cylindrical shells with cracks with regard for the contact of crack lips. Strength Mater. 2009, 41, 560–565. [Google Scholar] [CrossRef]
- Dovbnya, K.; Shevtsova, N. Studies on the stress state of an orthotropic shell of arbitrary curvature with the through crack under bending loading. Strength Mater. 2014, 46, 345–349. [Google Scholar] [CrossRef]
- Shats’kyi, I.P.; Makoviichuk, M.V. Сontact interaction of crack lips in shallow shells in bending with tension. Mater. Sci. 2005, 41, 486–494. [Google Scholar] [CrossRef]
- Shatskii, I.P.; Makoviichuk, N.V. Effect of closure of collinear cracks on the stress-strain state and the limiting equilibrium of bent shallow shells. J. Appl. Mech. Tech. Phys. 2011, 52, 464–470. [Google Scholar] [CrossRef]
- Kopei, V.; Onysko, O.; Odosii, Z.; Pituley, L.; Goroshko, A. Investigation of the influence of tapered thread profile accuracy on the mechanical stress, fatigue safety factor and contact pressure. In Lecture Notes in Networks and Systems, New Technologies, Development and Application IV. NT 2021; Karabegović, I, Ed.; Springer: Cham, Switzerland, 2021; Volume 233, pp. 177–185. [Google Scholar]
- Kopei, V.B.; Onysko, O.R.; Panchuk, A.G.; Dzhus, A.P.; Protsiuk, V.R. Improving the fatigue life of the tool-joint of drill pipes by optimizing the variable pitch of the box thread. IOP Conf. Series: Materials Science and Engineering 2021, 1166, 012017. [Google Scholar] [CrossRef]
- Kopei, V.; Onysko, O.; Panchuk, V.; Pituley, L.; Schuliar, I. Influence of Working Height of a Thread Profile on Quality Indicators of the Drill-String Tool-Joint. In Lecture Notes in Mechanical Engineering, Grabchenko’s international conference on Advanced manufacturing Processes. «InterPartner» 2021; Tonkonogyi V. at al. Eds.; Springer: Cham, Switzerland, 2022; pp. 395–404.
- Onysko, O.; Borushchak, L.; Kopei, V.; Lukan, T.; Medvid, I.; Vryukalo, V. Computer Studies of the Tightness of the Drill String Connector Depending on the Profile of Its Tapered Thread. In Lecture Notes in Networks and Systems, New Technologies, Development and Application III. NT 2020; Karabegović, I., Ed.; Springer: Cham, Switzerland, 2020; Volume 128, pp. 720–729. [Google Scholar]
- Bazaluk, O.; Velychkovych, A.; Ropyak, L.; Pashechko, M.; Pryhorovska, T.; Lozynskyi, V. Influence of heavy weight drill pipe material and drill bit manufacturing errors on stress state of steel blades. Energies 2021, 14, 4198. [Google Scholar] [CrossRef]
- Kopei, V.B.; Onysko, O.R.; Panchuk, V.G.; Odosii, Z.M.; Kusyi, Y.M. Increasing the fatigue strength of threaded joints of oil and gas equipment by plastic deformation of the thread under high load before make-up. J. Phys.: Conf. Ser. 2023, 2540, 012033. [Google Scholar] [CrossRef]
- Litvin, F.; Gonzalez-Perez, I.; Yukishima, K.; Fuentes, A.; Hayasaka, K. Design, simulation of meshing, and contact stresses for an improved worm gear drive. Mech. Mach. Theory 2007, 42, 940–959. [Google Scholar] [CrossRef]
- Kusyi, Y.; Stupnytskyy, V.; Onysko, O.; Dragašius, E. Optimization synthesis of technological parameters during manufacturing of the parts. Eksploatacja i Niezawodnosc 2022, 24(4), 655–667. [Google Scholar] [CrossRef]
- Ivchenko, O.; Ivanov, V.; Trojanowska, J.; Zhyhylii, D.; Ciszak, O.; Zaloha, O.; Pavlenko, I.; Hladyshev, D. Method for an Effective Selection of Tools and Cutting Conditions during Precise Turning of Non-Alloy Quality Steel C45. Materials 2022, 15(2), 505. [Google Scholar] [CrossRef]
- Petrakov, Y.; Danylchenko, M. A Time-Frequency Approach to Ensuring Stability of Machining by Turning. Eastern-European Journal of Enterprise Technologies 2022, 6, 85. [Google Scholar] [CrossRef]
- Pasternak, S.; Danylchenko, Y.M.; Storchak, M.; Okhrimenko, O.A. Gear Cutting with Disk-Shaped Milling Cutters. In Advances in Gear Theory and Gear Cutting Tool Design; Radzevich, S.P., Storchak, M., Eds.; Springer: Cham, Switzerland, 2022; pp. 151–179. [Google Scholar]
- Danylchenko, Y.M., Kryvosheia, A.V., Melnyk, V.Y., Tkach, P.M. Generalizing Structural Unified Model of the Synthesis of Links of Flat-Toothed Gearing Systems. In Advances in Gear Theory and Gear Cutting Tool Design; Radzevich, S.P.; Storchak, M. Eds.; Springer: Cham, Switzerland, 2022; pp. 445–483.
- Neshta, A.; Kryvoruchko, D.; Hatala, M.; Ivanov, V.; Botko, F.; Radchenko, S.; Mital, D. Technological Assurance of High-Efficiency Machining of Internal Rope Threads on Computer Numerical Control Milling Machines. J. Manuf. Sci. Eng. 2018, 140(7), 071012. [Google Scholar] [CrossRef]
- API SREC 7-2. Specification for Threading and Gauging of Rotary Shouldered Thread Connection. Second Edition. API: Washington, DC, USA, 2020.
- Sandvik Coromant. Tread turning tools. Available online: https://www.sandvik.coromant.com/en-us/tools/threading-tools/thread-turning-tools (accessed on 11 March 2024).
- Costa, C.E.; Polli, M.L. Effects of the infeed method on thread turning of AISI 304L stainless steel. J Braz. Soc. Mech. Sci. Eng. 2021, 43, 253. [Google Scholar] [CrossRef]
- Günay, M. Investigation of the Effects on Screw Thread of Infeed Angle during External Threading. Gazi University Journal of Science 2011, 24(1), 153–160. [Google Scholar]
- An, Q. L.; Guo, G. G.; Zheng, X. H.; Chen, M.; Liu, G.; Zhang, Y. S. Experimental Study on Cutting Characteristics for Buttress Thread Turning of 13%Cr Stainless Steel. Key Engineering Materials 2010, 443, 262–267. [Google Scholar] [CrossRef]
- Onysko, O.; Kopei, V.; Kusyi, Y.; Pituley, L.; Taras, I. Tool Wear in the Process of Drill-String Connector Thread Lathe Machining. In Lecture Notes in Networks and Systems, New Technologies, Development and Application VI. NT 2023; Karabegovic, I., Kovačević, A., Mandzuka, S., Eds.; Springer: Cham, Switzerland, 2023; Volume 687, pp. 98–111. [Google Scholar]
- Medvid, I.; Onysko, O.; Panchuk, V.; Pituley, L.; Schuliar, I. Kinematics of the Tapered Thread Machining by Lathe: Analytical Study. In Lecture Notes in Mechanical Engineering, Advanced Manufacturing Processes II. InterPartner 2020; Tonkonogyi, V., et al., Eds.; Springer: Cham, Switzerland, 2021; pp. 555–565. [Google Scholar]
- Onysko, O.; Panchuk, V.; Kopei, V.; Havryliv, Y.; Schuliar, I. Investigation of the influence of the cutter-tool rake angle on the accuracy of the conical helix in the tapered thread machining. J. Phys.: Conf. Ser. 2021, 1781, 012028. [Google Scholar] [CrossRef]
- Slătineanu, L.; Radovanovic, M.; Coteață, M.; Beșliu, I.; Dodun, O.; Coman, I.; Olaru, S.-C. Requirements in designing a device for experimental investigation of threading accuracy. MATEC Web of Conferences 2017, 112, 01005. [Google Scholar] [CrossRef]
- Boral, P.; Gołębski, R. Technology of Manufacturing of ZC Cylindrical Worm. Materials 2022, 15(18), 6412. [Google Scholar] [CrossRef]
- Andrianto, M.; Wu, YR.; Arifin, A. Mathematical modeling on a novel manufacturing method for roller-gear cams using a whirl-machining process. Int J Adv Manuf Technol 2023, 125, 5015–5029. [Google Scholar] [CrossRef]
- Onysko, O.; Panchuk, V.; Kopei, V.; Pituley, L.; Lukan, T. Influence of Back Rake Angle of a Threading Cutter on the Drill-String Tool-Joint Pitch Diameter. In Lecture Notes in Mechanical Engineering, Grabchenko’s international conference on Advanced manufacturing Processes. «InterPartner» 2022; Tonkonogyi V. at al. Eds.; Springer: Cham, Switzerland, 2023; pp. 200-210.
- Onysko, O.; Medvid, I.; Panchuk, V.; Rodic, V.; Barz, C. Geometric Modeling of Lathe Cutters for Turning High-Precision Stainless Steel Tapered Threads. In Lecture Notes in Mechanical Engineering, Advances in Design, Simulation and Manufacturing IV. DSMIE 2021; Ivanov, V.; Trojanowska, J.; Pavlenko, I.; Zajac, J.; Peraković, D. Eds. Springer: Cham, Switzerland, 2021; pp. 472–480.
- Kacalak, W.; Majewski, M.; Budniak, Z.; Ponomarenkow, J. Worm Gear Drives with Improved Kinematic Accuracy. Materials 2021, 14, 7825. [Google Scholar] [CrossRef] [PubMed]
- Onysko, O.; Kopei, V.; Kusyj, Y.; Kornuta, O.; Schuliar, I. Turning of NC10 Threads for Drill Pipes: Theoretical Study of the Designed Profile. In Lecture Notes in Mechanical Engineering, Advances in Design, Simulation and Manufacturing VI. DSMIE 2023; Ivanov, V.; Trojanowska, J.; Pavlenko, I.; Rauch, E.; Piteľ, J. Eds. Springer: Cham, Switzerland, 2023; pp. 356–366.
- Fromentin, G.; Poulachon, G. Geometrical analysis of thread milling—part 1: evaluation of tool angles. Int J Adv Manuf Technol 2010, 49, 73–80. [Google Scholar] [CrossRef]
- Fu, X.; Li, K.; Li, Z.; et al. A SVM-based design method for cutting edge profile stability of large-pitch thread turning tool considering vibration. Int J Adv Manuf Technol 2023, 125, 4529–4547. [Google Scholar] [CrossRef]
- Kacalak, W.; Szafraniec, F. Analiza kształtu i położenia strefy obróbki w procesie szlifowania powierzchni śrubowych ślimaków stożkowych. Mechanik 2015, 8–9, 159–163. [Google Scholar]
Figure 1.
Scheme of a drill-string threaded connection according to the API7 standard with reference to the ZOX rectangular coordinate system. H - thread height (not truncated), h - thread height (truncated), fr - root truncation, fc - crest truncation, R - root radius, P - pitch.
Figure 1.
Scheme of a drill-string threaded connection according to the API7 standard with reference to the ZOX rectangular coordinate system. H - thread height (not truncated), h - thread height (truncated), fr - root truncation, fc - crest truncation, R - root radius, P - pitch.
Figure 2.
Scheme of installing a threaded cutter with a non-zero value of the rake angle (γ>0).
Figure 2.
Scheme of installing a threaded cutter with a non-zero value of the rake angle (γ>0).
Figure 3.
Scheme of execution of an oblique closed helicoid using a lathe cutter.
Figure 3.
Scheme of execution of an oblique closed helicoid using a lathe cutter.
Figure 4.
Scheme of execution of a convolute helicoid using a lathe cutter.
Figure 4.
Scheme of execution of a convolute helicoid using a lathe cutter.
Figure 5.
Schematic of placement of the rake surface of the thread cutter in cylindrical coordinates.
Figure 5.
Schematic of placement of the rake surface of the thread cutter in cylindrical coordinates.
Figure 6.
The scheme of ensuring the specified value of the back rake angle γ: (a) Conventional tool with back rake angle γ=0; (b) Modernized tool shank with a changed tool-base with back rake angle γ<0.
Figure 6.
The scheme of ensuring the specified value of the back rake angle γ: (a) Conventional tool with back rake angle γ=0; (b) Modernized tool shank with a changed tool-base with back rake angle γ<0.
Figure 7.
Scheme of installing the cutter perpendicular to the inclination of the screw turn: on the left – without the inclination of the cutting insert (λ = 0), on the right – with the inclination of the cutting insert (λ > 0).
Figure 7.
Scheme of installing the cutter perpendicular to the inclination of the screw turn: on the left – without the inclination of the cutting insert (λ = 0), on the right – with the inclination of the cutting insert (λ > 0).
Figure 8.
Scheme for calculating the deviation of the received profile of the convolute surface from the given profile of the thread.
Figure 8.
Scheme for calculating the deviation of the received profile of the convolute surface from the given profile of the thread.
Figure 9.
Scheme of placing of the rake plane of the ABiDi cutting tool in the cylindrical coordinate system.
Figure 9.
Scheme of placing of the rake plane of the ABiDi cutting tool in the cylindrical coordinate system.
Figure 10.
Diagram of placement of the rake plane projection of the lathe tool A b'd' in the polar coordinate system.
Figure 10.
Diagram of placement of the rake plane projection of the lathe tool A b'd' in the polar coordinate system.
Figure 11.
Complex drawing of the plane of the rake surface ABD of the lathe tool, which is placed under the angle of inclination λz and the rake angle at the nose point γ.
Figure 11.
Complex drawing of the plane of the rake surface ABD of the lathe tool, which is placed under the angle of inclination λz and the rake angle at the nose point γ.
Figure 12.
Drawing of the drill-string tool-joint parts of the pin (a) and the box (b): φ is the taper angle, D is the outer diameter of the tool-joint tapered thread, D1 is the diameter of the tool-joint tapered thread on the end section, d1 is the diameter of the cylindrical twist, d2 is the diameter of the larger base of the cone, d3 is the diameter of the smaller base of the cone, Lp is the length of the threaded part of the pin, Lb is the length of the threaded parts of the box.
Figure 13.
Scheme of obtaining the profile of a drill-string thread, which is made using the full-profile lathe thread cutting-tool (yellow).
Figure 13.
Scheme of obtaining the profile of a drill-string thread, which is made using the full-profile lathe thread cutting-tool (yellow).
Figure 14.
Visual software model of the flank profile AD of the drill-string tool-joint thread NC23.
Figure 14.
Visual software model of the flank profile AD of the drill-string tool-joint thread NC23.
Figure 15.
Visual software model of the flank profile AB of the drill-string tool-joint thread NC23.
Figure 15.
Visual software model of the flank profile AB of the drill-string tool-joint thread NC23.
Figure 16.
Comparison of models of the lateral theoretical profile of the NC23 thread: standard (red) and made by the tool with the geometric parameters of the cutter γ=50°, λz=2.61° (green).
Figure 16.
Comparison of models of the lateral theoretical profile of the NC23 thread: standard (red) and made by the tool with the geometric parameters of the cutter γ=50°, λz=2.61° (green).
Figure 17.
Comparison of models of the side profile of the NC23 thread: red straight AD – standard, green curve AD1 – predicted profile obtained using the tool with geometric parameters of the cutter γ=50°, λz=2.61°, black straight AD1 linear interpolation of the green curve by two points.
Figure 17.
Comparison of models of the side profile of the NC23 thread: red straight AD – standard, green curve AD1 – predicted profile obtained using the tool with geometric parameters of the cutter γ=50°, λz=2.61°, black straight AD1 linear interpolation of the green curve by two points.
Figure 18.
Comparison of the models of the side profile AB of the NC23 thread: standard (red) and made using the cutting tool with the geometric parameters of γ=12°, λz=2.61° (green).
Figure 18.
Comparison of the models of the side profile AB of the NC23 thread: standard (red) and made using the cutting tool with the geometric parameters of γ=12°, λz=2.61° (green).
Figure 19.
Comparison of the models of the side profile AD of the NC23 thread: standard (red) and made using the cutting tool with the geometric parameters of γ=12°, λz=2.61° (green).
Figure 19.
Comparison of the models of the side profile AD of the NC23 thread: standard (red) and made using the cutting tool with the geometric parameters of γ=12°, λz=2.61° (green).
Table 1.
Profile parameters of the drill-string tool-joint tapered thread NC23 according to the standard [
43].
Table 1.
Profile parameters of the drill-string tool-joint tapered thread NC23 according to the standard [
43].
| No |
Parameter name, dimension |
Marking |
Value |
| 1 |
Pitch, mm |
P |
6.35 |
| 2 |
Tapered angle, ° |
φ |
4.763 |
| 3 |
Thread height (not truncated), mm |
H |
5.487 |
| 4 |
Thread height (truncated), mm |
h |
3.095 |
| 5 |
Root truncation, mm |
fc |
1.427 |
| 6 |
Crest truncation, mm |
fr |
0.965 |
| 7 |
Angular depth, mm |
h1 |
2.633 |
| 8 |
The outer thread diameter of the small base of the cone of pin, mm |
d3 |
52.433 |
| 9 |
Half-profile angle, ° |
α |
30 |
Table 3.
Results of the predictive software calculation of half-profile angles of NC23 drill-string thread αsh', αsh'', αl', αl'' made using tool with the rake angle γ=12° and the inclination angle of the cutting edge λz=2.61°.
Table 3.
Results of the predictive software calculation of half-profile angles of NC23 drill-string thread αsh', αsh'', αl', αl'' made using tool with the rake angle γ=12° and the inclination angle of the cutting edge λz=2.61°.
| Half- profile angles, ° |
|---|
| Side АВ
|
Side АD
|
Flank 34 |
Flank 56 |
| αl’ |
αsh’ |
αsh’’ |
αl’’ |
| 30.58 |
30.08 |
30.04 |
30.15 |
Table 4.
Profile parameters of the drill-string tool-joint tapered thread NC56 according to the standard [
41].
Table 4.
Profile parameters of the drill-string tool-joint tapered thread NC56 according to the standard [
41].
| No |
Parameter name, dimension |
Marking |
Value |
| 1 |
Pitch, mm |
P |
5.471 |
| 2 |
Tapered angle, ° |
φ |
7°,7’30’’ |
| 3 |
Thread height (not truncated), mm |
H |
5.471 |
| 4 |
Thread height (truncated), mm |
h |
3.083 |
| 5 |
Root truncation, mm |
fc |
1.423 |
| 6 |
Crest truncation, mm |
fr |
0.965 |
| 7 |
Angular depth, mm |
h1 |
2.625 |
| 8 |
The outer thread diameter of the small base of the cone of pin, mm |
d3 |
117.5 |
| 9 |
Half-profile angle, ° |
α |
30 |
Table 5.
Results of the predictive software calculation of half-profile angles of NC56 drill-string thread αsh', αsh'', αl', αl'' obtained as a result of turning using cutting tool with geometric parameters: rake angle γ = 8°, γ = -8°, γ = 4° and the inclination angle of the cutting edge λz = 1.06°.
| Parameters |
Half-profile angles, ° |
| Side АВ
|
Side АD
|
Flank 34 |
Flank 56 |
| λ,° |
γ,° |
αl’ |
αsh’ |
αsh’’ |
αl’’ |
| 1.060 |
-8 |
29.99 |
30.39 |
30.35 |
29.91 |
| 1.060 |
8 |
30.17 |
30.28 |
30.35 |
30.11 |
| 1.060 |
4 |
30.10 |
29.97 |
29.95 |
30.01 |
|
Disclaimer/Publisher’s Note: The statements, opinions and data contained in all publications are solely those of the individual author(s) and contributor(s) and not of MDPI and/or the editor(s). MDPI and/or the editor(s) disclaim responsibility for any injury to people or property resulting from any ideas, methods, instructions or products referred to in the content. |
© 2024 by the authors. Licensee MDPI, Basel, Switzerland. This article is an open access article distributed under the terms and conditions of the Creative Commons Attribution (CC BY) license (http://creativecommons.org/licenses/by/4.0/).
