1. Introduction
FFF as one of the additive manufacturing techniques has undergone a great boom in the last decade and has found applications ranging from hobby applications to highly demanding industrial applications. Compared to conventional technologies, FFF (Fused Filament Fabrication) offers the possibility of producing parts by adding material instead of removing it, but it also has its limitations, especially when it comes to small batch production or small part sizes. While many studies have been devoted to the actual printing process and mechanical properties due to the dimensions of FFF technology (as discussed below), the tribological properties of printed models have only been studied marginally and on a limited range of materials [
1,
2,
3,
4]. A study by Jadwiga Pisula at al investigated the contact wear of spur gears made by the FFF method from ABS M-30 (acrylonitrile butadiene styrene), ULTEM 9085 (PEI polyetherimide) and PEEK (polyetheretherketone) materials, finding that the greatest wear was observed for gears made from PEI material. The hardness of the material decreased due to the operating temperature of the loaded gear [
5]. Research by Sencer Sureyya Karabeyoglu at al investigated the dependence of texture and filling density on wear and wear rate, friction coefficient, wear mechanism and so-so microscopic wear characteristics. The study revealed that the grid pattern with high and hexagonal pattern with low filler density exhibited the lowest wear rate and the lowest coefficient of friction compared to the rectangular pattern [
6,
7].
Research on parts printed by the FFF method is mainly concerned with the mechanical properties of polymeric materials, and within tribology, it mainly focuses on ABS, POM, PLA or even PEEK materials, but research on PEI material within the tribological three-concave system is lacking [
8,
9,
10,
11,
12,
13]. Wenzheng Wu at al investigated fibre-reinforced thermoplastic polymer composites. Their research mainly focuses on tensile and flexural strength and evaluation of tribological properties is lacking [
14,
15]. Due to its advantages, PLA is a leading biomaterial for many applications in medicine as well as in industry, where it replaces conventional petrochemical-based polymers and is biodegradable. In the investigation of PP and PLA, R. Revati at al and Cifuentes, S.C., at al address the mechanical and degradation characterization of plastics and composites reinforced with Mg microparticles (up to 15 wt.%). Physicochemical characterization by TGA and DSC indicates that Mg prevents thermal degradation of the polymers but does not compromise their stability during processing. Particular emphasis is given to determine the influence of de-formation rate and Mg content on the mechanical behaviour, providing important information on the visco-elastic behaviour and time-dependent response of the composites. Importantly for the intended application, the addition of Mg increases the elastic modulus and hardness of polymer matrices and induces higher resistance to PLA flow [
16,
17,
18,
19]. Some investigations indicate the nature of plastic part behaviour during abrasive wear such as S. Perepel-kina et al. where analysis of experimental data showed that changing the 3D printing (filling) settings during part construction has a significant effect not only on the strength and stiffness of the parts, but also on the surface quality, which influences the tribological properties of the tribopairs. The results of these investigations make it possible to select the optimal 3D printing settings depending on the desired tribological properties of the parts, such as friction and wear coefficients, the ability of the thermoplastic material to soften by heating and to form under pressure [
20,
21,
22,
23,
24].
Singh R. at al states that the use of functional prototypes based on fused deposition modelling (FDM) for wear resistance applications is currently limited mainly due to selective availability of filament material. Several thermoplastic-based fillers have been reinforced by various research groups to improve mechanical properties. Current research with three particle sizes added suggests that the pin reinforced with double particle size shows better wear properties, followed by triple particle size and ABS reinforcement with the first particle type [
25,
26,
27].
In the experiment of Lin L. at al, a polyetheretherketone (PEEK) coating material reinforced with carbon fibers (CF) was prepared on a pure PEEK substrate. The results show that the friction coefficient and wear rate are strongly dependent on the direction of wear action with respect to the orientation of the print paths. The values are much lower when the wear direction was perpendicular to the carbon fibers. Comparative analyses of the worn surfaces show that an effective distribution of shear stress on the carbon fibers can contribute to a large reduction in friction and wear [
28,
29].
Bijwe et al. tested three materials, PEI (A), PEI + 20% glass fiber (B), PEI + 25% glass fiber + 15% MoS2 and graphite (C), for their performance in different wear regimes. They were adhesive, abrasive (three types) erosive and friction wear. Different operating parameters such as loads, speeds, roughness of the anti-seize were selected as the operating conditions. Bijwe et al. concluded that this performance of materials depends largely on the type of wear. So Composite C, a commercially developed material performed well in adhesive wear and friction wear modes. The inclusion of glass fiber and three solid lubricants improved the wear performance of pure PEI. Approximately 20-fold improvement in wear resistance could be achieved in the op-wear mode due to the reinforcement and solid lubrication, while the improvement in frictional wear resistance was twofold. Operating parameters such as load, speed, temperature, sliding duration significantly affected the performance of the materials. The same fillers were found to be detrimental in case of abrasive and erosive wear [
30].
The results of the previous research on abrasion resistance of PEI material showed the suitability of the chosen build orientation and deposition strategy for the production of parts by additive manufacturing, depending on the required tribological properties such as friction coefficient and wear behavior at 3D printing technological parameters such as layer height of 0.254mm and filament width of 0.5mm. The results of the study show that the wear continuity and frictional force depend on the trajectory traversed in the model orientation of the fabrication. The magnitude of wear (material loss) ranged from 0.451 to 0.809%. It was shown that the weight loss of the specimen under load was on average greater for the chosen fiber orientation strategy in the Z-direction than in the X-direction [
31]. Current scientific research aimed at determining the tribological characteristics of parts produced by 3D printing in most cases describes the materials most commonly used in engineering practice (ABS, PLS, PC) [
32,
33].
The use of FFF additive manufacturing is nowadays considered as a popular progressive method for the rapid production of various parts and components for different industries which entails the necessity of researching new materials and determining their utility-properties. Knowledge about the tribological properties of 3D printed PEI material is poorly described today. In the context of the diffusion and application of new plastic materials in different industries with FFF technology, it is necessary to investigate their characteristic properties at different printing technological parameters.
2. Materials and Methods
2.1. Measurements and equipment
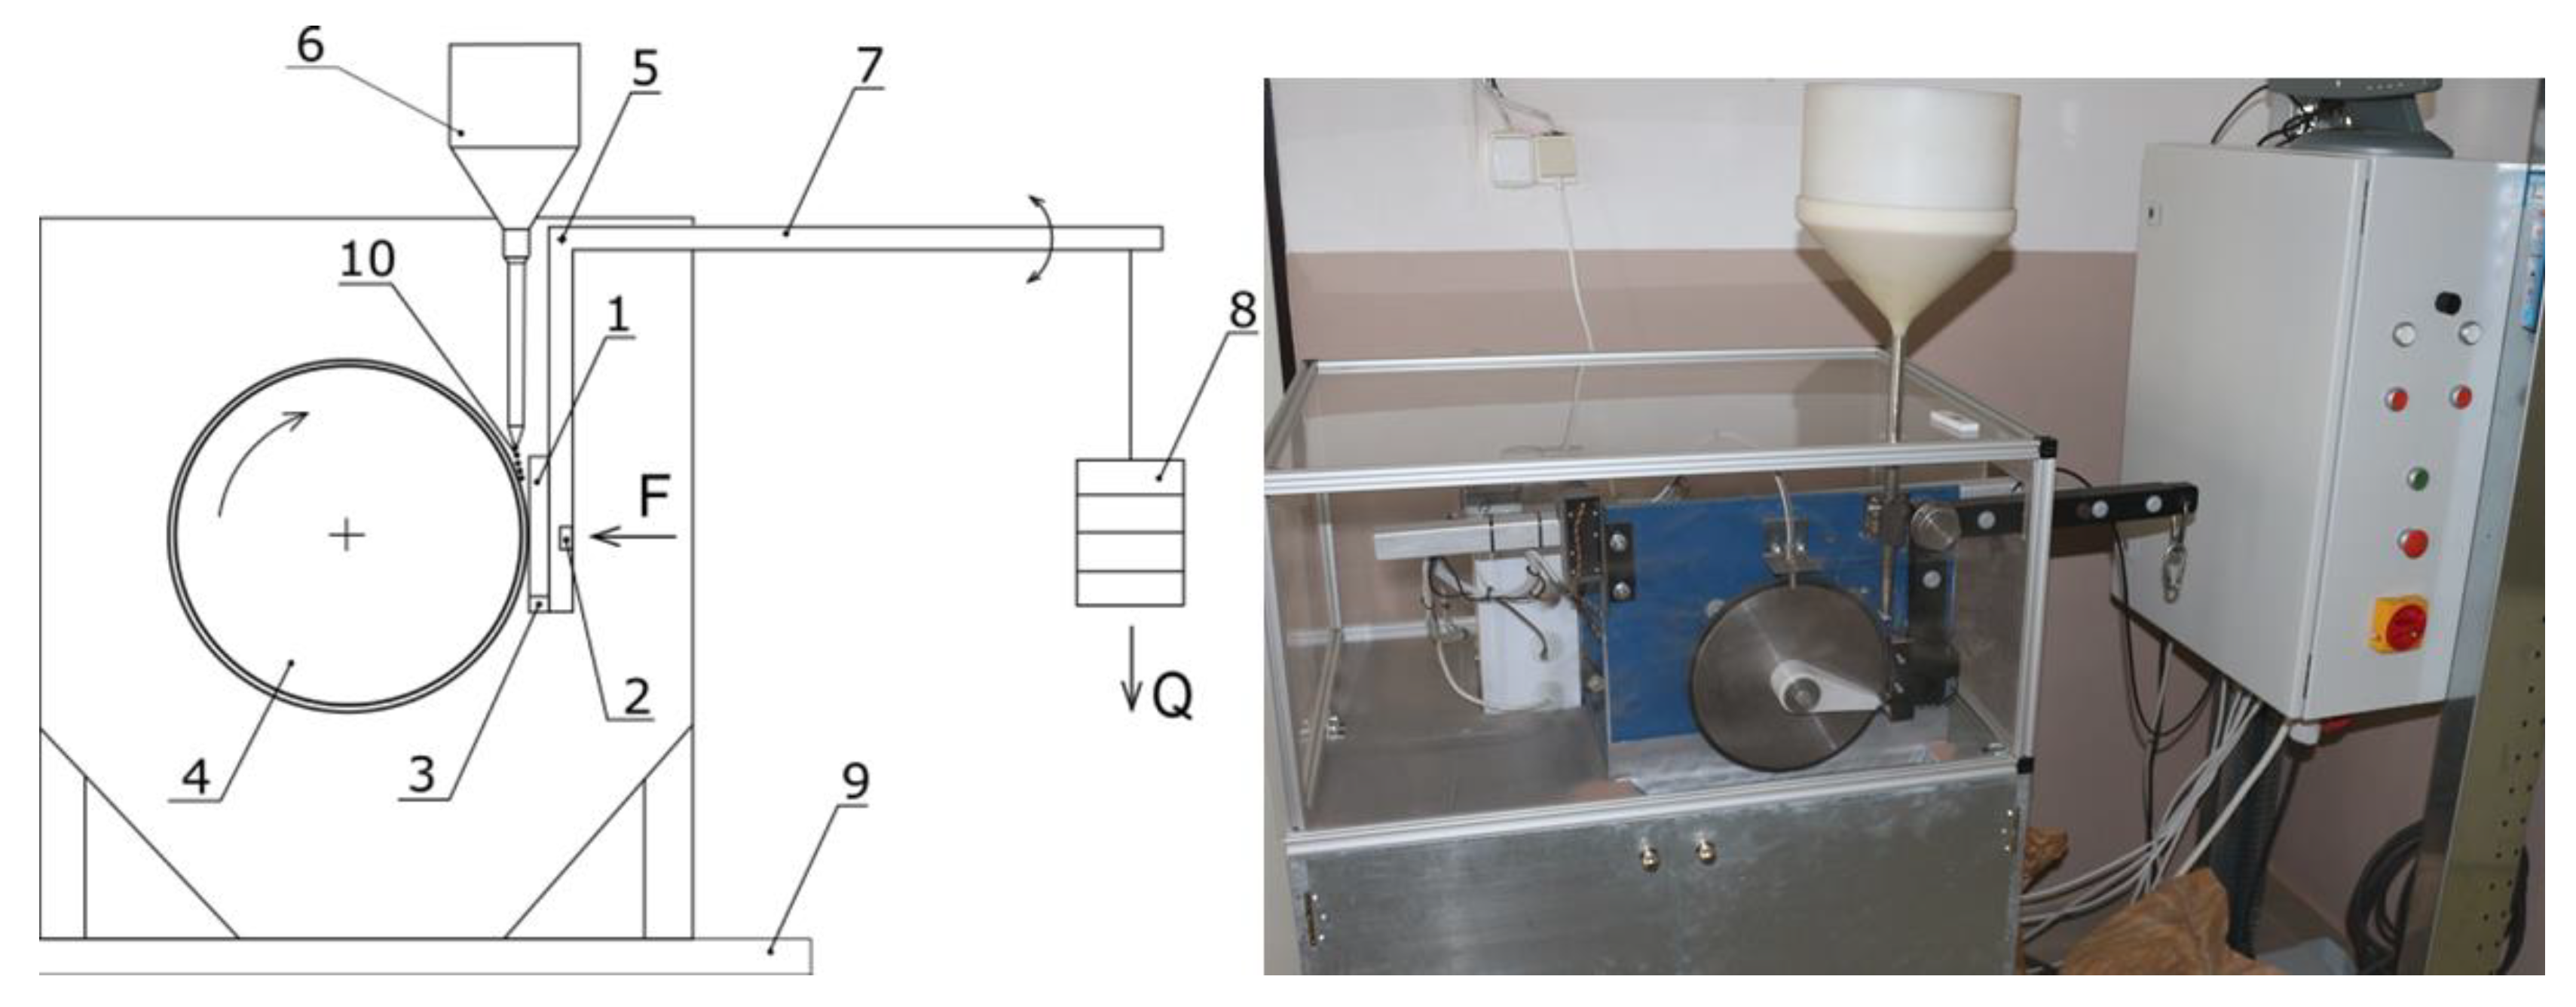
The testing apparatus (
Figure 1) contains a tribological pair consisting of a rotating disc and a specimen mounted in a holder.
In a tribometer with a rotating rubber disc, abrasive wear conditions are created by particles (10) which are discharged from a reservoir (6) between the sample (1) and the rotating disc (4).
During testing, the wear rate of the surface layers is monitored as a function of the sliding path and load. At the same time, the effect of different abrasive particles on the wear of the specimens can be investigated. It is possible to change the load magnitude and the rotation speed of the wheel (so-called sliding speed). The load magnitude is generated by the load unit (5,7,8). The device allows samples with different physical and mechanical properties to be tested. During testing, the time history of the specimen temperature, normal force, friction force and sliding distance can be continuously recorded. The device can be set to automatically terminate the test after a certain number of rotations. The test process can be controlled and monitored via PC.
Prior to the testing process, it is possible to adjust the magnitude of the normal force by fixing and positioning the weight on the lever, whereby the normal force is measured using the force sensor (2) which is located in the arm (7). The arm holding the test specimen is pivotally mounted by means of a pin (5). To measure the frictional force between the specimen (1) and the rotating disc (4), a frictional force sensor (3) is located in the load (8). The control of the sliding speed (rotation) is re-a-lised based on the desired value of the time course of the movement or the number of cycles. The advantage of this technical solution is that it has the ability to record the friction force, the normal force and the temperature of the sample and to convert this data into a tabular form.
Figure 2 shows a schematic of the flow and extent of data acquisition and processing.
2.2. Experimental parameters
Experimental measurements were carried out according to ASTM G65/16 (Standard Test Method for Measuring Abrasion Using the Dry Sand/Rubber Wheel Apparatus) at an ambient temperature of 21°C and relative humidity of 64%.
To determine the wear rate as a function of specimen build direction and orientation of the deposition paths, 9 tests were performed for specimens with X orientation and 9 tests for specimens with Z orientation, using Garnet Fe
3Al
2 (SiO
4)
3 abrasive. The same rubber disc was used for all tests to eliminate any differences in the chemical composition or hardness of the rubber. As a basis for determining wear, the weight loss of the samples was determined by weighing the samples on a precision balance with an accuracy of 0.0001g before and after the test. The abrasive test results are reported as weight loss in grams for a particular test procedure according to the following formula [
34]:
The advantage of this technical solution is that it allows the recording of friction and normal force and temperature of the sample during the test. The machine parameter settings during the test are shown in
Table 1. [
34].
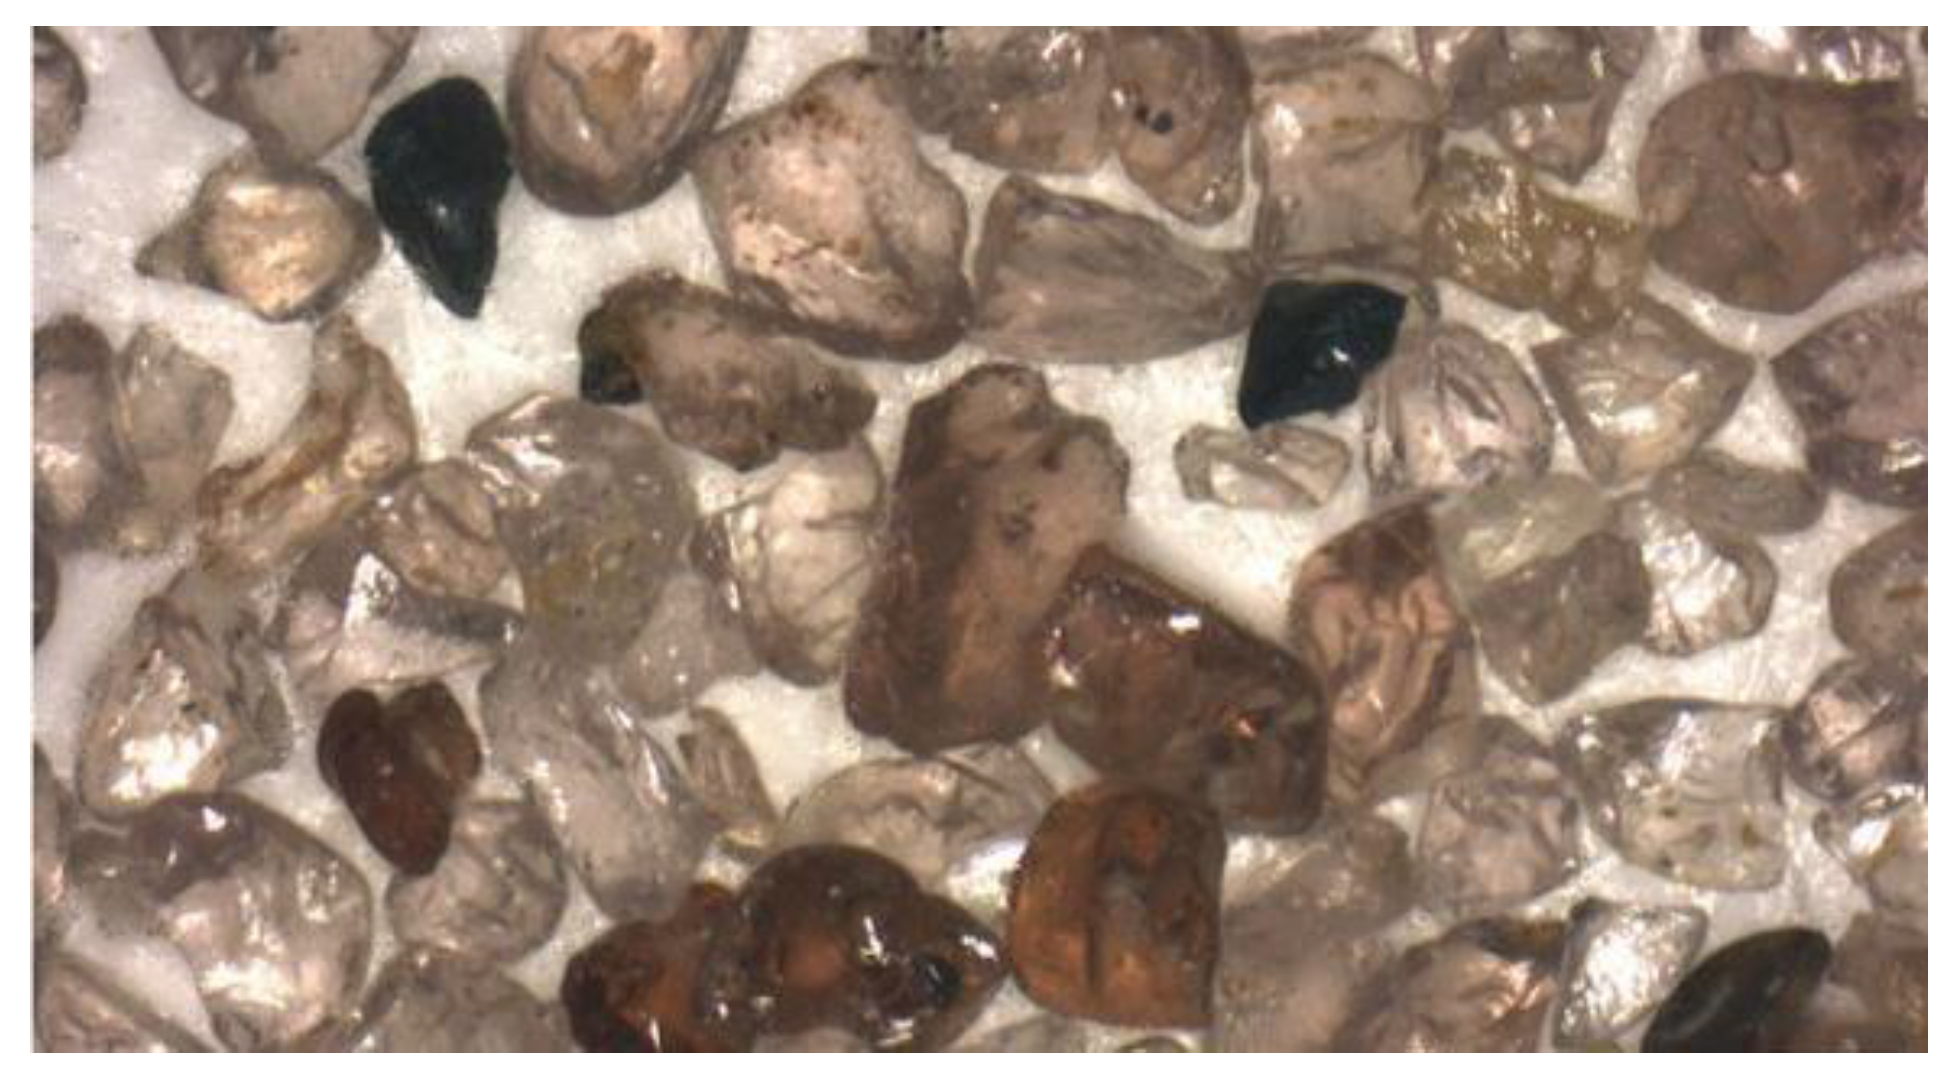
The three-point abrasive process involves loose particles that are free to move (abrasive). Garnet abrasive was used in this experiment. Garnet sand is a natural material [
34]. The composition of the abrasive used is shown in
Table 2.
Figure 3 shows a snapshot of the abrasive used.
2.3. Pre-processing and production of experimental samples
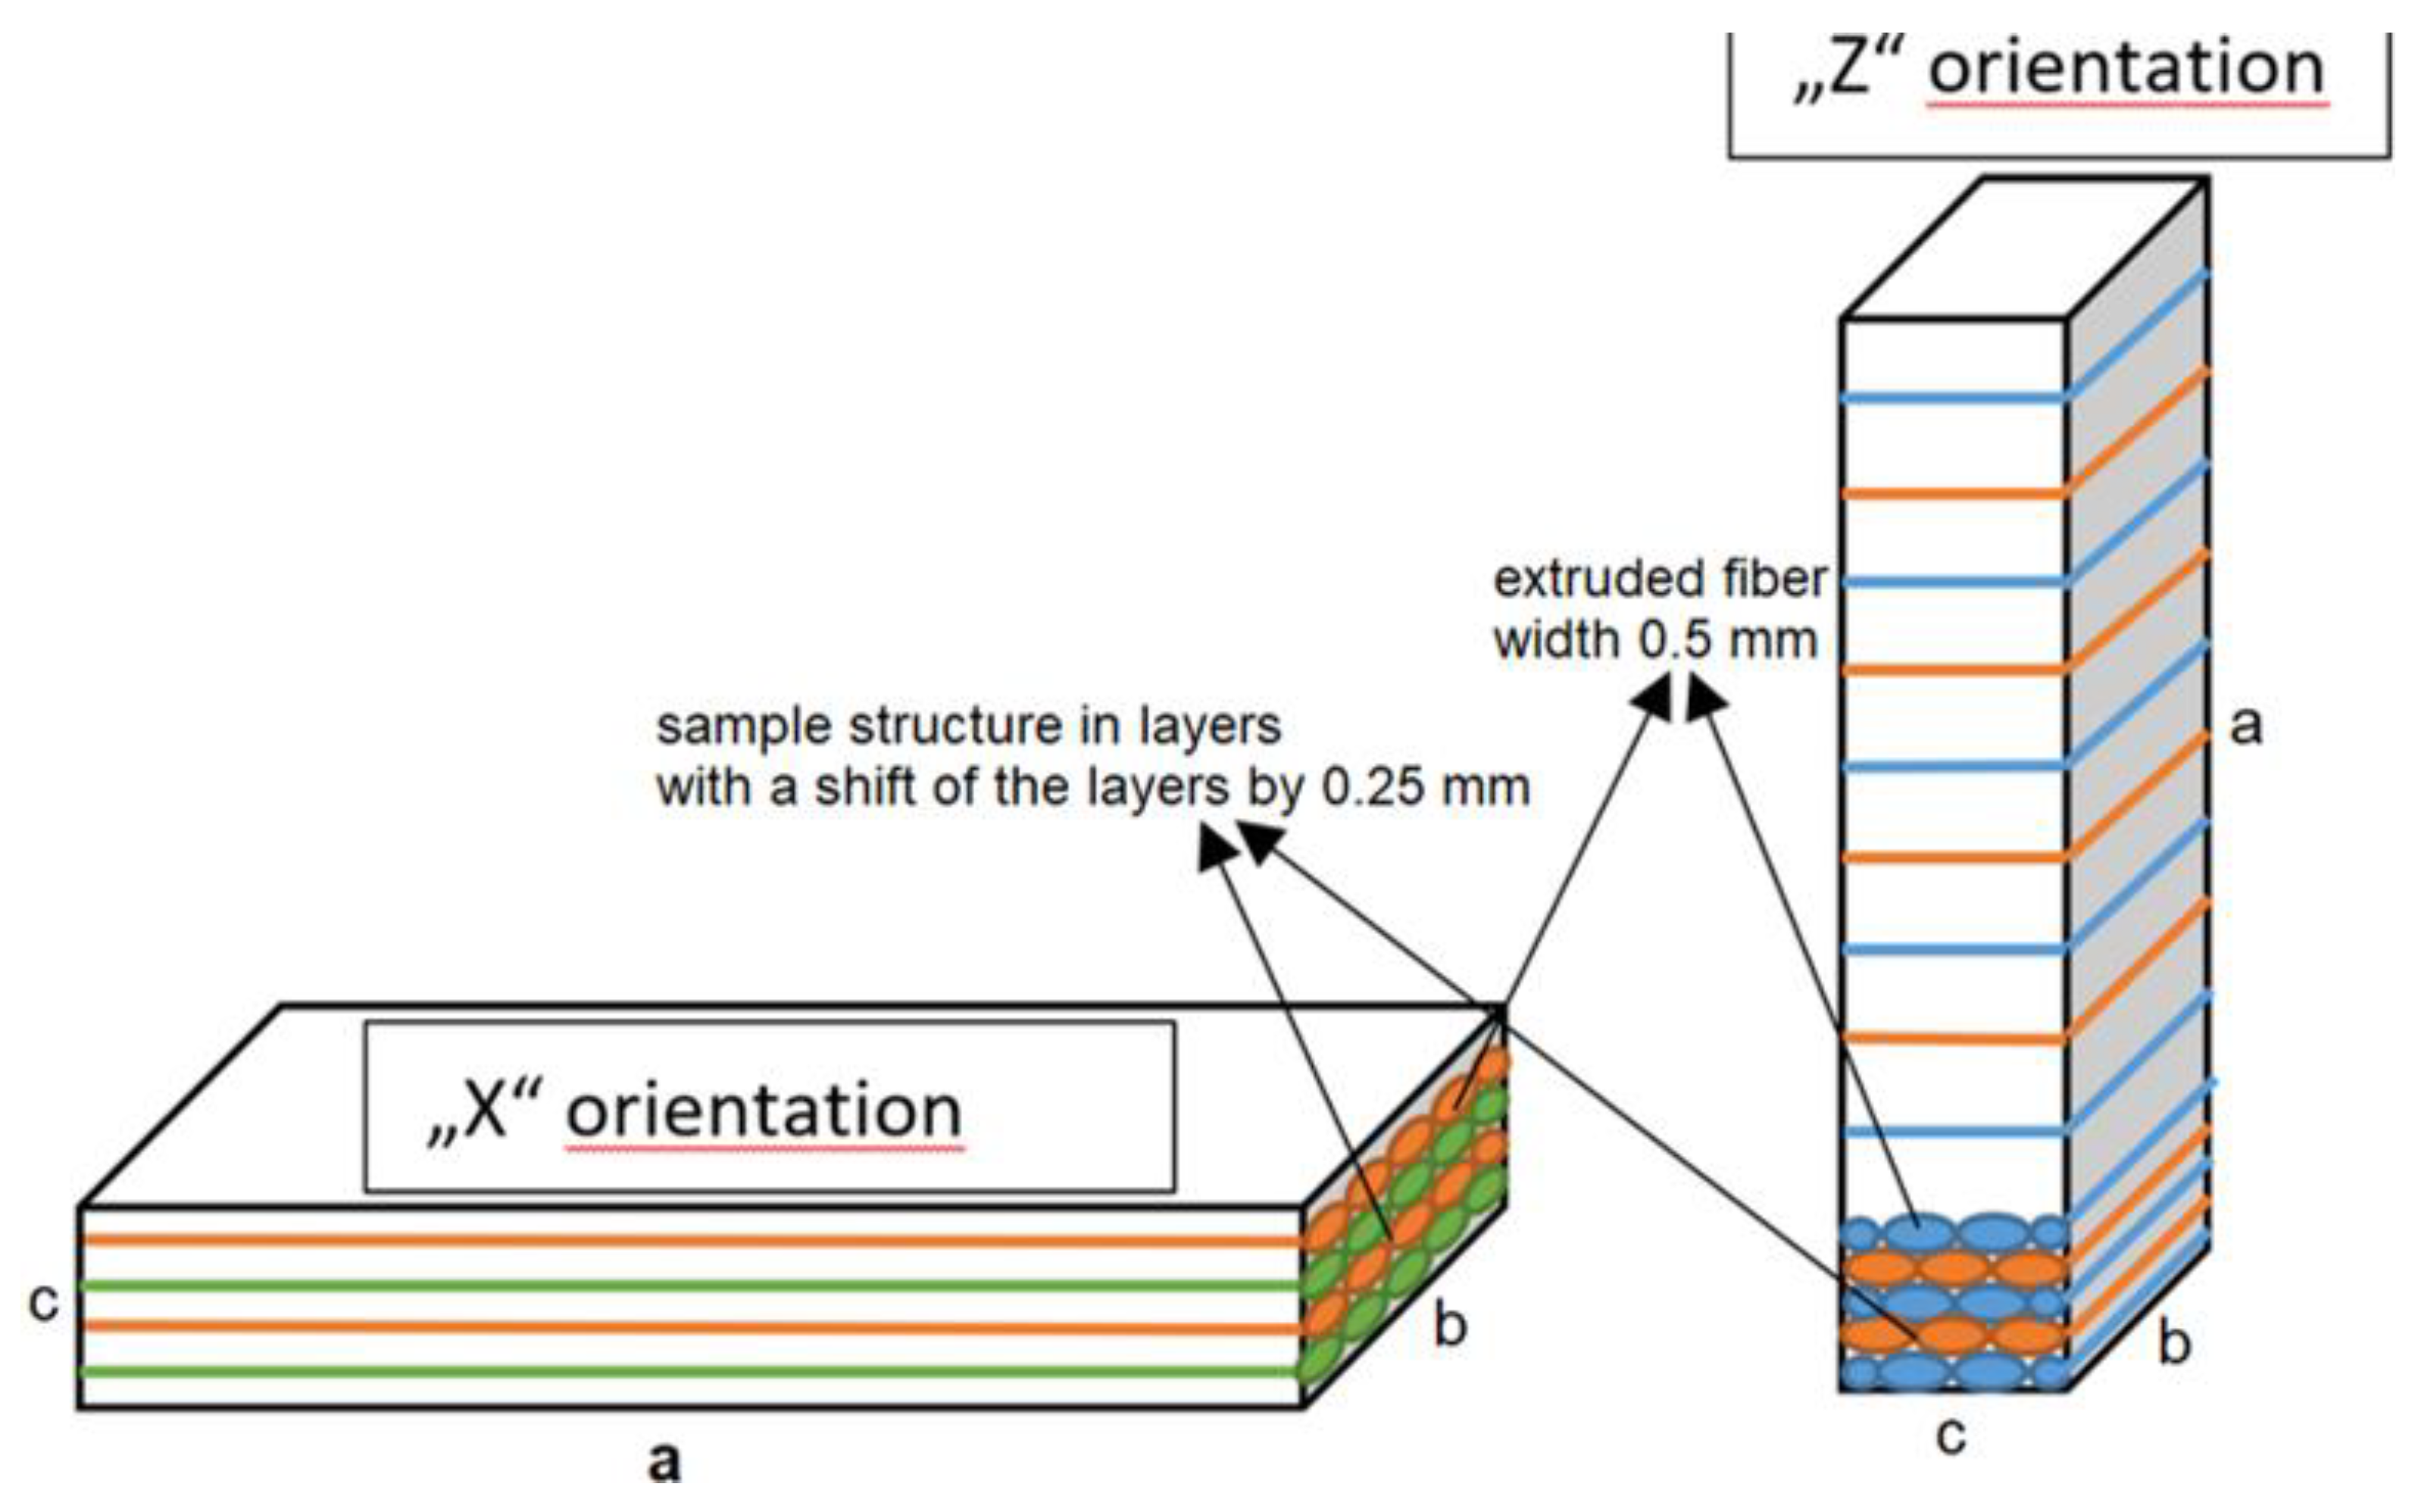
The samples were made from PEI polymer (ULTEM 9085) on a Fortus 400mc machine at 380°C nozzle temperature according to the scheme shown in
Figure 4. PEI is a high temperature resistant amorphous plastic with an amber-transparent coloration. The material meets the highest requirements for heat resistance (permanent operating temperatures from 170°C are possible depending on the application and type) and at the same time, thanks to its chemical composition, it slows down combustion without the addition of further flame retardants and at the same time with very low smoke generation. It has a very high strength, which can be increased by adding glass or carbon fibers. The wide range of material properties is complemented by an above-average dimensional stability and a low tendency to creep. All these properties make the material an ideal candidate for the automotive and aerospace industries. Thermoplastic is also popularly used in the telecommunications and medical technology sectors.
The specimens were in the shape of a 70*20*6mm block (a*b*c), and the contact surface in contact with the rotating disc was the wall of the specimen with a dimension of 70*20mm (
Figure 4). The strategies used in the sample construction are shown in
Figure 4, where the alternating layers (XY plane) when printing the sample were at the same angle but with a shift of the printing nozzle by 0.25mm which provided a better filling of the sample volume and a denser structure [
35]. The same construction procedure was used for both orientations.
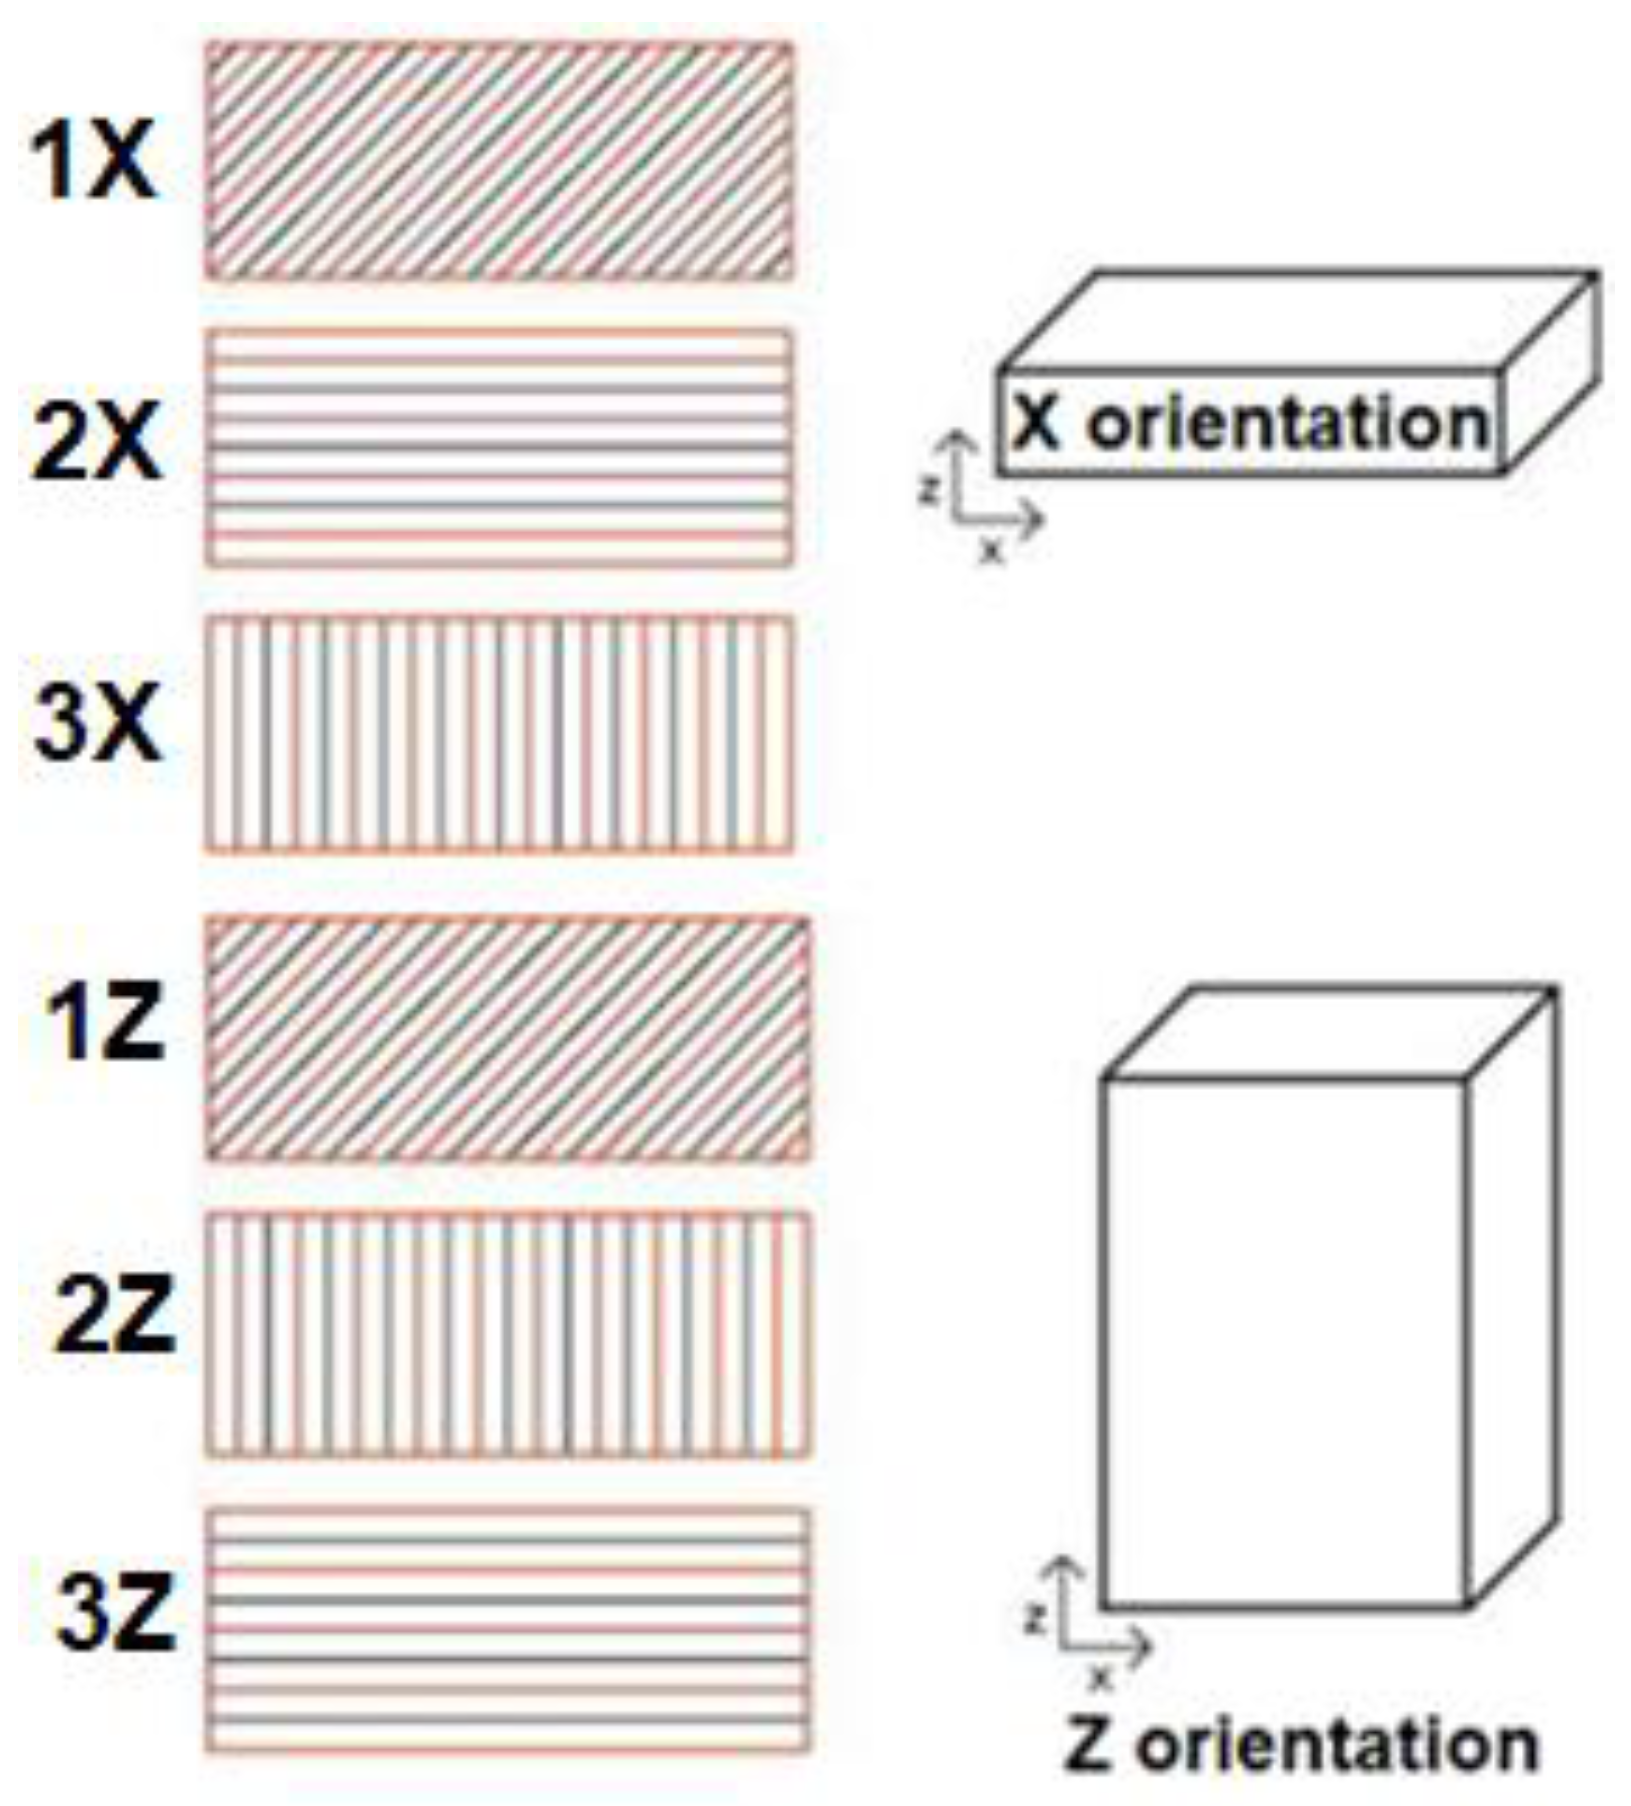
Figure 5 shows the method of sample formation in alternate layers. In this experiment, the alternating layers were formed at the same angle in the sample construction, but with the deposition path axis shifted relative to each other in the direction perpendicular to the deposition direction by 0.25mm. The even and odd layers are color-resolved in this view. The odd layer is marked in blue. The odd layer is marked in orange. The 1X, 2X and 3X samples are deposited with the orientation of the construction marked as X. Samples 1Z, 2Z and 3Z are deposited with the construction orientation marked Z.
In the abrasive wear resistance test, three types of path deposition orientation were used to construct the specimen in the X and Z directions, on which the material weight loss was investigated.
Table 3 shows the methods and angles of specimen formation.
3. Results
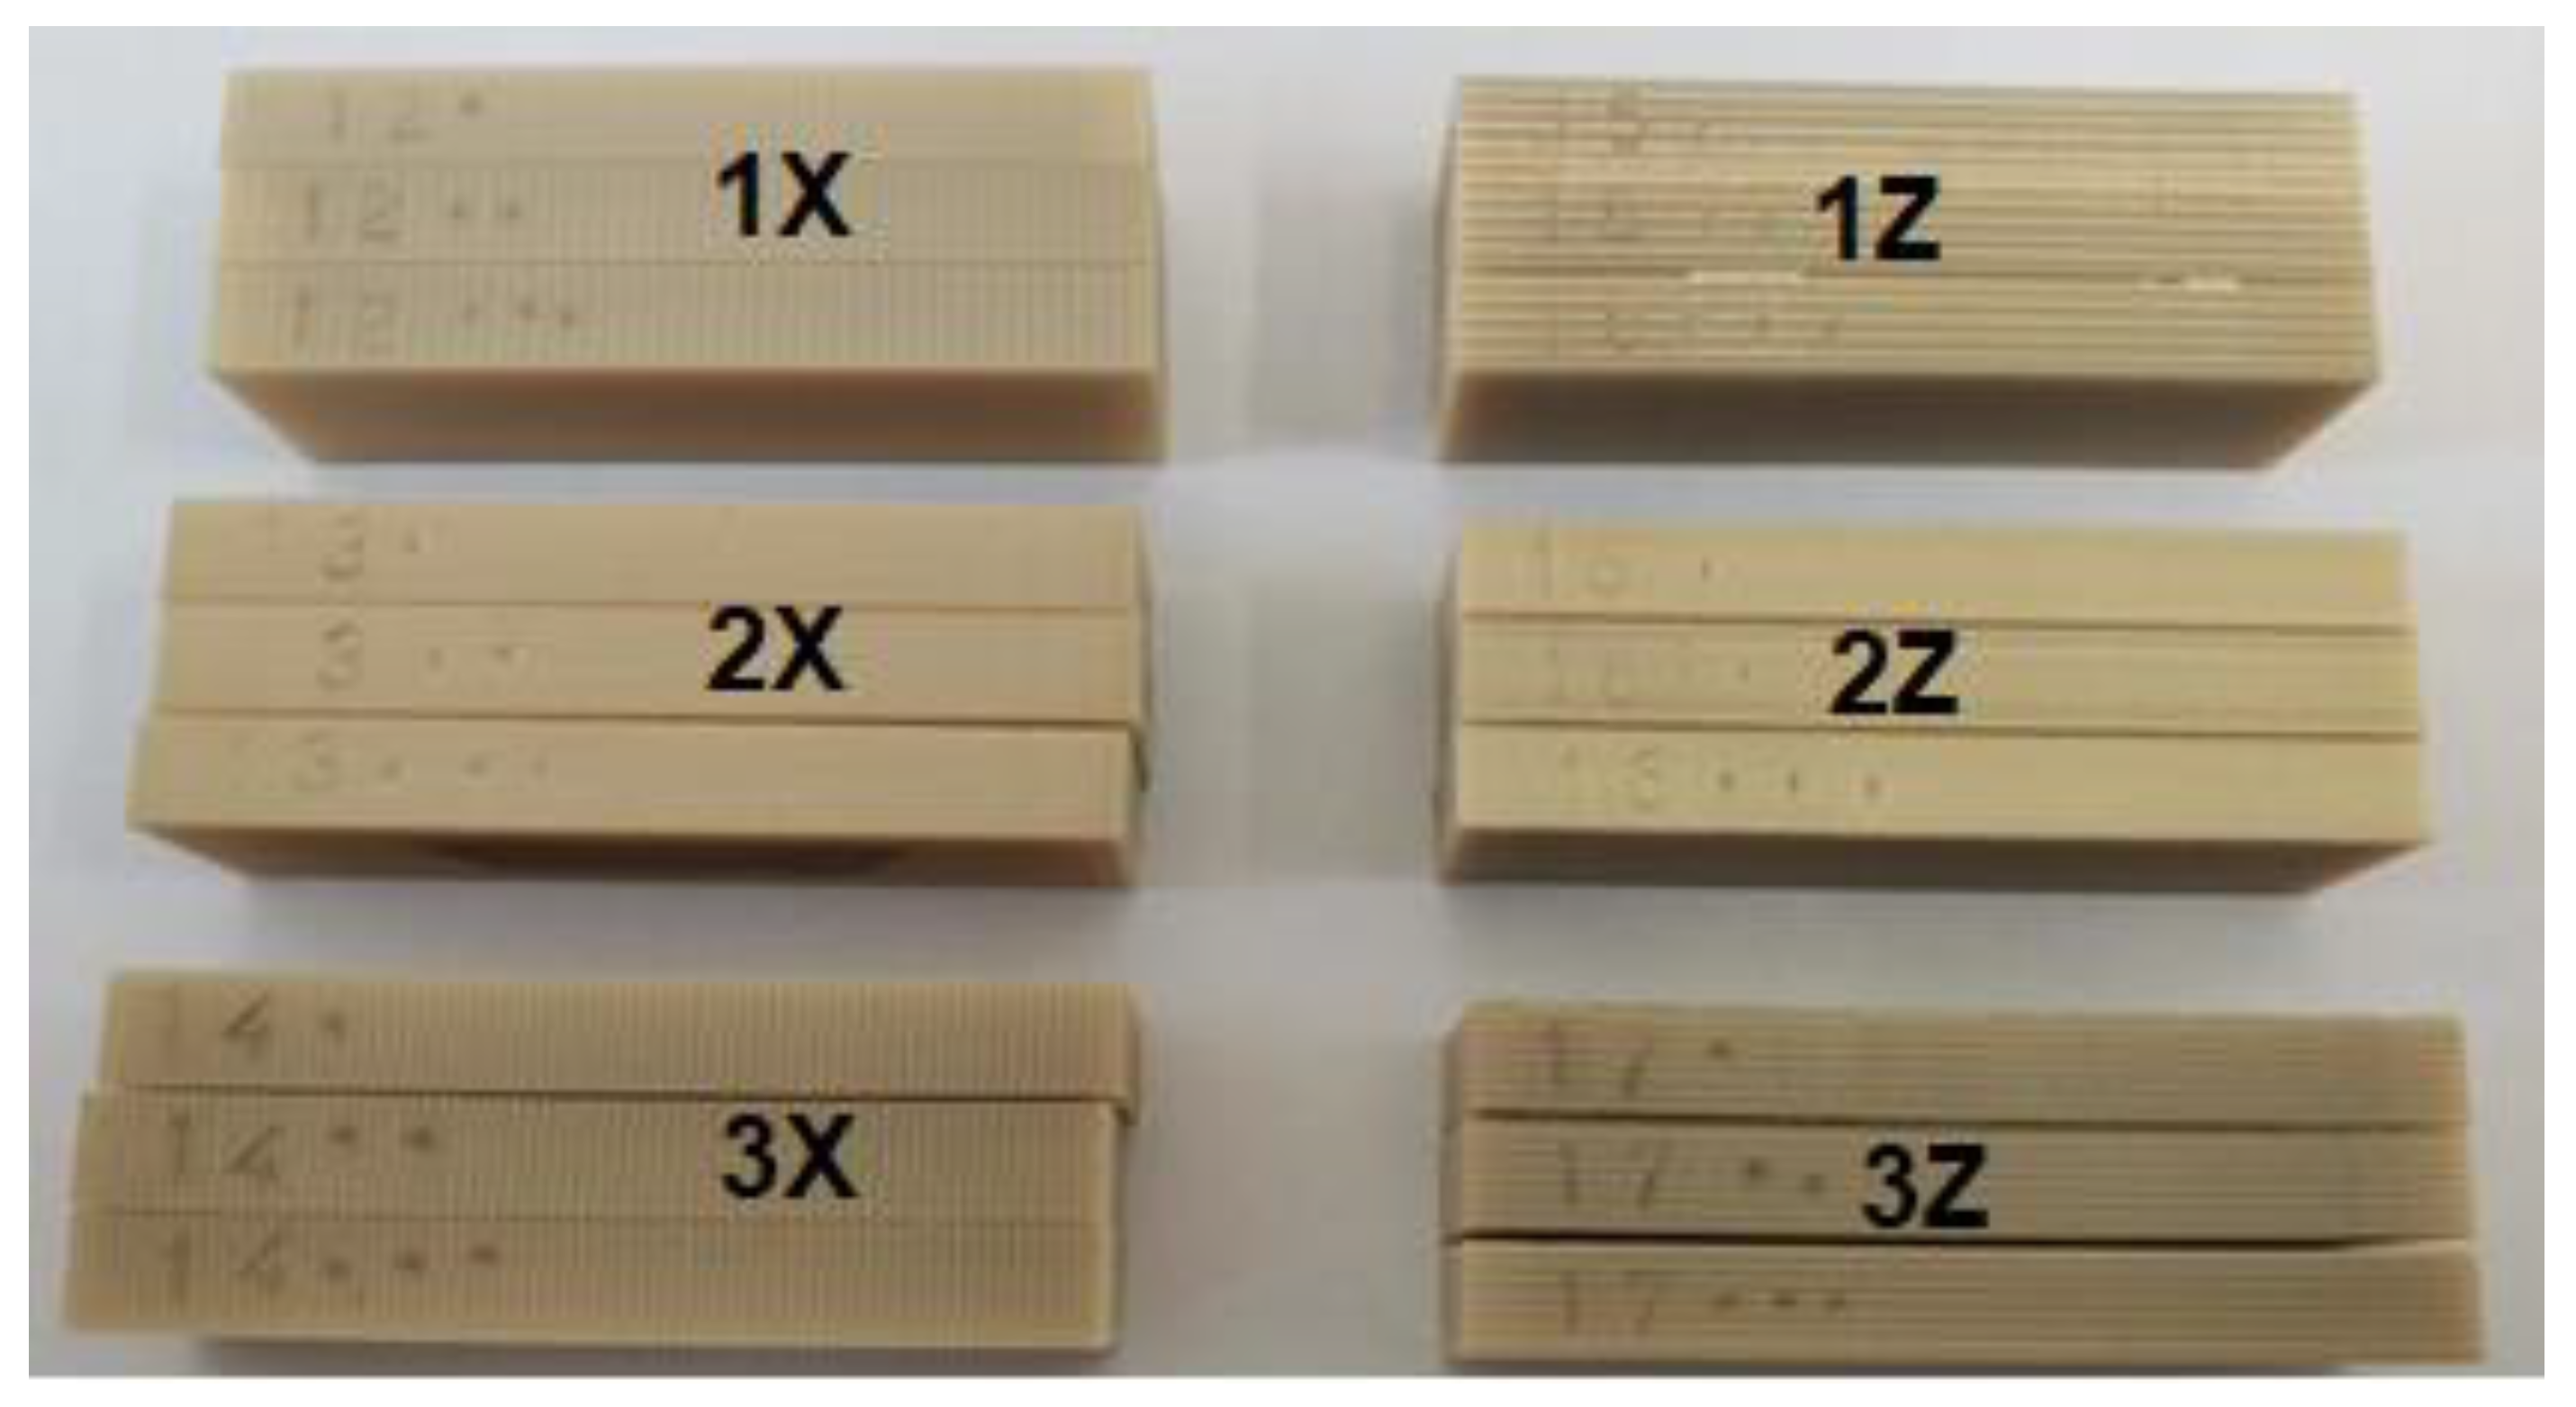
The experimental results were evaluated as the value of weight loss and friction force waveform as a function of the traveled path for different orientation of specimen construction by FFF process. Two orientations of specimen construction (X and Z orientation) were made for this experiment. For each orientation, three identical methods of path deposition and layer formation were used, up to the desired specimen size. Three samples were made from each method, thus a total of 18 samples tested (
Figure 6).
3.1. Comparison of 1X - 3X samples with the same path orientation without displacement in the intermediate layers of samples 2 - 4
The experimental results are presented as the weight loss of the sample as a function of the orientation of the path deposition.
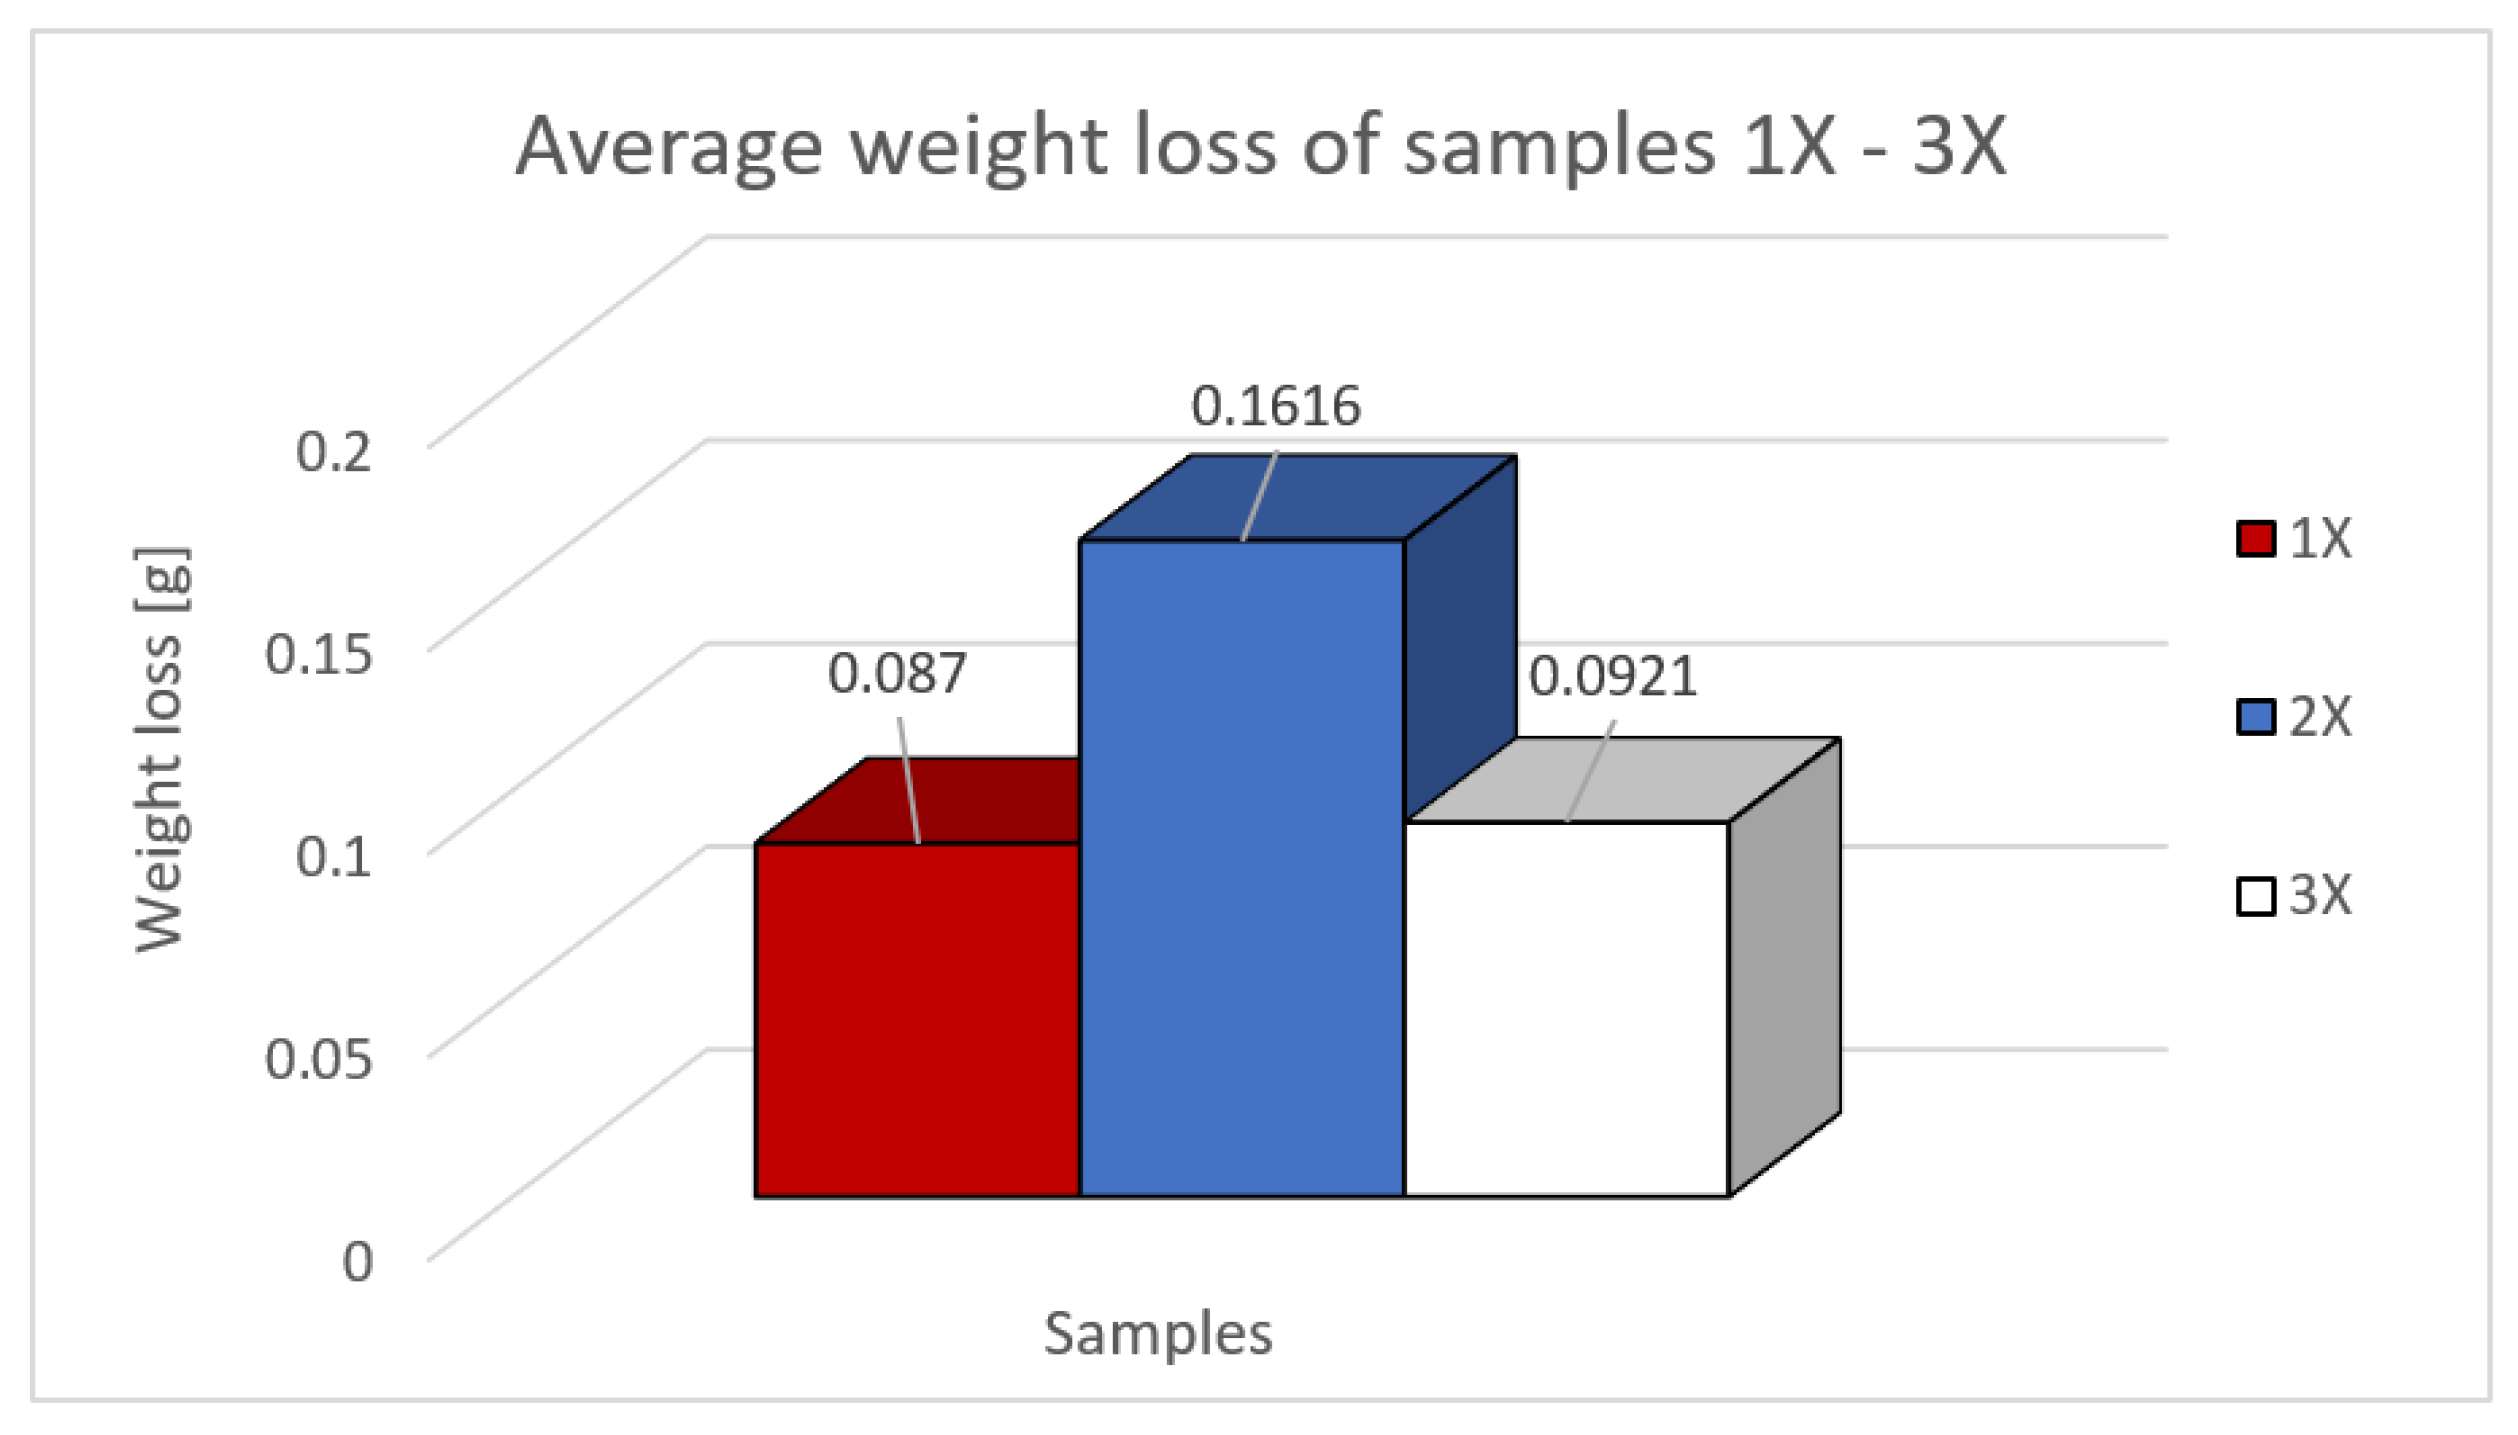
Table 4 shows the weight loss of the samples used and their average loss.
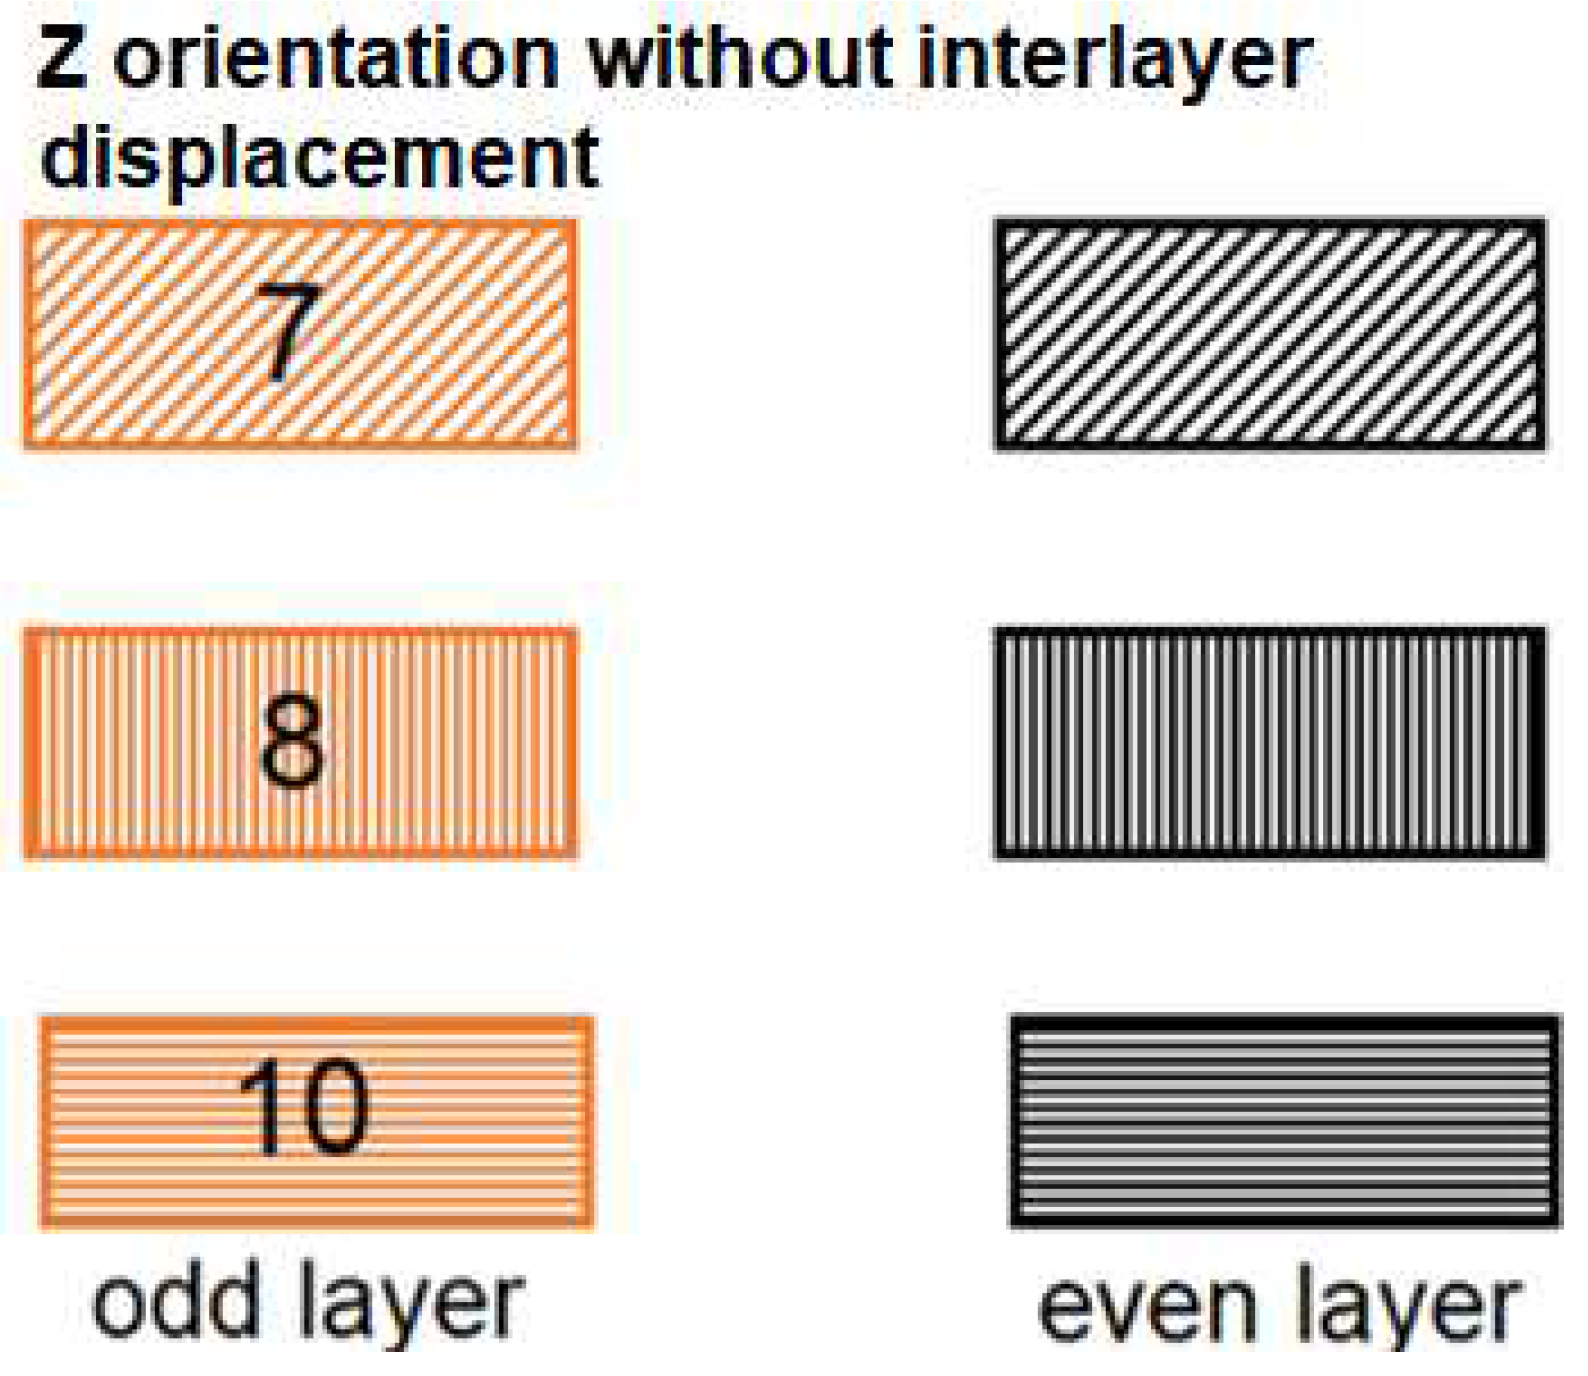
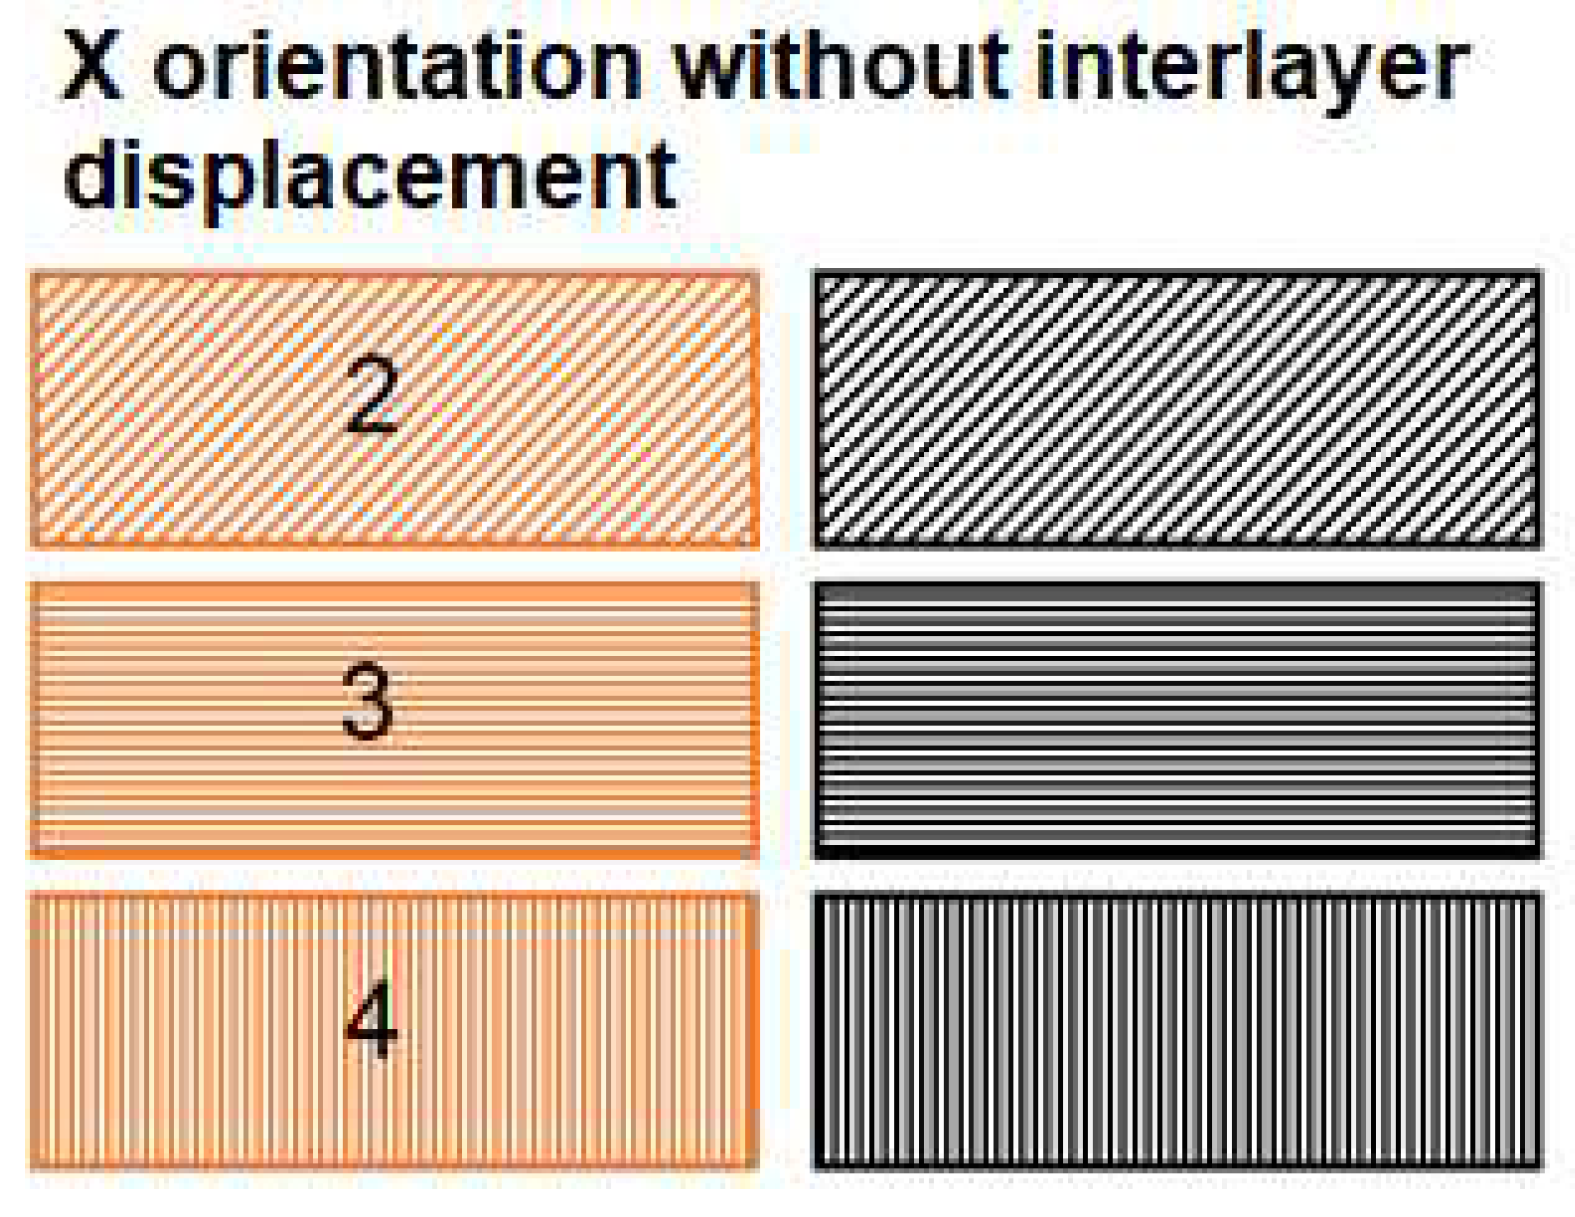
Figure 8 shows the orientation of the path deposition in odd and even layers in samples from study [
31] “Analysis of the selected technological parameters' in-fluence on tribological properties of products manufactured by FFF technology. These orientations are compared with newly produced samples with a denser structure. The denser structure was achieved by shifting the internalized layers by 0.25 mm, which ensured a higher weight of the printed samples in orientation X and thus a denser interlayered sample structure.
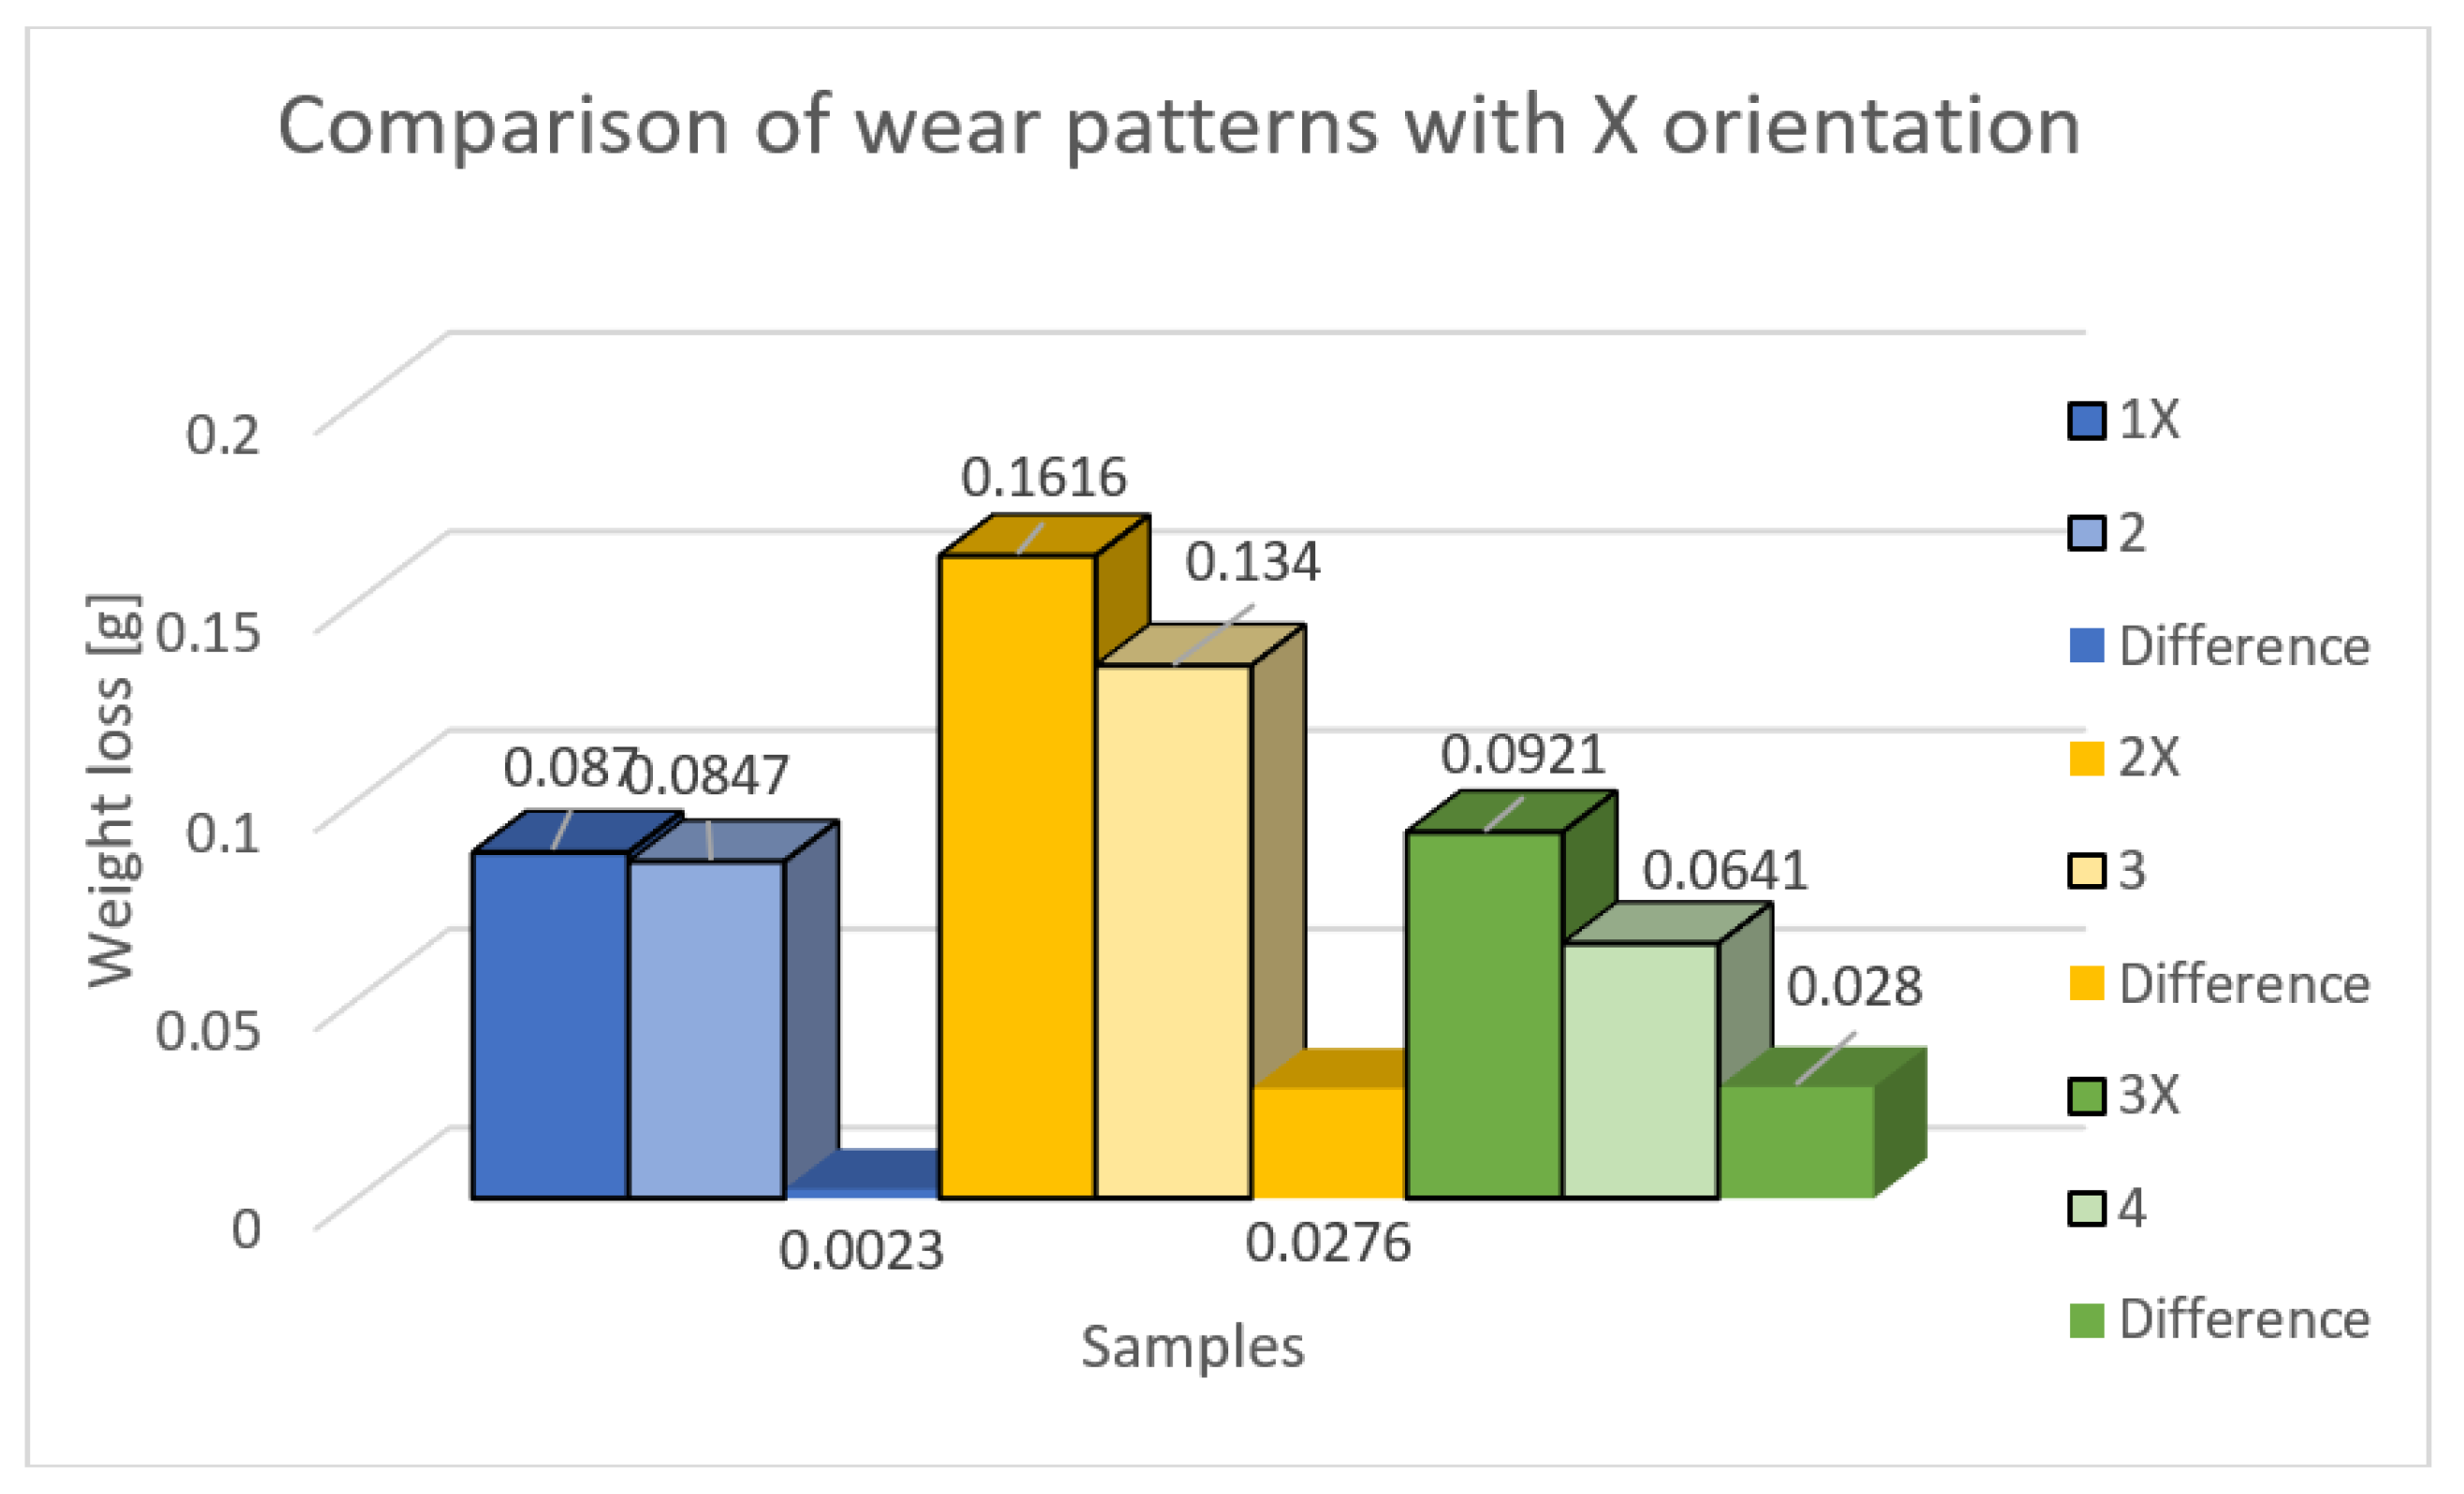
Table 5 shows the difference in mass loss of specimens with X orientation during abrasive wear with and without 0.25 mm displacement in the alternate layers, i.e., the construction of the specimen layers was carried out by a system of depositing the deposited fibers perpendicular to each other.
Figure 9 shows a comparison of the mass differences of the specimens within the X orientation and the mass difference of material loss due to abrasive wear. The blue color shows the loss of samples 1X (new samples) and 2 (from the previous study). Within this orientation (45°), the specimen with a perpendicular construction system in alternate layers (fibers in alternate layers directly above each other) proved more durable with a percentage decrease in wear of 2.64% with a loss difference of 0.0023g. The yellow color shows the loss of samples 2X (new samples) and 3 (from the previous study). Within this orientation (0°), the specimen with a perpendicular construction system in alternating layers (paths in alternating layers directly and with each other) proved to be more durable with a percentage decrease in wear of 17.08% with a difference in loss of 0.0276g. Losses of 3X (new samples) and 4 (from previous study) samples are shown in green. Within this orientation (90°), the specimen with a perpendicular construction system in alternate layers (fibers in alternate layers directly and with each other) proved more durable with a percentage decrease in wear of 30.4% with a difference in loss of 0.0286g. As a result of this comparison, it was found that there was an increase in abrasive wear resistance for the specimens with a 0.25 mm offset of the alternating layers in the X orientation construction.
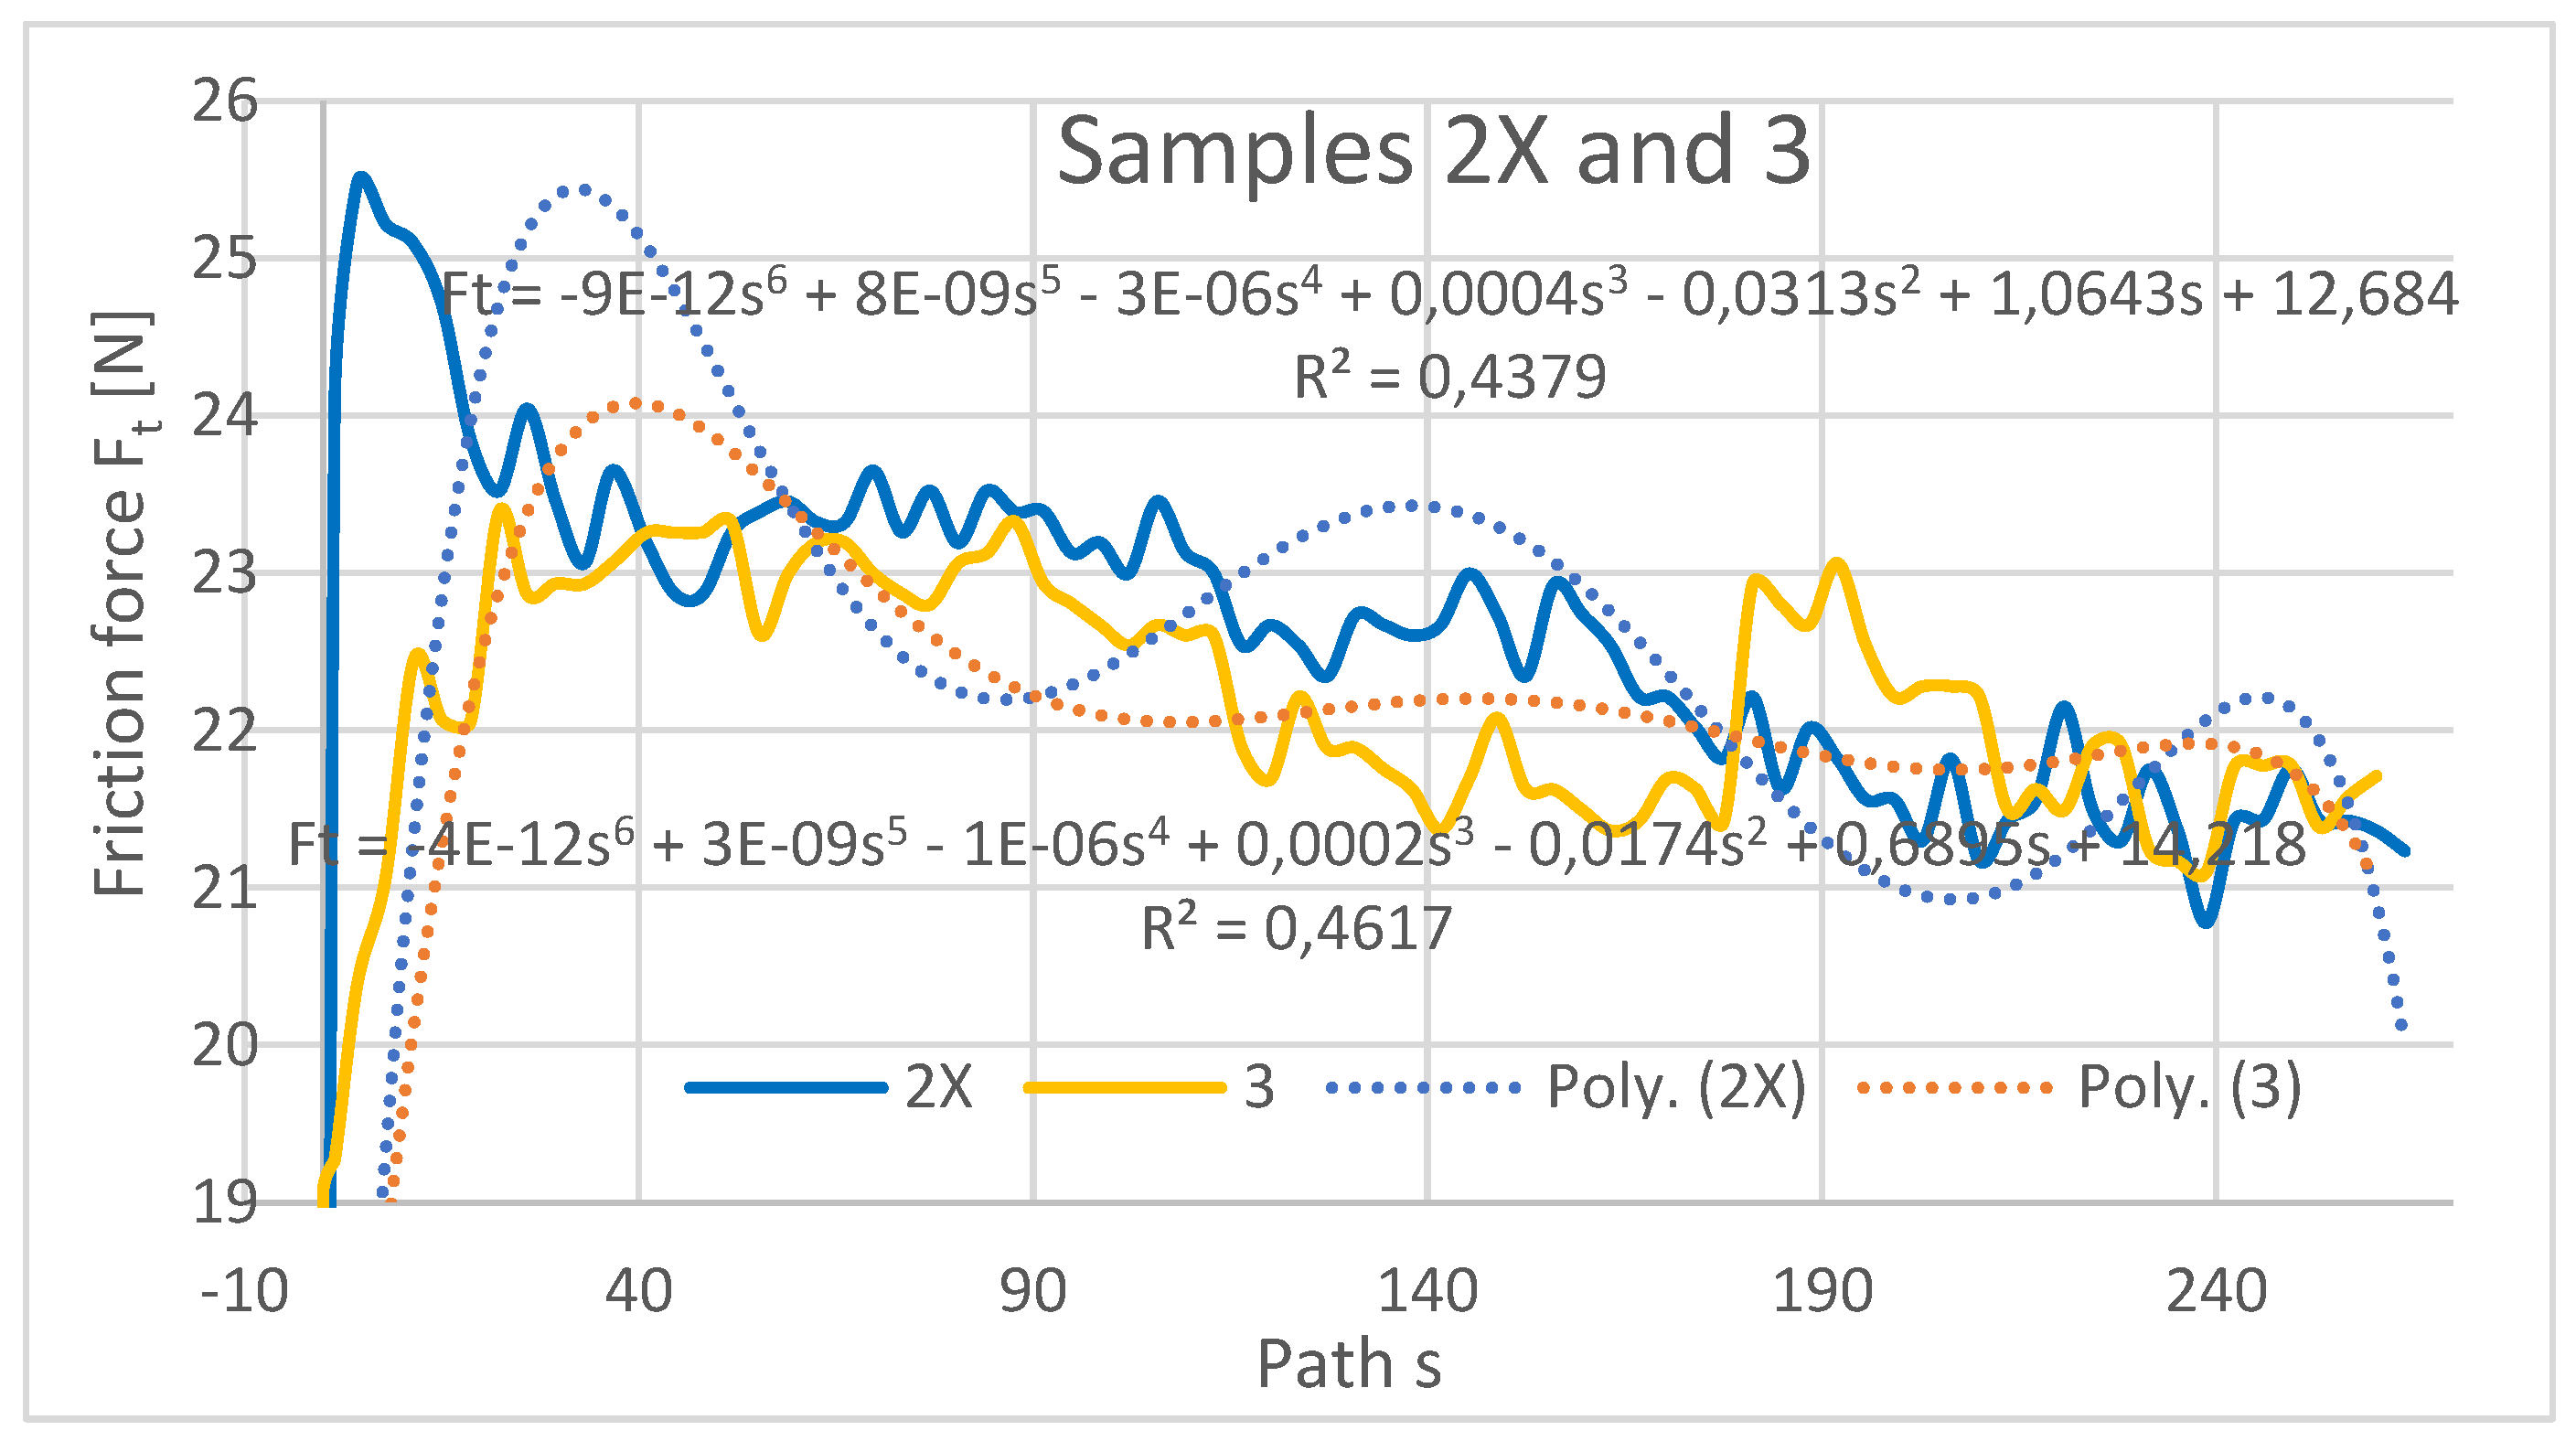
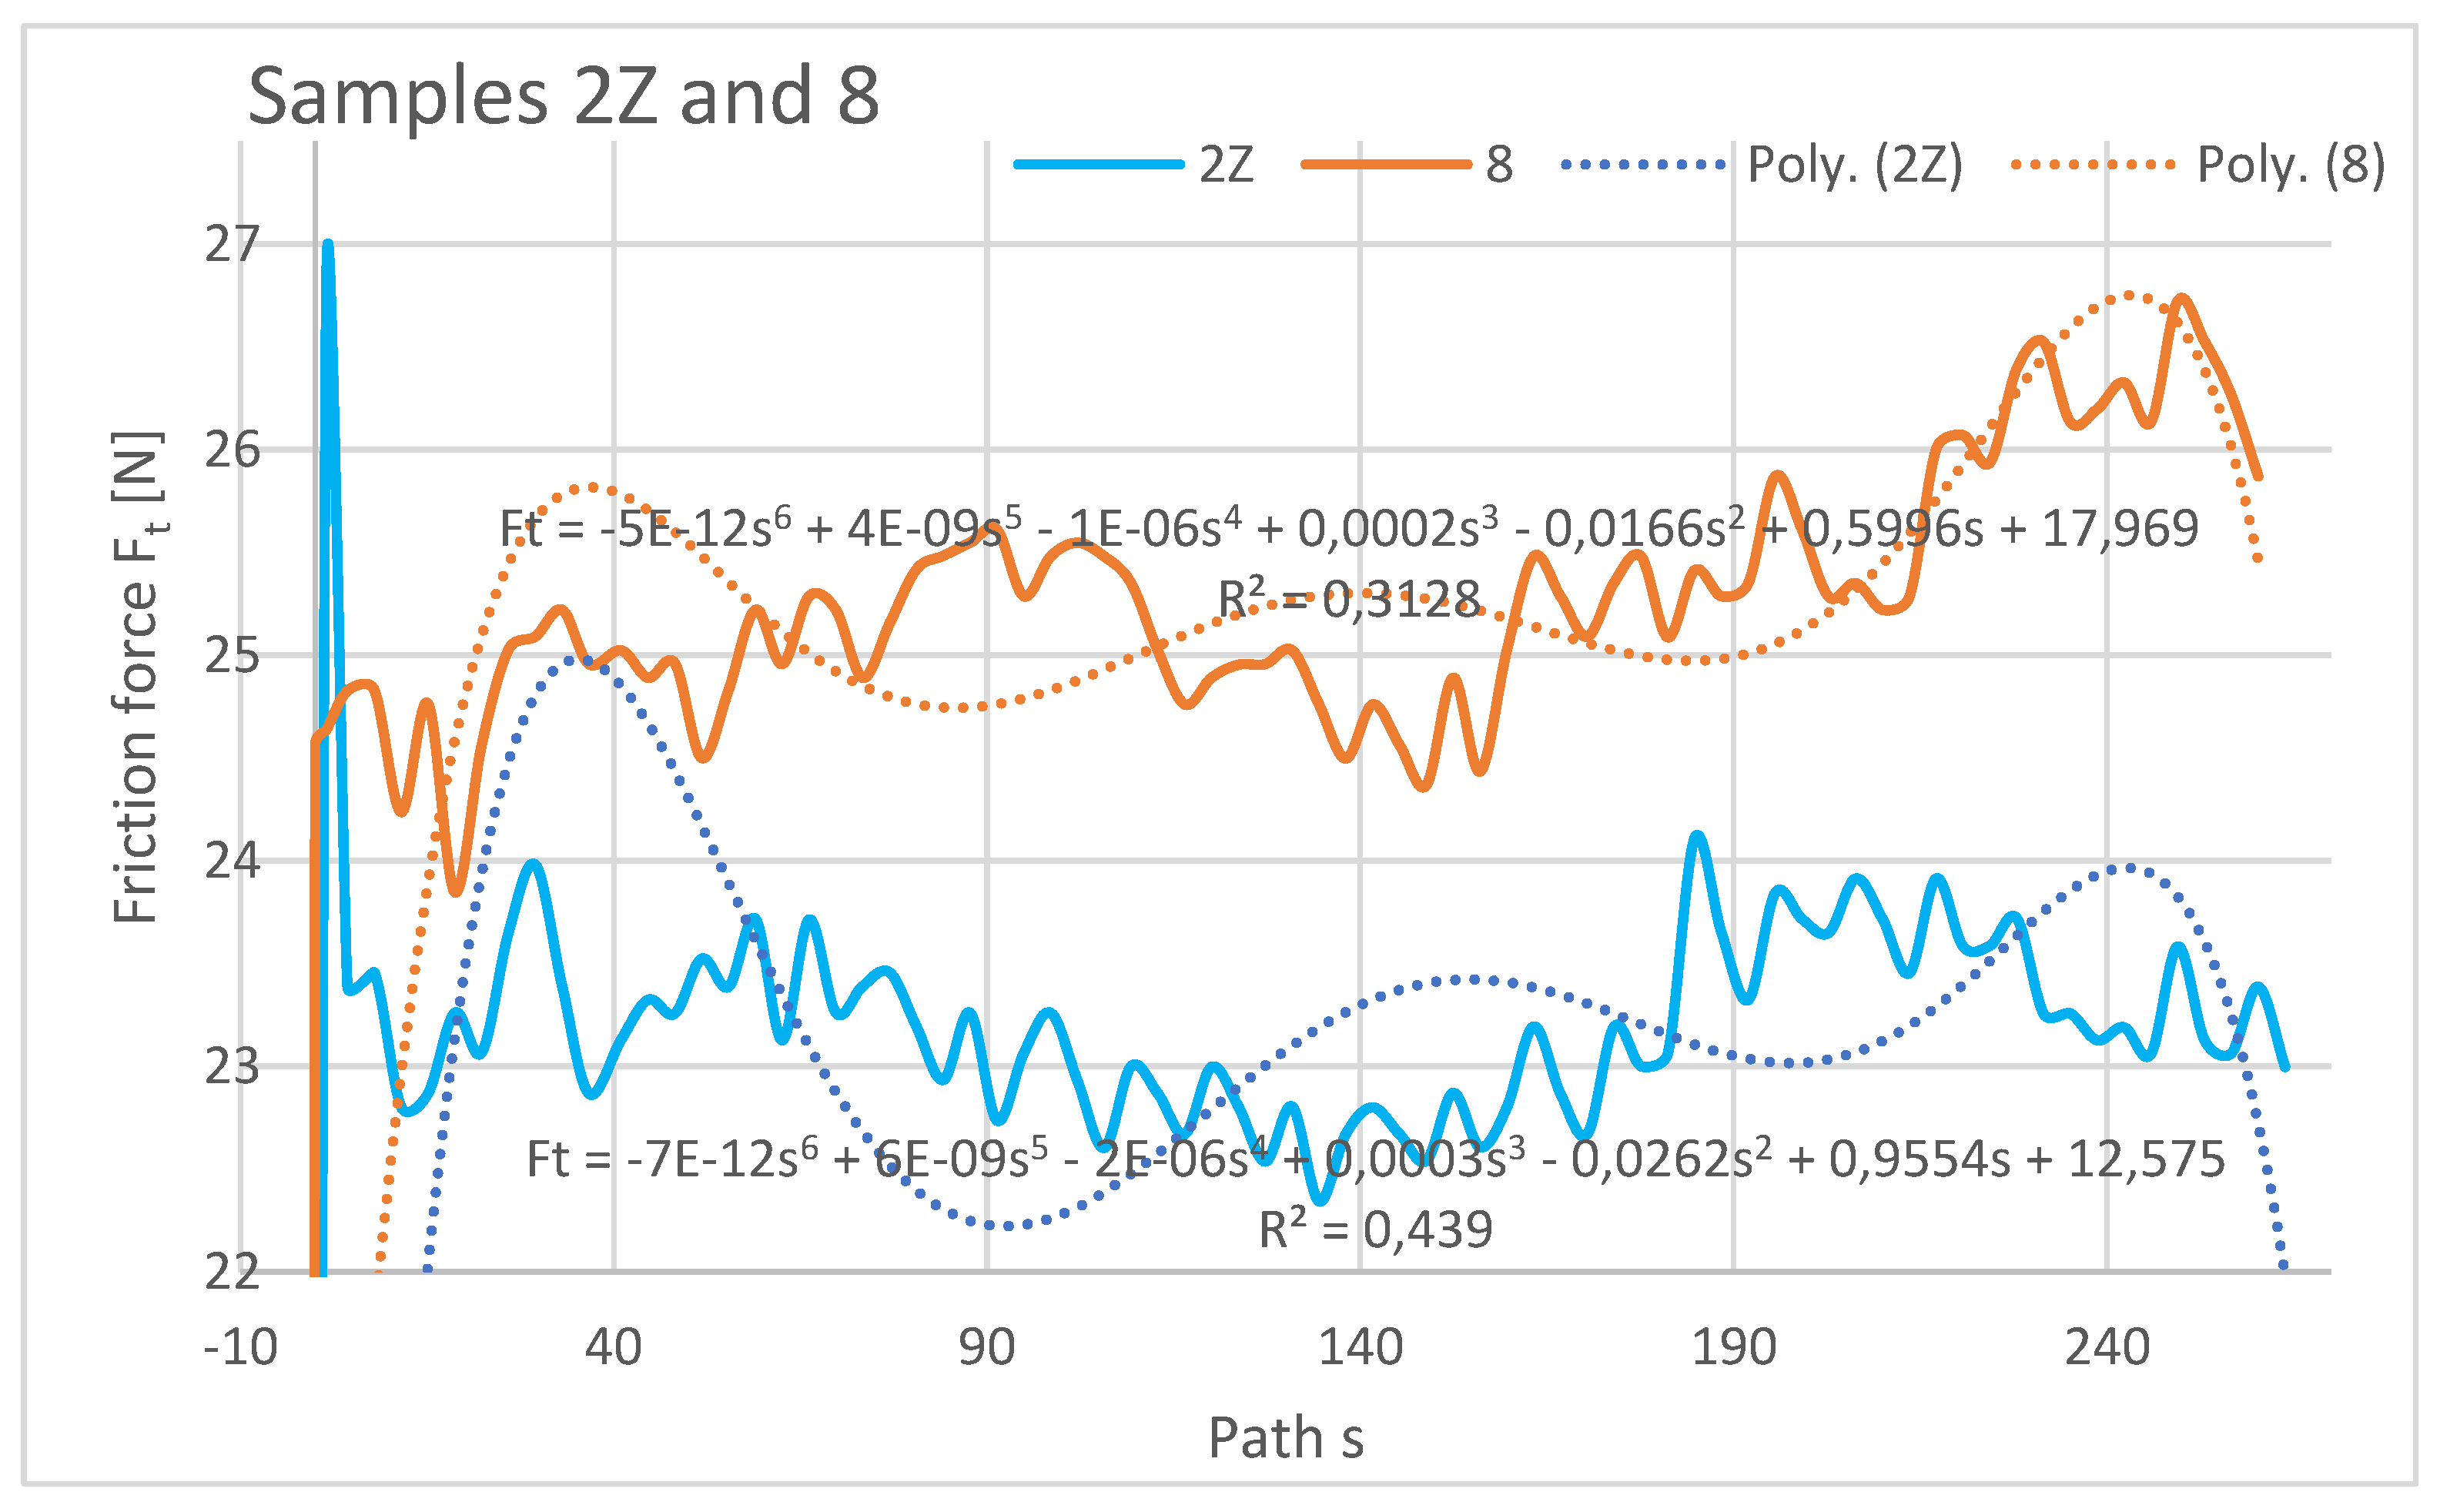
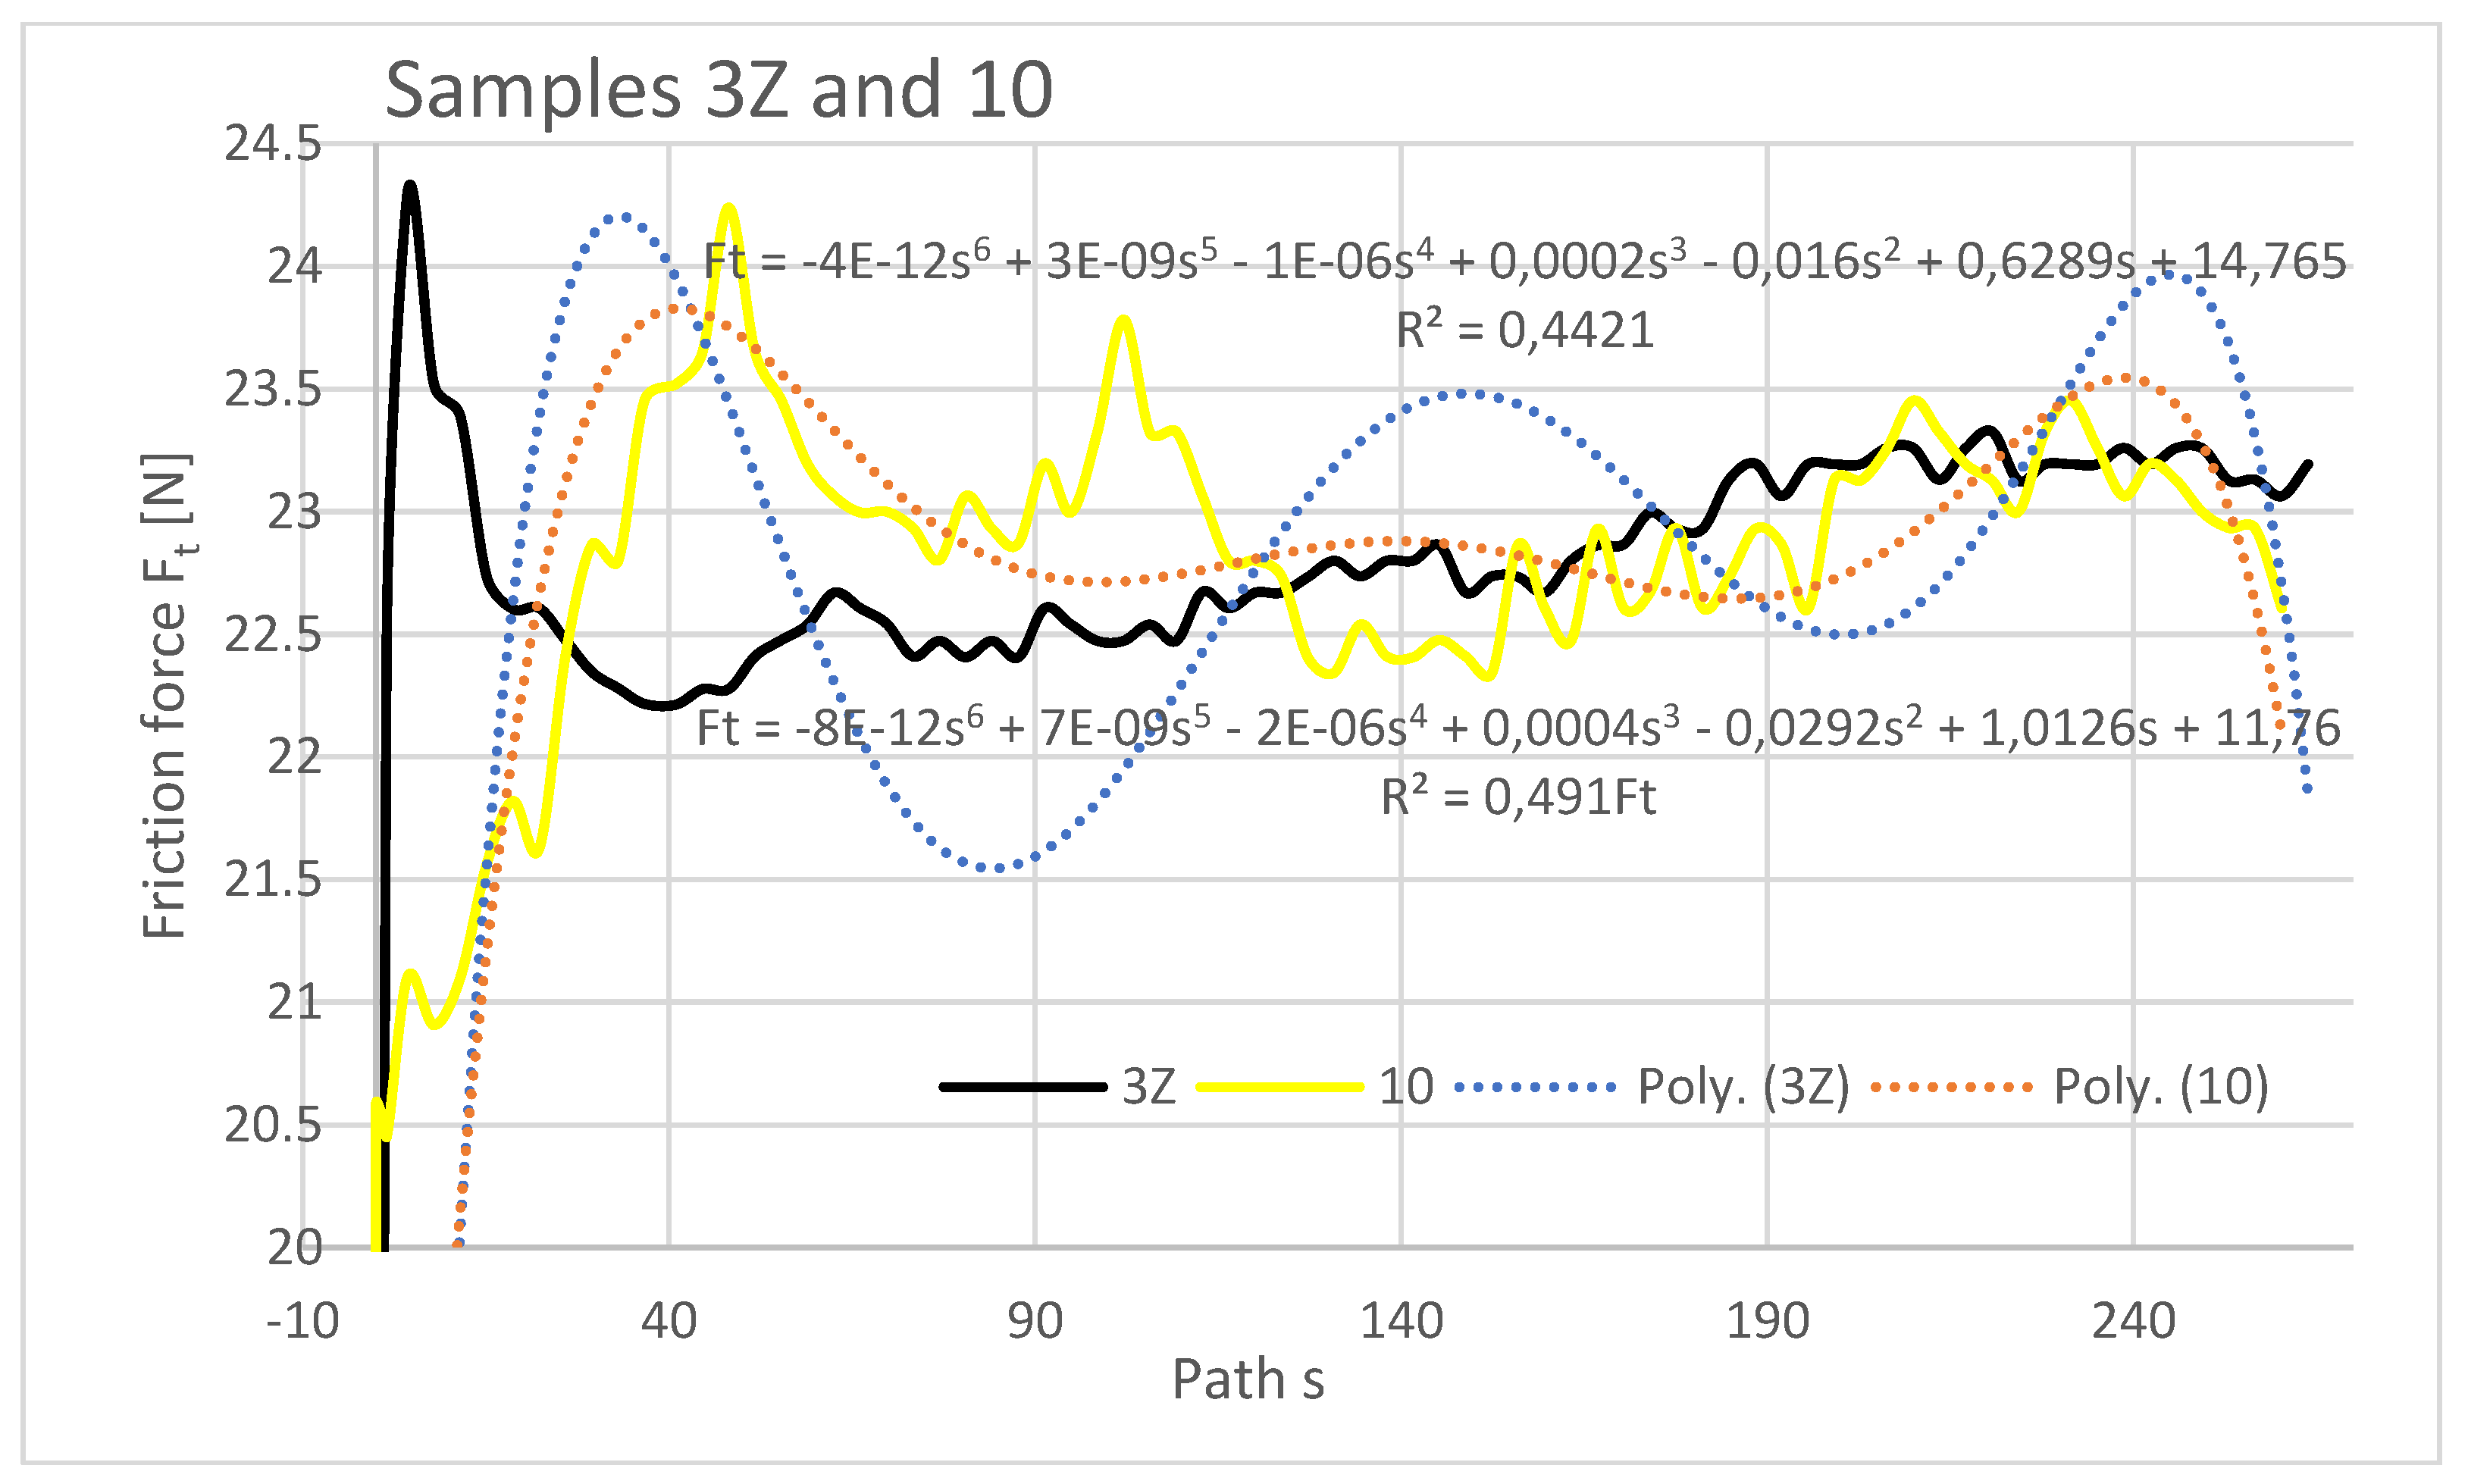
The friction force was also evaluated as a dependent variable in the evaluation of the experimental data as a function of the path of the rubberized disc. The frictional force was read directly from the tribometer output data, and its evolution depends on several factors such as the mechanical properties of the material, contact pressure and friction, chemical interactions of the materials in the three-contact tribosystem (disc, abrasive particles, specimen), and the contact time length. The resulting friction force curves are shown in
Figure 10,
Figure 11 and
Figure 12 and are processed into separate graphical dependencies for better clarity.
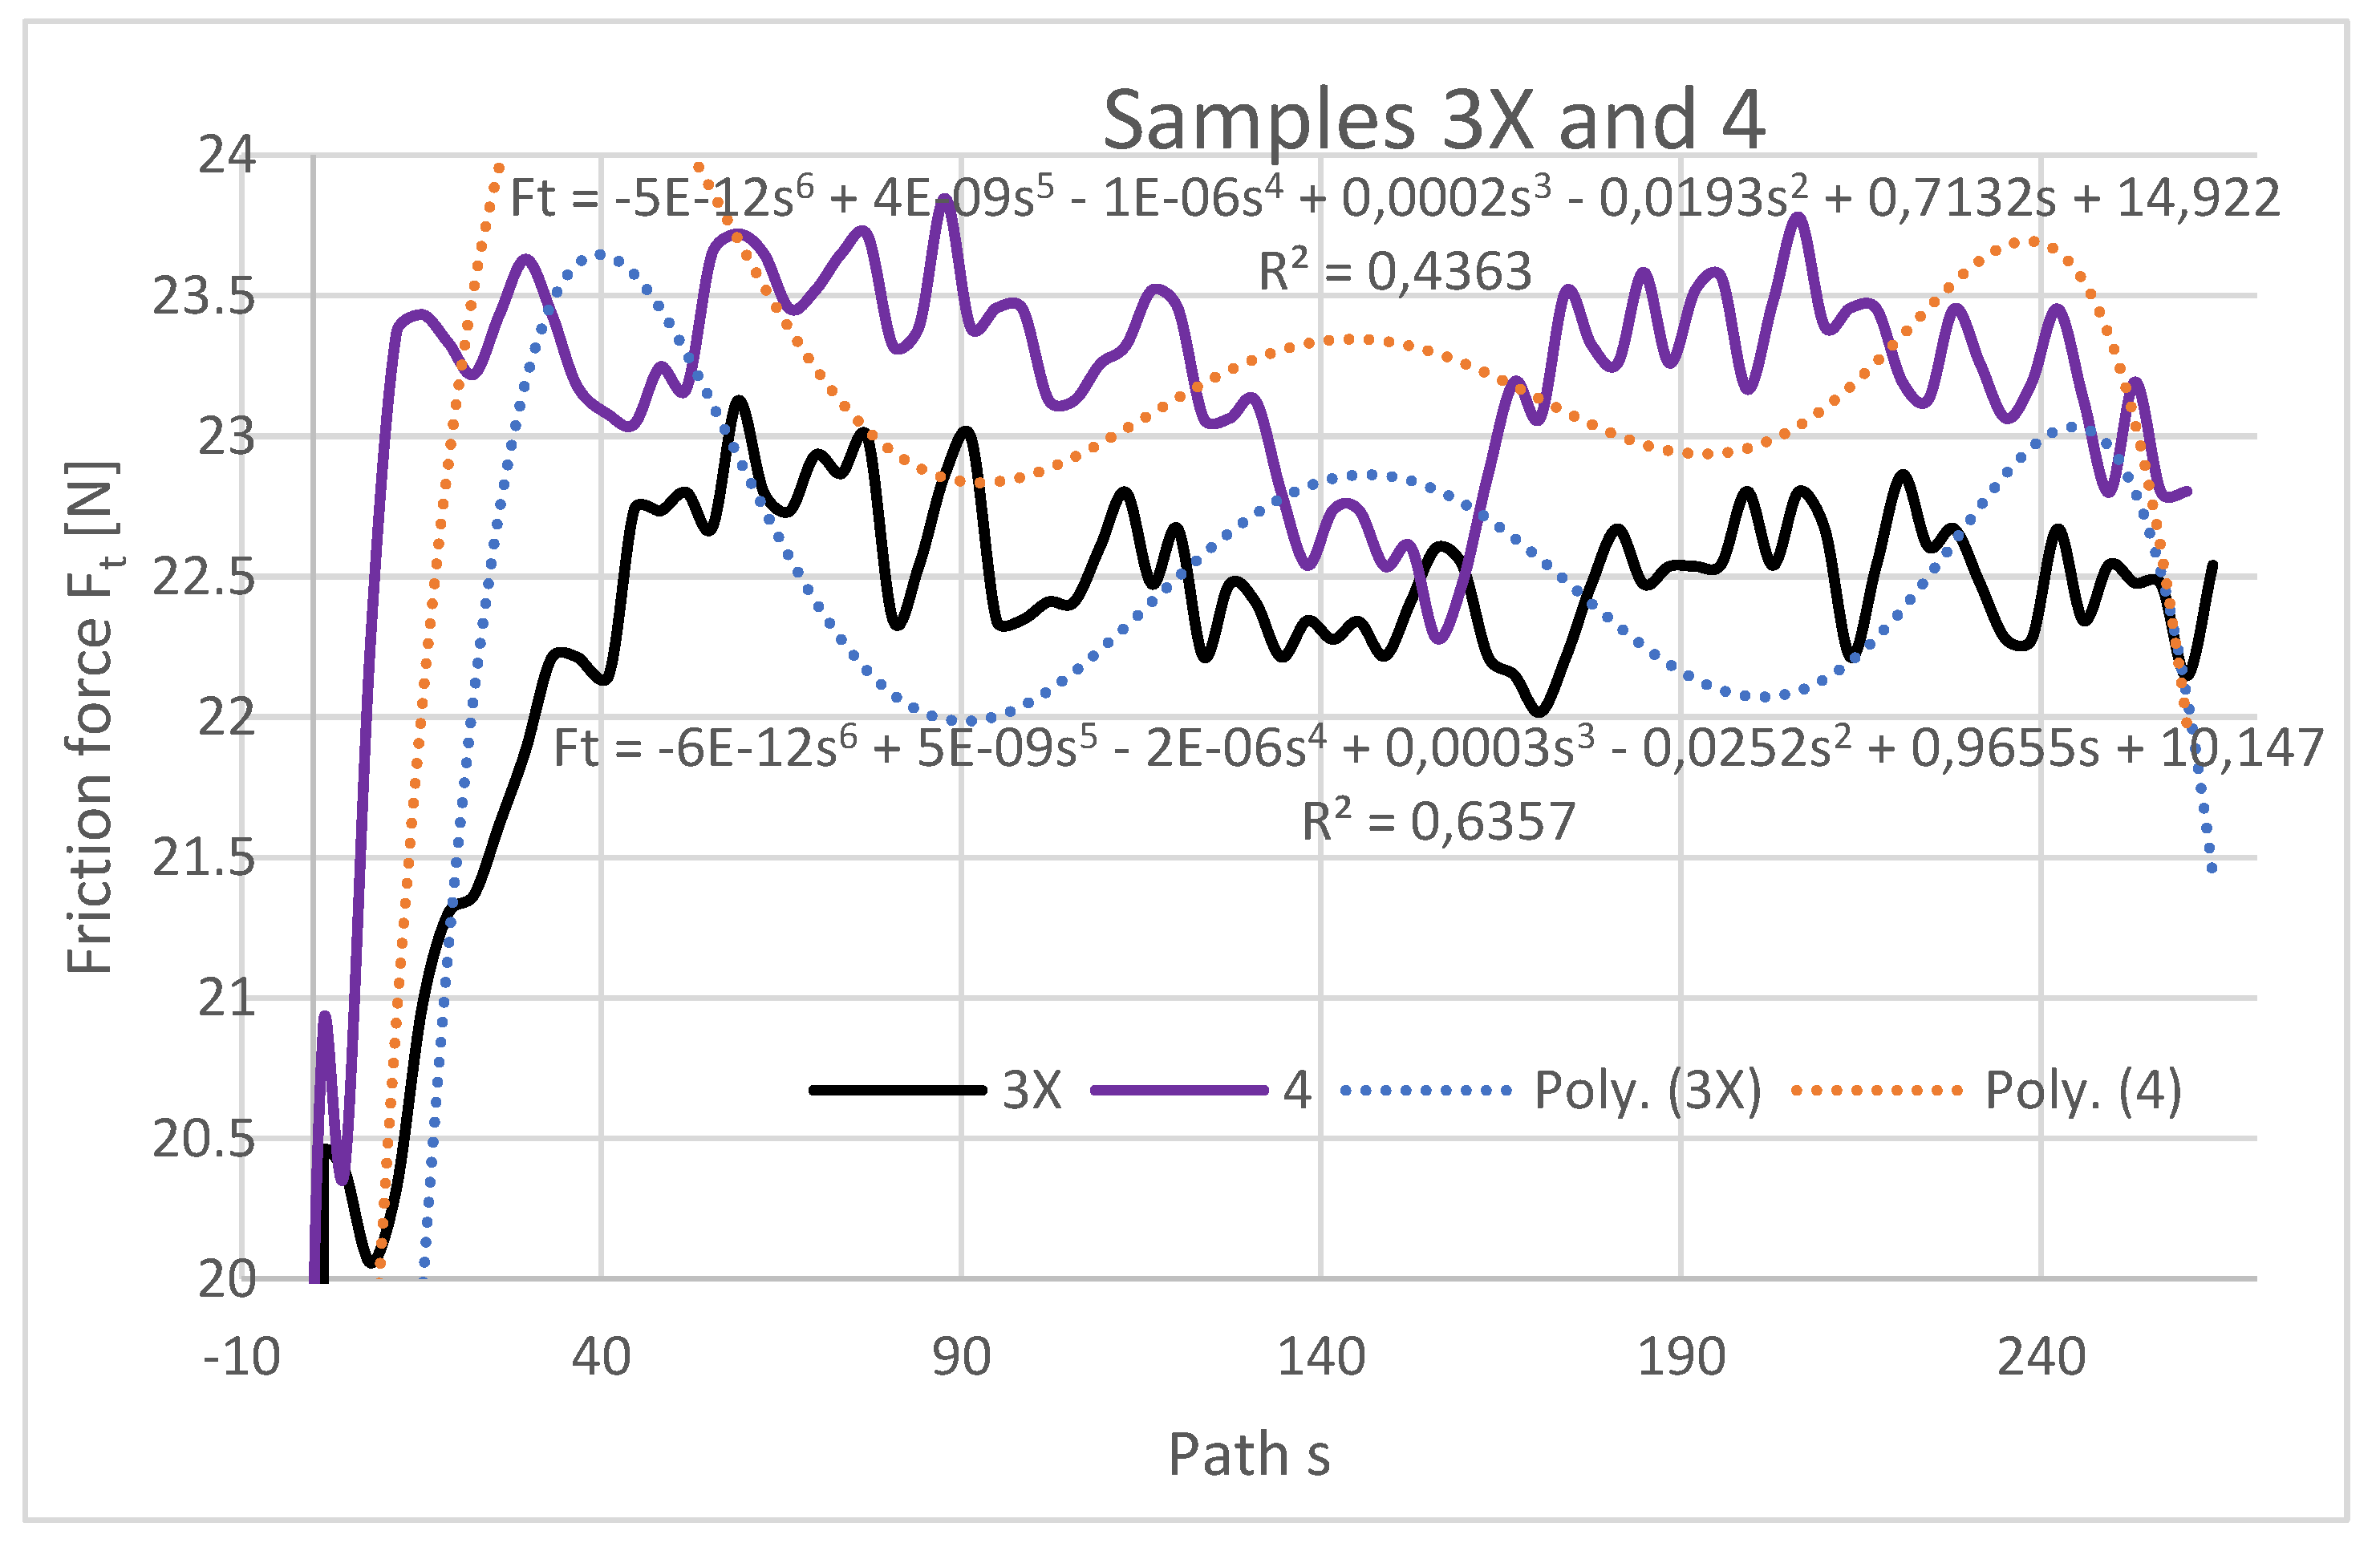
The graphical dependencies of the samples with 1X - 3X orientation show that they are less resistant to wear compared to samples 2-4. Samples 1X and 2 in the test showed similar material loss characteristics. This means that if the layers are applied at an angle of 45° from the direction of the abrasion flow this does not have much effect on the wear, whether the layers are applied at se-but with a 0.25 mm rasterization offset.
The highest frictional force was at the beginning of the abrasion test, which was due to the material putting up the most resistance to the frictional force at the beginning. It can be seen from the dependencies that the coefficient of friction from the initial value at the beginning of the experiment increases and stabilizes after a path of 40-50m, where it then oscillates around a certain value until the end of the experiment. The lowest coefficient of friction at the beginning of the experiment can be observed for the Type 1X samples, which is also the lowest at the end along with the coefficient of friction for the Type 3 and 3X samples.
Within the graphical characterization of the friction forces, regression mathematical models of the given dependencies were also worked out, which indicate that there is negligible mathematical dependence between the compared variables, i.e. that it is mathematically meaningless to investigate the compared variables and to create mathematical models.
3.2. Comparison of 1Z – 3Z samples with the same fibre orientation without displacement in the intermediate layers of samples 7, 8 and 10
V
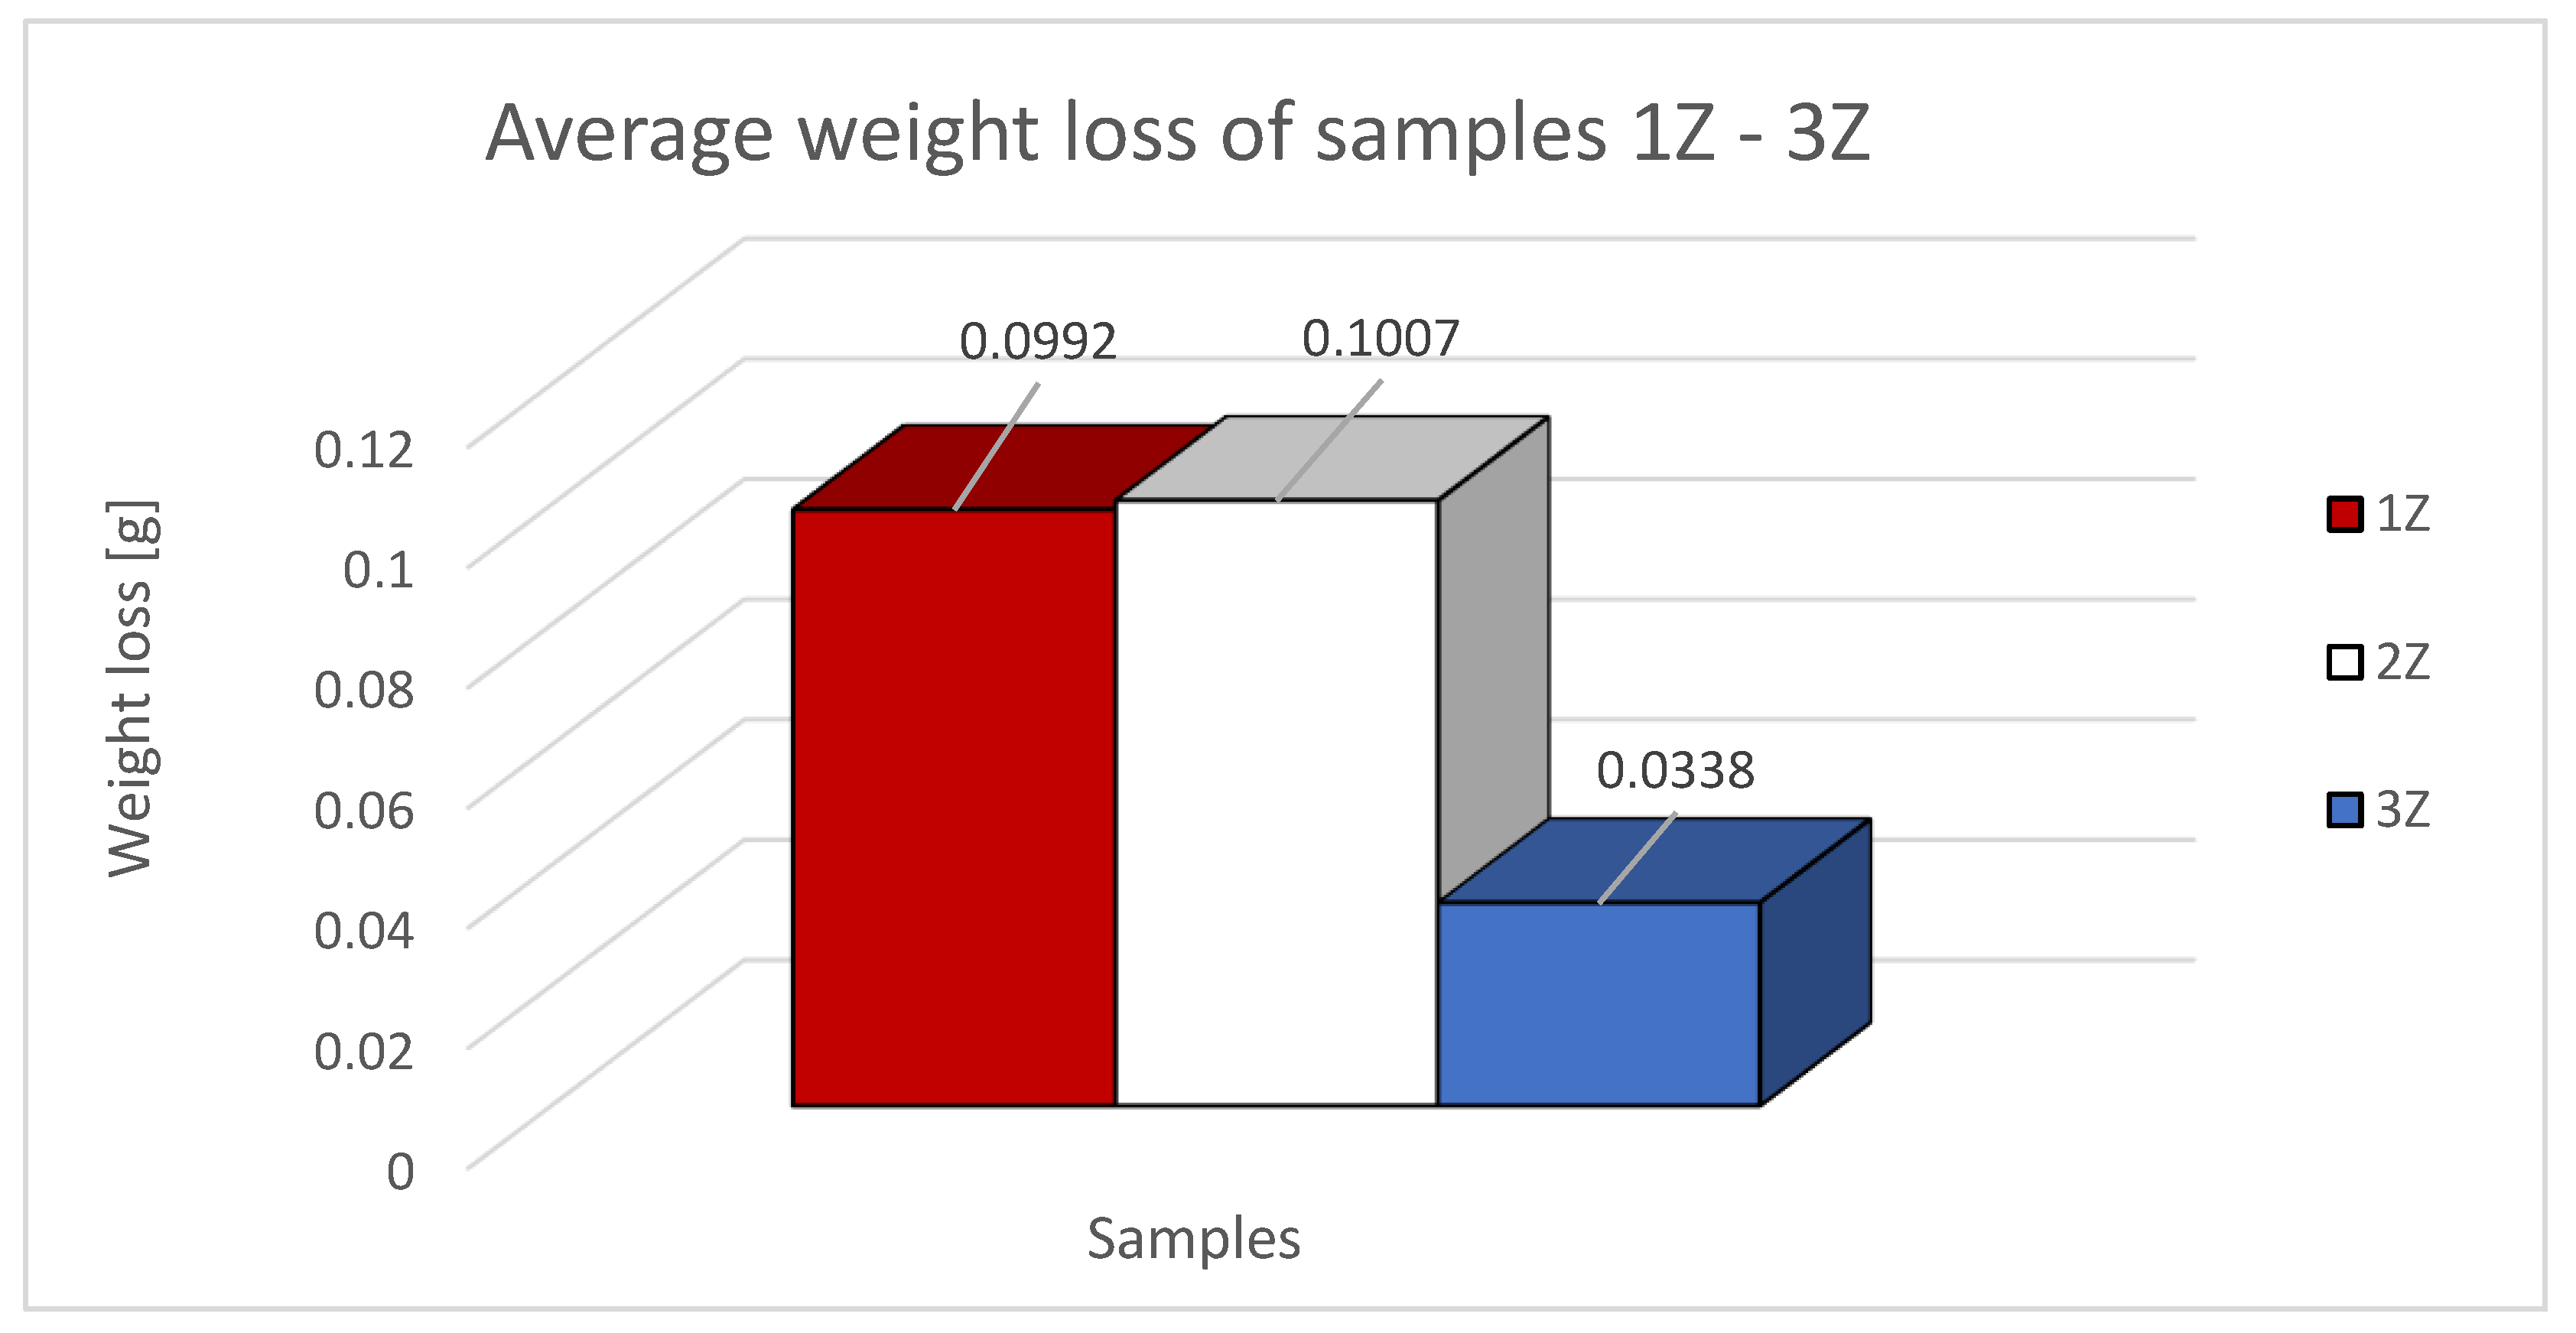
Table 6 shows the weight losses of the samples used and their average losses.
Figure 8 shows the orientation of the path deposition in odd and even layers in samples from study [
31] “Analysis of the selected technological parameters' influence on tribological properties of products manufactured by FFF technology. These orientations are also compared with new samples with a denser structure, where the denser structure was achieved by shifting the internalized layers by 0.25 mm, which provided a lower weight of the printed samples in the Z orientation and thus a more densely bonded sample structure.
Figure 14.
Path generation strategy in even (red) and odd (black) building layers of samples from study [
31].
Figure 14.
Path generation strategy in even (red) and odd (black) building layers of samples from study [
31].
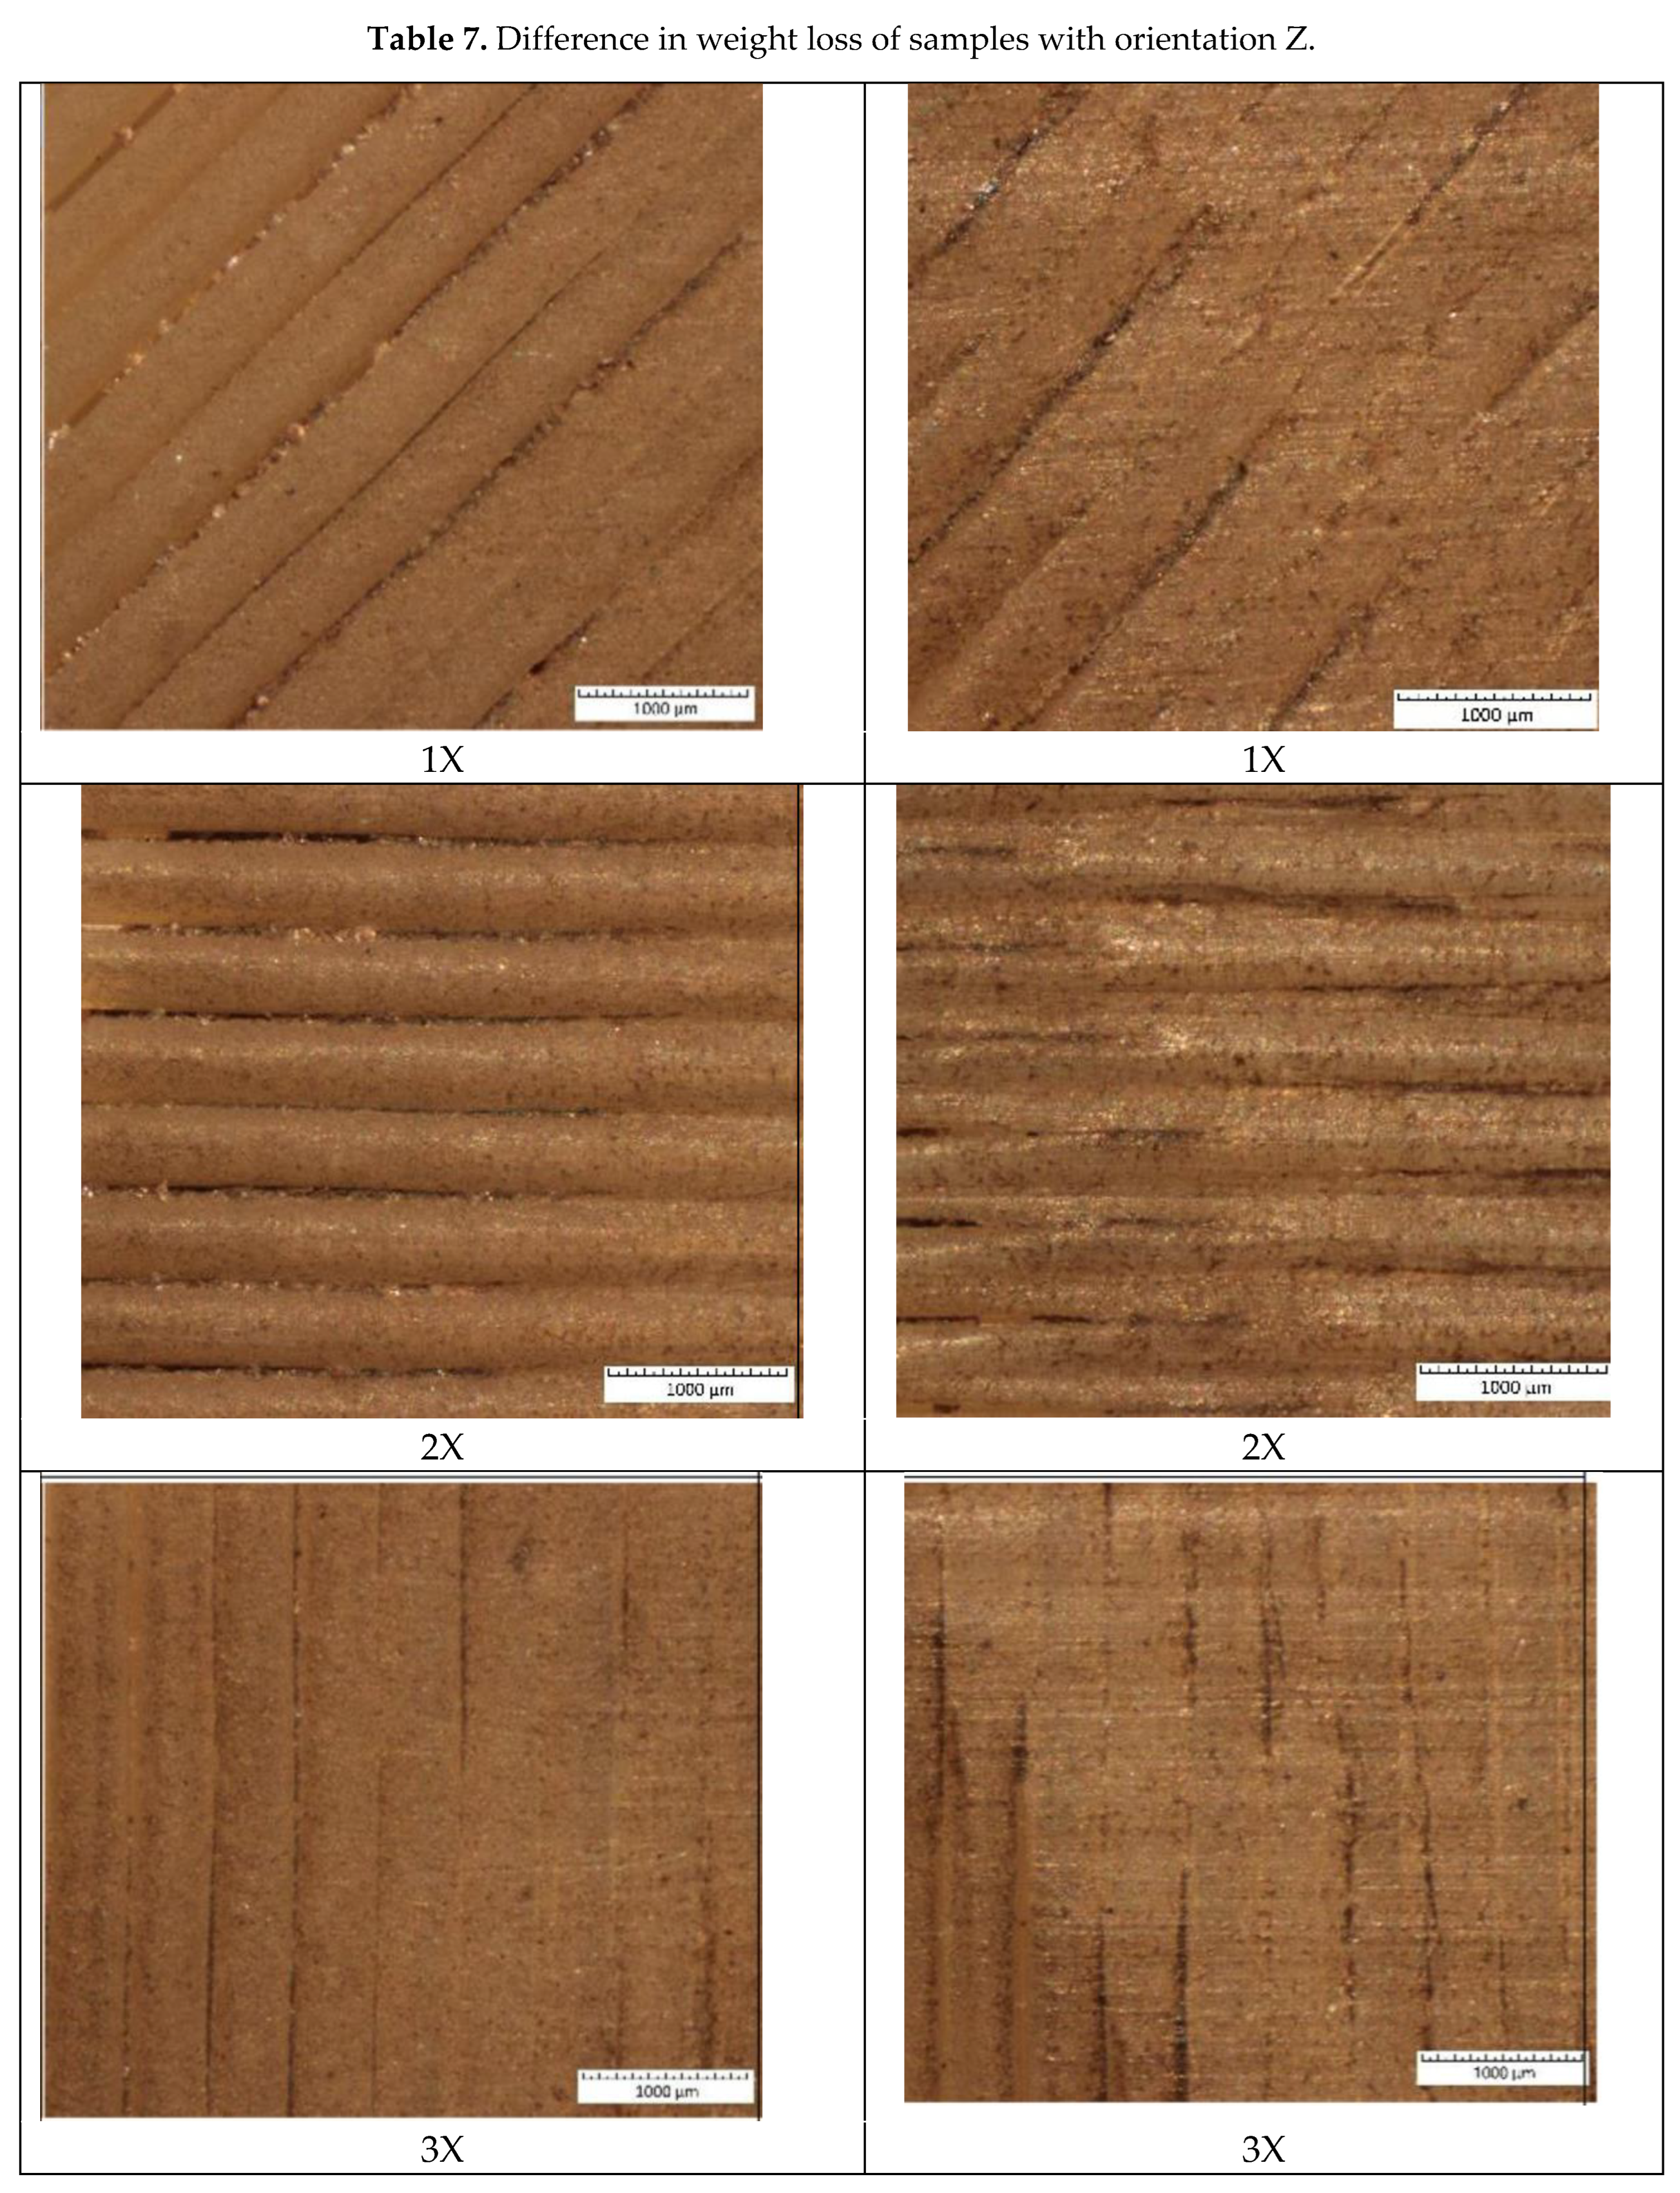
Table 7 shows the difference in the mass loss of the Z-oriented specimens under abrasive wear with and without 0.25 mm displacement in the alternate layers, i.e., the construction of the specimen layers was carried out by a system of stacking the deposited paths perpendicular on top of each other.
The graphical representation in
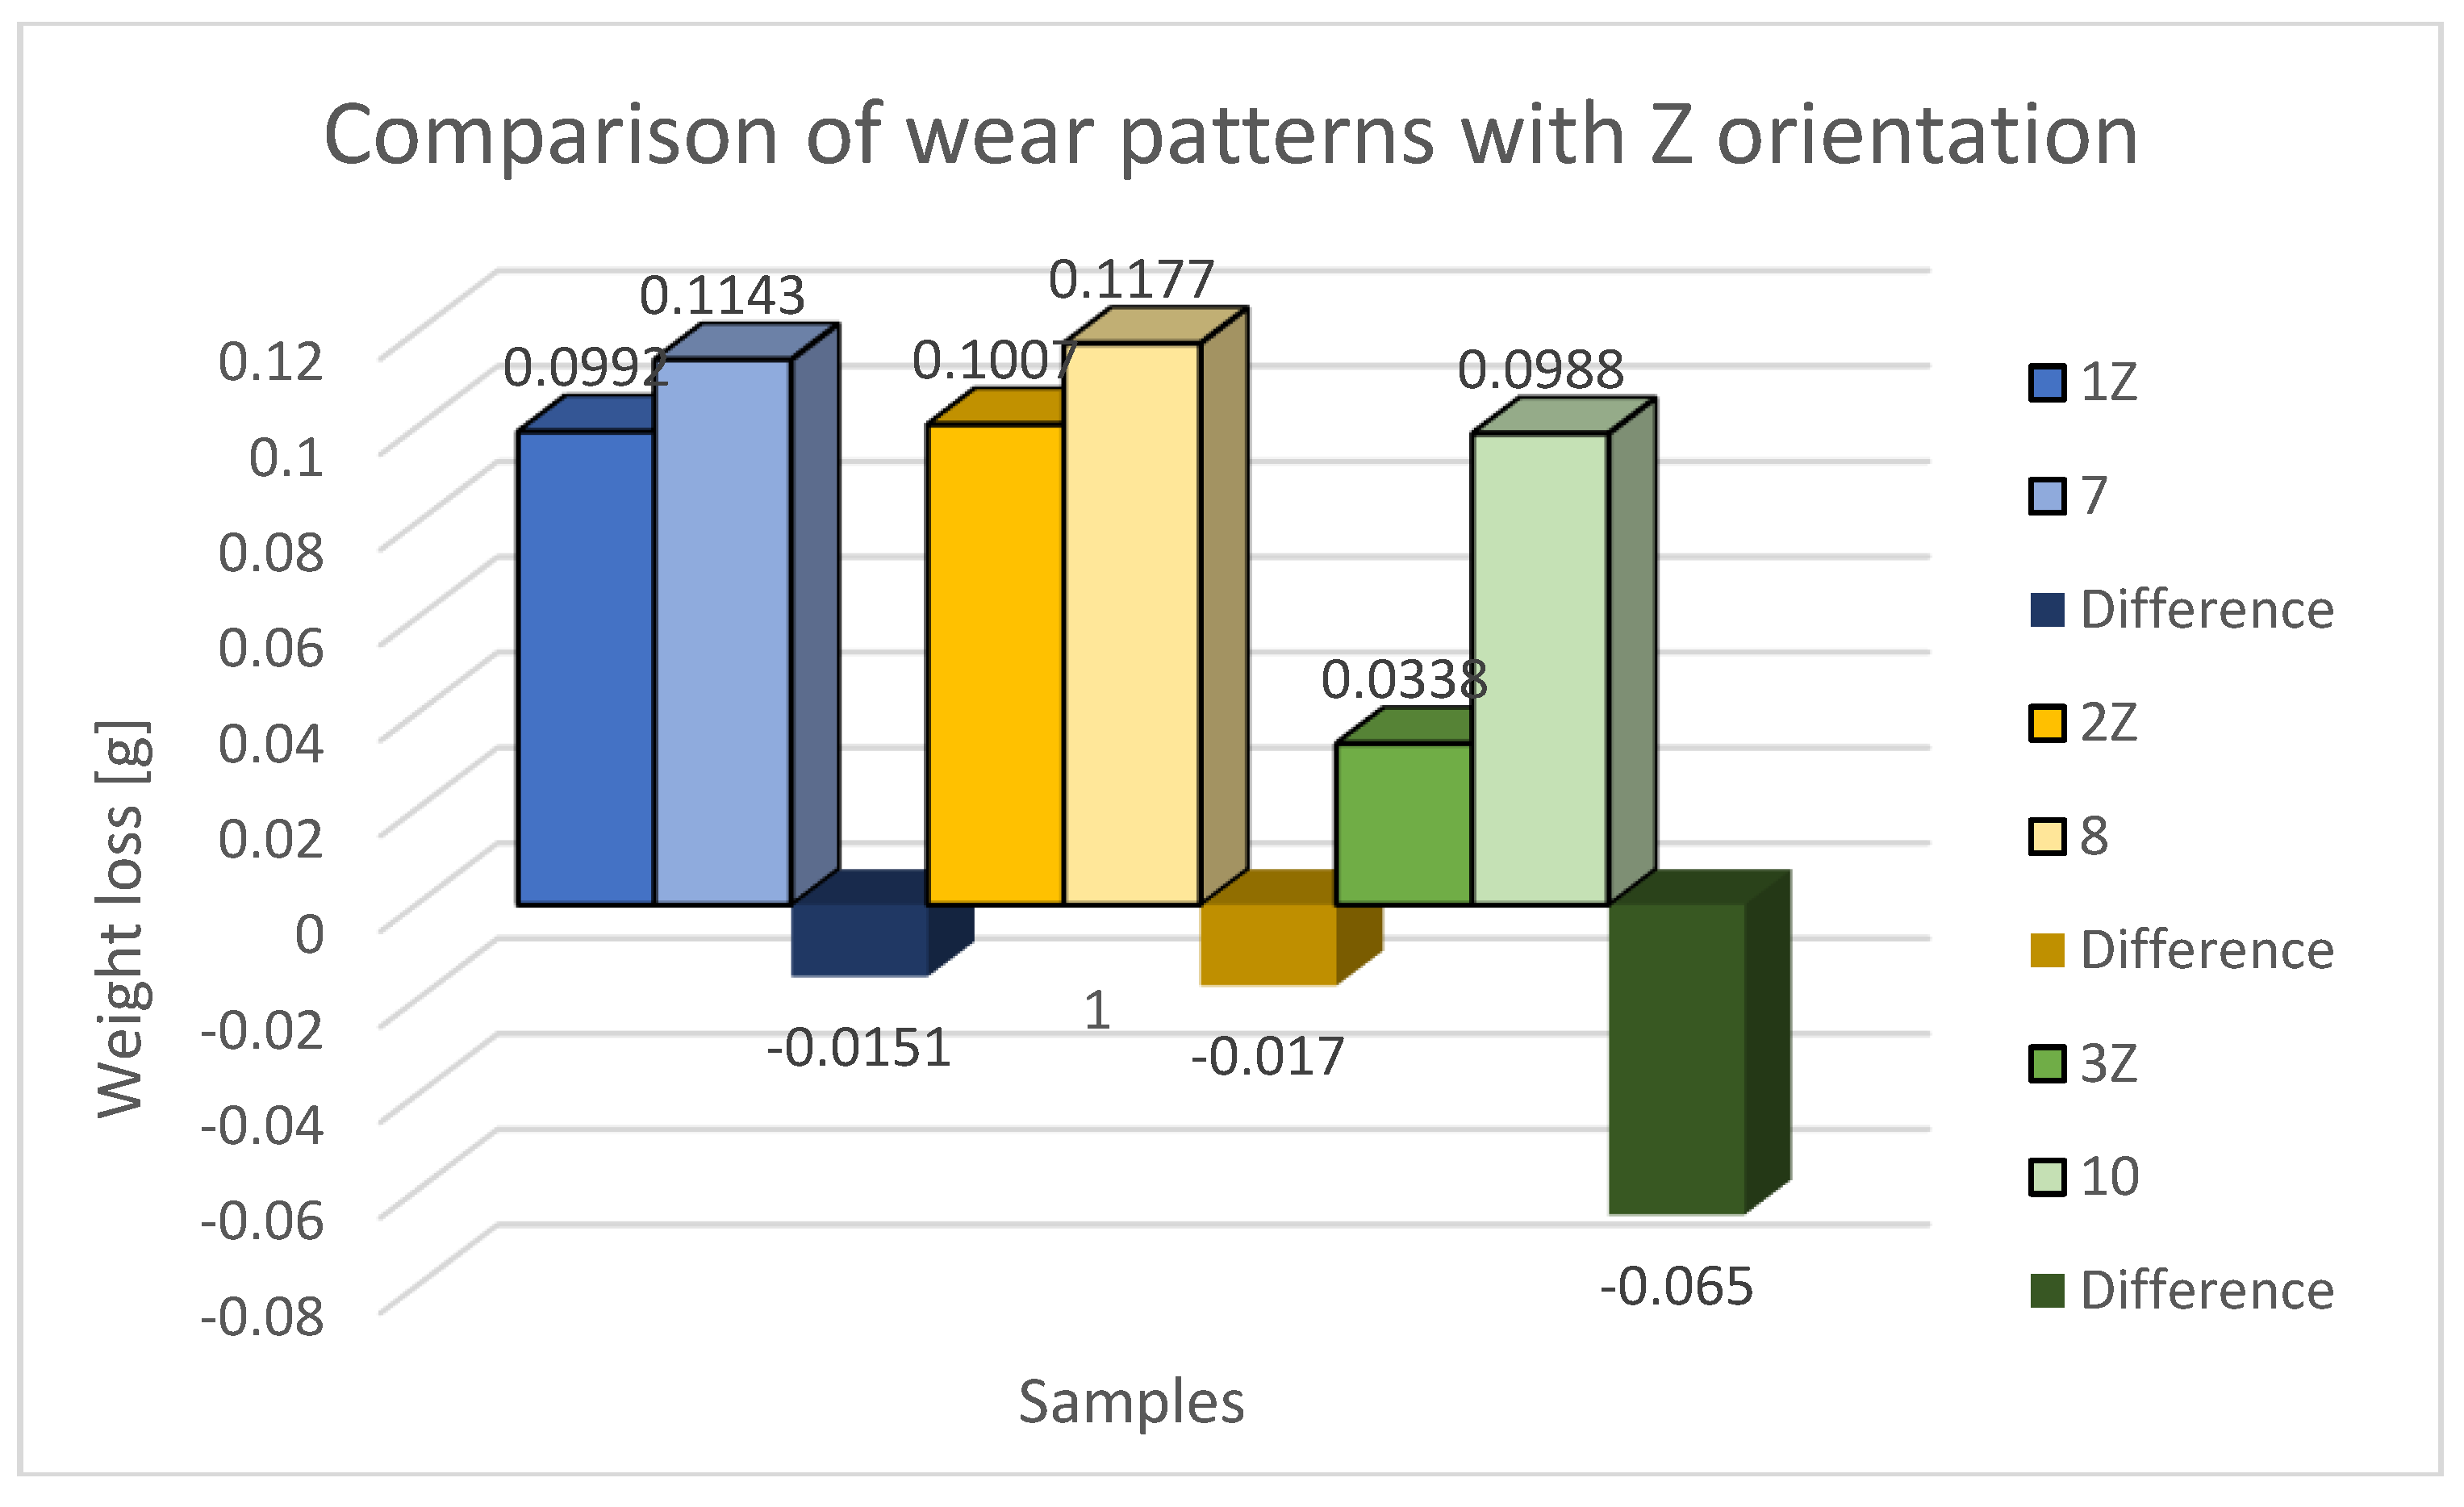
Figure 15 shows a comparison of the mass differences of the specimens within the Z orientation and the mass difference of the material loss due to abrasive wear. The blue color shows the loss of 1Z samples (new samples) and 7 (from the previous study). Within this orientation (45°), the specimen with a perpendicular build-up system in the alternate layers (fibers in alternate layers directly above each other) proved less durable with a percentage increase in wear of 15.22% and a loss difference of 0.0151g. The yellow color shows the loss of samples 2Z (new samples) and 8 (from the previous study). Within this orientation (90°), the specimen with a perpendicular construction system in alternating layers (fibers in alternating layers directly and with each other) also proved to be less durable with a percentage increase in wear of 15.88% with a difference in loss of 0.017g. The green color shows the loss of samples 3Z (new samples) and 10 (from the previous study). Within this orientation (0°), the specimen with a perpendicular construction system in alternate layers (fibers in alternate layers directly and with each other) proved less durable with a percent increase in wear of 192.31% with a loss difference of 0.065g. As a result of this comparison, it is found that specimens built in Z orientation with a 0.25 mm offset of the alternating fiber layers are less resistant to abrasive wear than the layers with a perpendicularly superimposed fiber stacking construction scheme. Sample 3X has the lowest material loss of the trio of samples 1X, 2X, and 3X. Samples 1X and 2X have approximately identical values of material loss.
In the evaluation of the experimental data, the friction force was also evaluated as a dependent variable in the Z-orientation depending on the travelled path of the rubberized disc. The friction force was read directly from the tribometer output data. The resulting friction force curves are shown separately in
Figure 16,
Figure 17 and
Figure 18.
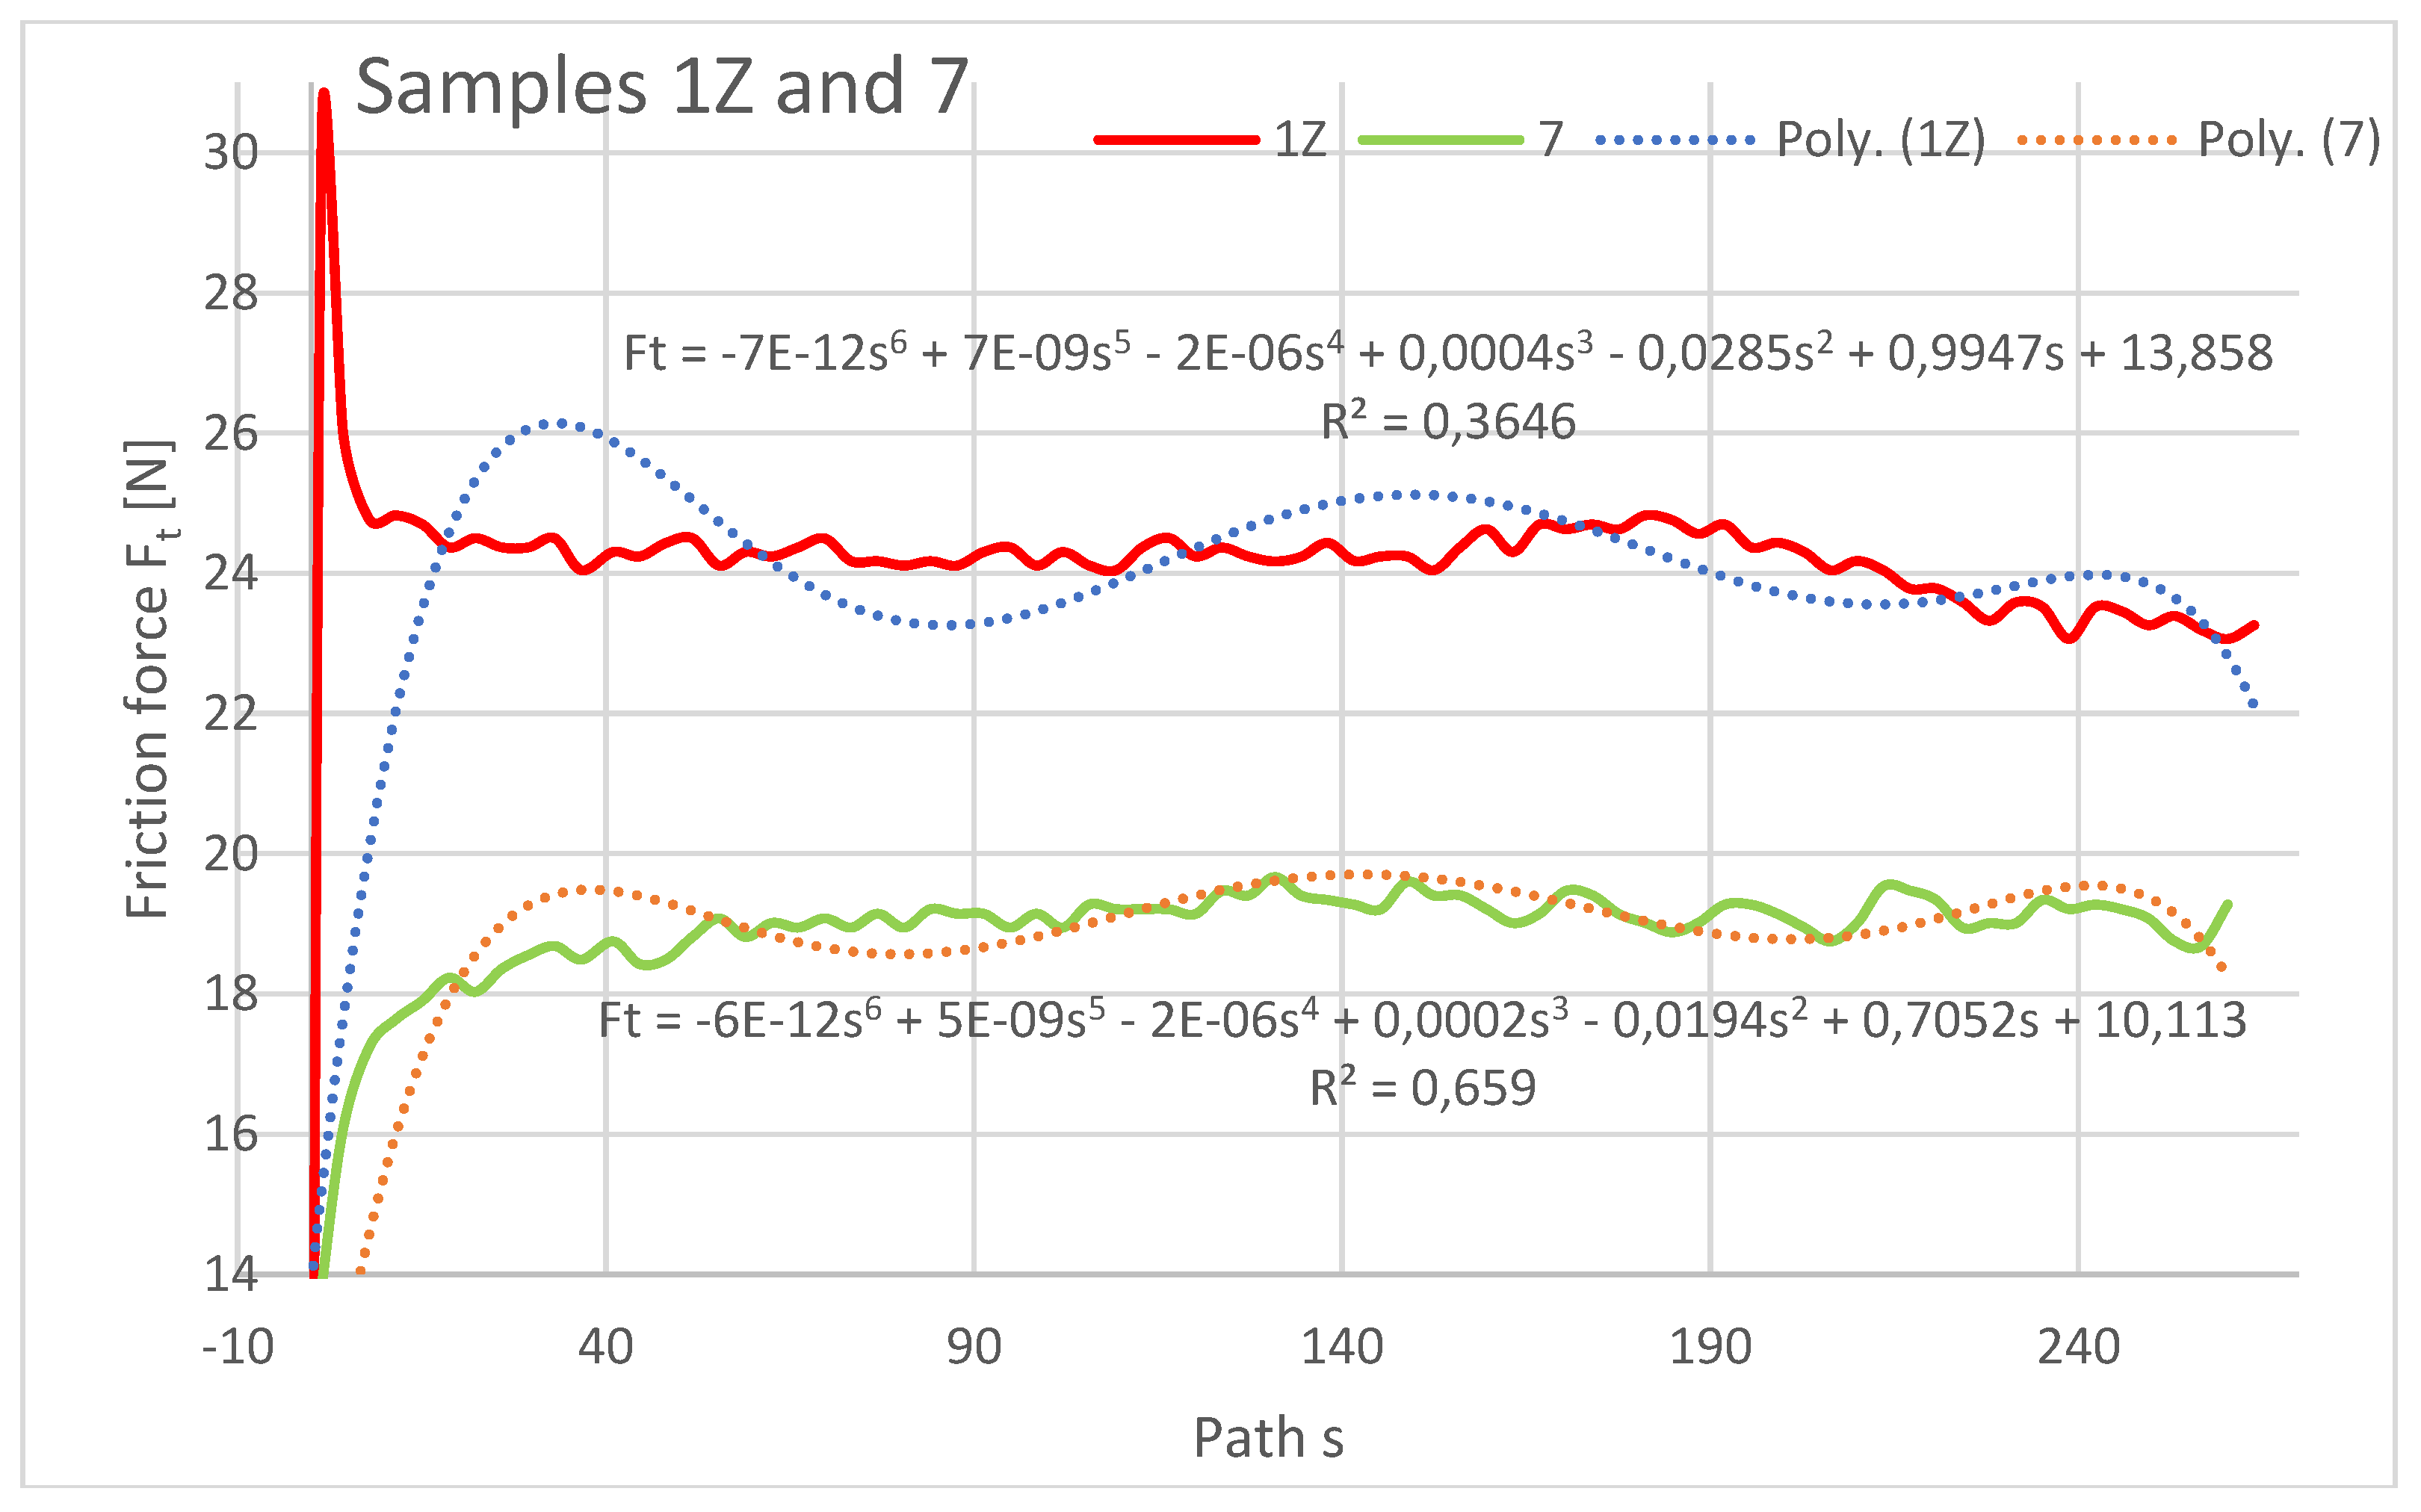
The graphical dependencies of specimens with 1Z - 3Z orientation show us that they are more resistant to wear compared to specimens 7, 8 and 10. Specimens 3Z and 10 showed similar material loss characteristics in the friction force test. This means that if the layers are deposited at an angle of 0° from the direction of abrasion flow then this does not have much effect on the friction, whether the layers are deposited on top of each other but with a 0.25 mm rasterization offset. For samples 1Z, 7 and 2Z and 8 the friction forces already had different values. The highest friction was obtained for the orientation of sample 8 and 1Z. Lower frictional forces were achieved by specimens with orientations 2Z and 7 while the lowest friction was achieved by specimen with orientation 7 from the previous study. From the current study, the specimen with orientation 3Z showed the lowest friction. It is important to note the pattern of frictional forces of the compared specimens, the nature or pattern of which did not change when comparing the same orientations in turn.
The highest frictional force was at the beginning of the abrasion test, which was due to the material putting up the most resistance to the frictional force at the beginning. It can be seen in the dependencies that the coefficient of friction increases from the initial value at the beginning of the experiment and stabilizes after a 10 - 20 m path, where it then oscillates around a certain value until the end of the experiment, with a difference for samples 2Z and 8, where there was a slight increase towards the end of the path travelled. The lowest coefficient of friction at the beginning of the experiment can be observed for Type 1X samples, which is also the lowest at the end along with the coefficient of friction for Type 3 and 3X samples.
Within the graphical characterization of the friction forces, regression mathematical models of the given dependencies were also worked out, which say that there is negligible mathematical dependence between the compared variables, i.e., that it is mathematically meaningless to investigate the compared variables and to create mathematical models.
3.3. Wear images of specimen surfaces at the abrasive inlet (left) to the contact zone and the abrasive outlet (right) from the containment zone
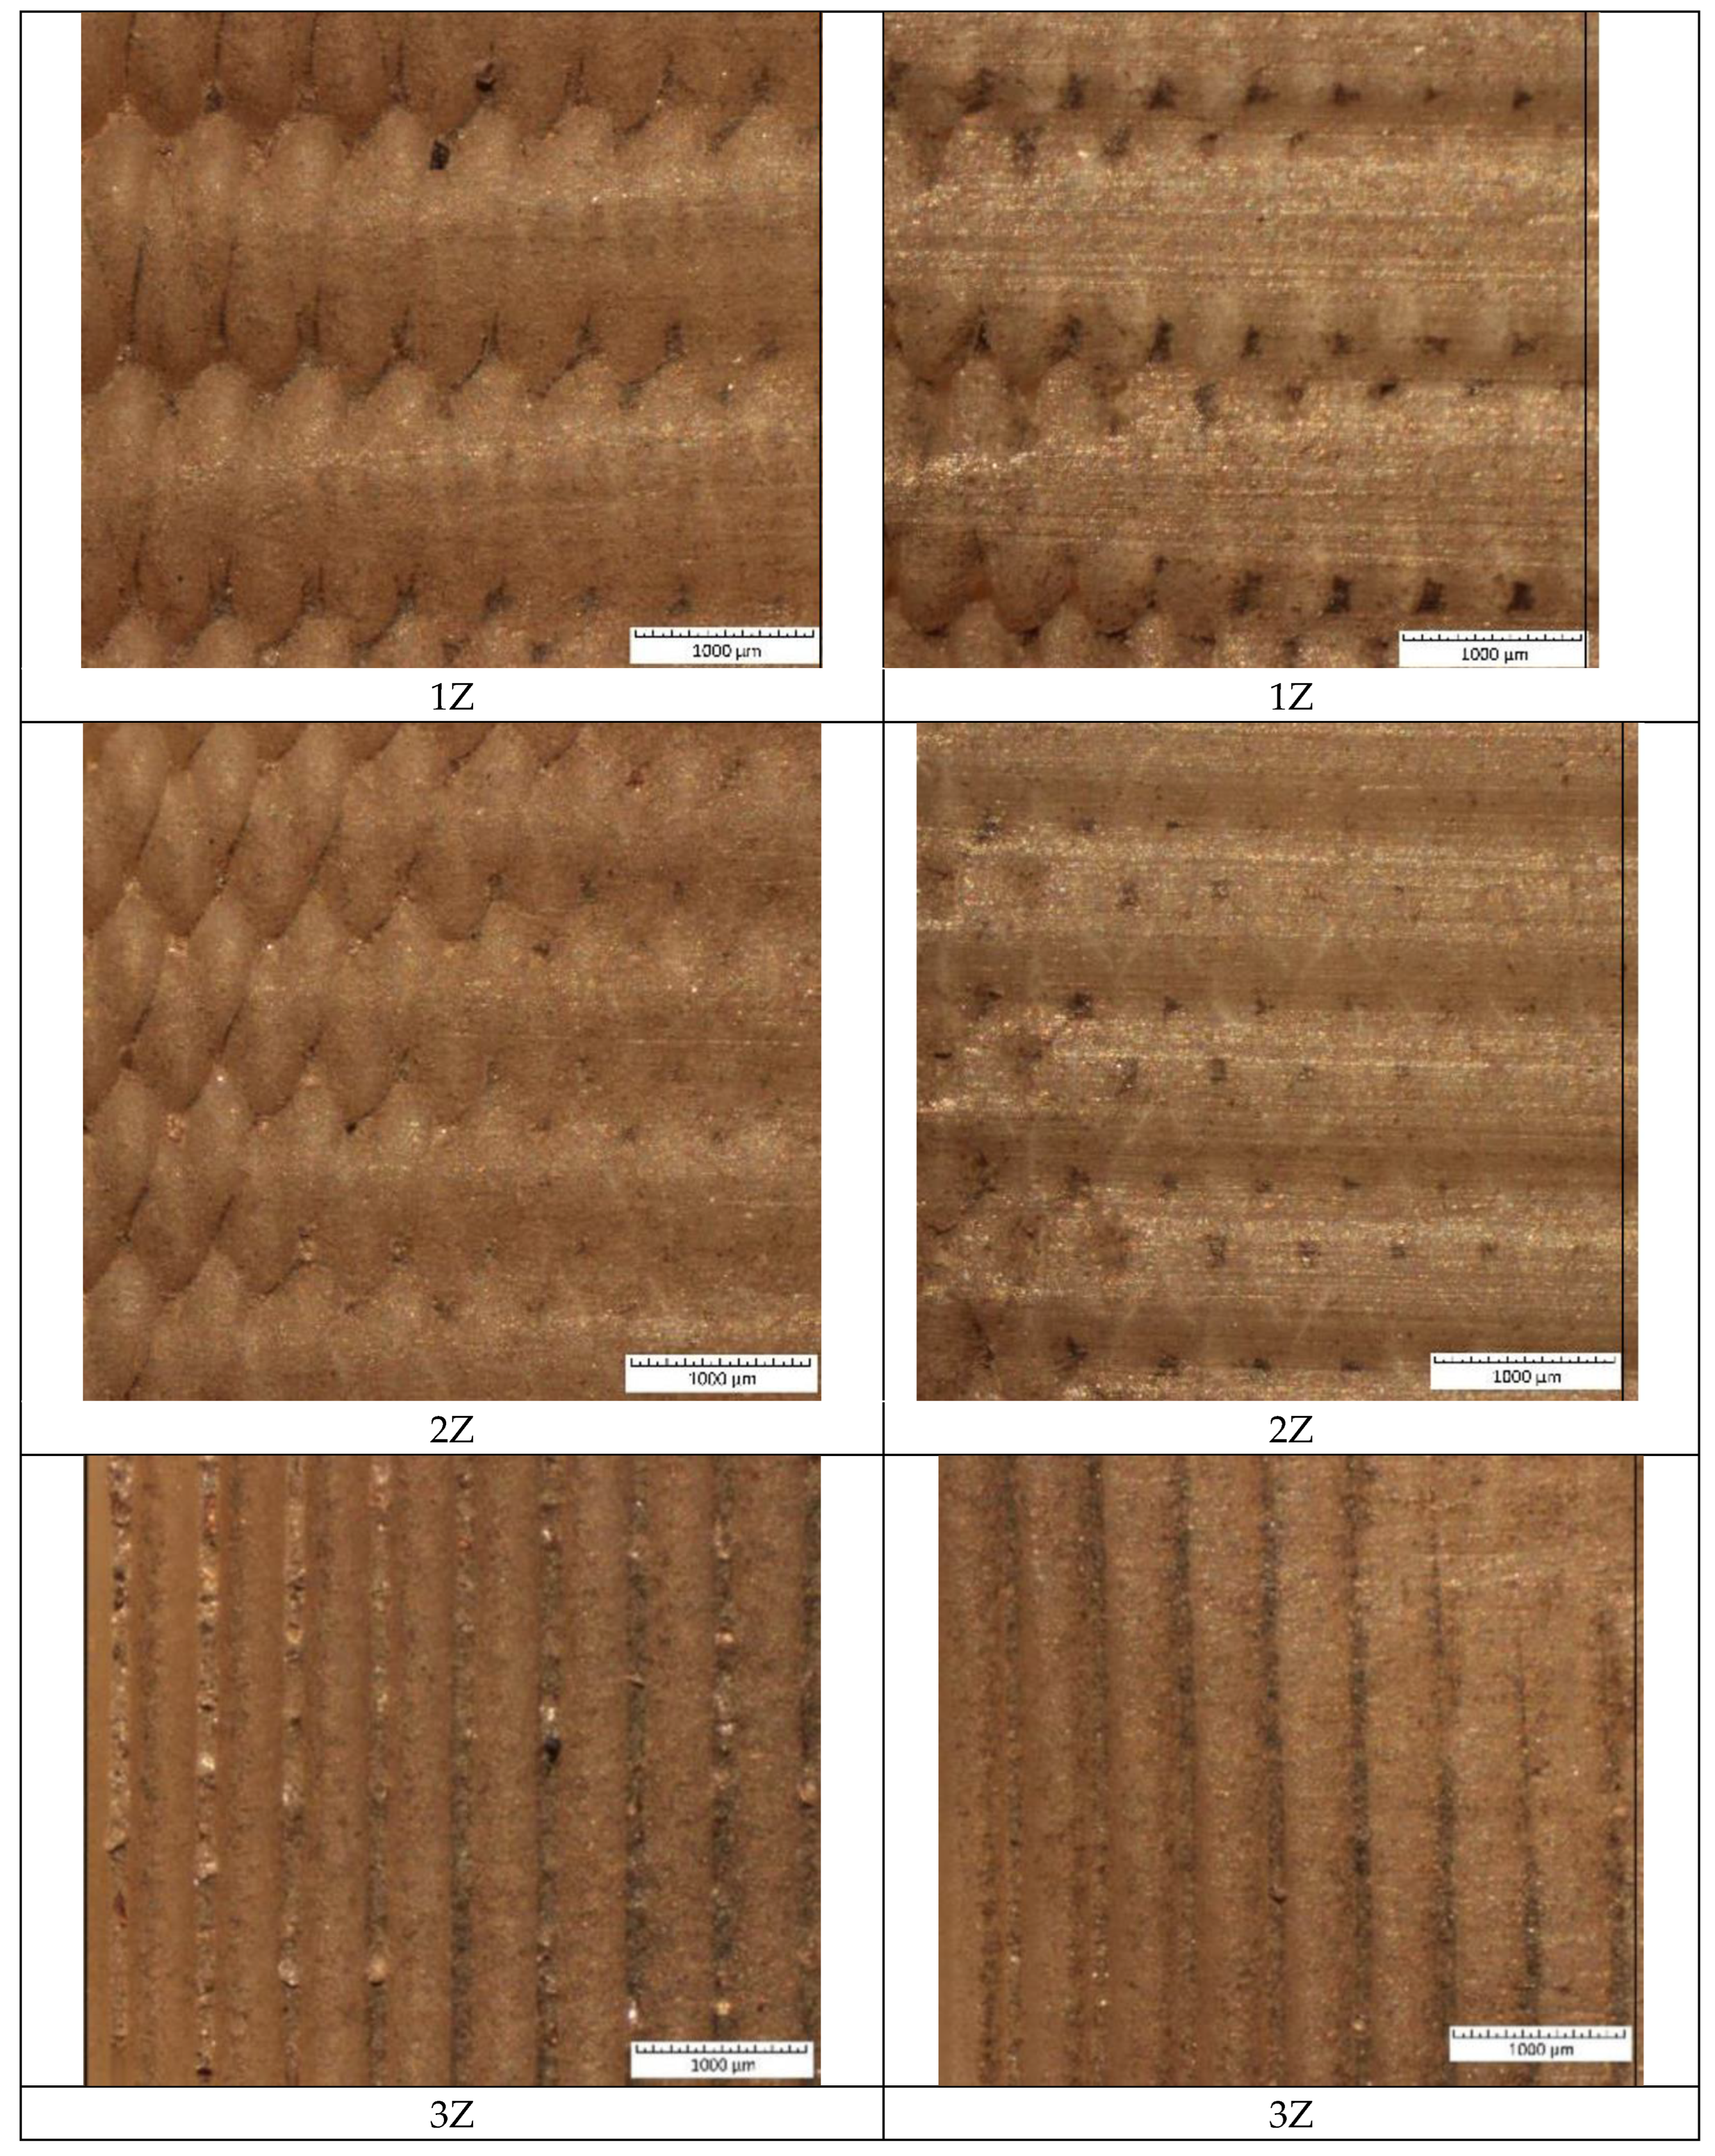
In the table shown below (
Table 7), we have processed the test results from a visual perspective. In the first column, the surfaces before the abrasion test are photographed. The second column contains photos of the surfaces after the input abrasion test (from left to right). The last third column contains the surface of the material at the outlet of the abrasion (from right to left). In these photos, we can see how the abrasive penetrated the different layers of the prints during the test. This can be seen most clearly in specimens with alternating filament deposition. Although the samples were cleaned with the ultrasonic cleaner after testing, we observed residues of abrasive on the surface, especially in orientation Z but also in X orientation.


4. Discussion
As part of the evaluation of material wear and weight loss, the construction system of specimens X and Z are also compared and evaluated with each other.
Comparison of the mass loss of 1X and 1Z samples showed a lower mass loss on the 1X sample. Based on the experimental results, weight loss and the friction coefficient versus distance traveled were evaluated.
When evaluating weight loss and its dependence on the chosen fiber placement strategy, the highest weight loss in the X-oriented specimens occurred in specimen 3, where the fibers in both layers were oriented parallel (0°) to the wall of the tested specimen. In samples 1 and 2, where the deposition paths formed a 45° angle, the weight loss was 36.79-45.6 % lower than in sample 3. In sample 4, where the deposition strategy of all layers was the same (90 °), weight loss was reduced by 52.16 % compared to sample 3. In sample 5 (90° and 0°), where layers with perpendicular paths and paths parallel to the wall of the tested sample were alternated, the weight loss was the lowest compared to sample 3, up to 52.91%. From the results of the weight loss measurements, it can be concluded that when the same strategy was used in both layers (sample 2, 45°) or a strategy parallel to the direction of wear in both layers (sample 3), greater weight loss occurred. With the straight-straight strategy in both layers (sample 4, 0°) or the combined strategy, weight loss in the layers decreased (sample 5, 0 ° and 90°) (
Figure 12).
Based on the experimental results, the weight loss and the friction coefficient versus the traveled distance were evaluated.
5. Conclusions
A total of 18 PEI plastic samples were made by the FFF (FDM) method. The specimens were made with different orientations of the deposited fibers by two construction methods. Three identical samples were made from each fiber orientation. The first method was the X orientation, and the second method was the Z orientation of the sample construction method. The X orientation was the lay-flat construction of the specimen, and the Z orientation was the portrait construction of the specimen (
Figure 5) with a modification of the displacement of the in-laid layers by 0.25 mm thus achieving a denser structure. The abrasive wear of the specimens was also compared with the specimens from the previous study. The fabricated specimens were tested on a tribometer constructed according to ASTM G65/16, which is an abrasive wear test also called dry sand test.
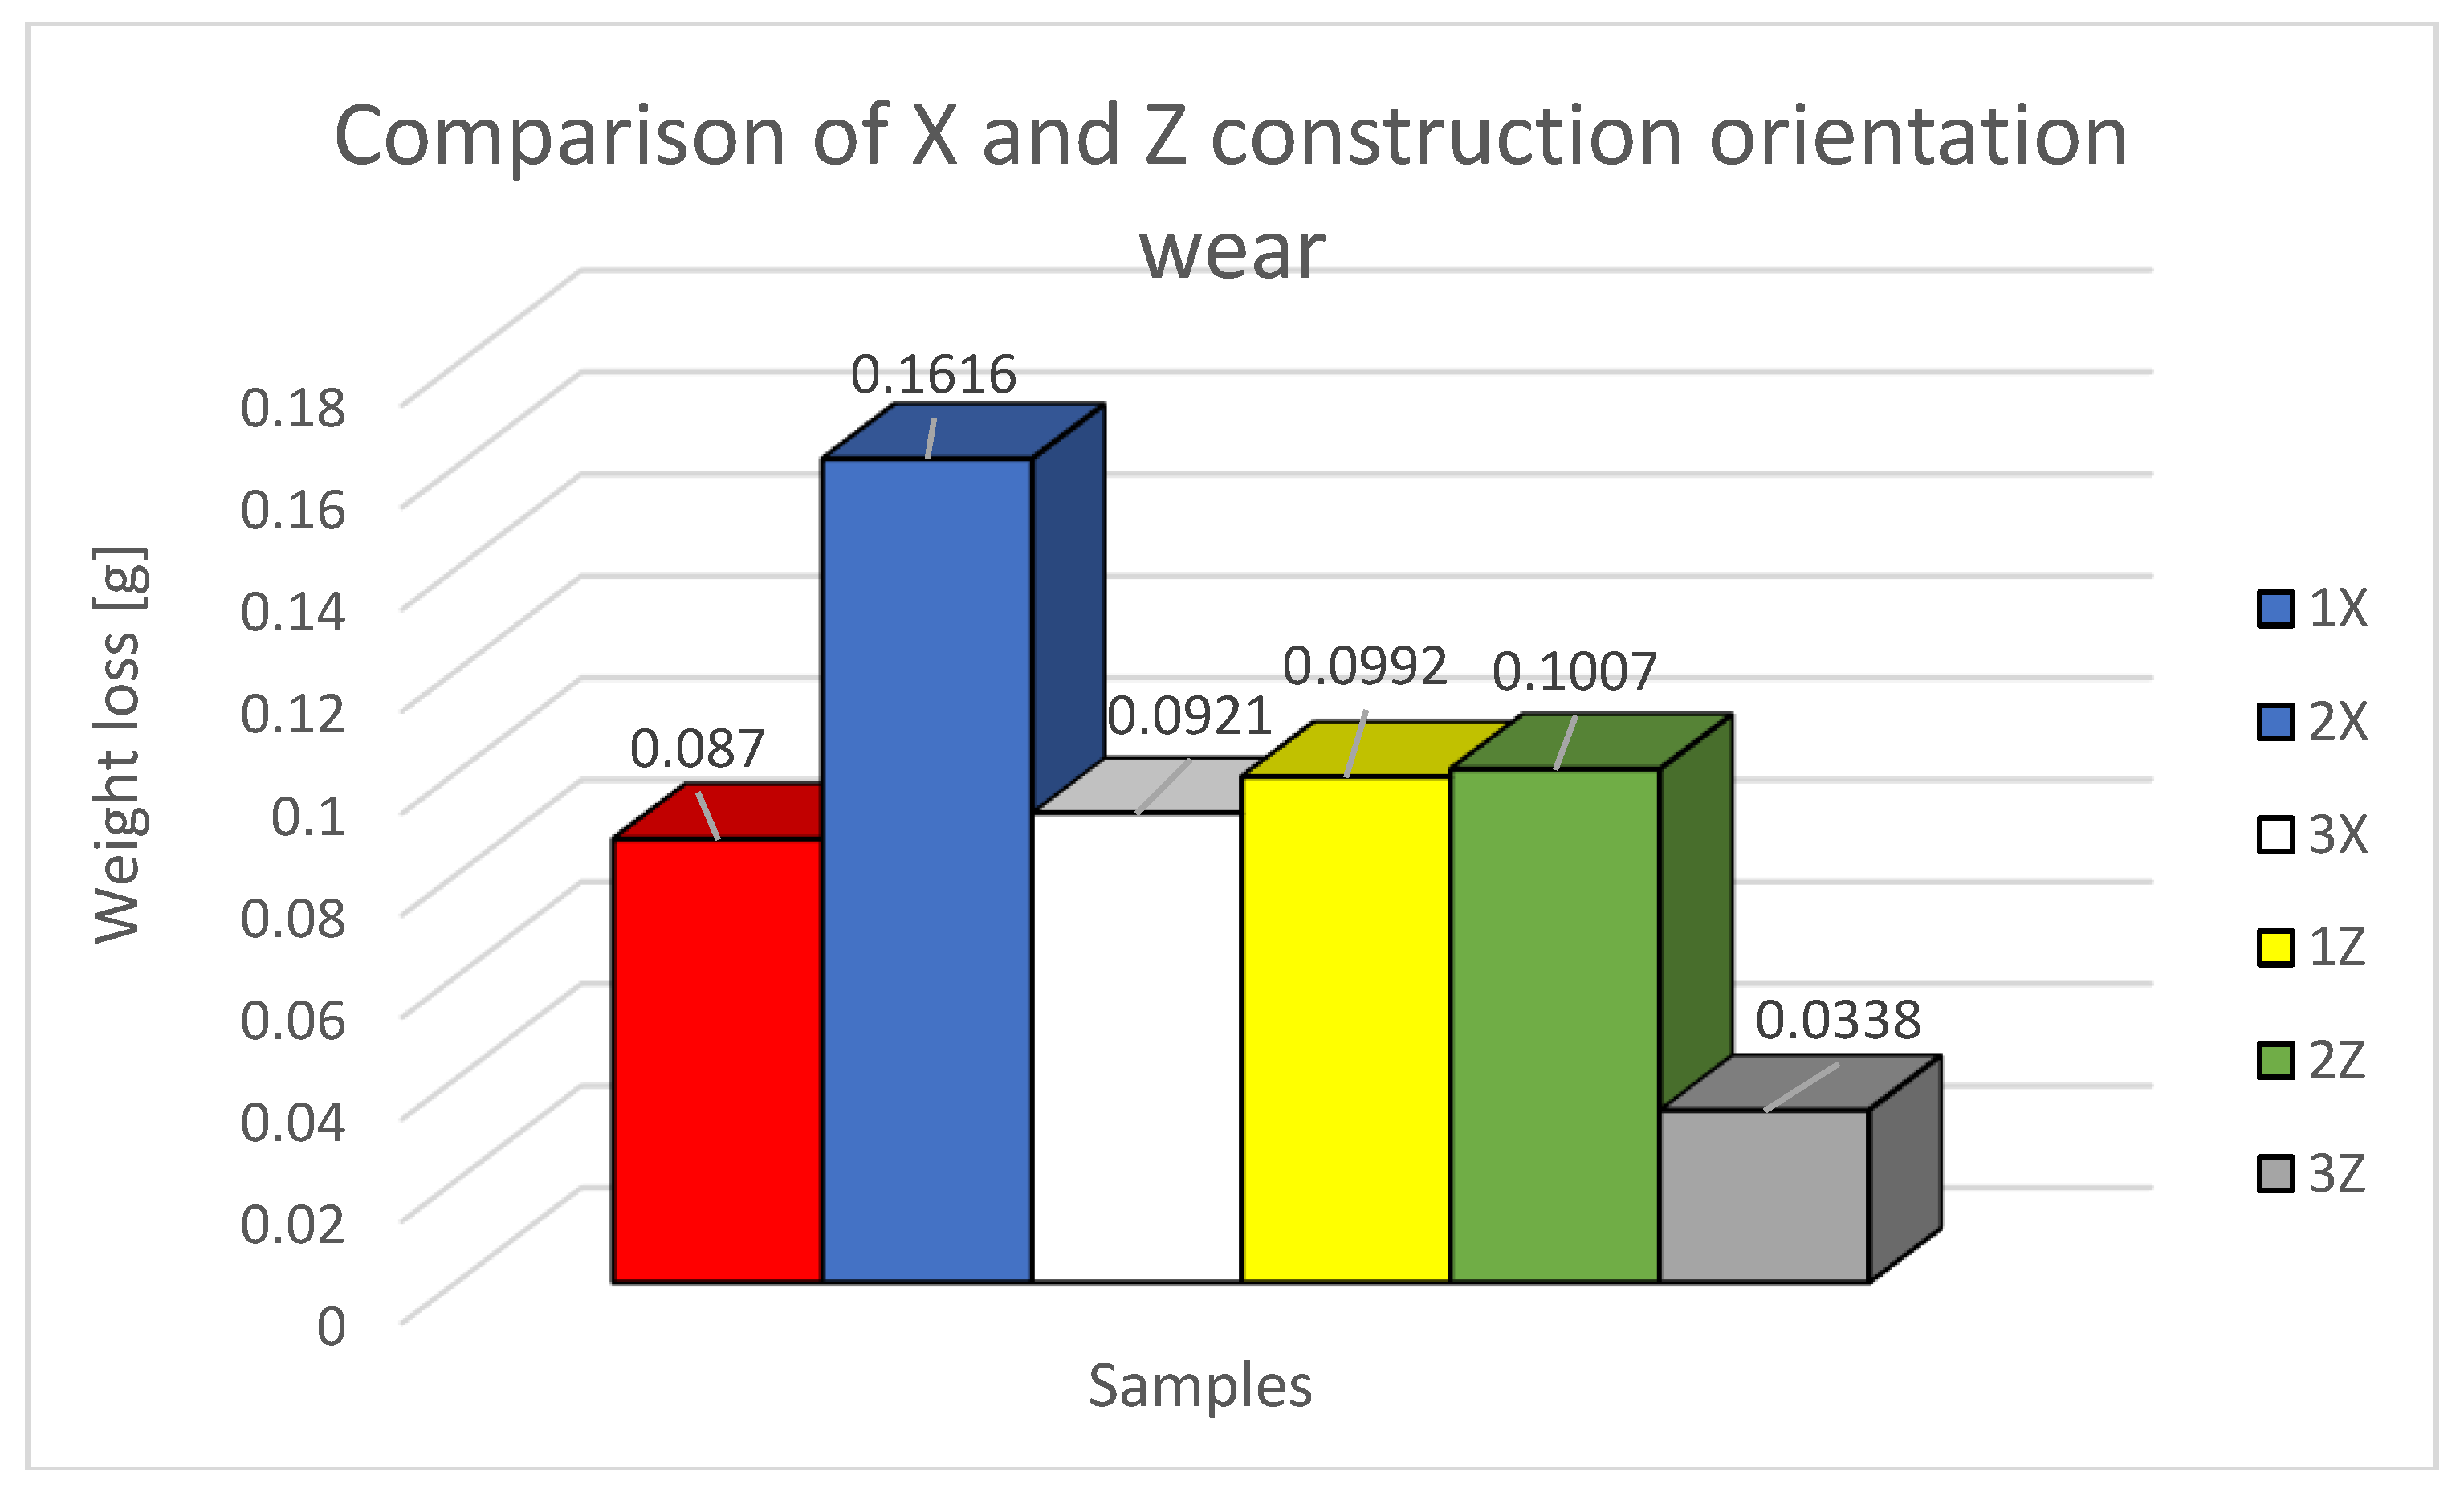
It was found that the orientation of the applied layers influences the nature of the wear of the mate-rial and on the wear rate of the abrasive particles thereby predicting their useful predictable properties in terms of abrasion of the surface and subsurface layers. The most abrasion-resistant specimen appears to be the construction-oriented specimen in the Z construction system, designated 3Z, with a material loss value of 0.0338g. From the percentage of weight loss against the average weight in Z orientation, it is 14.46% of the average loss of Z orientation and 9.921% of the average loss of X orientation. The second sample with relatively low weight loss is sample 1X with a material loss value of 0.087g. From the percentage of weight loss to the average weight in Z orientation, it is 37.23% from the average loss of Z orientation and 25.54% from X orientation.
The third sample with relatively low weight loss is sample 3X with a material loss value of 0.0921g. From the percentage of weight loss to the average weight at the Z orientation, it is 39.41% of the the average weight loss of Z orientation and 27.03% of the X orientation.
In order, the fourth sample with increasing weight loss is sample 1Z with a material loss value of 0.0992g. From the percentage of weight loss to the average weight in Z orientation, it is 42.45% of the average weight loss of Z orientation and 29.12% of X orientation.
This was followed by the sample labelled 2Z with a relatively low weight loss with a difference of 19% against sample 1Z with a material loss value of 0.1007g. In terms of the percentage of weight loss relative to the average weight loss for the Z orientation, this is 43.09% of the average weight loss of the Z orientation and 29.56% of the X orientation.
The last specimen with the highest percentage of weight loss due to abrasive wear was the specimen labeled 2X with high weight loss with a material loss value of 0.1616g. From the percentage of weight loss to the average weight loss for Z orientation, it is 69.15% of the average weight loss of Z orientation and 47.43% of the average weight loss of X orientation. Based on the analyzed data, a recommendation can be made for parts made with FFF technology with a 0.25mm offset in the internalized layers, which will operate in an environment where contact or abrasion of surfaces occurs, to be built in the Z orientation construction method. Specifically, this is the orientation as for the 3Z specimen, i.e., building the specimen in height and orienting the fibers 0° to the specimen wall or abrasion location to be tested.
Comparison of samples with an offset in alternate layers of 0.25mm with specimens constructed in alternate layers perpendicularly to each other showed a difference in the durability of the specimen construction system used. By comparing the construction with the X orientation, it was found that the construction with 0.25mm displacement in the alternate layers is 22.92% more resistant than the layers displaced by the perpendicularly superimposed system. With Z orientation, the construction system used was also found to be more resistant to wear when constructed with 0.25mm offset in alternate layers by up to 127.43% than layers constructed perpendicular to each other.
The total mass loss of material after wear for the construction with 0.25mm offset in alternate layers and the specimen construction system perpendicularly and consecutively in alternate layers at both orientations, the construction with 0.25mm offset also proved to be more durable by 65.44% more durable than the fiber layer construction system perpendicularly above each other in percentage terms.
The results of this study may form the basis for future research on the abrasion resistance of products made from elastomeric materials and their composites using FFF technology. It is anticipated that the abrasion resistance of such materials will pose a greater challenge in the application of such manufactured products [
37,
38].
The PEI material allows the use of printed products in more demanding applications, and this is the reason why we decided to perform experimental measurements of the abrasive wear resistance of this material.
This study is aimed at analyzing the orientation of the structure and the deposition strategy of the influence of the additive manufacturing technique of FFF on the evolution of the friction coefficient and the wear rate of the samples (trilobogic properties of the surface and subsurface layers) of the ULTEM9085™ thermoplastic, as manifested by the weight loss of the material, in accordance with the ASTM G65-16 standard.
Author Contributions
Conceptualization, G.M. and I.G.; methodology, I.G.; software, E.S. .; validation, E.S.; formal analysis, G.M..; investigation, G.M.; resources, I.G.; data curation, G.M.; writing—original draft preparation, I.G. and G.M..; writing—review and editing, G.M. and E.S.; visualization, I.G.; supervision, E.S. and G.M. All authors have read and agreed to the published version of the manuscript.
Funding
This research was funded by VEGA/1/0384/20 and APVV-21-0418.
Institutional Review Board Statement
Not applicable.
Informed Consent Statement
Not applicable.
Data Availability Statement
Not applicable.
Acknowledgments
This work was supported by the Slovak Research and Development Agency under the contract No. APVV-21-0418. The autors would like to thank the VEGA grant agency for supporting research work and co-financing the project VEGA 1/0384/20.
Conflicts of Interest
The authors declare no conflict of interest.
References
- Pisula, J. , Budzik, G., Turek, P. and Cieplak, (2021), “An Analysis of Polymer Gear Wear in a Spur Gear Train Made Using FDM and FFF Methods Based on Tooth Surface Topography Assessment”, MDPI, Basel, Switzerland, Polymers. [CrossRef]
- Norani, M. , Chua Abdullah, M, Abdollah, M., Amiruddin, H., Redza Ramli, F., Tamaldin, N, (2021), “Mechanical and tribological properties of FFF 3D-printed polymers: A brief review”, Jurnal Tribologi 29, 11-30, e-issn: 2289-7232.
- Bonaiti, L.; Concli, F.; Gorla, C.; Rosa, F. (2019), “Bending fatigue behaviour of 17-4 PH gears produced via selective laser melting, Procedia Struct. Integr., 24, 764–774.
- Pisula, J., Dziubek, T., Przeszłowski, L., Budzik, G. “Evaluation of geometrical parameters of a spur gear manufactured in an incremental process from GP1 steel”, In Industrial Measurements in Machining; Królczyk, G.M., Niesłony, P., Królczyk, J., Eds.; Part of the Lecture Notes in Mechanical Engineering Book Series; Springer: Cham, Switzerland, 2020; Volume 975, pp. 109–127.
- Karabeyoglu, S.S. , Eksi, O., Yaman, P., and Kucukyildirim, B.O. (2023), “Effects of infill pattern and density on wear performance of FDM-printed acrylonitrilebutadiene-styrene parts”, Journal of Reinforced Plastics and Composites.
- Karabeyoglu, S.S. , Eksi, O., Yaman, P., and Kucukyildirim, B.O. "Effects of infill pattern and density on wear performance of FDM-printed acrylonitrile-butadiene-styrene parts" Journal of Polymer Engineering, vol. 41, no. 10, 2021, pp. 854-862. [CrossRef]
- Norani, M.N.M. , Abdollah, M.F.B., Abdullah, M.I.H.CH., Amiruddin, H., Ramli, F.R., and Tamaldin, N. (2020) “Correlation of tribo-mechanical properties of internal geometry structures of fused filament fabrication 3D-printed acrylonitrile butadiene styrene”,doi.org/10.1108/ILT-04-2020-0143, ISSN: 0036-8792.
- Kaur, G. , Singari, R.M., Kumar, H., (2021), “A review of fused filament fabrication (FFF): Process parameters and their impact on the tribological behavior of polymers (ABS)”, ELSEVIER, Materials Today: Proceedings 51, 854–860.
- Levy, G.N. , Schindel, R., Kruth, J.P., Leuven, K.U. (2003) “Rapid manufacturing and rapid tooling with layer manufacturing (LM) technologies – state of the art and future perspectives”, CIRP Ann. Manuf. Tech. 52 (2), 589–609.
- Singh, J. , Kumar, Goyal K., Kumar, R. “Effect of filling percentage and raster style on tensile behavior of FDM produced PLA parts at different build orientation”, Mater Today Proc 2022; Vol. 63: 433–439.
- Balla, .E, Daniilidis, V., Karlioti, G., et al. “Poly (lactic acid): a versatile biobased polymer for the future with multifunctional properties-from monomer synthesis, polymerization techniques and molecular weight increase to PLA applications”, Polymers 2021; 13(11): 1822.
- Grytsenko, O., Dulebová, Ľ., Spišák, E., Berezhnyy, B. (2022), “New Materials Based on Polyvinylpyrrolidone-Containing Copolymers with Ferromagnetic Fillers”, Materials, 15(15), 5183. [CrossRef]
- Gurrala, P. K, Regalla, S.P, (2014), “Friction and Wear Behavior of ABS Polymer Parts made by Fused Deposition Modeling (FDM)”, International conference on advances in tribology [icat14], Abstract id NO.–“300”.
- Wu, W. , Li, Z., Lin, G., Ma, J., Gao, Z., Qu, H., and Zhang, F. (2022), “Additive manufacturing of continuous BF-reinforced PES composite material and mechanical and wear properties evaluation”, J Mater Sci, doi.org/10.1007/s10853-022-07425-z.
- Valíček, J. , Harničárová, M., Panda, A., Hlavatý, I., Kušnerová, M., Mustafa T.H.Y., Václavík, V. (2016), “Mechanism of Creating the Topography of an Abrasive Water Jet Cut Surface”, Machining, joining and modifications of advanced materials, Advanced Structured Materials, Singapore: Springer Verlag, Vol. 61, p. 111-120. - ISBN 978-981-10-1082-8 - ISSN 1869-8433.
- Cifuentes, S.C. , Frutos, E., Benavente, R., Lorenzo, V. and Gonzalez-Carrasco, J.L. (2017), “Assessment of mechanical behavior of PLA composites reinforced with Mg microparticles through depth-sensing indentations analysis”, Journal of the Mechanical Behavior of Biomedical Materials, Vol. 65, pp. 781-790.
- Farah, S. , Anderson, D.G. and Langer, R. (2016), “Physical and mechanical properties of PLA, and their functions in widespread applications – a comprehensive review”, Advanced Drug Delivery Reviews, Vol. 107, pp. 367-392.
- Murariu, M. and Dubois, P. (2016), “PLA composites: from production to properties”, Advanced Drug Delivery Reviews, Vol. 107, pp. 17-46.
- Revati, R. , Majid, M.S.A., Ridzuan, M.J.M., Basaruddin, K. S., Rahman Y, M.N., Cheng, E.M. and Gibson, A.G. (2017), “In vitro degradation of a 3D porous pennisetum purpureum/PLA biocomposite scaffold”, Journal of the Mechanical Behavior of Biomedical Materials, Vol. 74, pp. 383-391.
- Perepelkina, S., Kovalenko, P., Pechenko, R., Makhmudova, P.K. (2017), “Investigation of Friction Coefficient of Various Polymers Used in Rapid Prototyping Technologies with Different Settings of 3D Printing”, Tribology in Industry 39(4):519-526.
- Kováč, I. , Mikuš, R., Žarnovský, J., Ružbarský, J. “Nitrogen effect on mechanical and tribological properties of STN 41 5230 steel surface layer”, Advanced Materials Research: Materials, Technologies and Quality Assurance 2. Vol. 1059 (2014), p. 11-17. - ISBN 978-3-03835-336-2 - ISSN 1022-6680.
- Dobransky, J. , Hatala, M. “Influence of selected technological parameter to quality parameters by injection moulding”, Annals of DAAAM for 2007 & proceedings of the 18th International DAAAM Symposium: 24.-27.10.2007, Zadar. - Vienna: DAAAM International, 2007 2 p. - ISBN 3901509585.
- Coranič, T. , Gašpár, Š., Paško, J. “Utilization of Optimization of Internal Topology in Manufacturing of Injection Moulds by the DMLS Technology”, Applied Sciences. - Basel (Švajčiarsko): Multidisciplinary Digital Publishing Institute Roč. 11, č. 1 (2021), s. 1-13 [online]. - ISSN 2076-3417 (online).
- Phogat, A. , Chhabra, D., Sindhu, V. and Ahlawat, A. (2022), “Analysis of wear assessment of FDM printed specimens with PLA, multi-material and ABS via hybrid algorithms”, Elsevier, Materials Today: Proceedings 62 (2022) 37–43, doi.org/10.1016/j.matpr.2022.01.429.
- Singh, R. , Kumar, S., Bedi, P., Hashmi, M.S.J. (2020), “On wear of 3D printed Al2O3 reinforced Nylon6 matrix based functional prototypes”, Elesevei - Materials Today: Proceedings 33 (2020) 1477–1482, doi.org/10.1016/j.matpr.2020.02.097.
- Lin, L. , Ecke, N., Huang, M., Pei, X-O., Schlarb, A.K. (2019), “Impact of nanosilica on the friction and wear of a PEEK/CF composite coating manufactured by fused deposition modeling (FDM)”, Elsevier - Composites Part B 177 (2019) 107428, doi.org/10.1016/j.compositesb.2019.107428.
- Čacko, P. , Krenicky, T. (2014), “Impact of lubrication interval to operating status of bearing. Applied Mechanics and Materials”, Vol. 616, pp. 151-158. ISSN 1660-9336.
- Olejarova, S. , Krenicky, T. (2021), “Water Jet Technology: Experimental Verification of the Input Factors Variation Influence on the Generated Vibration Levels and Frequency Spectra”, Materials, Vol. 14, 15 p., pp. 4281. [CrossRef]
- Gu, Y. , Fei, J., Zheng, X., Li, M., Huang, J., Qu, M., Zhang, L. (2020), “Graft PEI ultra-antiwear nanolayer onto carbon spheres as lubricant additives for tribological enhancement”, Elsevier, Tribology International.
- Bijwe, J.J., Indumathi, J., Rajesh, J.J., Fahim, M. (2001), “Friction and wear behavior of polyetherimide composites in various wear modes”, Wear 249, 715–726.
- Mitaľ, G. , Gajdoš, I., Jezný, T., Spišák, E., and Majerníková, J. (2021), “Analysis of the selected technological parameters' influence on tribological properties of products manufactured by FFF tech-nology”, MDPI, Basel, Switzerland, Applied sciences. 3390. [Google Scholar]
- Bankupalli, N. , Srinivasa Rao, D., Vamsi Krishna, T.S. (2020), “Role of butadiene content on tribological properties of polymeric components fabricated by FDM”, Elsevier, Materials Today: Proceedings.
- Mohameda,O.A., Masooda S.H., Bhowmikb, J.L., Somersc, A.E. (2017), “Investigation on the tribological behavior and wear mechanism of parts processed by fused deposition additive manufacturing process”, Journal of Manufacturing Processes.
- Copyright © ASTM International, 100 Barr Harbor Drive, PO Box C700, West Conshohocken, PA 19428-2959. United States, ASTM G65-16, Standard Test Method for Measuring Abrasion Using the Dry Sand/Rubber Wheel Apparatus1, (2016).
- Guzanová, A., Draganovská, D., Brezinová, J., Viňáš, J., Janoško, E., Moro, R.., Szelag, P., Vojtko, M., Tomáš, M. (2022), “Application of organosilanes in the preparation of metal surfaces for adhesive bonding”, http://dx.doi.org/10.1080/01694243.2021.1962078. In: Journal of Adhesion Science and Technology. - Abingdon (Big Britain): Taylor & Francis Group, Pages 1153-1175.
- Gajdoš, I. et al. (2016), Structure and tensile properties evaluation of samples produced by Fused Deposition Modeling, In: Open Engineering. Vol. 6, no. 1 (2016), p. 86-89. - ISSN 2391-5439.
- Khalaf E., (2023), A comparative study for the main properties of silica and carbon black Filled bagasse-styrene butadiene rubber composites, In :Polymers and Polymer Composites, Volume 31: 1–14, 2023. 1.
- Suder, J. , Mlotek, J., Panec, A., Fojtík, F., “Design of Printing Parameter Settings Methodology for FFF Printing of Waterproof Samples from a Flexible Material”. Acta Mechanica Slovaca. 2023. 27(1). pp. 58-64. [CrossRef]
Figure 1.
Principle of friction and wear measurement (G65/16) – left, tribometer - right.
Figure 1.
Principle of friction and wear measurement (G65/16) – left, tribometer - right.
Figure 2.
Scheme of data processing during the test.
Figure 2.
Scheme of data processing during the test.
Figure 3.
Garnet abrasive.
Figure 3.
Garnet abrasive.
Figure 4.
X and Z thermoplastic layer deposition strategy.
Figure 4.
X and Z thermoplastic layer deposition strategy.
Figure 5.
Path generation strategy in even (red) and odd (black) building layers
Figure 5.
Path generation strategy in even (red) and odd (black) building layers
Figure 6.
Samples used in the experiment.
Figure 6.
Samples used in the experiment.
Figure 7.
Hmotnostné straty vzoriek 1X, 2X a 3X.
Figure 7.
Hmotnostné straty vzoriek 1X, 2X a 3X.
Figure 8.
Path generation strategy in even (red) and odd (black) building layers of samples from study [
31].
Figure 8.
Path generation strategy in even (red) and odd (black) building layers of samples from study [
31].
Figure 9.
Comparison and difference of mass loss of 1X, 2X and 3X samples with samples with the same orientation but without displacement in alternate layers of samples 2, 3 and 4 [
31].
Figure 9.
Comparison and difference of mass loss of 1X, 2X and 3X samples with samples with the same orientation but without displacement in alternate layers of samples 2, 3 and 4 [
31].
Figure 10.
Plot of coefficient of friction versus path for samples 1X and 2.
Figure 10.
Plot of coefficient of friction versus path for samples 1X and 2.
Figure 11.
Plot of coefficient of friction versus path for samples 2X and 3.
Figure 11.
Plot of coefficient of friction versus path for samples 2X and 3.
Figure 12.
Plot of coefficient of friction versus path for samples 3X and 4.
Figure 12.
Plot of coefficient of friction versus path for samples 3X and 4.
Figure 13.
Mass losses of 1Z, 2Z and 3Z samples.
Figure 13.
Mass losses of 1Z, 2Z and 3Z samples.
Figure 15.
Comparison and difference of mass losses of samples 1Z, 2Z and 3Z with samples with the same orientation but without displacement in the intermediate layers of samples 7, 8 and 10.
Figure 15.
Comparison and difference of mass losses of samples 1Z, 2Z and 3Z with samples with the same orientation but without displacement in the intermediate layers of samples 7, 8 and 10.
Figure 16.
Plot of coefficient of friction versus path, samples 1Z and 7.
Figure 16.
Plot of coefficient of friction versus path, samples 1Z and 7.
Figure 17.
Plot of coefficient of friction versus path, samples 2Z and 8.
Figure 17.
Plot of coefficient of friction versus path, samples 2Z and 8.
Figure 18.
Graph of coefficient of friction versus path, samples 3Z a 10.
Figure 18.
Graph of coefficient of friction versus path, samples 3Z a 10.
Figure 19.
Graphical representation of the comparison of orientations X a Z.
Figure 19.
Graphical representation of the comparison of orientations X a Z.
Table 1.
ASTM G65-16 test parameters.
Table 1.
ASTM G65-16 test parameters.
| Disc diameter |
[mm] |
229 |
| Rotations per minute |
[RPM] |
278 |
| Sample size |
[mm] |
70 x 20 x 6 |
| Load |
[N] |
30 |
| Path |
[m] |
200 |
Table 2.
Chemical composition of garnet abrasive [
31]
Table 2.
Chemical composition of garnet abrasive [
31]
Garnet
Fe3Al2(SiO4)3 |
SiO2 |
FeO |
Fe2O3 |
Al2O3 |
CaO |
MgO |
MnO |
| [%] |
[%] |
[%] |
[%] |
[%] |
[%] |
[%] |
| 41,34 |
9,72 |
12,55 |
20,36 |
2,97 |
12,35 |
0,85 |
Table 3.
Angle of deposition path alignment to the testing surface.
Table 3.
Angle of deposition path alignment to the testing surface.
| Sample Type |
Strategy |
Sample Type |
Strategy |
| 1X |
45° |
1Z |
45° |
| 2X |
0° |
2Z |
90° |
| 3X |
90° |
3Z |
0° |
Table 4.
Weight loss results in samples 1X – 3X [g].
Table 4.
Weight loss results in samples 1X – 3X [g].
| Sample Type |
1 |
2 |
3 |
Average weight loss [g] |
| 1X |
0.0869 |
0.0839 |
0.0901 |
0.0870 |
| 2X |
0.1646 |
0.1623 |
0.1578 |
0.1616 |
| 3X |
0.0966 |
0.0873 |
0.0924 |
0.0921 |
Table 5.
Difference in mass loss of samples with orientation X.
Table 5.
Difference in mass loss of samples with orientation X.
Compared
samples |
Orientation with layers offset by 0.25 mm [g] |
Orientation without layer shift [g] |
Difference in weight loss [g] |
| 1X vs 2 |
0.0870 |
0.0847 |
0.0023 |
| 2X vs 3 |
0.1616 |
0.1340 |
0.0276 |
| 3X vs 4 |
0.0921 |
0.0641 |
0.028 |
Table 6.
Weight loss in samples 1Z – 3Z [g].
Table 6.
Weight loss in samples 1Z – 3Z [g].
| Sample Type |
1 |
2 |
3 |
Average weight loss [g] |
| 1Z |
0.1009 |
0.0974 |
0.0994 |
0.0992 |
| 2Z |
0.1116 |
0.0911 |
0.0993 |
0.1007 |
| 3Z |
0.0394 |
0.0350 |
0.0271 |
0.0338 |
Table 7.
Difference in mass loss of samples with Z orientation.
Table 7.
Difference in mass loss of samples with Z orientation.
Compared
samples |
Orientation with layers offset by 0.25 mm [g] |
Orientation without layer shift [g] |
Difference in weight loss [g] |
| 1Z vs 7 |
0.0992 |
0.1143 |
- 0.0151 |
| 2Z vs 8 |
0.1007 |
0.1177 |
- 0.017 |
| 3Z vs 10 |
0.0338 |
0.0988 |
- 0.065 |
Table 8.
Difference in weight loss within the X and Z sample building direction.
Table 8.
Difference in weight loss within the X and Z sample building direction.
Building
direction
|
Sample Type |
Initial Weight [g] |
Weight Loss [g] |
Weight Loss [%] |
| X |
1 |
13.9903 |
0.0729 |
0.520 |
| 2 |
14.0028 |
0.0847 |
0.605 |
| 3 |
13.8603 |
0.134 |
0.967 |
| Z |
7 |
14.5401 |
0.1143 |
0.786 |
| 8 |
14.5558 |
0.1177 |
0.809 |
| 10 |
14.5100 |
0.0988 |
0.681 |
|
Disclaimer/Publisher’s Note: The statements, opinions and data contained in all publications are solely those of the individual author(s) and contributor(s) and not of MDPI and/or the editor(s). MDPI and/or the editor(s) disclaim responsibility for any injury to people or property resulting from any ideas, methods, instructions or products referred to in the content. |
© 2023 by the authors. Licensee MDPI, Basel, Switzerland. This article is an open access article distributed under the terms and conditions of the Creative Commons Attribution (CC BY) license (http://creativecommons.org/licenses/by/4.0/).
