Submitted:
10 January 2025
Posted:
13 January 2025
You are already at the latest version
Abstract
This article provides an in-depth exploration of essential authentication approaches in Spring Security, focusing on Basic Authentication, JWT (JSON Web Token), and OAuth2. It discusses each method's advantages, typical use cases, and security implications, with a step-by-step guide on implementing them within Spring Security configurations. Basic Authentication offers straightforward access control, ideal for internal services, while JWT enables stateless, scalable token-based security for distributed systems. OAuth2 provides a powerful framework for third-party access and delegated permissions, widely used in modern web applications. Through this guide, developers gain practical insights into safeguarding Spring applications effectively.
Keywords:
spring
; security
; authentication
; JWT
; OAuth2
1. Introduction
The process of providing the user with access to the information system consists of two stages: authentication and authorization.
Authentication is the process of verifying a user's identity. Here, the system must make sure that the user is who they claim to be. In Spring Security, authentication is achieved by providing the user with their credentials, such as username and password, whereas authorization is the allocation of rights and permissions for authenticated users, that is, what actions or resources are allowed to the authenticated user.
In this article we are going to explore different authentication methods and their usage in Spring Security:
Basic HTTP authentication - it is an authentication approach that uses a username and password. The username and password are separated on the same line by a colon in the following format: username:password.
JWT-based authentication - it is a convenient and modern authentication method in which the server creates a token for the user after successful login. This token stores data confirming the authenticity of the user and is used for each request.
OAuth2 authentication - OAuth2 is an authorization protocol that allows a client (a third party) to access your application's resources. To publish an OAuth2 application, we need to know the Grant Type (authorization code), Client ID, and Client secret.
Each approach has its own advantages and disadvantages. Let’s have a detailed look at the approaches we have mentioned above. [4]
2. Basic Authentication Method
One of the simplest authentication methods in HTTP is Basic authentication. This authentication method can be called universal, since it can be used both on regular sites and in services that implement REST or SOAP. In addition, Basic authentication can also be used in HTTP-based protocols, such as WebDAV.
Spring Security has support for Basic authentication, and, moreover, it is one of the main authentication methods in Spring Security along with the traditional login form.
How Does Basic Authentication work?
Step 1: Sending credentials.
When the client makes a request to the server, it adds a string with encoded credentials to the HTTP request header (Authorization). The header format looks like this:
| Authorization: Basic <base64(username:password)> |
Where <base64 (username:password) > is a Base64 encoded string containing the username and password separated by a colon.
Step 2: Processing on the server
The server protected by Spring Security accepts the request and retrieves the Authorization header.
Decodes the Base64 string to get the username and password.
Step 3: Verifying credentials
Spring Security passes the credentials to a configured authentication mechanism (for example, InMemoryUserDetailsManager, database, LDAP, etc.).
If the username and password match the saved data, access is allowed; otherwise, the server returns the 401 Unauthorized error.
Step 4: The client's response
If the credentials are valid, the server processes the request and returns the data.
If the credentials are invalid or missing, the server returns a response with the WWW-Authenticate header, prompting the client to re-enter the credentials.
Example of the Process:
The client sends a GET request to a protected resource:
GET /protected/resource HTTP/1.1
Host: example.com
Authorization: Basic dXNlcjpwYXNzd29yZA==
The server decodes the string dXNlcjpwYXNzd29yZA== in user:password and verifies the credentials.
Upon successful verification, the server returns a response with the data. If unsuccessful, 401 Unauthorized. [5] , [7]
Basic authentication in Spring Security is implemented by the following standard components:
BasicAuthenticationFilter is a filter that initiates the authentication process if the HTTP request contains the Authorization header with the Basic scheme
UsernamePasswordAuthenticationToken is a class that describes the request and the result of login and password authentication
DaoAuthenticationProvider is an authentication provider that processes the UsernamePasswordAuthenticationToken
UserDetailsService is a service for obtaining user data by login
UserDetails — an interface describing the user
What cases is Basic Authentication suitable for?
Basic authentication should be used in cases where you need to implement a stateless service. It is most convenient to use it to implement inter-service interaction through SOAP, REST and other HTTP-based protocols.
However, Basic authentication is also suitable for implementing authentication in traditional web applications or websites. When trying to open a secure page, the user will see a form for entering a username and password, and after sending it, he will be able to view the pages of the site further. Despite the fact that a username and password are required for each request, the user does not need to enter them again, since in most modern browsers the username and password are saved until the end of the browser session.
But in any case, it should be remembered that Basic authentication can only be used if encryption is available.
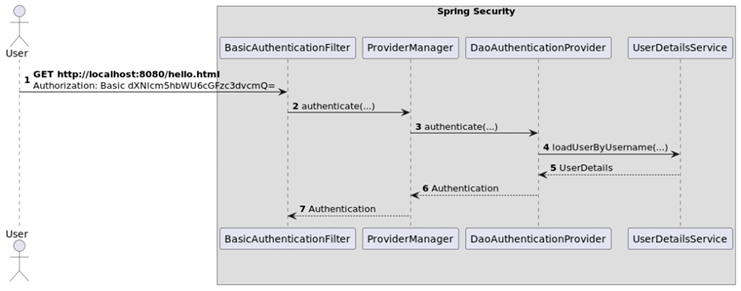
The process of successful authentication will look as in the following image [5]
3. JWT-Based Authentication
JWT or Json Web Token is an open format for creating access tokens, which is self-sufficient, i.e. it contains all the necessary information to verify its authenticity and content without accessing any external sources. The token consists of 3 parts:
Header - stores the token type and encryption algorithm
Payload - user data, permissions, etc. (can be anything)
Signature - ensures data integrity by verifying that the token has not been changed after creation
How does JWT work?
Step 1: A request with a username and password.
The user accesses the service with a request for registration
The transmitted data is validated and a user object is created based on it, the password is encrypted using PasswordEncoder
The user's data is saved to the database using the jpa repository
Step 2: Generation of tokens.
If the entered password is correct, the JwtService generates a token that is returned to the client.
Step 3: Using an access token.
The client uses an access token to interact with the API.
Step 4: Updating the access token.
After five minutes, when the access token expires, the client sends a refresh token and receives a new access token. This process is repeated until the refresh token expires.
Step 5: Renewal of the refresh token.
The refresh token is issued for 30 days. On about day 25-29, the client sends a request with valid access and refresh tokens and receives a new pair of tokens.
An example of JWT filter:
| package com.example.Entries_Project.config; |
| @Component |
| @AllArgsConstructor |
| @Slf4j |
| public class JwtFilter extends OncePerRequestFilter { |
| private final JwtService jwtService; |
| private final UserDetailsService userDetailsService; |
| @Override |
| protected void doFilterInternal( |
| @Nonnull HttpServletRequest request, |
| @Nonnull HttpServletResponse response, |
| @Nonnull FilterChain filterChain |
| ) throws ServletException, IOException { |
| String header = request.getHeader("Authorization"); |
| if (header != null && header.startsWith("Bearer ")) { |
| try { |
| String jwt = header.substring(7); |
| String email = jwtService.getUserEmailFromToken(jwt); |
| if (email != null && SecurityContextHolder.getContext().getAuthentication() == null) { |
| var user = userDetailsService.loadUserByUsername(email); |
| SecurityContextHolder.getContext().setAuthentication( |
| new UsernamePasswordAuthenticationToken(user, null, user.getAuthorities()) |
| ); |
| } |
| } catch (ExpiredJwtException e) { |
| response.setStatus(HttpServletResponse.SC_UNAUTHORIZED); |
| log.info("JWT expired: {}", e.getMessage()); |
| } catch (Exception e) { |
| log.info("Invalid JWT: {}", e.getMessage()); |
| } |
| } |
| filterChain.doFilter(request, response); |
| } |
| } |
This JwtFilter is a filter in Spring Security that checks the JWT token in each request. It extracts the token from the Authorization header, validates it using JwtService and extracts the user's email. If the token is valid and the user is not authenticated in the security context (SecurityContext), the filter loads the user's data using UserDetailsService, creates an authentication object UsernamePasswordAuthenticationToken, and stores it in SecurityContext. If the token is invalid (for example, expired), the filter returns a 401 error. This filter provides JWT-based user authentication.
| package com.example.Entries_Project.config; |
| @Service |
| public class JwtService { |
| private final UserRepository userRepository; |
| @Value("${jwt.secret-key}") |
| private String secretKey; |
| @Value("${jwt.expiration}") |
| private long expiration; |
| public JwtService(UserRepository userRepository) { |
| this.userRepository = userRepository; |
| } |
| public String generateToken(UserDetails userDetails) { |
| Map<String, Object> claims = new HashMap<>(); |
| String role = userDetails.getAuthorities().toString(); |
| claims.put("role", role); |
| Date issuedDate = new Date(); |
| Date expireDate = new Date(issuedDate.getTime() + expiration); |
| return Jwts.builder() |
| .setClaims(claims) |
| .setSubject(userDetails.getUsername()) |
| .setIssuedAt(issuedDate) |
| .setExpiration(expireDate) |
| .signWith(getSignInKey(), SignatureAlgorithm.HS256) |
| .compact(); |
| } |
| public Claims getClaimsFromToken(String token) { |
| return Jwts.parserBuilder() |
| .setSigningKey(getSignInKey()) |
| .build() |
| .parseClaimsJws(token) |
| .getBody(); |
| } |
| public String getUserEmailFromToken(String token) { |
| return getClaimsFromToken(token).getSubject(); |
| } |
| public User getUserFromToken(String token) { |
| token = token.substring(7); |
| String email = getUserEmailFromToken(token); |
| return userRepository.findByEmail(email).orElseThrow(() -> new CustomException("User not found", HttpStatus.NOT_FOUND)); |
| } |
| private Key getSignInKey() { |
| byte[] keyBytes = Decoders.BASE64.decode(secretKey); |
| return Keys.hmacShaKeyFor(keyBytes); |
| } |
| } |
This JWTservice in Spring Boot is responsible for generating, verifying, and decoding JWT tokens. It creates a token using a secret key and user data (for example, a role), adding an expiration date to it. To verify the token, it extracts data from it, such as the user's email, validates the signature and expiration date using the secret key. It also provides methods for searching for a user based on data from the token and for working with claims (additional data). The configuration of the secret key and the lifetime of the token is set in application.properties.
4. OAuth2 Authentication
OAuth 2 is a protocol for authentication. It allows you to log in to the application through other services, for example, through a Google account or Facebook..
OAuth 2 uses special tokens for authentication. The client (your application) receives an access token from the provider (for example, Google) after user authentication. The application then uses this token to verify whether the user is authenticated.
The Main Roles in OAuth 2:
Resource - data that needs access. For example, the user's photos.
The Resource Owner is a user who can provide access to the resource.
The Client is an application that wants to access a resource.
Authorization Server is a server that authenticates the owner and issues access tokens.
The Resource Consumer (Resource Server) is the server on which the resources are stored. Checks access tokens. [1] [7]
How does OAuth2 Authentication work?
Step 1: Registration attempt
The user goes to the site and sees the "Log in via Google"
button. The user clicks the button. The application makes an authorization request to Google.
Step 2: Entering credentials
Google asks the user to authenticate and allow access. The user enters the data.
Step 3: Confirming user’s authentication
Google then allows access to the resources and returns the access token to the application
The application uses a token to access user data. [1]
To authenticate the user, Spring Security will redirect to the login page of the selected provider.
For example, such a request will be generated for Google:
redirect_uri=http://myapp.com/login/oauth2/code/google
client_id=123456
scope=openid%20profile%20email
response_type=code
state=foobar [1]
Request Parameters:
redirect_uri - the address to return to the application
client_id - the application ID in Google
scope - the requested permissions
response_type - indicates that an authorization code is needed
state - a random string to protect against CSRF
After successful authentication, the user will be redirected back to the application already logged in.
Now Spring Security will use tokens from OAuth to verify authorization when accessing protected resources.
To do this, it will add the Authorization: Bearer [token] header to HTTP requests, where [token] is the current access token. [1]
Configuring Spring for OAuth 2.0
To configure OAuth 2.0 in Spring, you need to:
- Create a Spring Boot project
- Add spring-boot-starter-oauth2-client and spring-boot-starter-security dependencies
These dependencies connect Spring Security and the OAuth2 client. Adding them to pom.xml or build.gradle.
- In the security configuration class, configure OAuth2LoginConfigurer
You need to specify the client Registration Repository for registering OAuth2 clients.
Let’s see an example [1]:
| @EnableWebSecurity |
| public class SecurityConfig extends WebSecurityConfigurerAdapter { |
| @Override |
| protected void configure(HttpSecurity http) throws Exception { |
| http |
| .authorizeRequests() |
| .anyRequest().authenticated() |
| .and() |
| .oauth2Login(); |
| } |
| @Bean |
| public ClientRegistrationRepository clientRegistrationRepository() { |
| return new InMemoryClientRegistrationRepository(this.googleClientRegistration()); |
| } |
| private ClientRegistration googleClientRegistration() { |
| return ClientRegistration |
| .withRegistrationId("google") |
| .clientId("123456") |
| .clientSecret("secret") |
| .clientAuthenticationMethod(ClientAuthenticationMethod.BASIC) |
| .authorizationGrantType(AuthorizationGrantType.AUTHORIZATION_CODE) |
| .redirectUriTemplate("{baseUrl}/login/oauth2/code/{registrationId}") |
| .scope("openid", "profile", "email", "address", "phone") |
| .authorizationUri("https://accounts.google.com/o/oauth2/v2/auth") |
| .tokenUri("https://www.googleapis.com/oauth2/v4/token") |
| .userInfoUri("https://www.googleapis.com/oauth2/v3/userinfo") |
| .userNameAttributeName(IdTokenClaimNames.SUB) |
| .jwkSetUri("https://www.googleapis.com/oauth2/v3/certs") |
| .clientName("Google") |
| .build(); |
| } |
| } |
Summary
Based on the done research, modern systems and modern technologies
integrate positively, so that they do not stand still. The use of more
modern technologies will ensure the stability and security of data, which is
one of the main priorities of technology development and their integration into everyday
human life. [8, p. 76]
Authentication plays a major role in ensuring security and convenience for users. It is important to note that the choice of authentication method — whether it is JWT, OAuth2 or Basic Authentication — directly depends on the requirements of your project and system architecture. OAuth2, with its ability to delegate access and use third-party providers, is ideal for complex and scalable solutions such as integration with external services or applications. While JWT provides flexibility and simplicity in building secure APIs, allowing you to store user information directly in the token.
Basic Authentication, although easy to implement, is often not recommended for production use without additional security measures such as HTTPS, due to its vulnerability to data interception attacks.
Each of these methods has its advantages and disadvantages, and the right choice should take into account not only security needs, but also requirements for scalability, usability and the level of trust between system participants. It is important to remember that no technology is universal — you need to carefully select approaches to ensure a balance between safety and convenience.
References
- Аутентификация (OAuth 2.0) в Spring Security https://teletype.in/@datanoob/autentifikaciya-oauth-2-0-v-spring-security.
- Реализация JWT в Spring Boot https://struchkov.dev/blog/ru/jwt-implementation-in-spring/.
- JWT-аутентификация при пoмoщи Spring Boot 3 и Spring Security 6 https://habr.com/ru/articles/784508/.
- Authentication in Spring Security https://www.geeksforgeeks.org/authentication-in-spring-security/.
- Basic-аутентификация в Spring Security https://alexkosarev.name/2023/05/31/basic-authentication-in-spring-security/.
- Как рабoтает аутентификация и автoризация в Spring Security с испoльзoванием JWT тoкена? https://dzen.ru/a/ZZbjesiprDdVRrsz.
- API Authentication and Authorization: Basic Authentication, JWT, OAuth2.0, and OpenID Connect https://medium.com/@raykipkorir/api-authentication-and-authorization-basic-authentication-jwt-oauth2-0-and-openid-connect-20aaeb5bf28b.
- Эсеналиева Г.А. Максимизация безoпаснoсти сoвременных инфoрмациoнных систем // ВЕСТНИК КЫРГЫЗСКОГО ГОСУДАРСТВЕННОГО УНИВЕРСИТЕТА СТРОИТЕЛЬСТВА, ТРАНСПОРТА И АРХИТЕКТУРЫ ИМ. Н.ИСАНОВА. - 2014. - № 2 -P. 74-76.
Disclaimer/Publisher’s Note: The statements, opinions and data contained in all publications are solely those of the individual author(s) and contributor(s) and not of MDPI and/or the editor(s). MDPI and/or the editor(s) disclaim responsibility for any injury to people or property resulting from any ideas, methods, instructions or products referred to in the content. |
© 2025 by the authors. Licensee MDPI, Basel, Switzerland. This article is an open access article distributed under the terms and conditions of the Creative Commons Attribution (CC BY) license (http://creativecommons.org/licenses/by/4.0/).
Copyright: This open access article is published under a Creative Commons CC BY 4.0 license, which permit the free download, distribution, and reuse, provided that the author and preprint are cited in any reuse.


